Auto Complete for Xamarin.Android
AutoCompleteTextView is an editable text view element that shows
completion suggestions automatically while the user is typing. The list
of suggestions is displayed in a drop down menu from which the user can
choose an item to replace the content of the edit box with.

Overview
To create a text entry widget that provides auto-complete suggestions,
use the
AutoCompleteTextView
widget. Suggestions are received from a collection of strings
associated with the widget through an
ArrayAdapter.
In this tutorial, you will create a
AutoCompleteTextView
widget that provides suggestions for a country name.
<?xml version="1.0" encoding="utf-8"?>
<LinearLayout xmlns:android="http://schemas.android.com/apk/res/android"
    android:orientation="horizontal"
    android:layout_width="fill_parent"
    android:layout_height="wrap_content"
    android:padding="5dp">
    <TextView
        android:layout_width="wrap_content"
        android:layout_height="wrap_content"
        android:text="Country" />
    <AutoCompleteTextView android:id="@+id/autocomplete_country"
        android:layout_width="fill_parent"
        android:layout_height="wrap_content"
        android:layout_marginLeft="5dp"/>
</LinearLayout>
The TextView
is a label that introduces the
AutoCompleteTextView
widget.
Tutorial
Start a new project named HelloAutoComplete.
Create an XML file named list_item.xml and save it inside the
Resources/Layout folder. Set the Build Action of this file to
AndroidResource. Edit the file to look like this:
<?xml version="1.0" encoding="utf-8"?>

<TextView xmlns:android="http://schemas.android.com/apk/res/android"
    android:layout_width="fill_parent"
    android:layout_height="fill_parent"
    android:padding="10dp"
    android:textSize="16sp"
    android:textColor="#000">
</TextView>
This file defines a simple
TextView that will be used for
each item that appears in the list of suggestions.
Open Resources/Layout/Main.axml and insert the following:
<?xml version="1.0" encoding="utf-8"?>
<LinearLayout xmlns:android="http://schemas.android.com/apk/res/android"
    android:orientation="horizontal"
    android:layout_width="fill_parent"
    android:layout_height="wrap_content"
    android:padding="5dp">
    <TextView
        android:layout_width="wrap_content"
        android:layout_height="wrap_content"
        android:text="Country" />
    <AutoCompleteTextView android:id="@+id/autocomplete_country"
        android:layout_width="fill_parent"
        android:layout_height="wrap_content"
        android:layout_marginLeft="5dp"/>
</LinearLayout>
Open MainActivity.cs and insert the following code for the
OnCreate()
method:
protected override void OnCreate (Bundle bundle)
{
    base.OnCreate (bundle);

    // Set our view from the "Main" layout resource
    SetContentView (Resource.Layout.Main);

    AutoCompleteTextView textView = FindViewById<AutoCompleteTextView> (Resource.Id.autocomplete_country);
    var adapter = new ArrayAdapter<String> (this, Resource.Layout.list_item, COUNTRIES);

    textView.Adapter = adapter;
}
After the content view is set to the main.xml layout, the
AutoCompleteTextView
widget is captured from the layout with
FindViewById. A new
ArrayAdapter is then
initialized to bind the list_item.xml layout to each list item in the
COUNTRIES string array (defined in the next step). Finally,
SetAdapter() is called to associate the
ArrayAdapter with the
AutoCompleteTextView
widget so that the string array will populate the list of suggestions.
Inside the MainActivity class, add the string array:
static string[] COUNTRIES = new string[] {
  "Afghanistan", "Albania", "Algeria", "American Samoa", "Andorra",
  "Angola", "Anguilla", "Antarctica", "Antigua and Barbuda", "Argentina",
  "Armenia", "Aruba", "Australia", "Austria", "Azerbaijan",
  "Bahrain", "Bangladesh", "Barbados", "Belarus", "Belgium",
  "Belize", "Benin", "Bermuda", "Bhutan", "Bolivia",
  "Bosnia and Herzegovina", "Botswana", "Bouvet Island", "Brazil", "British Indian Ocean Territory",
  "British Virgin Islands", "Brunei", "Bulgaria", "Burkina Faso", "Burundi",
  "Cote d'Ivoire", "Cambodia", "Cameroon", "Canada", "Cape Verde",
  "Cayman Islands", "Central African Republic", "Chad", "Chile", "China",
  "Christmas Island", "Cocos (Keeling) Islands", "Colombia", "Comoros", "Congo",
  "Cook Islands", "Costa Rica", "Croatia", "Cuba", "Cyprus", "Czech Republic",
  "Democratic Republic of the Congo", "Denmark", "Djibouti", "Dominica", "Dominican Republic",
  "East Timor", "Ecuador", "Egypt", "El Salvador", "Equatorial Guinea", "Eritrea",
  "Estonia", "Ethiopia", "Faeroe Islands", "Falkland Islands", "Fiji", "Finland",
  "Former Yugoslav Republic of Macedonia", "France", "French Guiana", "French Polynesia",
  "French Southern Territories", "Gabon", "Georgia", "Germany", "Ghana", "Gibraltar",
  "Greece", "Greenland", "Grenada", "Guadeloupe", "Guam", "Guatemala", "Guinea", "Guinea-Bissau",
  "Guyana", "Haiti", "Heard Island and McDonald Islands", "Honduras", "Hong Kong", "Hungary",
  "Iceland", "India", "Indonesia", "Iran", "Iraq", "Ireland", "Israel", "Italy", "Jamaica",
  "Japan", "Jordan", "Kazakhstan", "Kenya", "Kiribati", "Kuwait", "Kyrgyzstan", "Laos",
  "Latvia", "Lebanon", "Lesotho", "Liberia", "Libya", "Liechtenstein", "Lithuania", "Luxembourg",
  "Macau", "Madagascar", "Malawi", "Malaysia", "Maldives", "Mali", "Malta", "Marshall Islands",
  "Martinique", "Mauritania", "Mauritius", "Mayotte", "Mexico", "Micronesia", "Moldova",
  "Monaco", "Mongolia", "Montserrat", "Morocco", "Mozambique", "Myanmar", "Namibia",
  "Nauru", "Nepal", "Netherlands", "Netherlands Antilles", "New Caledonia", "New Zealand",
  "Nicaragua", "Niger", "Nigeria", "Niue", "Norfolk Island", "North Korea", "Northern Marianas",
  "Norway", "Oman", "Pakistan", "Palau", "Panama", "Papua New Guinea", "Paraguay", "Peru",
  "Philippines", "Pitcairn Islands", "Poland", "Portugal", "Puerto Rico", "Qatar",
  "Reunion", "Romania", "Russia", "Rwanda", "Sqo Tome and Principe", "Saint Helena",
  "Saint Kitts and Nevis", "Saint Lucia", "Saint Pierre and Miquelon",
  "Saint Vincent and the Grenadines", "Samoa", "San Marino", "Saudi Arabia", "Senegal",
  "Seychelles", "Sierra Leone", "Singapore", "Slovakia", "Slovenia", "Solomon Islands",
  "Somalia", "South Africa", "South Georgia and the South Sandwich Islands", "South Korea",
  "Spain", "Sri Lanka", "Sudan", "Suriname", "Svalbard and Jan Mayen", "Swaziland", "Sweden",
  "Switzerland", "Syria", "Taiwan", "Tajikistan", "Tanzania", "Thailand", "The Bahamas",
  "The Gambia", "Togo", "Tokelau", "Tonga", "Trinidad and Tobago", "Tunisia", "Turkey",
  "Turkmenistan", "Turks and Caicos Islands", "Tuvalu", "Virgin Islands", "Uganda",
  "Ukraine", "United Arab Emirates", "United Kingdom",
  "United States", "United States Minor Outlying Islands", "Uruguay", "Uzbekistan",
  "Vanuatu", "Vatican City", "Venezuela", "Vietnam", "Wallis and Futuna", "Western Sahara",
  "Yemen", "Yugoslavia", "Zambia", "Zimbabwe"
};
This is the list of suggestions that will be provided in a drop-down
list when the user types into the
AutoCompleteTextView
widget.
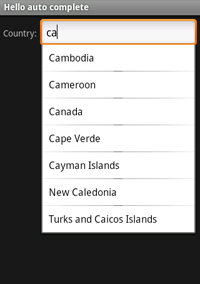
Run the application. As you type, you should see something like this:
More Information
Note that using a hard-coded string array is not a recommended design
practice because your application code should focus on behavior, not
content. Application content such as strings should be externalized
from the code to make modifications to the content easier and
facilitate localization of the content. The hard-coded strings are used
in this tutorial only to make it simple and focus on the
AutoCompleteTextView
widget. Instead, your application should declare such string arrays in
an XML file. This can be done with a <string-array> resource in your
project res/values/strings.xml file. For example:
<?xml version="1.0" encoding="utf-8"?>
<resources>
    <string-array name="countries_array">
        <item>Bahrain</item>
        <item>Bangladesh</item>
        <item>Barbados</item>
        <item>Belarus</item>
        <item>Belgium</item>
        <item>Belize</item>
        <item>Benin</item>
    </string-array>
</resources>
To use these resource strings for the
ArrayAdapter,
replace the original
ArrayAdapter
constructor line with the following:
string[] countries = Resources.GetStringArray (Resource.array.countries_array);
var adapter = new ArrayAdapter<String> (this, Resource.layout.list_item, countries);
References
- AutoCompleteTextView Recipe – Xamarin.Android sample project for the
AutoCompleteTextView ArrayAdapterAutoCompleteTextView
Portions of this page are modifications based on work created and shared by the Android Open Source Project and used according to terms described in the Creative Commons 2.5 Attribution License. This tutorial is based on the Android Auto Complete tutorial*.
