Windows Powershell The WMI Connection
Don Jones
One of the technologies I relied heavily upon in the world of VBScript was Windows Management Instrumentation, or WMI. Interestingly, Windows PowerShell has strong connections to WMI—and not just in a technical sense. Jeffrey Snover, who architected Windows PowerShell, was also a key player in the creation of
Wmic.exe, a Windows Server® 2003-era command-line tool used to work with WMI. In many ways, Wmic.exe foreshadowed Windows PowerShell™ in that it worked in a somewhat similar fashion. (For more information on WMIC, see John Kelbley’s article from the September 2006 issue of TechNet Magazine, available online at microsoft.com/technet/technetmag/issues/2006/09/WMIData.)
Windows PowerShell has support for WMI that’s delivered in the same consistent, object-based way as you get with the rest of the shell’s capabilities. This makes WMI infinitely easier to learn and use—especially in ad hoc situations—than earlier technologies, like VBScript.
A WMI Primer
If you read scripting books and articles, it’s nearly impossible not to see WMI mentioned. However, it’s easy to get so mired in actually using WMI that you forget how it is built under the hood—and how it’s built is especially important to how it works in Windows PowerShell.
WMI is primarily a system of organized classes that represent management information from the Windows® operating system and other Windows-based hardware and software products. A class is really nothing more than an abstract description of the properties and capabilities some given software or hardware component possesses. For example, a logical disk class might describe a device that has a serial number, a fixed storage capacity, an amount of available capacity, and so forth. Meanwhile, a class that describes a Windows service might specify that the service has a name, that it can start and stop, its current status, and so on.
In WMI, classes represent all the things that WMI can manage. If WMI doesn’t have a class for something, it can’t manage that component. Microsoft documents the core Windows WMI classes at msdn2.microsoft.com/aa394554.aspx; other products—such as Internet Information Services, SQL Server™—document their WMI classes separately.
Because there are so many classes, WMI organizes them into a hierarchy of namespaces. For example, the namespace containing the core Windows OS classes is called root\cimv2, while Microsoft IIS 6.0 stores its classes in root\MicrosoftIISv2. Conveniently, the root\cimv2 namespace is the WMI default namespace, a setting shared by Windows PowerShell, making it easy to work with those core classes.
An "instance" is an actual, real-world occurrence of a class. If, for example, your computer has two logical disks, you’ll have two instances of the Win32_LogicalDisk class. If you have 50 services running on your computer, WMI will see 50 instances of the Win32_Service class. Working with WMI is essentially a matter of asking WMI to give you one or more instances, and then either examining the properties of those instances to find the management information you need or executing the methods of those instances to make management changes, such as starting or stopping a service.
WMI uses a client-server architecture. Every version of Windows since Windows 2000 has come with WMI built in (later versions have expanded the number of available classes), meaning you have both the WMI client and the WMI server software readily available. When you use WMI, you’re actually sending a request to the WMI Service running on whichever computer you’re interested in. That WMI Service retrieves the WMI instances you specify and returns them to you so you can work with them. That’s where Windows PowerShell enters the picture—it simplifies the process of asking for instances, getting them back, and working with them.
Getting a WMI Object
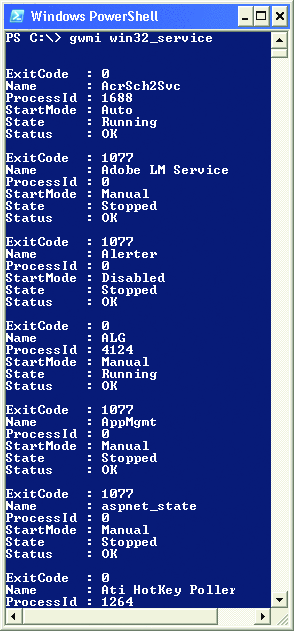
WMI class instances are loosely referred to as objects, so it makes sense that the way to retrieve those instances in Windows PowerShell is the Get-WMIObject cmdlet. This cmdlet has a convenient alias, gwmi, which I’ll use for most of my examples. In its simplest form, you simply specify the WMI class name you want to retrieve and then sit back and look at the results (see Figure 1). When I ran gwmi win32_service, Windows PowerShell connected to the WMI service on my local computer (since I hadn’t specified another computer) and connected to the root\cimv2 namespace (since I hadn’t specified a different namespace). Windows PowerShell retrieved all instances of the specified class and, since I hadn’t told it to do anything else with these instances, converted them into a textual representation. In other words, Windows PowerShell took those objects and produced some text that I, as a human, could read.

Figure 1 When running gwmi win32_service, Windows PowerShell returns all instances of the specified class in a readable text format
Specifically, Windows PowerShell converts WMI objects into text by reading and displaying the names and values of selected class properties. For the Win32_Service class, it selects a set of six properties.
Actually, Windows PowerShell converts any object to text in this way. The properties it chooses to display are, for the most part, defined in a set of .format.ps1xml files located in the Windows PowerShell installation folder. These format definition files are digitally signed by Microsoft. It is recommended that you do not change these files, although you can provide your own formatting files. (This is a topic I will discuss in greater detail in a future column.)
The gwmi cmdlet can help you explore your computer to find out what classes are available. Running gwmi –namespace "root\cimv2" –list, for example, gets you a complete list of classes in that namespace. Remember, though, that the classes on your computer are only relevant if you’re managing your computer; if you’re managing a remote computer, you’ll want to find out about the classes available on that system. For this, you’ll want to use gwmi’s –computer parameter to connect to a remote computer. For example, gwmi –namespace "root\cimv2" –list –computer ServerA will list all the classes in the root\cimv2 namespace on the remote computer called ServerA.
Remote WMI
In version 1.0 of Windows PowerShell, gwmi is about the only cmdlet that directly supports remote management. This is due primarily to the fact that remote control is built into the underlying WMI architecture. And, because Windows PowerShell is simply utilizing that existing architecture, it’s subject to that architecture’s security features. Here’s an example:
C:\> gwmi -namespace “root\cimv2” -computer
mediaserver -list
Get-WmiObject : Access is denied. (Exception
from HRESULT: 0x80070005 (E_ACCESSDENIED))
At line:1 char:5
+ gwmi <<<< -namespace “root\cimv2” -computer
mediaserver -list
PS C:\>
In this instance, I tried to connect to a remote computer—called MediaServer—that I don’t have permission to access. As an administrator, I should have permission to work with this computer’s WMI service, but it’s likely that my local workstation credentials aren’t sufficient. I might, for example, be logged on in a different, untrusted domain, or I could be logged on with a less-privileged account. Fortunately, gwmi supports a –credential parameter that allows me to specify an alternate set of user credentials for my WMI connection. Below, you’ll see a very simple example:
gwmi win32_service –credential mydomain\administrator –computer mediaserver
My credential—more specifically, my username—is provided in the DOMAIN\Username format.
Note that there’s nowhere you can enter a password—Windows PowerShell will prompt me for that. Windows PowerShell deliberately doesn’t provide a way to enter a password on the command line because doing so would enable you to hardcode passwords into script files, which is an absolute security risk. However, there is another way you can work with this –credential parameter, and that’s by creating a sort of credential object, called a PSCredential, ahead of time. The key is the Get-Credential cmdlet:
$cred = get-credential mydomain\administrator
When I run this, I’m still prompted for the matching password. This time, however, the credential object that is created is stored in the $cred variable. If I look at the contents of $cred, I’ll see the name but not the password:
PS C:\> $cred

UserName
--------
mydomain\adminstrator
I can then reuse that credential object as much as I want:
gwmi win32_service –credential $cred –computer mediaserver
This simplifies repeated WMI connections to a remote computer by predefining a reusable credential object. It is worth noting, however, that the Get-WMIObject cmdlet does not currently support specifying authentication levels (otherwise known as impersonation) in the same way VBScript supports it. See msdn2.microsoft.com/aa389290.aspx for more information.
Self-Discovery
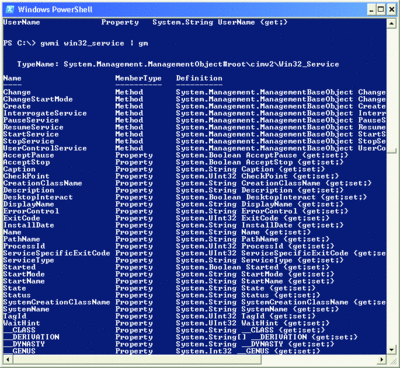
One of my favorite things about Windows PowerShell is that it doesn’t dumb things down. I showed you how Windows PowerShell selected only a set of properties for the Win32_Service class I queried. The shell still has access to all of the properties, though, and can even tell you what they are. To do this, simply pipe the object (or objects) to the Get-Member cmdlet (or its alias, gm), as shown in Figure 2.

Figure 2 ** Piping an object to the Get-Member cmdlet tells you what methods and properties you can access** (Click the image for a larger view)
In addition to properties, the shell also lists available methods, meaning I don’t necessarily need the documentation to find out what a class can do. I can see that the class itself provides the means to change an instance’s configuration, pause a service, stop a service, and so forth.
To utilize these methods, or display other properties, it’s often easiest to put the instances into a variable:
$server = gwmi win32_operatingsystem
$server.reboot()
This sample will retrieve the only available instance of the Win32_OperatingSystem class (that class has only one instance per computer) and save it into the $server variable. It will then use the $server variable to access the instance’s Reboot method, restarting the computer. Be careful with that one!
Rich Query Language
If you’ve used WMI under VBScript or another technology, you’re probably accustomed to retrieving WMI class instances using a query written in WQL, the WMI Query Language. Its SQL-like syntax makes it easier to retrieve specific instances—such as a specific service—rather than all instances of a given class. Fortunately, gwmi also lets you specify a query, like so:
gwmi –query “select * from win32_service where name=’alerter’”
This syntax of gwmi (which was added just before Windows PowerShell was officially released) is incredibly useful and makes it very, very easy to migrate complex WMI queries that you may have developed for other purposes. And, as always, Windows PowerShell will return rich objects with their own properties and methods, offering you complete access to the management power of WMI.
Moving Forward with WMI
WMI continues to be developed for future versions of Windows, adding new classes and capabilities. And it continues to be added to new Microsoft products. While most Microsoft products haven’t yet released versions built specifically on Windows PowerShell, its ability to connect to WMI is one of the biggest benefits that make Windows PowerShell useful today.
I’ve only just scratched the surface of what WMI can do. Still, I hope I’ve inspired you to explore Windows PowerShell and discover for yourself what capabilities are available.
Don Jones is the Director of Projects and Services for SAPIEN Technologies, and coauthor of Windows PowerShell: TFM (SAPIEN Press). Contact Don through his Web site at www.ScriptingAnswers.com.
© 2008 Microsoft Corporation and CMP Media, LLC. All rights reserved; reproduction in part or in whole without permission is prohibited.