A Developer's Guide to the WCF REST Starter Kit
Aaron Skonnard, Pluralsight
August 2009
NOTE: This paper is based on the WCF REST Starter Kit Preview 2 release.
Overview
Windows Communication Foundation (WCF) 3.5 introduced a “Web” programming model for building RESTful services in .NET. Although WCF 3.5 lays a solid foundation for building a wide-variety of RESTful services, it still requires developers to implement a great deal of boiler-plate code for each RESTful service they build and to deal directly with important HTTP protocol features. The WCF REST Starter Kit provides a set of WCF extensions and project templates that aim to simplify REST development even further. Although the WCF REST Starter Kit is currently considered a “preview” technology, many of its features will most likely find their way into future versions of the .NET Framework.
In this whitepaper, we’ll fully explore the various WCF REST Starter Kit features and show you how can begin putting them to good use to handle some of the most common REST development scenarios today. Microsoft is committed to offering a rich platform for RESTful services as part of Microsoft .NET.
If you’re unfamiliar with REST concepts or the WCF 3.5 REST programming model, be sure to read A Guide to Designing and Building RESTful Services with WCF 3.5 before proceeding.
Introducing the WCF REST Starter Kit
Ever since the release of WCF 3.5, Microsoft has been working hard to make the process of building and consuming RESTful services even easier on the .NET platform. One of the results of that effort is a new suite of helper classes, extension methods, and Visual Studio project templates packaged into what’s called the WCF REST Starter Kit. Today, the WCF REST Starter Kit can be downloaded from CodePlex but many of its features may find their way into future versions of the official .NET framework. You can find the latest information on the WCF REST Starter Kit on the MSDN WCF REST landing page.
The WCF REST Starter Kit (Preview 2) comes with three new .NET assemblies that you can take advantage of in your code to simplify common REST programming tasks (see Figure 1).
| Assembly Name | Description |
|---|---|
Microsoft.ServiceModel.Web |
Contains a set of new classes and extension methods that simplify the process of building and hosting RESTful services using WCF. |
Microsoft.Http |
Contains a set of new classes and extension methods that simplify the process of consuming RESTful services using HTTP. |
Microsoft.Http.Extensions |
Contains a set of new classes and extension methods for consuming specific types of RESTful services and response formats. |
Figure 1: WCF REST Starter Kit Assemblies
The Microsoft.ServiceModel.Web assembly contains a new WebServiceHost2 class (derived from WebServiceHost in WCF 3.5) designed specifically for hosting RESTful services. This class bootstraps several REST-specific features and configures the underlying WCF runtime in a way that will ultimately make your RESTful services easier to build and easier for others to consume. This new assembly also comes with some .NET attributes and extension methods that you can also take advantage of in your code. These extensions allow you to tap into the various features offered by WebServiceHost2.
The Microsoft.Http assembly contains a new client-side HTTP API for consuming RESTful services. The primary class of interest in this assembly is HttpClient. With HttpClient, you can easily issue HTTP GET, POST, PUT, and DELETE requests and process the response through a variety of different content-specific API’s. It also makes it easier to send form data and query string values, and it simplifies the process of working with HTTP headers through a new set of typed header classes. This new client-side API provides a more natural HTTP experience for consuming any RESTful service found on the Web.
And finally, the Microsoft.Http.Extensions assembly contains a few specialized HttpClient-derived classes that focus on specific scenarios. It also provides quite a few extension methods focused on processing the body of an HTTP message in a variety of different formats (XML, JSON, Atom feed, etc). You’ll take advantage of these extension methods in conjunction with HttpClient when consuming a service.
The WCF REST Starter Kit also comes with a set of helpful Visual Studio project templates (see Figure 2) that target common REST scenarios. These project templates provide the boilerplate code you need to get started, taking advantage of the new classes/extensions found in the assemblies described above. For example, there’s a template for producing a “singleton” service (exposes a single resource) and another for producing a “collection” service (exposes a collection of resources). There’s another template for producing an Atom feed and another that produces a fully functional AtomPub service. These templates can help jump-start your service implementation for these different REST scenarios.
| Project Template | Description |
|---|---|
REST Singleton Service |
Produces a service that defines a sample singleton resource (SampleItem) and the full HTTP interface for interacting with the singleton (GET, POST, PUT, and DELETE) with support for both XML and JSON representations. |
REST Collection Service |
Similar to the REST Singleton Service only it also provides support for managing a collection of SampleItem resources. |
Atom Feed Service |
Produces a service that exposes a sample Atom feed with dummy data. |
AtomPub Service |
Produces a fully functional AtomPub service capable of managing collections of resources as well as media entries. |
HTTP Plain XML Service |
Produces a service with simple GET and POST methods that you can build on for plain-old XML (POX) services that don’t fully conform to RESTful design principles, but instead rely only on GET and POST operations. |
Figure 2: WCF REST Starter Kit Project Templates
In the sections that follow, we’ll dive into these assemblies and project templates in more detail and along the way we’ll look at how to handle some common REST scenarios.
Building and Hosting Services with Microsoft.ServiceModel.Web
In order to begin taking advantage of the WCF REST Starter Kit in your WCF service projects, you need to modify your host application to use the WebServiceHost2 class found in Microsoft.ServiceModel.Web. This class bootstraps the new WCF REST Starter Kit features for all of the service endpoints exposed by the host application. Once you’ve done this, you can begin taking advantage of the automatic help page, HTTP caching support, new exception handling behavior, and a new request interception feature. First I’ll show you how to wire-up WebServiceHost2, and then we’ll explore each of these new feature areas.
Hosting REST Services with WebServiceHost2
The WebServiceHost2 class derives from the WebServiceHost class found in WCF 3.5. Hence, you can use it just like any other ServiceHost-derived class. If you’re using self-hosting techniques in the host application, you probably have some code that looks like this right now:
WebServiceHost host = new WebServiceHost(typeof(BookmarkService));
host.Open();
In order to begin using the WCF REST Starter Kit features with your service, all you need to do is change the class name from “WebServiceHost” to “WebServiceHost2” in your code:
WebServiceHost2 host = new WebServiceHost2(typeof(BookmarkService));
host.Open();
You can also take advantage of WebServiceHost2 when hosting services in IIS. If you’re hosting your WCF services inside of IIS today, you’ll have an SVC file that looks something like this:
<%@ ServiceHost Language="C#" Debug="true" Service="BookmarkService"
    Factory="System.ServiceModel.Activation.WebServiceHostFactory"%>
The WCF REST Starter Kit comes with a new WebServiceHost2Factory class – it’s responsible for activating WebServiceHost2 instances. Simply replace the factory class with WebServiceHost2Factory and your IIS-hosted services will be managed by WebServiceHost2 instances automatically:
<%@ ServiceHost Language="C#" Debug="true" Service="BookmarkService"
    Factory="Microsoft.ServiceModel.Web.WebServiceHost2Factory"%>
So what exactly does WebServiceHost2 do differently than the WebServiceHost class that comes with WCF 3.5? It does two key things. First, it replaces the WebHttpBehavior on all endpoints with an instance of WebHttpBehavior2. The new WebHttpBehavior2 class is responsible for providing the automatic help page functionality and the server “Web” error handling logic. Second, it adds a new binding element to each endpoint to inject the new request interception logic. So by simply changing the host type, your WCF REST services will be able to take advantage of these new features.
Automatic Help Page
Once you’re using WebServiceHost2, your services will automatically enjoy the benefits of the new automatic help page functionality, which is a huge step forward for RESTful services. You can see the help page by browsing to service’s your base address with “help” appended to the end (see Figure 3).
The help page provides a human-readable description of each WCF service operation annotated with [WebGet] or [WebInvoke], and for each one it describes the URI template, the supported HTTP operation, and the request/response formats, basically everything a consumer needs to know.
For each request/response, the help page also provides an XML Schema and a corresponding sample XML instance that consumers can use to integrate with the service. Consumers can use the schema to generate appropriate client-side serializable types or they can simply inspect the sample XML document to manually determine how to write the appropriate XML processing code. Both approaches are useful.
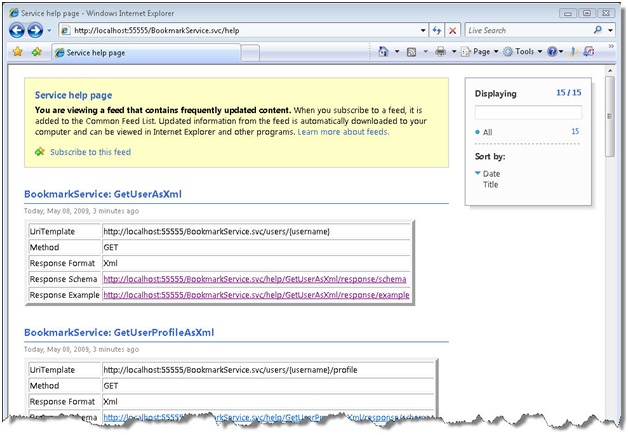
Figure 3: Automatic help page for RESTFul services
It’s important to note that the help page is returned as an Atom feed. Most Web browsers provide built-in feed rendering to facilitate human viewing, which is what Internet Explorer is doing in Figure . However, since it’s a feed, consumers can also programmatically consume the description if desired. If you were to turn off the “feed reading view” in the Internet Explorer options, you’d actually see the feed XML rendered instead – you can also inspect the feed XML by viewing the source of the page.
By default, the help page is made available at the base address with “help” appended to the end but you can customize the help page address through the HelpPageLink property on WebServiceHost2.
You can also add a human readable description to each RESTful operation through the new [WebHelp] attribute found in Microsoft.ServiceModel.Web, as illustrated in the following example:
[WebHelp(Comment = "Returns the user account details for the authenticated user.")]
[WebGet(UriTemplate = BookmarkServiceUris.User)]
[OperationContract]
User GetUserAsXml(string username)
{
    return HandleGetUser(username);
}
Now when you rerun the host application and browse back to the help page, you’ll see this comment text appear within the GetUserAsXml description (see Figure 4).
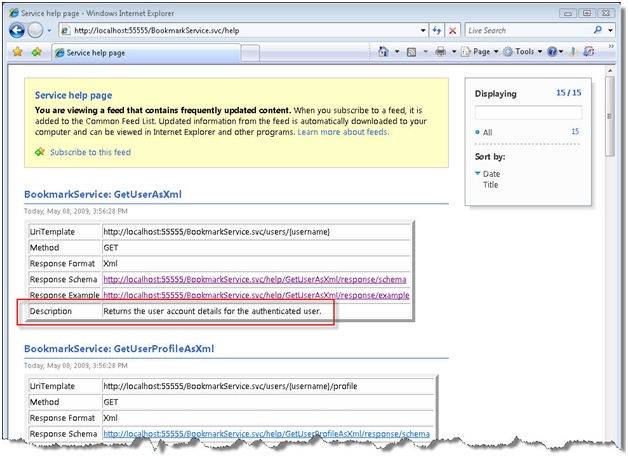
Figure 4: Automatic Help Page with Custom Description
This new help page automatically makes your RESTful services more discoverable, which ultimately makes them easier for others to consume. Your consumers can discover the service’s URI design, the supported HTTP operations, and the request/response formats, and your description will always stay in sync with your WCF code – similar to how things worked with ASP.NET Web Services.
You still don’t get a full client-side code generation experience (a la WSDL) but when you combine this help page with the new HttpClient functionality, you really don’t need it.
ExceptionHandling
One of the more tedious aspects of implementing RESTful services is dealing directly with some of the HTTP protocol details, like returning the appropriate HTTP status codes and descriptions, especially within the context of a WCF service operation. The following code illustrates how to check for unauthorized users and it returns a 401 “Unauthorized” response when necessary:
if (!IsUserAuthorized(username))  {
    WebOperationContext.Current.OutgoingResponse.StatusCode =
        HttpStatusCode.Unauthorized;
    WebOperationContext.Current.OutgoingResponse.StatusDescription = "Unauthorized";
    return null;
}
This code isn’t terribly difficult but it also doesn’t return a detailed response message, which is typically very helpful for consumers. When you want to return this type of detailed response message, the complexity goes up significantly because there’s not an easy way to do it within the WCF operation.
In order to simplify this common scenario, the WCF REST Starter Kit provides a new WebProtocolException class that makes it really easy to return an HTTP error to the caller. You simply throw an instance of WebProtocolException within your WCF service operations, specifying the HTTP status code and error message, and (assuming you’re using WebServiceHost2) the underlying runtime takes care of producing the appropriate HTTP response message.
The following example illustrates how to throw a few different WebProtocolException instances specifying different HTTP status codes and error messages:
if (!IsUserAuthorized(username)) {
    throw new WebProtocolException(HttpStatusCode.Unauthorized,
        "Missing or invalid user key (supply via the Authorization header)", null);
}
if (bookmark_id <= 0)
    throw new WebProtocolException(HttpStatusCode.BadRequest,
        "The bookmark_id field must be greater than zero", null);
After a WebProtocolException is thrown, it will be handled by a custom WCF error handler (introduced by the WebHttpBehavior2). The error handler translates the WebProtocolException instance into an appropriate HTTP response message containing a detailed response for the consumer’s benefit.
Figure 5 illustrates what the first WebProtocolException looks like when rendered in a browser. Notice how the resulting XHTML clearly displays the HTTP status code along with a “detail” message. This standard XHTML template is built into the WebProtocolException class so if you like the way it works, you don’t have to do anything further and your consumers will receive something reasonable.

Figure 5: WebProtocolException Rendered in a Browser
If, however, you’d like to customize the resulting XHTML, you can use one of the other constructor overloads and supply the precise XHTML you’d like to return as illustrated here:
if (!IsUserAuthorized(username)) {
    throw new WebProtocolException(HttpStatusCode.Unauthorized, "Unauthorized",
        new XElement("html",
            new XElement("body"),
                new XElement("h1", "Unauthorized"),
                new XElement("p", "Missing or invalid user key " +
                "(supply via the Authorization header)")), true, null);
}
Figure 6 shows the results of throwing this WebProtocolException when rendered in a browser:
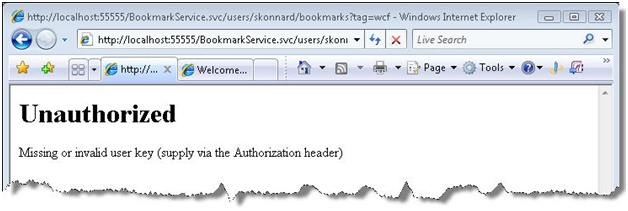
Figure 6: WebProtocolException with Custom XHTML Response
This approach gives you complete freedom over the response XHTML.
However, if you’re not concerned with returning a human-readable error message (in XHTML), you can instead return a custom type that will be serialized into XML (using DataContractSerializer). The following code example illustrates how to accomplish this using a custom type called CustomErrorMessage:
if (!IsUserAuthorized(username)) {
    throw new WebProtocolException(HttpStatusCode.Unauthorized,
        "Custom error message",
        new CustomErrorMessage() {
            ApplicationErrorCode = 5000,
            Description = "Authentication token missing" },
        null);
}
In this case, the consumer receives the custom XML message illustrated in Figure 7.

Figure 7: WebProtocolException with a Custom XML Response
Furthermore, if the WCF operation specifies WebMessageFormat.Json for the response, the resulting XML will be serialized using the DataContractJsonSerializer in order to return JSON to the consumer.
You can even take things one step further by integrating with the ASP.NET custom error feature. You can accomplish this by adding some code to Global.asax to check for the existence of a WebProtocolException and to redirect the consumer to a custom error page when it finds one:
protected void Application_EndRequest(object sender, EventArgs e)
{
    if (HttpContext.Current.Error != null)
    {
        WebProtocolException webEx =
            HttpContext.Current.Error as WebProtocolException;
        if (webEx != null && webEx.StatusCode == HttpStatusCode.BadRequest)
        {
            HttpContext.Current.ClearError();
            HttpContext.Current.Response.Redirect("BadRequest.htm");
        }
        if (webEx != null && webEx.StatusCode == HttpStatusCode.Unauthorized)
        {
            HttpContext.Current.ClearError();
            HttpContext.Current.Response.Redirect("Unauthorized.htm");
        }
    }
}
There are two samples in the WCF REST Starter Kit SDK that illustrate how these WebProtocolException features work – one called “WebException” and another called “WebException2”. In the end, these features make it much easier to produce custom HTTP error messages containing descriptive response messages by simply throwing exceptions, which is a more natural model for .NET developers.
Caching Support
One of the primary potential benefits of REST is HTTP caching. However, in order to realize that benefit, you have to leverage the various HTTP caching headers in your request and response messages. You can accomplish this within your WCF service operations by manually accessing the request/response headers through the WebOperationContext instance but it’s not trivial to do properly.
The WCF REST Starter Kit also provides a simpler model for controlling caching through the [WebCache] attribute that you can declaratively apply to your various GET operations. This attribute allows you to specifying a caching profile for each operation and then the caching behavior (CachingParameterInspector) takes care of handling all of the underlying HTTP caching details.
The [WebCache] implementation builds on ASP.NET output caching and provides most of the same properties found on the System.Web.UI.OutputCacheParameters class. It simply integrates that same behavior with the WCF runtime and makes it easy to declaratively apply that behavior to your WCF service operations. The following example shows how to cache a [WebGet] response for 60 seconds:
[WebCache(Duration = 60)]
WebGet(UriTemplate = BookmarkServiceUris.PublicBookmarks)]
OperationContract]
ookmarks GetPublicBookmarksByTagAsXml(string tag)
   return HandleGetPublicBookmarks(tag);
However, since this operation can return a different response for each supplied “tag”, we really want to vary the cached response on a tag-by-tag basis. You can accomplish this by using the VaryByParam property (which you may be familiar with from ASP.NET) as illustrated here:
[WebCache(Duration = 60, VaryByParam = "tag")]
[WebGet(UriTemplate = BookmarkServiceUris.PublicBookmarks)]
[OperationContract]
Bookmarks GetPublicBookmarksByTagAsXml(string tag)
{
    return HandleGetPublicBookmarks(tag);
}
In addition to VaryByParam, the [WebCache] attribute provides VaryByHeader and VaryByCustom, which allow you to specify different variables for influencing the output cache entry. You can also use the Location to control where the response is allowed to be cached (e.g., Any, Client, Server, ServerAndClient etc), and to prevent caching altogether, you can set the NoStore property to “true”.
[WebCache] also supports the CacheProfile property, which allows you to reference an “output cache profile” found in web.config. For example, the following web.config contains an output cache profile called “CacheFor1Min” that specifies the response will be cached for 60 seconds, the cached response can be stored anywhere, and the cache entry will vary by the “tag” parameter:
<configuration>
  <system.web>
    <compilation debug="true"/>
    <caching>
      <outputCacheSettings>
        <outputCacheProfiles>
          <clear/>
          <add name="CacheFor1Min" duration="60" enabled="true"
               location="Any" varyByParam="tag"/>
        </outputCacheProfiles>
      </outputCacheSettings>
    </caching>
  </system.web>
  <system.serviceModel>
    <serviceHostingEnvironment aspNetCompatibilityEnabled="true"/>
  </system.serviceModel>
</configuration>
This allows you to decouple the caching behavior from your compiled WCF code. You can apply this output cache profile to your WCF operations through the [WebCache] attribute as shown here:
[WebCache(CacheProfileName="CacheFor1Min")]
WebGet(UriTemplate = BookmarkServiceUris.PublicBookmarks)]
OperationContract]
ookmarks GetPublicBookmarksByTagAsXml(string tag)
   return HandleGetPublicBookmarks(tag);
And finally, the [WebCache] attribute even allows you to tie the caching behavior to a SQL dependency through the SqlDependency property. In order to take advantage of this, you need to add a <sqlCacheDependency> entry for the database in question to web.config. Then you use the [WebCache] attribute’s SqlDependency property to specify a list of database & table name pairs that the cache entry should depend on. The cache entry will expire when any of the specified tables are modified.
The following web.config illustrates how to configure a new <sqlCacheDependency> entry:
<configuration>
  <connectionStrings>
    <add name="bmconn" connectionString=
     "Data Source=.; Initial Catalog=BookmarksDB; Integrated Security=true" />
  </connectionStrings>
    <system.web>
    <caching>
      <sqlCacheDependency enabled="true" pollTime="1000" >
        <databases>
          <add name="bmdb" connectionStringName="bmconn" />
        </databases>
      </sqlCacheDependency>
    </caching>
  </system.web>
  <system.serviceModel>
    <serviceHostingEnvironment aspNetCompatibilityEnabled="true"/>
  </system.serviceModel>
</configuration>
Then you can apply [WebCache] to an operation to tie the output caching behavior to a specific table within the SQL database. The following example ties the output caching to the “Bookmarks” table:
[WebCache(SqlDependency="bmdb:Bookmarks", VaryByParam = "tag")]
WebGet(UriTemplate = BookmarkServiceUris.PublicBookmarks)]
OperationContract]
ookmarks GetPublicBookmarksByTagAsXml(string tag)
   return HandleGetPublicBookmarks(tag);
With this in place, the output of this particular operation will be cached (for each unique “tag”) until the data in the underlying Bookmarks table changes.
The [WebCache] attribute makes it much easier for you to take advantage of HTTP caching without requiring you to work with the HTTP caching headers directly. The underlying WCF behavior takes care of injecting the HTTP Cache-Control, Date, Expires, and Vary HTTP headers in the response, which clients can then take advantage of to cache the response and reduce the number of future round-trips.
The WCF REST Starter Kit SDK comes with two complete samples that illustrate how to work with the [WebCache] feature in more detail – one called “Caching1” and another called “Caching2” – the “Caching2” sample provides a complete example using a SQL cache dependency.
In addition to the [WebCache] feature, the WCF REST Starter Kit also comes with a few extension methods that make it easier to work with ETags, which simplify the process of implementing conditional GET and conditional PUT scenarios. I’ll show you an example of this later in the paper.
Request Interception
Another common need when building RESTful services is “request interception”. For example, when you need to implement a service behavior that is going to apply to all operations (such as authentication or custom dispatching logic), it’s usually best to implement it as a WCF behavior since the behavior model allows you to inject a request processing “interceptor” into the runtime. The only problem is writing WCF behaviors and interceptors is fairly complex and not for the faint of heart. Hence, in order to simplify this common scenario, the WCF REST Starter Kit provides a much simpler “request interception” mechanism that shields you from writing the more complex WCF extensibility components.
Within Microsoft.ServiceModel.Web, you’ll find a new abstract base class called RequestInterceptor that defines a single abstract method called ProcessRequest. Here’s the full class definition:
public abstract class RequestInterceptor
{
    protected RequestInterceptor(bool isSynchronous);
    public bool IsSynchronous { get; }
    public virtual IAsyncResult BeginProcessRequest(RequestContext context,
        AsyncCallback callback, object state);
    public virtual RequestContext EndProcessRequest(IAsyncResult result);
    public abstract void ProcessRequest(ref RequestContext requestContext);
}
You derive a class from RequestInterceptor and override ProcessRequest (and BeginProcessRequest/EndProcessRequest if you want to support asynchronous calls). Your implementation of ProcessRequest is where you implement the request interception logic. Notice you’re supplied a Request Context instance, which gives you access to the request message and provides a few methods for short-circuiting the request pipeline and returning a response message.
The WebServiceHost2 class manages the collection of RequestInterceptor instances configured for a particular service. You simply add RequestInterceptor instances to the Interceptors collection before calling Open on the host instance. Then when you call Open, they will be inserted into the request processing pipeline behind the scenes (through a new binding element).
The following example shows how to implement a RequestInterceptor that performs API key authentication and rejects unauthorized requests:
public class AuthenticationInterceptor : RequestInterceptor
{
    public AuthenticationInterceptor() : base(false) { }
    public override void ProcessRequest(ref RequestContext requestContext)
    {
        if (!IsValidApiKey(requestContext))
            GenerateErrorResponse(requestContext,
                HttpStatusCode.Unauthorized,
                "Missing or invalid user key (supply via the Authorization header)");
    }
    public bool IsValidUserKey(Message req, string key, string uri)
    {
        ... // ommitted for brevity
    }
    public void GenerateErrorResponse(RequestContext requestContext,
        HttpStatusCode statusCode, string errorMessage)
    {
        // The error message is padded so that IE shows the response by default
        string errorHtml =
            "<html><HEAD><TITLE>Request Error</TITLE></HEAD><BODY>" +
            "<H1>Error processing request</H1><P>{0}</P></BODY></html>";
        XElement response = XElement.Load(new StringReader(
            string.Format(errorHtml, errorMessage)));
        Message reply = Message.CreateMessage(MessageVersion.None, null, response);
        HttpResponseMessageProperty responseProp = new HttpResponseMessageProperty()
        {
            StatusCode = statusCode
        };
        responseProp.Headers[HttpResponseHeader.ContentType] = "text/html";
        reply.Properties[HttpResponseMessageProperty.Name] = responseProp;
        requestContext.Reply(reply);
        // set the request context to null to terminate processing of this request
        requestContext = null;
    }
}
Now, you can take advantage of this request interceptor with your IIS-hosted services by writing a custom ServiceHostFactory that injects the interceptor when the WebServiceHost2 instance is first created. The following example illustrates how to accomplish this:
public class SecureWebServiceHostFactory : ServiceHostFactory
{
    protected override ServiceHost CreateServiceHost(Type serviceType,
        Uri[] baseAddresses)
    {
        WebServiceHost2 host = new WebServiceHost2(serviceType, true, baseAddresses);
        host.Interceptors.Add(new AuthenticationInterceptor());
        return host;
    }
}
Then you simply specify SecureWebServiceHostFactory in your .svc files (using the Factory attribute) and your interceptor will automatically kick in. This turns out to be much easier than writing the equivalent WCF behavior, interceptor, and attribute classes that would be necessary to pull this off.
The WCF REST Starter Kit SDK comes with a few additional examples that illustrate some of the possibilities with RequestInterceptor. One of the samples shows how to implement X-HTTP-Method-Override behavior with a RequestInterceptor. Here’s the RequestInterceptor implementation:
public class XHttpMethodOverrideInterceptor : RequestInterceptor
{
    public XHttpMethodOverrideInterceptor() : base(true) {}
    public override void ProcessRequest(ref RequestContext requestContext)
    {
        if (requestContext == null || requestContext.RequestMessage == null)
        {
            return;
        }
        Message message = requestContext.RequestMessage;
        HttpRequestMessageProperty reqProp = (HttpRequestMessageProperty)
            message.Properties[HttpRequestMessageProperty.Name];
        string methodOverrideVal = reqProp.Headers["X-HTTP-Method-Override"];
        if (!string.IsNullOrEmpty(methodOverrideVal))
        {
            reqProp.Method = methodOverrideVal;
        }
    }
}
It looks for the X-HTTP-Method-Override header and if it finds one, it resets the HTTP method for the request message to the value found in the header. This provides for a very simple solution to this scenario and it can easily be reused across all of your RESTful WCF service solutions.
Another RequestInterceptor example they provide with the WCF REST Starter Kit is content-type-based dispatching. In other words, making it possible to dispatch to different service operations based on the value of the HTTP Accept or Content-Type request headers. The following example shows how you can accomplish this through another RequestInterceptor implementation:
public class ContentTypeRequestInterceptor : RequestInterceptor
{
    public ContentTypeRequestInterceptor() : base(true) {}
    public override void ProcessRequest(ref RequestContext requestContext)
    {
        if (requestContext == null) return;
        Message request = requestContext.RequestMessage;
        if (request == null) return;
        HttpRequestMessageProperty prop = (HttpRequestMessageProperty)
            request.Properties[HttpRequestMessageProperty.Name];
        string format = null;
        string accepts = prop.Headers[HttpRequestHeader.Accept];
        if (accepts != null)
        {
            if (accepts.Contains("text/xml") || accepts.Contains("application/xml"))
            {
                format = "xml";
            }
            else if (accepts.Contains("application/json"))
            {
                format = "json";
            }
        }
        else
        {
            string contentType = prop.Headers[HttpRequestHeader.ContentType];
            if (contentType != null)
            {
                if (contentType.Contains("text/xml") ||
                    contentType.Contains("application/xml"))
                {
                    format = "xml";
                }
                else if (contentType.Contains("application/json"))
                {
                    format = "json";
                }
            }
        }
        if (format != null)
        {
            UriBuilder toBuilder = new UriBuilder(request.Headers.To);
            if (string.IsNullOrEmpty(toBuilder.Query))
            {
                toBuilder.Query = "format=" + format;
            }
            else if (!toBuilder.Query.Contains("format="))
            {
                toBuilder.Query += "&format=" + format;
            }
            request.Headers.To = toBuilder.Uri;
        }
    }
}
These are just a few examples of what you can accomplish with the RequestInterceptor mechanism. You can use this technique to accomplish a variety of different request processing behaviors such as logging, validation, or even custom caching. And the solution is easy to reuse across your RESTful services.
Additional Classes and Extension Methods
In addition to the key features I just described, the WCF REST Starter Kit also comes with various extension methods that simplify common REST programming tasks. These extension methods are scattered across several classes within Microsoft.ServiceModel.Web. I’ll highlight a few of them here.
The WebOperationContextExtensions class contains a set of extension methods for the core WebOperationContext class. A few of them are designed to make URI and UriTemplate manipulation easier (GetBaseUri, GetRequestUri, and BindTemplateToRequestUri). And the rest are designed to simplify HTTP ETag processing (through several SetHashEtag overloads and ThrowIfEtagMissingOrStale). The following shows the class definition for WebOperationContextExtensions:
public static class WebOperationContextExtensions
{
    public static Uri BindTemplateToRequestUri(this WebOperationContext context,
        UriTemplate template, params string[] values);
    public static Uri GetBaseUri(this IncomingWebRequestContext context);
    public static NameValueCollection GetQueryParameters(
        this IncomingWebRequestContext context);
    public static Uri GetRequestUri(this IncomingWebRequestContext context);
    public static string SetHashEtag<T>(this OutgoingWebResponseContext context,
        T entityToHash);
    public static string SetHashEtag<T>(this OutgoingWebResponseContext context,
        BinaryFormatter formatter, T entityToHash);
    public static string SetHashEtag<T>(this OutgoingWebResponseContext context,
        XmlObjectSerializer serializer, T entityToHash);
    public static string SetHashEtag<T>(this OutgoingWebResponseContext context,
        XmlSerializer serializer, T entityToHash);
    public static void ThrowIfEtagMissingOrStale(
        this IncomingWebRequestContext context, string expectedEtag);
}
The SerializationExtensions class contains several extension methods that simplify serializing objects to and from XElement instances (when using XLinq). It provides several ToObject and ToXml overloads:
public static class SerializationExtensions
{
    public static TObject ToObject<TObject>(this XElement xml);
    public static TObject ToObject<TObject>(this XElement xml,
        XmlObjectSerializer serializer);
    public static TObject ToObject<TObject>(this XElement xml,
        XmlSerializer serializer);
    public static XElement ToXml<TObject>(TObject obj);
    public static XElement ToXml<TObject>(TObject obj,
        XmlObjectSerializer serializer);
    public static XElement ToXml<TObject>(TObject obj, XmlSerializer serializer);
}
And finally, the SyndicationExtensions class contains several extension methods that simplify working with RSS/Atom feeds through the SyndicationFeed and SyndicationItem classes. These methods make it easier to add various types of links to a feed including “self” links, “edit” links, and navigation links:
public static class SyndicationExtensions
{
    public static void AddEditLink(this SyndicationItem entry, Uri uri);
    public static void AddEditMediaLink(this SyndicationItem entry, Uri uri,
        string contentType, long contentLength);
    public static void AddNextPageLink(this SyndicationFeed feed, Uri uri);
    public static void AddPreviousPageLink(this SyndicationFeed feed, Uri uri);
    public static void AddSelfLink(this SyndicationFeed feed, Uri uri);
}
In addition to these extension methods, the Microsoft.ServiceModel.Web.SpecializedServices namespace also contains a set of service contract interfaces and base class definitions for some of the most common types of “specialized” RESTful services (see Figure 8). Here you’ll find types for singleton services, collection services, and AtomPub services.
| Interface | Base Class | Description |
|---|---|---|
ISingletonService<TItem> |
SingletonServiceBase<TItem> |
Defines a generic service contract and base implementation for “singleton” REST services, e.g. a RESTful service that only exposes a single TItem resource. |
ICollectionService<TItem> |
CollectionServiceBase<TItem> |
Defines a generic service contract and base implementation for “collection” REST services, e.g. a RESTful service that exposes a collection of TItem resources. |
IAtomPubService |
AtomPubServiceBase |
Defines a generic service contract and base implementation for AtomPub services. |
Figure 8: Specialized REST Service Contract Interfaces and Base Classes
These types define the REST contract details for each type of service, shielding you from the HTTP details while allowing you to focus on the resource definitions (TItem) and the core CRUD functionality.
If you wish to implement one of these standard service types, you simply derive a class from the base class of interest and the corresponding service contract definition. Then you override the abstract methods to define the CRUD functionality for the resource in question, and then you’re ready to host it. You don’t have to worry about the HTTP details because they are handled by the base types.
For example, suppose you want to implement a simple bookmark service using the ICollectionService<TItem> and CollectionServiceBase<TItem> types. You can do this by deriving a new class from both types while specifying Bookmark for the resource type. Then you override the handful of abstract methods defined on the base class including OnAddItem, OnDeleteItem, OnGetItem, OnGetItems, and OnUpdateItem. Your method implementations define the CRUD functionality.
Figure 9 shows a complete sample implementation for your reference.
public class BookmarkService : CollectionServiceBase<Bookmark>,
    ICollectionService<Bookmark>
{
    Dictionary<string, Bookmark> bookmarks = new Dictionary<string, Bookmark>();
    protected override Bookmark OnAddItem(Bookmark initialValue, out string id)
    {
        id = Guid.NewGuid().ToString();
        bookmarks.Add(id, initialValue);
        return initialValue;
    }
    protected override bool OnDeleteItem(string id)
    {
        bookmarks.Remove(id);
        return true;
    }
    protected override Bookmark OnGetItem(string id)
    {
        return bookmarks[id];
    }
    protected override IEnumerable<KeyValuePair<string, Bookmark>> OnGetItems()
    {
        return bookmarks;
    }
    protected override Bookmark OnUpdateItem(string id, Bookmark newValue)
    {
        bookmarks[id] = newValue;
        return bookmarks[id];
    }
}
Figure 9: Sample Implementation using ICollectionService<TItem> and CollectionServiceBase<TItem>
The sample implementation shown in Figure 9 is now completely ready to be hosted. In order to make the hosting aspect easier, the Microsoft.ServiceModel.Web.SpecializedServices namespace also contains a specialized host class for each specialized service type. For example, you’ll find SingletonServiceHost, CollectionServiceHost, and AtomPubServiceHost classes at your disposal. These specialized host types configure the necessary WCF behaviors for you behind the scenes so you don’t have to worry about it.
The following code sample illustrates how to host the BookmarkService implementation shown in Figure 9 within a simple console application:
class Program
{
    static void Main(string[] args)
    {
        CollectionServiceHost host = new CollectionServiceHost(
            typeof(BookmarkService),
            new Uri("https://localhost:8080/bookmarkservice"));
        host.Open();
        Console.WriteLine("Host is up and running...");
        Console.ReadLine();
        host.Close();
    }
}
If you run this console application and then browse to the base address of the service, you should get the list of bookmarks back (returned by OnGetItems) as illustrated in Figure 10.
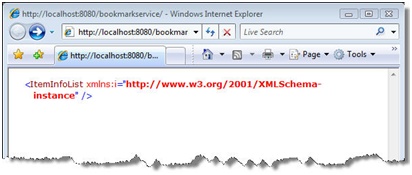
Figure 10: Browsing to BookmarkService while it’s Running
And if you append “/help” to the end of the base URI, you’ll see the REST help page (see And if you append “/help” to the end of the base URI, you’ll see the REST help page (see Figure 11).).
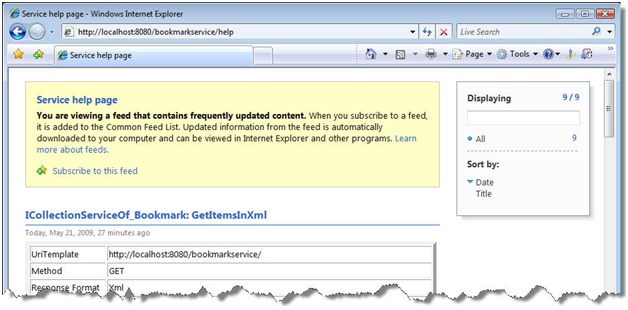
Figure 11: Help Page Describing the Bookmark Service
If you browse through the help page, you’ll see that this service implementation supports both XML and JSON message formats for each logical operation without any doing on our part.
You can use these same techniques to implement singleton services (one that only exposes a single resource) or fully functional AtomPub services, which are becoming quite popular throughout the industry today. These specialized service types can make it much easier to get your RESTful service up and running, assuming it fits within the constraints imposed by the generic implementation.
In an effort to make these specialized types even easier for developers to use, the WCF REST Starter Kit also comes with a set of Visual Studio project templates that help bootstrap the process of using these “specialized” service types to create new service implementations.
Visual Studio Project Templates
The WCF REST Starter Kit comes with some helpful Visual Studio project templates that provide the necessary boiler plate code for a few types of “specialized” services. Once you’ve installed the WCF REST Starter Kit, you’ll see a suite of new project templates in the Visual Studio New Project dialog (see Figure 12). I’ve described what each project template provides below in Figure 13.
You simply need to choose one, enter the remaining project details, and press OK. Then you’ll end up with a skeleton REST project that you can immediately run and start building on. The project templates will basically build you a service implementation like the one I just showed in the previous section.
When you use one of these project templates, your primary focus is on modifying the resource class definitions and propagating those changes throughout the implementation (you can use Visual Studio refactoring to accomplish this), and implementing the CRUD method stubs for each HTTP operation.
Let’s walk through a few examples using the WCF REST Starter Kit project templates to help illustrate how it can simplify the process of building these types of RESTful services.
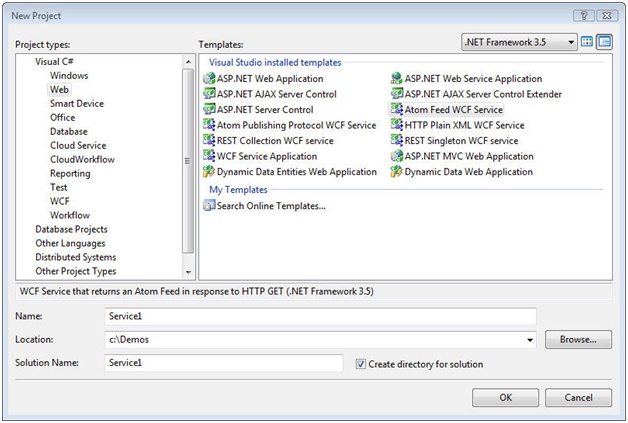
Figure 12: The WCF REST Starter Kit project templates
| Interface | Description |
|---|---|
Atom Feed WCF Service |
Produces a sample WCF service that shows how to programmatically generate and return a SyndicationFeed. You simply need to change the implementation to fill in the feed with your business data. |
AtomPub WCF Service |
Produces a complete skeleton implementation for a fully compliant AtomPub service, greatly reducing the amount of code you have to write for this scenario, and allowing you to focus primarily on how to map your business resources to the AtomPub protocol. |
HTTP Plain XML WCF Service |
Produces an XML over HTTP service that doesn’t support the full HTTP interface. Instead, it provides simple GET and POST operations and makes it easy to build XML-based services that aren’t truly RESTful. |
REST Collection WCF Service |
Produces a service that exposes the full HTTP interface (GET, POST, PUT, and DELETE) around a collection of resources, and it provides both XML and JSON representations for the underlying resource. |
REST Singleton WCF Service |
Produces a service that exposes the full HTTP interface (GET, POST, PUT, and DELETE) around a singleton resource, and it provides both XML and JSON representations for the underlying resource. |
Figure 13: WCF REST Starter Kit Project Templates
REST Singleton Services
Let’s start by creating a simple service that exposes a single resource representing my current whereabouts at any point in time. I’ll create a new “REST Singleton WCF Service” project and name it MyWhereabouts. Once the project is generated, I’ll have a service.svc file that contains my service implementation (the code is actually found in service.svc.cs). At this point I can actually press F5 to test the service illustrating the initial generated project is complete and ready to run.
When I press F5 to load the service and browse to it, the service returns a <SampleItem> resource in an XML representation, which is rendered in the browser (see Figure 14).
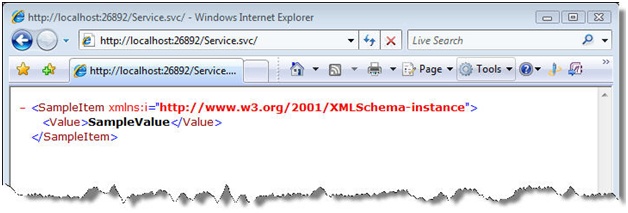
Figure 14: Browsing to the generated singleton service (no changes)
If you look at the source code within service.svc.cs, you’ll notice they’ve provided a class definition for SampleItem – this class represents the singleton resource exposed by the service implementation. The intention is for you to modify this class definition to represent the actual resource you wish to expose. This class is referenced elsewhere throughout the file so you’ll want to take advantage of Visual Studio’s refactoring support to propagate the change once you’ve made it. Here’s what the initial class looks like:
// TODO: Modify the SampleItem. Use Visual Studio refactoring while modifying so
// that the references are updated.
/// <summary>
/// Sample type for the singleton resource.
/// By default all public properties are DataContract serializable
/// </summary>
public class SampleItem
{
    public string Value { get; set; }
}
And if you look at the service class definition, you’ll see it derives from SingletonServiceBase<SampleItem> and ISingletonService<SampleItem>. Now you need to modify the SampleItem class definition to something more appropriate. Since I’m trying to expose “my whereabouts”, I’ll change the class name to MyWhereabouts. And right when I do, I’ll use the refactoring menu and select “Rename ‘SampleItem’ to ‘MyWhereabouts’” (see Figure 15).
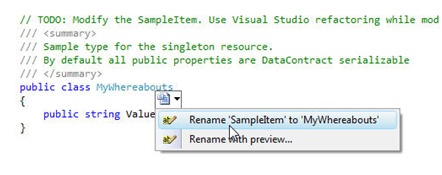
Figure 15: Using Visual Studio refactoring to change the resource class name
Selecting this option takes care of renaming the class references throughout the rest of the file so everything should still build and run after the change.
Now I can simply focus on modifying the class definition to model the resource representation I’m trying to expose. For the MyWhereabouts resource, I’ll simply add a few public fields called Placename, Timezone, Lattitude, and Longitude. Here’s what my revised resource class looks like:
public class MyWhereabouts
{
    public string Placename { get; set; }
    public string Timezone { get; set; }
    public string Lattitude { get; set; }
    public string Longitude { get; set; }
}
After making this change, I also modified the MyWhereabouts field initialization code to set these fields to my current location while writing this whitepaper:
public class Service : SingletonServiceBase<MyWhereabouts>,
    ISingletonService<MyWhereabouts>
{
    // TODO: This variable used by the sample implementation. Remove if needed
    MyWhereabouts item = new MyWhereabouts()
    {
        Placename = "Fruit Heights",
        Timezone = "GMT-07:00 Mountain Time",
        Lattitude = "41.016962",
        Longitude = "-111.904238"
    };
With these few changes in place, you can now press F5 again to browse to the service.svc file and you should see the <MyWhereabouts> resource displayed in the browser (see Figure 16).
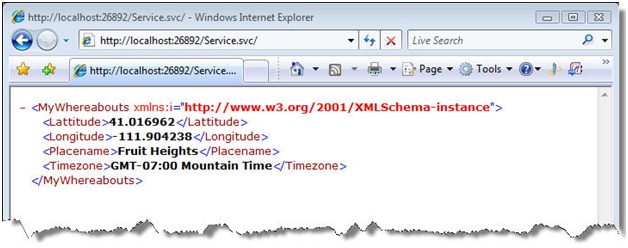
Figure 16: Browsing to the MyWhereabouts Resource
This generic service implementation supports the full HTTP interface (GET, POST, PUT, and DELETE) and each operation supports both XML and JSON representations. Simply add “?format=json” to the end of the URI and you’ll retrieve the current resource in JSON format. You can now test the other operations (POST, PUT, and DELETE) by using Fiddler or by writing a custom client.
REST Collection Services
Next let’s create a REST collection service to implement another BookmarkService. First, we’ll create a new project by selecting the “REST Collection WCF Service” template. Like in the previous example, we’ll end up with a WCF project containing a resource class named SampleItem along with a service class that derives from CollectionServiceBase<SampleItem> and ICollectionService<Bookmark>. These base types implement the full HTTP interface as shown earlier. Now, we need to make only a few changes.
The first thing we need to change is the name of the resource class – we’ll change it from “SampleItem” to “Bookmark” and I’ll take advantage of Visual Studio refactoring to propagate the change throughout the project again. Now I can fill in the Bookmark class with the fields I need for representing a bookmark resource. I’ll change the Bookmark class definition to the following:
public class Bookmark
{
    public Uri Url { get; set; }
    public string User { get; set; }
    public string Title { get; set; }
    public string Tags { get; set; }
    public bool Public { get; set; }
    public DateTime LastModified { get; set; }
}
With these changes in place, my new bookmark collection service is ready to test. Simply press F5 in Visual Studio and it will load the service and browse to the service.svc file. When the browser comes up, you’ll see an empty <ItemInfoList> element because the Bookmark collection is currently empty.
At this point you can use something like Fiddler to add some bookmarks to the collection (via POST) or you can pre-populate the Bookmark items collection in the service constructor. Once you’ve populated the Bookmark collection, you’ll get some <Bookmark> elements back when you browse to the service again (see Figure 17). Notice the resulting list contains links to the individual Bookmark resources.
You can browse to an individual bookmark by following one of the <EditLink> elements found within one of the <ItemInfo> elements. For example, you can get the first bookmark in the collection by browsing to “https://localhost:26826/Service.svc/7b5b4a15-3b05-4f94-a7b8-1f324b5cfc7d” (see Figure 18).
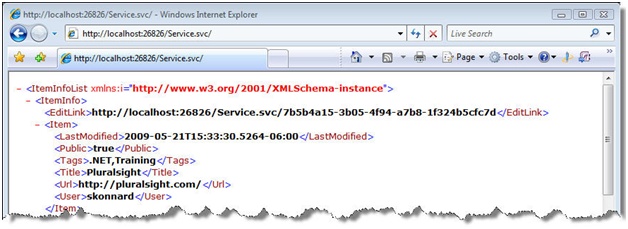
Figure 17: Browsing to the Bookmark collection service
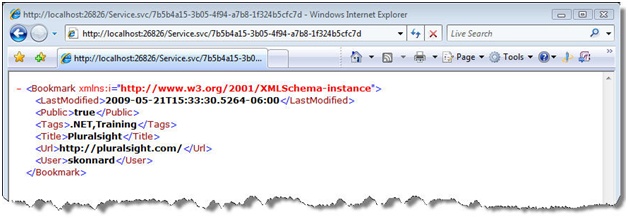
Figure 18: Browsing to a single bookmark within the collection
At this point you can also use POST, PUT, and DELETE operations without any additional coding – the generated project template already contains a default implementation for each one. You can POST new <Bookmark> elements to the service’s root address and it will generate a new Bookmark resource and assign it a new Id, and return a 201 Created response with the corresponding Location header. You can also PUT <Bookmark> elements to individual bookmark URIs to perform updates. And you can send DELETE requests to individual bookmark resources to remove them from the collection.
As you can see, for this particular type of RESTful service (a collection-oriented service), the WCF REST Starter Kit made it possible to get our implementation up and running with very little coding on our part.
Atom Feed Services
When you need to generate a simple Atom feed service, create a new project of type “Atom Feed WCF Service” from the WCF REST Starter Kit. It will generate a WCF service with a sample feed implementation like the one shown in Figure 19. This service will run as-is and produce a sample Atom feed that can be rendered in any standard Atom reader (see Figure 20 to see how it’s rendered in IE).
// TODO: Please set IncludeExceptionDetailInFaults to false in production
// environments
[ServiceBehavior(IncludeExceptionDetailInFaults = true),
 AspNetCompatibilityRequirements(RequirementsMode =
     AspNetCompatibilityRequirementsMode.Allowed), ServiceContract]
public partial class FeedService
{
    // TODO: Modify the URI template and method parameters according to your
    // application. An example URL is http://<url-for-svc-file>?numItems=1
    [WebHelp(Comment = "Sample description for GetFeed.")]
    [WebGet(UriTemplate = "?numItems={i}")]
    [OperationContract]
    public Atom10FeedFormatter GetFeed(int i)
    {
        SyndicationFeed feed;
        // TODO: Change the sample content feed creation logic here
        if (i < 0) throw new WebProtocolException(HttpStatusCode.BadRequest,
            "numItems cannot be negative", null);
        if (i == 0) i = 1;
        // Create the list of syndication items. These correspond to Atom entries
        List<SyndicationItem> items = new List<SyndicationItem>();
        for (int j = 1; j <= i; ++j)
        {
            items.Add(new SyndicationItem()
            {
                // Every entry must have a stable unique URI id
                Id = String.Format(CultureInfo.InvariantCulture,
                    "http://tempuri.org/Id{0}", j),
                Title = new TextSyndicationContent(
                    String.Format("Sample item '{0}'", j)),
                // Every entry should include the last time it was updated
                LastUpdatedTime = new DateTime(
                    2008, 7, 1, 0, 0, 0, DateTimeKind.Utc),
                // The Atom spec requires an author for every entry. If the entry has
                // no author, use the empty string
                Authors =
                {
                    new SyndicationPerson()
                    {
                        Name = "Sample Author"
                    }
                },
                // The content of an Atom entry can be text, xml, a link or arbitrary
                // content. In this sample text content is used.
                Content = new TextSyndicationContent("Sample content"),
            });
        }
        // create the feed containing the syndication items.
        feed = new SyndicationFeed()
        {
            // The feed must have a unique stable URI id
            Id = "http://tempuri.org/FeedId",
            Title = new TextSyndicationContent("Sample feed"),
            Items = items
        };
        feed.AddSelfLink(
            WebOperationContext.Current.IncomingRequest.GetRequestUri());
        #region Sets response content-type for Atom feeds
        WebOperationContext.Current.OutgoingResponse.ContentType = ContentTypes.Atom;
        #endregion
        return feed.GetAtom10Formatter();
    }
}
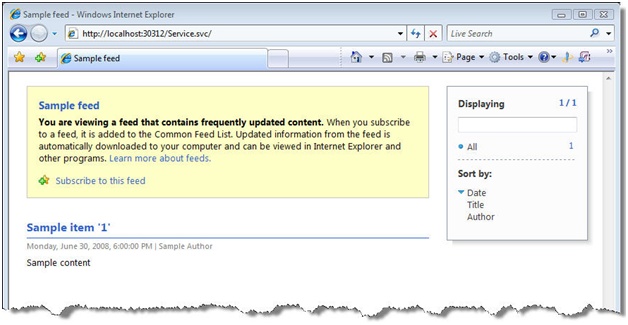
Figure 20: Sample feed rendered in Internet Explorer
This template simply provides sample code for generating a typical Atom feed service. You will need to modify the code to map your business entities into the SyndicationFeed instance, mapping each of the individual entities to a new SyndicationItem instance making use of the fields it provides.
AtomPub Services
When you want to implement a service that conforms to the Atom Publishing Protocol, you should use the “Atom Publishing Protocol WCF Service” project template that comes with the WCF REST Starter Kit. This template generates a complete AtomPub service that exposes a single sample collection. The generated service class derives from AtomPubServiceBase and IAtomPubService described earlier.
You can test the service immediately by browsing to the service.svc file and the service will return an AtomPub service document describing the collections it supports (see Figure 21). As you can see, this service exposes a collection called “Sample Collection” that you can access by adding “collection1” to the end of the service’s root URL. When you access the collection, the service returns an Atom feed representing the sample collection (see Figure 22). The service also supports adding, updating, and deleting Atom entries through the standard AtomPub HTTP interface.
When you build AtomPub services using the WCF REST Starter Kit, your job is to focus on the logical collections you want to expose. You’ll need to define a mapping between your business entity collections and AtomPub collections exposed by the service, which essentially boils down to defining a mapping between your custom business entity classes and the WCF SyndicationFeed/Item classes.
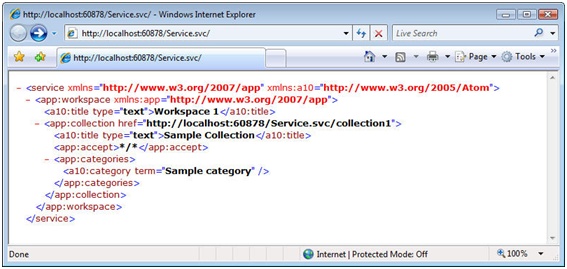
Figure 21: Browsing to the AtomPub service
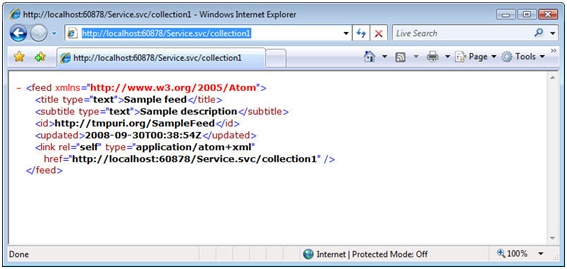
Figure 22: Browsing to the sample collection exposed by the AtomPub service
HTTP Plain XML Services
In situations where you don’t really need or want to do a fully RESTful service (adhering to all the REST constraints and supporting the full HTTP interface) but you would rather settle with a simple XML-over-HTTP service, you won’t want to use the project templates we just covered. Instead, you’ll want to check out the “HTTP Plain XML WCF Service” project template, which doesn’t attempt to provide a RESTful implementation. Instead, it provides a few sample XML-over-HTTP operations to help you get started.
Figure 23 shows the sample implementation you’ll get when you use this project template. Notice how it provides one [WebGet] operation that takes some query string parameters as input, and it provides another [WebInvoke] operation that accepts and returns an XML entity body. These operations are simply provided as examples to show you how to get started with plain old XML services (POX).
If you’re trying to build a POX service that returns data, you can keep the GetData method and tweak the request/response data to fit your needs. If you need to support POST requests, you can keep the DoWork method and adjust accordingly. Chances are you’ll end up rewriting these methods in their entirety so this particular project template doesn’t provide as much value as some of the others.
[ServiceBehavior(IncludeExceptionDetailInFaults = true),
AspNetCompatibilityRequirements(RequirementsMode =
AspNetCompatibilityRequirementsMode.Allowed), ServiceContract]
public partial class Service
{
[WebHelp(Comment = "Sample description for GetData")]
[WebGet(UriTemplate = "GetData?param1={i}¶m2={s}")]
[OperationContract]
public SampleResponseBody GetData(int i, string s)
{
// TODO: Change the sample implementation here
if (i < 0) throw new WebProtocolException(HttpStatusCode.BadRequest,
"param1 cannot be negative", null);
return new SampleResponseBody()
{
Value = String.Format("Sample GetData response: '{0}', '{1}'", i, s)
};
}
[WebHelp(Comment = "Sample description for DoWork")]
[WebInvoke(UriTemplate = "DoWork")]
[OperationContract]
public SampleResponseBody DoWork(SampleRequestBody request)
{
//TODO: Change the sample implementation here
return new SampleResponseBody()
{
Value = String.Format("Sample DoWork response: '{0}'", request.Data)
};
}
}
Figure 23: HTTP Plain XML WCF Service sample implementation
Consuming RESTful Services with HttpClient
One of the more challenging aspects of working with RESTful services is writing the client-side code to consume them. Since RESTful services don’t provide WSDL-like metadata, client-side developers don’t enjoy the luxury of code-generation and strongly-typed proxy classes that make most SOAP services very easy to integrate with programmatically. This reality often leads developers to think that integrating with RESTful services is more cumbersome than typical SOAP services. In my opinion, this is largely a matter of perspective. They key is choosing the right client-side HTTP API to program against.
Since REST services are simply HTTP-based services, you can literally use any HTTP API to consume them. This gives you a great deal of flexibility on the client-side. Microsoft .NET provides the System.Net classes, such as WebRequest and WebResponse, for programming HTTP client code. These classes will get the job done but they do make the client-side experience feel more complex than it should be. Developers used to working with SOAP-based proxies usually don’t find it very appealing or natural.
In an effort to simplify the client-side programming experience for consuming RESTful services, the WCF REST Starter Kit (Preview 2) comes with a new HTTP API called HttpClient that provides a more natural model for programming the uniform HTTP interface along with numerous extension methods that make it easier to handle a variety of different content types found within the HTTP messages.
Getting Started with HttpClient
The HttpClient class provides a simple API for sending HTTP requests and processing HTTP responses. The functionality is defined in two primary class definitions – one called HttpClient and another called HttpMethodExtensions (see Figure 24). The former defines the basic functionality of the class while the latter provides a bunch of layered extension methods targeting the different logical HTTP methods.
If you inspect the HttpClient class, you’ll see it provides a way to specific the target base address, a way to manipulate the HTTP request headers, and numerous overloads to Send the request. You supply the request message content via an HttpContent instance and you process the response through the HttpResponseMessage object you get back. The class also provides asynchronous Send methods for situations where you don’t want to block the calling thread while waiting for the response to come back.
The HttpMethodExtensions class makes things even easier by adding several extension methods to HttpClient for issuing logical Get, Post, Put, and Delete requests. These are the methods that you’ll most likely use when consuming a RESTful service with HttpClient.
public class HttpClient : IDisposable
{
    public HttpClient();
    public HttpClient(string baseAddress);
    public HttpClient(Uri baseAddress);
    public Uri BaseAddress { get; set; }
    public RequestHeaders DefaultHeaders { get; set; }
    public IList<HttpStage> Stages { get; set; }
    public HttpWebRequestTransportSettings TransportSettings { get; set; }
    public event EventHandler<SendCompletedEventArgs> SendCompleted;
    public IAsyncResult BeginSend(HttpRequestMessage request,
        AsyncCallback callback, object state);
    protected virtual HttpStage CreateTransportStage();
    public void Dispose();
    protected virtual void Dispose(bool disposing);
    public HttpResponseMessage EndSend(IAsyncResult result);
    public HttpResponseMessage Send(HttpMethod method);
    public HttpResponseMessage Send(HttpRequestMessage request);
    public HttpResponseMessage Send(HttpMethod method, string uri);
    public HttpResponseMessage Send(HttpMethod method, Uri uri);
    public HttpResponseMessage Send(HttpMethod method, string uri,
        HttpContent content);
    public HttpResponseMessage Send(HttpMethod method, string uri,
        RequestHeaders headers);
    public HttpResponseMessage Send(HttpMethod method, Uri uri, HttpContent content);
    public HttpResponseMessage Send(HttpMethod method, Uri uri,
        RequestHeaders headers);
    public HttpResponseMessage Send(HttpMethod method, string uri,
        RequestHeaders headers, HttpContent content);
    public HttpResponseMessage Send(HttpMethod method, Uri uri,
        RequestHeaders headers, HttpContent content);
    public void SendAsync(HttpRequestMessage request);
    public void SendAsync(HttpRequestMessage request, object userState);
    public void SendAsyncCancel(object userState);
    protected void ThrowIfDisposed();
}
public static class HttpMethodExtensions
{
    public static HttpResponseMessage Delete(this HttpClient client, string uri);
    public static HttpResponseMessage Delete(this HttpClient client, Uri uri);
    public static HttpResponseMessage Get(this HttpClient client);
    public static HttpResponseMessage Get(this HttpClient client, string uri);
    public static HttpResponseMessage Get(this HttpClient client, Uri uri);
    public static HttpResponseMessage Get(this HttpClient client, Uri uri,
        HttpQueryString queryString);
    public static HttpResponseMessage Get(this HttpClient client, Uri uri,
        IEnumerable<KeyValuePair<string, string>> queryString);
    public static HttpResponseMessage Head(this HttpClient client, string uri);
    public static HttpResponseMessage Head(this HttpClient client, Uri uri);
    public static HttpResponseMessage Post(this HttpClient client, string uri,
        HttpContent body);
    public static HttpResponseMessage Post(this HttpClient client, Uri uri,
        HttpContent body);
    public static HttpResponseMessage Post(this HttpClient client, string uri,
        string contentType, HttpContent body);
    public static HttpResponseMessage Post(this HttpClient client, Uri uri,
        string contentType, HttpContent body);
    public static HttpResponseMessage Put(this HttpClient client, string uri,
        HttpContent body);
    public static HttpResponseMessage Put(this HttpClient client, Uri uri,
        HttpContent body);
    public static HttpResponseMessage Put(this HttpClient client, string uri,
        string contentType, HttpContent body);
    public static HttpResponseMessage Put(this HttpClient client, Uri uri,
        string contentType, HttpContent body);
}
Figure 24: HttpClient and HttpMethodExtensions class definitions
Let’s take a look at an example to see how HttpClient simplifies things. We’ll consume a real RESTful service found on the Web that wasn’t built with .NET. We’ll consume the Twitter REST API.
If you browse to the Twitter REST API documentation at http://apiwiki.twitter.com/Twitter-API-Documentation, you can quickly learn how to begin issuing the proper HTTP requests to integrate with the service. The following code shows how to a retrieve a Twitter user’s “friend timeline”:
HttpClient http = new HttpClient("http://twitter.com/statuses/");
http.TransportSettings.Credentials =
    new NetworkCredential("{username}", "{password}");
HttpResponseMessage resp = http.Get("friends_timeline.xml");
resp.EnsureStatusIsSuccessful();
ProcessStatuses(resp.Content.ReadAsStream());
When we construct the HttpClient instance, we provide the base address for the Twitter REST API service and then we provide the user’s HTTP credentials through the TransportSettings.Credentials property. Now we’re ready to use the various Get, Post, Put, and Delete methods to interact with the different resources exposed by the service. In this example, I’m calling Get to retrieve the “friends_timeline.xml” resource from the service. Once that returns, I can call EnsureStatusIsSuccessful on the resp object to make sure we got a 200-level HTTP status code back.
Next, we need to process the contents of the response message. One way to accomplish that is to read the response out as a stream and then process the stream (ReadAsStream) with your favorite XML API. Here’s an example that shows how to process the response XML using XmlDocument:
static void ProcessStatuses(Stream str)
{
    XmlDocument doc = new XmlDocument();
    doc.Load(str);
    XmlNodeList statuses = doc.SelectNodes("/statuses/status");
    foreach (XmlNode n in statuses)
        Console.WriteLine("{0}: {1}",
            n.SelectSingleNode("user/screen_name").InnerText,
            n.SelectSingleNode("text").InnerText);
}
The HttpClient class comes with functionality for processing the message content as a stream, a string, or a byte array. In addition to this basic functionality, the WCF REST Start Kit (Preview 2) comes with another assembly called Microsoft.Http.Extensions that contains numerous extension methods that make it possible to process the message content using other popular techniques (XLinq, XmlSerializer, SyndicationFeed, etc). We’ll see how these extension methods work in the following section.
Let’s look at another example showing how to update a user’s Twitter status. You can accomplish this with HttpClient using the following code (assuming HttpClient is already instantiated above):
HttpUrlEncodedForm form = new HttpUrlEncodedForm();
form.Add("status", "my first HttpClient app");
resp = http.Post("update.xml", form.CreateHttpContent());
resp.EnsureStatusIsSuccessful();
The “update.xml” resource requires a POST request and it expects the message to contain a URL-encoded string containing the new status text. HttpClient makes it easy to generate a URL-encoded message via the HttpUrlEncodedForm class, and then you simply call Post supplying the content.
This quick example illustrates how easy is to issue GET and POST requests using HttpClient. In the following sections, we’ll dive deeper into the HttpClient details and highlight some of its key features.
Processing Message Content
Typically you’ll want to the process the body of the HTTP response using something a little more sophisticated than a Stream. The WCF REST Starter Kit (Preview 2) comes with another assembly called Microsoft.Http.Extensions that enhances the HttpContent class with numerous extension methods that make it possible to process the message content using a specific API.
In the current release, these extension methods are scattered across several namespaces. It’s important to note that you won’t see them in intellisense unless you’ve added a reference to Microsoft.Http.Extensions.dll, and you’ve added a using statement to the appropriate namespace. Figure 25 lists the HttpContent extension methods made available by this additional assembly.
| Extension Method | Namespace |
|---|---|
ReadAsDataContract |
System.Runtime.Serialization |
ReadAsJsonDataContract |
System.Runtime.Serialization.Json |
ReadAsServiceDocument |
System.ServiceModel.Syndication |
ReadAsSyndicationFeed |
System.ServiceModel.Syndication |
ReadAsXmlReader |
System.Xml |
ReadAsXElement |
System.Xml.Linq |
ReadAsXmlSerializable |
System.Xml.Serialization |
Figure 25: HttpContent Extension Methods
Let’s look at a few examples that show how to use some of these extension methods. We’ll start with an XLinq example since it’s a common .NET XML programming choice today. Instead of calling ReadAsStream on the Content property, we’ll now call ReadAsXElement as illustrated here:
HttpResponseMessage resp = http.Get("friends_timeline.xml");
resp.EnsureStatusIsSuccessful();
ProcessStatusesAsXElement(resp.Content.ReadAsXElement());
Remember, you’ll need a reference to the Microsoft.Http.Extensions assembly and you’ll need to add a using statement to the file for System.Xml.Linq – assuming you’ve done both of these steps, you should see ReadAsXElement within intellisense on the Content property. The following example illustrates how we can process the message content as an XElement:
static void ProcessStatusesAsXElement(XElement root)
{
    var statuses = root.Descendants("status");
    foreach (XElement status in statuses)
        Console.WriteLine("{0}: {1}",
            status.Element("user").Element("screen_name").Value,
            status.Element("text"));
}
It would be very similar if you wanted to process the message content using XmlReader instead of XElement – you’d simply call ReadAsXmlReader and process the content accordingly.
Instead of using XML API’s directly, many developers prefer to take advantage of XML serialization techniques, which allows them to work with strongly-typed .NET types instead of generic XML nodes. The ReadAsDataContract and ReadAsJsonDataContract extension methods allow you to leverage the DataContractSerializer (for XML or JSON content respectively) for serialization while ReadAsXmlSerializable allows you to leverage the XmlSerializer serialization engine.
However, before you can use any of these serialization-based methods, you’ll need to acquire some .NET classes that appropriately model the message content you’re going to process. It may be possible to generate the appropriate classes from an XML Schema definition supplied by the service or from some sample XML that you can retrieve while actually using the service during development. But if all else fails, you can always author these types manually based on your knowledge of the XML format.
For example, here are some C# classes that model the statuses we’re getting back from Twitter above when using the DataContractSerializer to perform the deserialization:
[assembly: ContractNamespace("", ClrNamespace = "TwitterShell")]
[CollectionDataContract(Name = "statuses", ItemName = "status")]
public class statusList : List<status> { }
public class user
{
    public string id;
    public string name;
    public string screen_name;
}
public class status
{
    public string id;
    public string text;
    public user user;
}
With these classes in place, we can now use the ReadAsDataContract method specifying the root type to use during the deserialization process (in this case, statusList):
HttpResponseMessage resp = http.Get("friends_timeline.xml");
resp.EnsureStatusIsSuccessful();
ProcessStatusesAsDataContract(resp.Content.ReadAsDataContract<statusList>());
Now that we have the message content deserialized into a statusList object, the processing code becomes much simpler as you can see here:
static void ProcessStatusesAsDataContract(statusList list)
{
    foreach (status status in list)
        Console.WriteLine("{0}: {1}", status.user.screen_name, status.text);
}
If the HTTP response will be returned in JSON format (instead of XML), you can simply call ReadAsJsonDataContract as illustrated here:
HttpResponseMessage resp = http.Get("friends_timeline.json");
resp.EnsureStatusIsSuccessful();
ProcessStatusesAsDataContract(resp.Content.ReadAsJsonDataContract<statusList>());
The rest of the processing code remains the same.
Additionally, if you want to use the XmlSerializer engine, you’ll first need to ensure that you have serializable types that are compatible with the XmlSerializer-mapping. For this particular example, we’d need to replace the statusList type with the following root type (because the XML mapping is different):
public class statuses
{
    [XmlElement("status")]
    public status[] status;
}
Then you simply call ReadAsXmlSerializable instead of ReadAsDataContract, specifying statuses for the root type to deserialize. In general, XmlSerializer is more flexible than DataContractSerializer in terms of the XML it’s able to handle. Hence, it’s likely that XmlSerializer will become a more common choice for consuming RESTful services. Plus, the WCF REST Starter Kit (Preview 2) comes with a Visual Studio plug-in that makes generating XmlSerializer types easy. We’ll cover how it works in the following section.
As a final example, what if the service returns an Atom feed? In this case, you can simply call ReadAsSyndicationFeed and then you’ll get back a SyndicationFeed object to process:
HttpResponseMessage resp = http.Get("friends_timeline.atom");
resp.EnsureStatusIsSuccessful();
ProcessStatusesAsFeed(resp.Content.ReadAsSyndicationFeed());
Then you can process the SyndicationFeed object to extract the information of interest (you’ll need to know where the information is located within the Atom feed structure):
static void ProcessStatusesAsFeed(SyndicationFeed feed)
{
    foreach (SyndicationItem item in feed.Items)
        Console.WriteLine("{0}: {1}", item.Authors[0].Name, item.Title.Text);
}
As you can see, the new HttpClient class makes it really easy to consume RESTful services in .NET. The new extension methods found in Microsoft.Http.Extensions provide a great deal of flexibility around message processing and simplify some of the most common REST scenarios (XML, JSON, and Atom, etc).
“Paste XML as Types” in Visual Studio
Since RESTful services don’t come with WSDL, it’s not possible to generate strongly-typed proxies like you’re used to with SOAP. However, since all REST services implement the same service contract (the HTTP uniform interface), you don’t really need anything beyond the operations provided by HttpClient (Get, Post, Put, and Delete). However, you may want some serializable types to simplify the HTTP message processing logic, which I showed you how to do in the previous section.
If the service in question provides an XML Schema definition describing the content (like the automatic “help” page does provide the WCF REST Starter Kit on the service side), you can use tools like xsd.exe or svcutil.exe to generate the appropriate types. If not, you can take advantage of a new Visual Studio plug-in introduced by the WCF REST Starter Kit (Preview 2) called “Paste XML as Types”.
This new feature allows you to copy either an XML Schema definition or a sample XML instance into your clipboard and then you can select “Paste XML as Types” from the Edit menu. When you do this, it will generate the appropriate XmlSerializer types for the schema/XML in the clipboard and paste them into the current location in the file. When using an XML sample instance, it won’t always be able to produce perfectly precise types so you may need to do some additional massaging after generation.
Let’s see how we could use this with our Twitter example. If you browse to the Twitter “friends_timeline.xml” resource using your browser (http://twitter.com/statuses/friends\_timeline.xml), you’ll get back the actual XML returned by this resource (see Figure 26). Now do a “View Source” and copy the XML into your clipboard. Once copied, you can return to Visual Studio and position your cursor where we want the generated types to go. Then simply select “Paste XML as Types” from the Edit menu (see Figure 27) and the required XmlSerializer types will be added to the file. Once in place, you can use these types in conjunction with the ReadAsXmlSerializable to process the message content.
You can use this feature in conjunction with the “help” page provided by the WCF REST Starter Kit when implementing services. You can browse the help page during development, navigate to the schemas or example XML messages for the different resources and operations, and you can use this plug-in to generate the appropriate message types within your client application. In general, this lowers the bar for clients attempting to integrate with RESTful services and simplifies the developer experience.
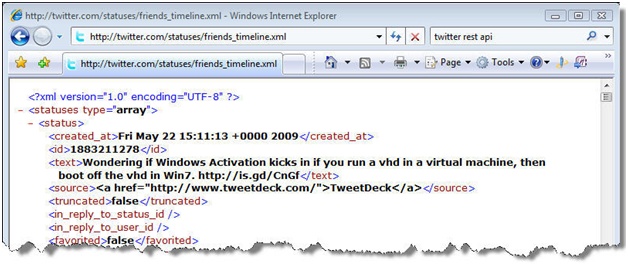
Figure 26: Sample XML returned by the Twitter friends_timeline.xml resource
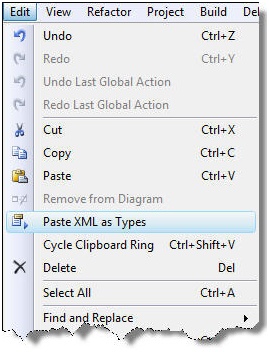
Figure 27: Paste XML as Types menu item
Handling Service Input
The previous section focused on processing message content found in the HTTP response messages. It’s also important to consider how to generate the appropriate input expected by a RESTful service. Many services accept input in the form of query strings, URL encoded form data, or through a variety of other formats that you can use within the HTTP request entity body (e.g., XML, JSON, Atom, etc).
If the service requires query string input, you can use the HttpQueryString class build it properly. The following example shows how to build a query string that we can supply to the Get method:
HttpQueryString vars = new HttpQueryString();
vars.Add("id", screenname);
vars.Add("count", count);
resp = http.Get(new Uri("user_timeline.xml", UriKind.Relative), vars);
resp.EnsureStatusIsSuccessful();
DisplayTwitterStatuses(resp.Content.ReadAsXElement());
If the service requires URL-encoded form input (e.g., what you’d get from an HTML <form> submission), you can use the HttpUrlEncodedForm or HttpMultipartMimeForm class to build the proper content (use the later if you need to produce a multi-part MIME form). The following example illustrates how to build a simple form submission that we can supply to the Post method:
HttpUrlEncodedForm form = new HttpUrlEncodedForm();
form.Add("status", status);
resp = http.Post("update.xml", form.CreateHttpContent());
resp.EnsureStatusIsSuccessful();
Console.WriteLine("Status updated!");
In addition to these classes, the Microsoft.Http.Extensions assembly comes with some additional extension methods that simplify the process of generating HttpContent objects that you can supply to HttpClient as input. These methods are defined in the HttpContentExtensions class and include things like Create (from an XElement), CreateDataContract, CreateJsonDataContract, CreateXmlSerializable, CreateAtom10SyndicationFeed, and CreateRss20SyndicationFeed. You’ll want to use these methods when you need to generate one of these types of content for the HTTP request message.
Simplifying Header Processing with Typed Headers
The Microsoft.Http assembly also comes with a suite of strongly-typed HTTP header classes. You’ll find them within the Microsoft.Http.Headers namespace. For example, you’ll find classes like CacheControl, Connection, Cookie, Credential, EntityTag, Expect, along with others.
The HttpClient class provides a DefaultHeaders property that exposes the request headers to you through these header types. You can manipulate individual headers before sending the request. The HttpResponseMessage class also comes with a Headers property that exposes the various HTTP response headers to you, again through these header classes. The following example illustrates how to manipulate headers in the request/response in order to issue a conditional GET request:
HttpResponseMessage resp = http.Get("public_timeline.atom");
resp.EnsureStatusIsSuccessful();
ProcessStatusesAsFeed(resp.Content.ReadAsSyndicationFeed());
DateTime? lastAccessDate = resp.Headers.Date;
...
http.DefaultHeaders.IfModifiedSince = lastAccessDate;
resp = http.Get("public_timeline.atom");
Console.WriteLine("status={0}", resp.StatusCode);
These strongly-typed HTTP header classes make it easier to work with the HTTP headers in your code because they shield you from many aspects of the underlying HTTP protocol details.
HttpClient “Stage” Processing
The HttpClient class comes with a request interception mechanism that you can plug custom code into, similar to the RequestInterceptor model provided by the WebServiceHost2 on the service-side. This request interception model is designed specifically for client-side HTTP interactions.
Here’s how it works. The HttpClient class manages a collection of “HTTP processing stages”, which are modeled by the HttpStage class. Before sending any messages, you configure a collection of HttpStage-derived objects with your HttpClient instance. Then, whenever you issue an HTTP request, the HttpClient instance will call into each HttpStage object, giving it a chance to do its processing.
There are a couple of classes that derive from HttpStage, HttpProcessingStage and HttpAsyncStage, which provide synchronous and asynchronous models respectively. You’ll typically derive from one of these two classes when implementing a custom stage of your own. When you derive from these classes, it’s your job to override the ProcessRequest and ProcessResponse methods to define your logic.
The following code illustrates how to implement a custom HttpProcessingStage that simply prints a message to the console window:
public class MyHttpStage : HttpProcessingStage
{
    public override void ProcessRequest(HttpRequestMessage request)
    {
        Console.WriteLine("ProcessRequest called: {0} {1}",
            request.Method, request.Uri);
    }
    public override void ProcessResponse(HttpResponseMessage response)
    {
        Console.WriteLine("ProcessResponse called: {0}",
            response.StatusCode);
    }
}
Once you’ve implemented your custom HttpStage-derived class, you can take advantage of it while using HttpClient. The following example illustrates how you can add a MyHttpStage instance into the mix before issuing any HTTP requests:
HttpClient http = new HttpClient("http://twitter.com/statuses/");
http.TransportSettings.Credentials =
    new NetworkCredential("skonnarddemo", "baby95");
// configure the custom stage
http.Stages.Add(new MyHttpStage());
HttpResponseMessage resp = http.Get("public_timeline.atom");
Now, when you call the Get method, you’ll see the MyHttpStage messages printed to the console window before and after issuing the HTTP request to the target service. You can use this interception technique to implement a variety of client-side HTTP processing needs (e.g., security, logging, tracing, custom caching, etc) in a way that fosters more reusability across HTTP client applications.
Extending HttpClient to Create Specialized Clients
In addition to the HttpStage extensibility mechanism, it’s also possible to derive from HttpClient to create your own specialized REST client libraries. This allows you to provide methods and properties that will make more sense to the users of your RESTful service and can ultimately provide a developer experience that parallels (in not exceeds) the typical SOAP proxy class experience.
As part of the WCF REST Starter Kit (Preview 2), they provide an example of specialized HttpClient-derived class called AtomPubClient. It offers a customized client-side experience for interacting with standard AtomPub services. Here’s what the AtomPubClient class definition looks like:
public class AtomPubClient : HttpClient
{
    public AtomPubClient();
    public SyndicationItem AddEntry(SyndicationFeed feed, SyndicationItem newEntry);
    public SyndicationItem AddEntry(Uri feedUri, SyndicationItem newEntry);
    public SyndicationItem AddMediaResource(SyndicationFeed feed, string contentType,
        string description, HttpContent mediaContent);
    public SyndicationItem AddMediaResource(Uri mediaCollectionUri,
        string contentType, string description, HttpContent mediaContent);
    public void DeleteEntry(SyndicationItem entry);
    public void DeleteEntry(Uri itemUri);
    public SyndicationItem GetEntry(Uri itemUri);
    public SyndicationFeed GetFeed(Uri feedUri);
    public ServiceDocument GetServiceDocument(Uri serviceDocumentUri);
    public SyndicationItem UpdateEntry(SyndicationItem oldValue,
        SyndicationItem newValue);
    public SyndicationItem UpdateEntry(Uri editUri, SyndicationItem newValue);
}
Notice how it provides methods like AddEntry, GetEntry, UpdateEntry, GetFeed, etc that are specific to an AtomPub service, which is a much more natural way to think about interacting with those types of services than using the underlying Get, Post, Put, and Delete methods on HttpClient.
The following code example illustrates how to use the AtomPubClient class to navigate an AtomPub service and add a new Atom entry into the first workspace collection:
AtomPubClient client = new AtomPubClient();
ServiceDocument doc = client.GetServiceDocument(
    new Uri("https://localhost:30807/Service.svc/"));
Uri feedUri = doc.Workspaces[0].Collections[0].Link;
SyndicationFeed feed = client.GetFeed(feedUri);
SyndicationItem item = new SyndicationItem()
{
    Title = new TextSyndicationContent("New Item"),
    PublishDate = DateTime.Now
};
client.AddEntry(feed, item);
The WCF REST Starter Kit (Preview 2) also comes with a class called PollingAgent that makes it easier to implement client logic for “polling” a service resource and only doing something when the resource changes. You use PollingAgent in conjunction with an HttpClient object that actually performs the HTTP work. Here’s the complete class definition for PollingAgent:
public class PollingAgent : IDisposable
{
    public PollingAgent();
    public HttpClient HttpClient { get; set; }
    public bool IgnoreExpiresHeader { get; set; }
    public bool IgnoreNonOKStatusCodes { get; set; }
    public bool IgnoreSendErrors { get; set; }
    public TimeSpan PollingInterval { get; set; }
    public event EventHandler<ConditionalGetEventArgs> ResourceChanged;
    public void Dispose();
    public void StartPolling();
    public void StartPolling(Uri uri);
    public void StartPolling(Uri uri, EntityTag etag, DateTime? lastModifiedTime);
    public void StopPolling();
}
So you create an instance of the PollingAgent class and provide it with an HttpClient object to use. Then you establish the callback method for the ResourceChanged event and specify the polling interval. Once you have all that in place, you simply call StartPolling and supply the target resource URI. The following code sample illustrates how to set this up for “polling” the Twitter public timeline:
class Program
{
    static void Main(string[] args)
    {
        PollingAgent pollingClient = new PollingAgent();
        pollingClient.HttpClient = new HttpClient();
        pollingClient.HttpClient.TransportSettings.Credentials =
            new NetworkCredential("skonnarddemo", "baby95");
        pollingClient.PollingInterval = TimeSpan.FromSeconds(10);
        pollingClient.ResourceChanged += new EventHandler<ConditionalGetEventArgs>(
            pollingClient_ResourceChanged);
        pollingClient.StartPolling(
            new Uri("http://twitter.com/statuses/public_timeline.xml"));
        Console.WriteLine("polling...");
        Console.ReadLine();
    }
    static void pollingClient_ResourceChanged(object s, ConditionalGetEventArgs e)
    {
        ProcessStatusesAsXElement(e.Response.Content.ReadAsXElement());
    }
    static void ProcessStatusesAsXElement(XElement root)
    {
        var statuses = root.Descendants("status");
        foreach (XElement status in statuses)
            Console.WriteLine("{0}: {1}",
                status.Element("user").Element("screen_name").Value,
                status.Element("text"));
    }
}
As you can see from these examples, HttpClient provides a simple HTTP foundation that you can extend to provide more specialized client-side programming models. Investing some time in building your own HttpClient-derived classes pays big dividends in terms of the client-side developer experience.
Conclusion
Microsoft is striving hard to provide a first-class programming model for both implementing and consuming RESTful services using the Microsoft .NET framework. WCF 3.5 introduced the fundamental “Web” programming model required to build RESTful services but it was only a start. The WCF REST Starter Kit is a Microsoft-sponsored CodePlex project that provides a set of WCF extensions and key Visual Studio integration designed specifically to simplify REST-focused development tasks. Many of the features found in the WCF REST Starter Kit today will most likely find their way into future versions of the .NET framework, but there’s no reason to wait, you can begin putting these features to use today.
About theAuthor
Aaron Skonnard is a cofounder of Pluralsight, a Microsoft training provider offering both instructor-led and on-demand developer courses. These days Aaron spends most of his time recording Pluralsight On-Demand! courses focused on Cloud Computing, Windows Azure, WCF and REST. Aaron has spent years writing, speaking, and teaching professional developers around the world. You can reach him at http://pluralsight.com/aaron and http://twitter.com/skonnard.
Additional Resources
- Architectural Styles and the Design of Network-based Software Architectures by Roy Fielding
- RESTful Web Services (O’Reilly) by Leonard Richardson & Sam Ruby
- RESTful .NET (O’Reilly) by Jon Flanders
- REST on the MSDN WCF Developer Center (including the WCF REST Starter Kit)
- Pluralsight’s RESTful .NET Fundamentals Training Course