Note
Access to this page requires authorization. You can try signing in or changing directories.
Access to this page requires authorization. You can try changing directories.
Table of Contents
Summary
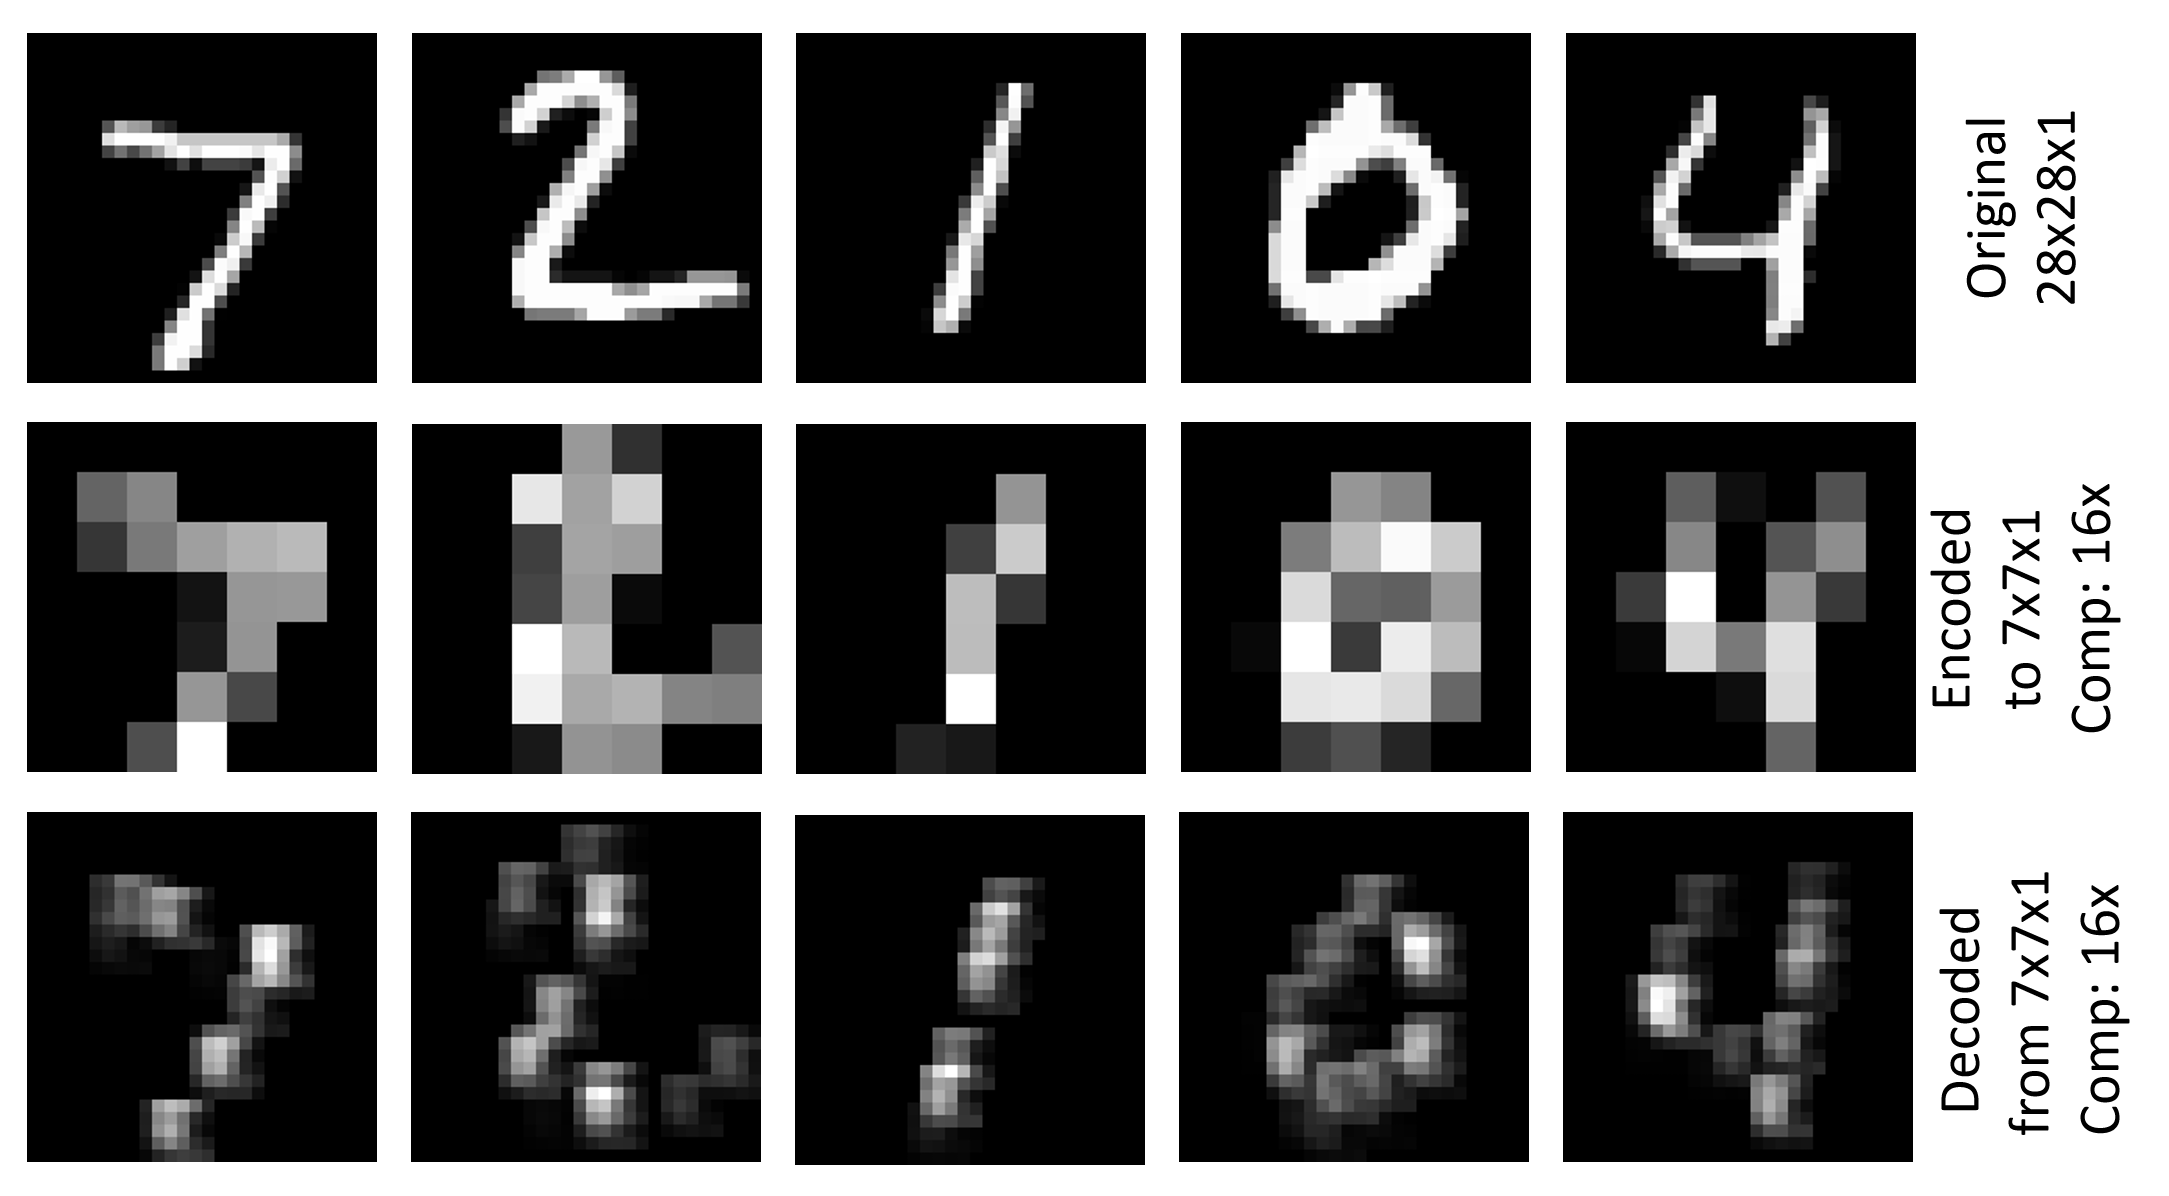
The example Image\GettingStarted\07_Deconvolution_PY.py shows how to use Deconvolution and Unpooling to generate a simple image auto encoder (07_Deconvolution_BS.cntk is the corresponding BrainScript version). It uses the MNIST dataset, which has a resolution of 28x28x1, encodes it into a 7x7x1 representation using convolution and pooling and decodes to the original resolution. The training criterion is root-mean-square error (RMSE). The figure above shows visualizations of the original image, the encoded image and the decoded image for the first five images of the MNIST test set.
Setup
To run the example you need the MNIST data set. You can get the data by running the following command from the Examples\Image\DataSets\MNIST folder:
python install_mnist.py
Run the example
The example is located in the Examples\Image\GettingStarted folder. To run this example, use the following command to run the Python version (from a Python CNTK environment):
python 07_Deconvolution_PY.py
or this command for the BrainScript version:
cntk configFile=07_Deconvolution_BS.cntk
The RMSE values for training and testing are 0.225 and 0.223 respectively. To visualize the encoded and decoded images run the following command:
python 07_Deconvolution_Visualizer.py
Set use_brain_script_model=True for the BrainScript model and False for the Python model.
The visualizations will be stored in the Output folder under Examples\Image\GettingStarted together with a text representation of the encoder and the decoder output.
Technical details
Below is the model definition for the simple image auto encoder in BrainScript (for the full config file see Image\GettingStarted\07_Deconvolution_BS.cntk)
    cMap = 1
    model = inputFeatures => {
        conv1   = ConvolutionalLayer {cMap, (5:5), pad = true, activation=ReLU}(inputFeatures)
        pool1   = MaxPoolingLayer    {(4:4), stride=(4:4)}(conv1)
        unpool1 = MaxUnpoolingLayer  {(4:4), stride=(4:4)}(pool1, conv1)
        deconv1 = DeconvLayer        {1, (5:5), cMap, lowerPad=(2:2:0), upperPad=(2:2:0), bias=false}(unpool1)
    }.deconv1
The corresponding model definition in 07_Deconvolution_PY.py is
    cMap = 1
    conv1   = cntk.layers.Convolution  ((5,5), cMap, pad=True, activation=cntk.ops.relu)(scaled_input)
    pool1   = cntk.layers.MaxPooling   ((4,4), (4,4))(conv1)
    unpool1 = cntk.layers.MaxUnpooling ((4,4), (4,4))(pool1, conv1)
    z       = cntk.layers.Deconvolution((5,5), num_channels, cMap, lower_pad=(0,2,2), upper_pad=(0,2,2), bias=False, init=cntk.glorot_uniform(0.001))(unpool1)
We describe the BrainScript version here, the Python version is analogous. The model first applies a ConvolutionalLayer with a depth of cMap=1 to the input features followed by a ReLU activation and the uses a MaxPoolingLayer with a filter shape and stride of (4:4). This results in an encoded tensor of size 7x7x1. It then uses a MaxUnpoolingLayer and a DeconvLayer with the corresponding filter shapes to decode it back to the original resolution.
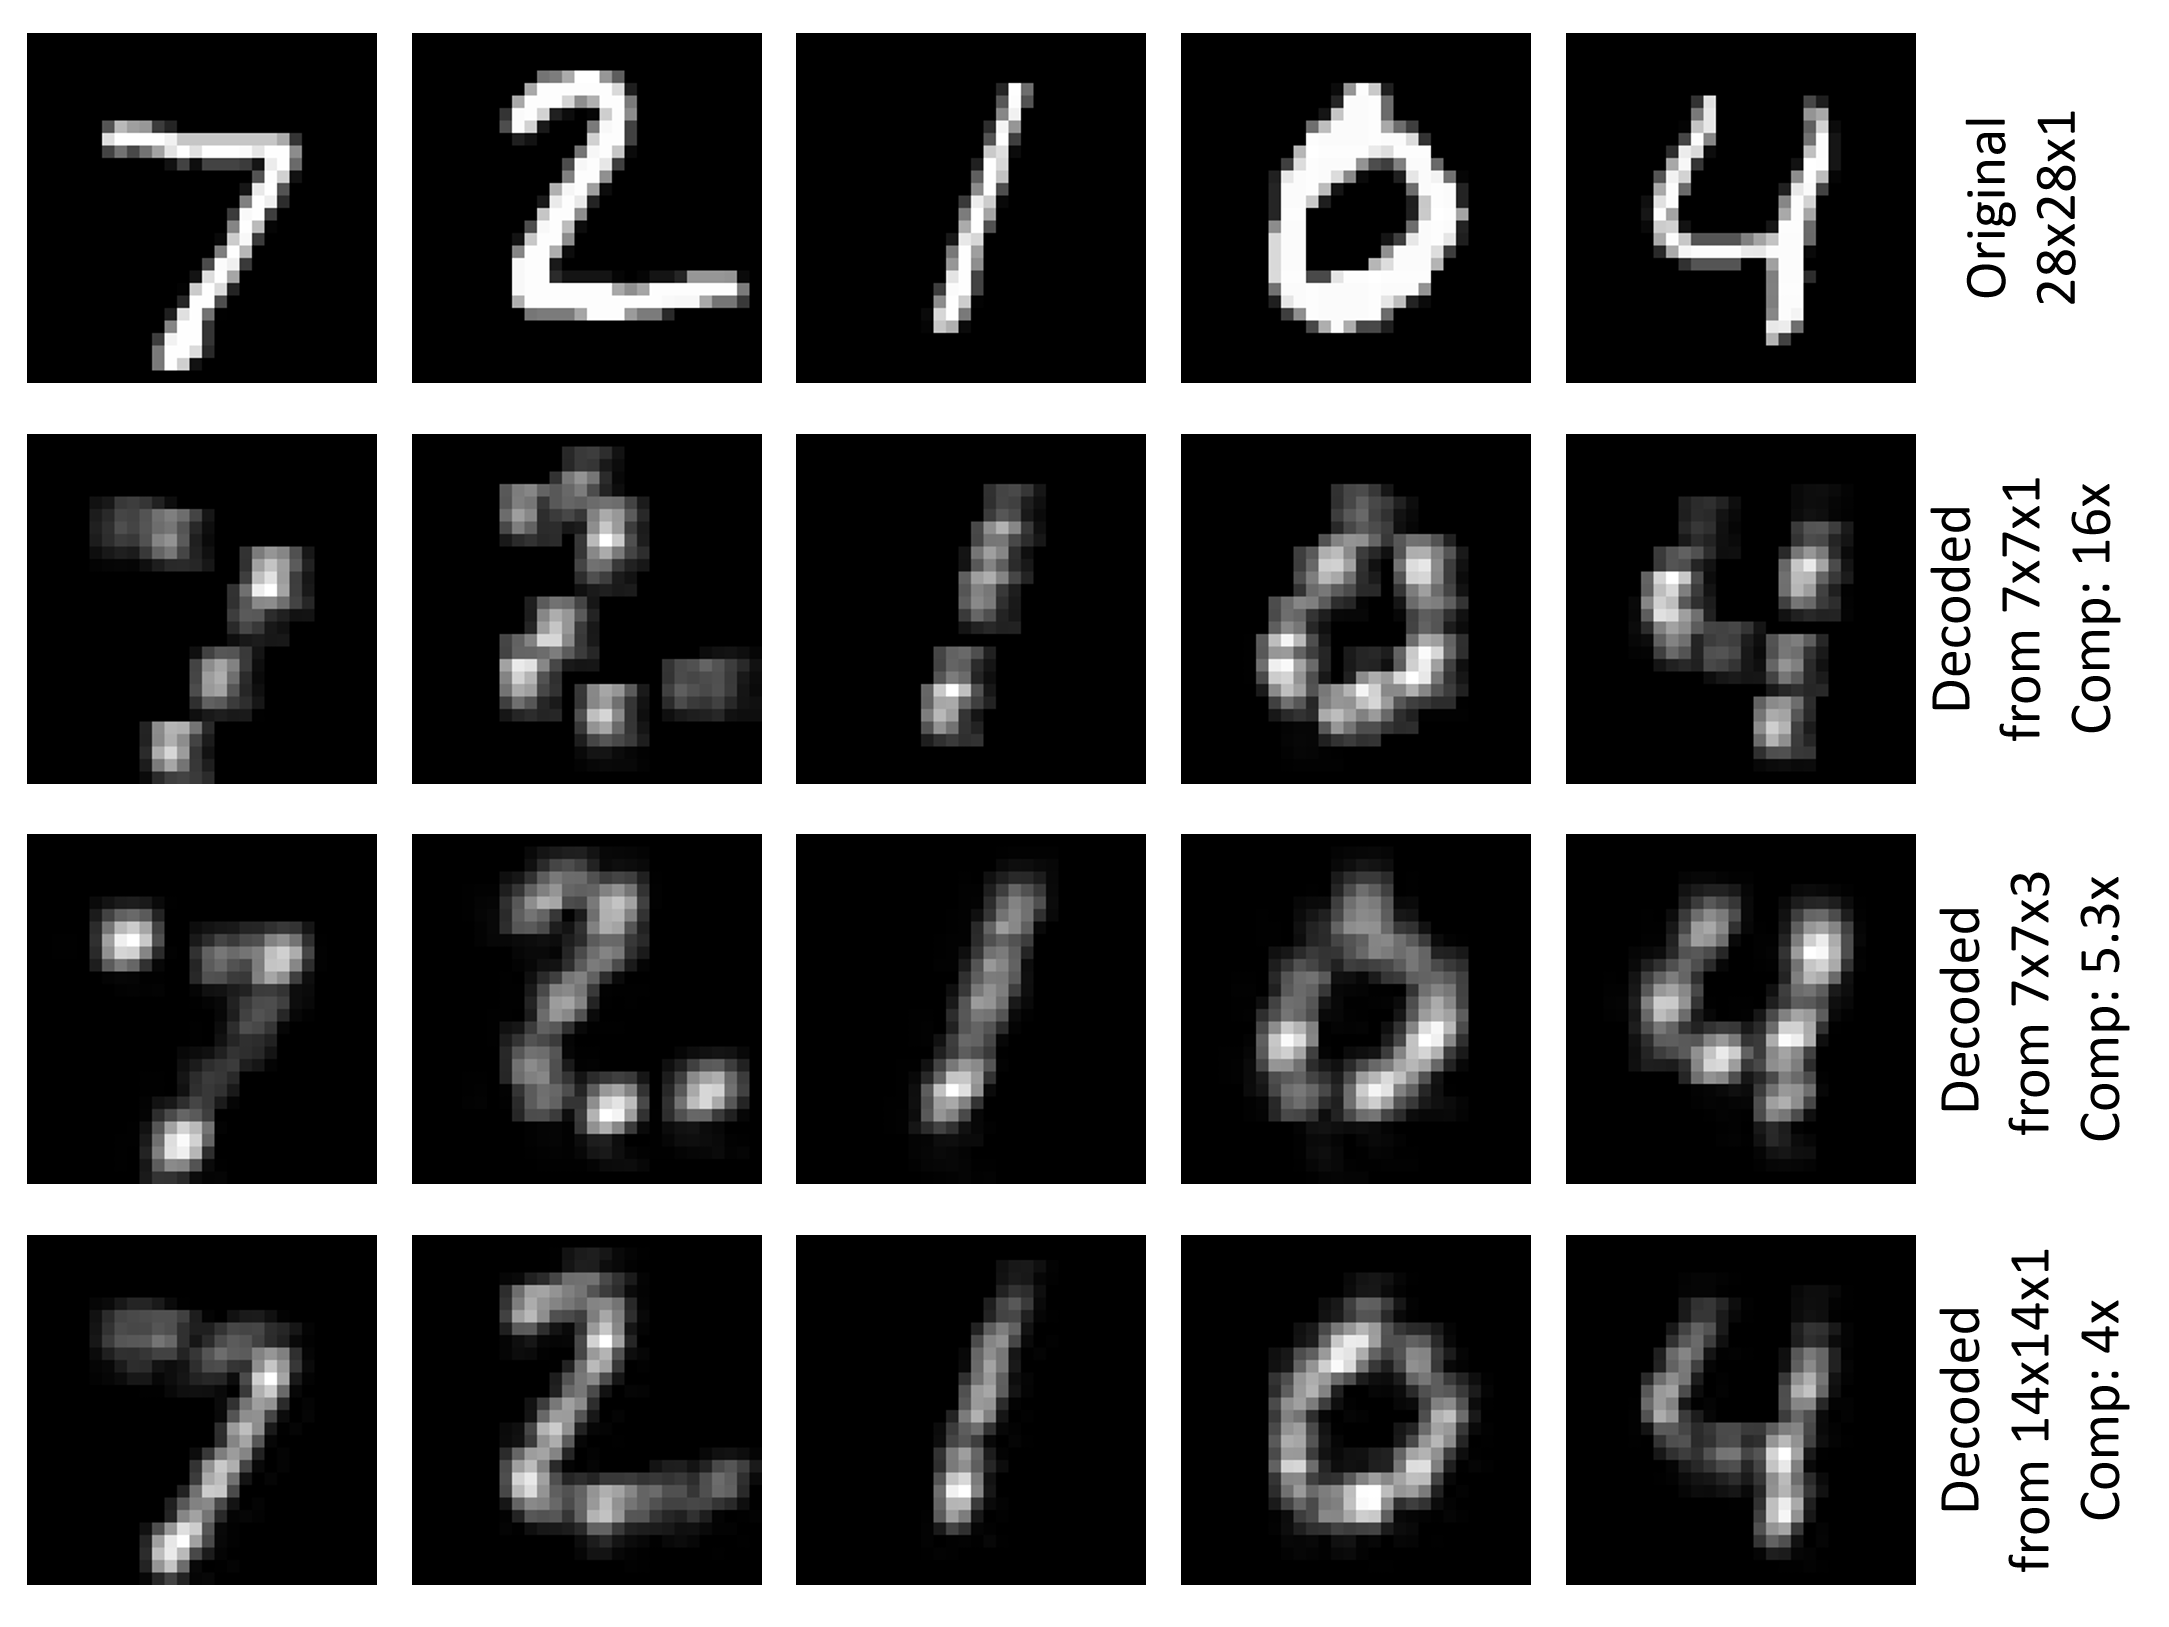
The decoder part compresses the original 784 (28x28) numbers to 49 (7x7), a factor of 16. Using only a depth of 1 for the ConvolutionalLayer has the advantage that the encoder results can be visualized in a meaningful way (see figure at the top of this page). One can increase the number of convolutional filters, e.g. to cMap=3 to have less compression and, hopefully, better decoding results. In this example the RMSE for both training and testing is reduced to 0.196. Another way to have less compression is to use a smaller filter shape and stride for the pooling layer. Using (2:2) for both pooling and unpooling yields an encoded tensor of size 14x14x1 and reduces the RMSE in this example to 0.136 for training and 0.131 for testing. The figure below shows visualization of the original image and the decoded image for the first five images of the MNIST test set for the three discussed settings.
Deconvolution and Unpooling
Lets look a bit closer at the MaxUnpoolingLayer and the DeconvLayer.
MaxUnpoolingLayer {(4:4), stride=(4:4)}(pool1, conv1)
The MaxPoolingLayer requires two inputs, which are the output of the corresponding pooling layer (pool1 in this case) and the input of the corresponding pooling layer (conv1 in this case). conv1 is required in CNTK to determine the target of the Unpooling operation, since CNTK does not store so called switch variables (see here for details).
DeconvLayer {1, (5:5), cMap, lowerPad=(2:2:0), upperPad=(2:2:0)}
The first parameter of the DeconvLayer is the depth of the output volume, the second is the kernel shape (width:height) and the third is the depth of the input volume. The padding parameters have to be set in accordance to the kernel shape to achieve the desired width and height of the output tensor (28x28 in this case). For more details on the DeconvLayer see the Layer Reference page.
Multi layer auto encoder
You can stack more layers of Conv/Deconv and Pool/Unpool for a more complex auto encoder. The following is an example with two layers of each type that you can use in 07_Deconvolution_BS.cntk (simply replace the model in the file):
    inputDim = 1
    cMap1 = 5
    cMap2 = 1
    model = inputFeatures => {
        conv_A   = ConvolutionalLayer {cMap1, (5:5), pad = true, activation=ReLU}(inputFeatures)
        pool_A   = MaxPoolingLayer    {(2:2), stride=(2:2)}(conv_A)
        conv_B   = ConvolutionalLayer {cMap2, (5:5), pad = true, activation=ReLU}(pool_A)
        pool_B   = MaxPoolingLayer    {(2:2), stride=(2:2)}(conv_B)
        unpool_B = MaxUnpoolingLayer  {(2:2), stride=(2:2)}(pool_B, conv_B)
        deconv_B = DeconvLayer        {cMap1, (5:5), cMap2, lowerPad=(2:2:0), upperPad=(2:2:0)}(unpool_B)
        unpool_A = MaxUnpoolingLayer  {(2:2), stride=(2:2)}(deconv_B, conv_A)
        deconv_A = DeconvLayer        {inputDim, (5:5), cMap1, lowerPad=(2:2:0), upperPad=(2:2:0)}(unpool_A)
    }.deconv_A
To visualize the results you need to replace z.pool1 by z.pool_B in 07_Deconvolution_Visualizer.py before running it to address the correct node name for the encoder output. To investigate all node names in the model simply uncomment print_all_node_names(model_file) in the Python script.

