How to install and configure Trend Micro Deep Security as a Service on a Windows VM
Important
Classic VMs will be retired on March 1, 2023.
If you use IaaS resources from ASM, please complete your migration by March 1, 2023. We encourage you to make the switch sooner to take advantage of the many feature enhancements in Azure Resource Manager.
For more information, see Migrate your IaaS resources to Azure Resource Manager by March 1, 2023.
Important
This extension has been deprecated and is only documented here for informational purposes only. We do not recommend you continue to use this extension within your deployments.
This article shows you how to install and configure Trend Micro Deep Security as a Service on a new or existing virtual machine (VM) running Windows Server. Deep Security as a Service includes anti-malware protection, a firewall, an intrusion prevention system, and integrity monitoring.
The client is installed as a security extension via the VM Agent. On a new virtual machine, you install the Deep Security Agent, as the VM Agent is created automatically by the Azure portal.
An existing VM created using the Azure portal, the Azure CLI, or PowerShell might not have a VM agent. For an existing virtual machine that doesn't have the VM Agent, you need to download and install it first. This article covers both situations.
If you have a current subscription from Trend Micro for an on-premises solution, you can use it to help protect your Azure virtual machines. If you're not a customer yet, you can sign up for a trial subscription. For more information about this solution, see the Trend Micro blog post Microsoft Azure VM Agent Extension For Deep Security.
Install the Deep Security Agent on a new VM
The Azure portal lets you install the Trend Micro security extension when you use an image from the Marketplace to create the virtual machine. If you're creating a single virtual machine, using the portal is an easy way to add protection from Trend Micro.
Using an entry from the Marketplace opens a wizard that helps you set up the virtual machine. You use the Settings blade, the third panel of the wizard, to install the Trend Micro security extension. For general instructions, see Create a virtual machine running Windows in the Azure portal.
When you get to the Settings blade of the wizard, do the following steps:
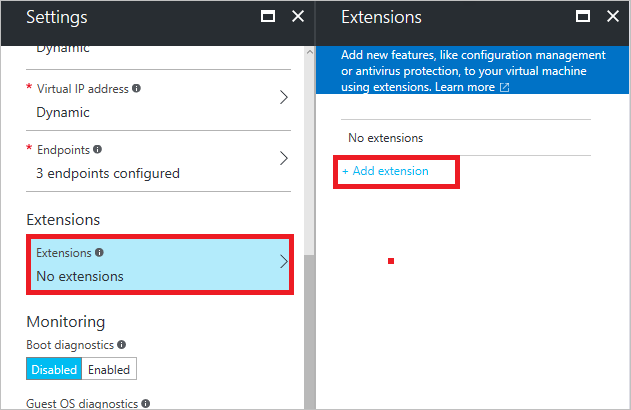
Click Extensions, then click Add extension in the next pane.

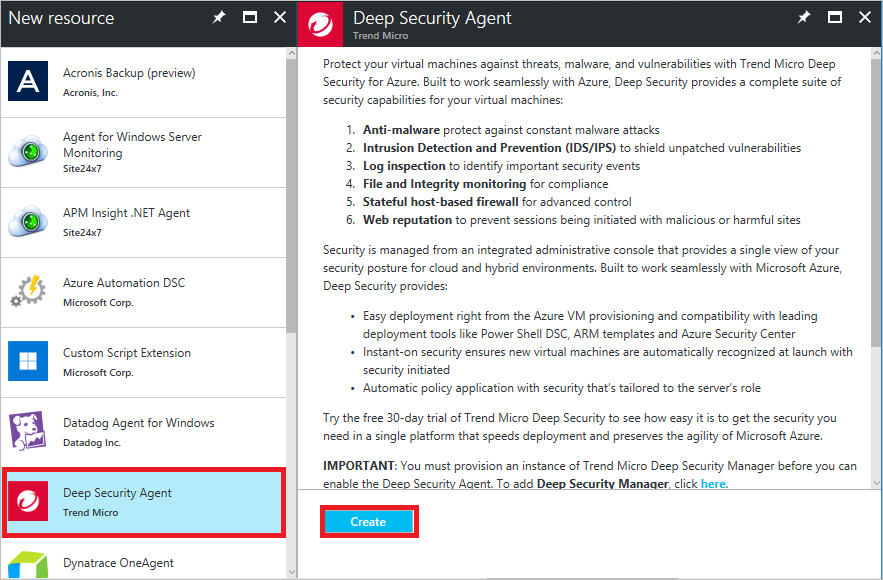
Select Deep Security Agent in the New resource pane. In the Deep Security Agent pane, click Create.

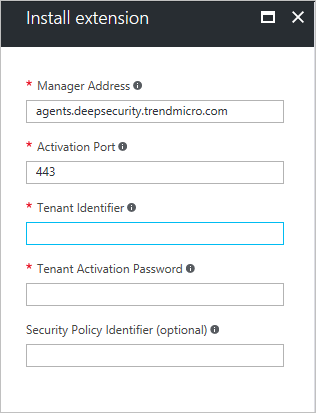
Enter the Tenant Identifier and Tenant Activation Password for the extension. Optionally, you can enter a Security Policy Identifier. Then, click OK to add the client.

Install the Deep Security Agent on an existing VM
To install the agent on an existing VM, you need the following items:
- The Azure PowerShell module, version 0.8.2 or newer, installed on your local computer. You can check the version of Azure PowerShell that you have installed by using the Get-Module azure | format-table version command. For instructions and a link to the latest version, see How to install and configure Azure PowerShell. Log in to your Azure subscription using
Add-AzureAccount. - The VM Agent installed on the target virtual machine.
First, verify that the VM Agent is already installed. Fill in the cloud service name and virtual machine name, and then run the following commands at an administrator-level Azure PowerShell command prompt. Replace everything within the quotes, including the < and > characters.
$CSName = "<cloud service name>"
$VMName = "<virtual machine name>"
$vm = Get-AzureVM -ServiceName $CSName -Name $VMName
write-host $vm.VM.ProvisionGuestAgent
If you don't know the cloud service and virtual machine name, run Get-AzureVM to display that information for all the virtual machines in your current subscription.
If the write-host command returns True, the VM Agent is installed. If it returns False, see the instructions and a link to the download in the Azure blog post VM Agent and Extensions - Part 2.
If the VM Agent is installed, run these commands.
$Agent = Get-AzureVMAvailableExtension TrendMicro.DeepSecurity -ExtensionName TrendMicroDSA

Set-AzureVMExtension -Publisher TrendMicro.DeepSecurity –Version $Agent.Version -ExtensionName TrendMicroDSA -VM $vm | Update-AzureVM
Next steps
It takes a few minutes for the agent to start running when it is installed. After that, you need to activate Deep Security on the virtual machine so it can be managed by a Deep Security Manager. See the following articles for additional instructions:
- Trend's article about this solution, Instant-On Cloud Security for Microsoft Azure
- A sample Windows PowerShell script to configure the virtual machine
- Instructions for the sample