Add offline data sync to your Xamarin.iOS app
Note
This product is retired. For a replacement for projects using .NET 8 or later, see the Community Toolkit Datasync library.
This tutorial covers the offline sync feature of Azure Mobile Apps for Xamarin.iOS. Offline sync allows end users to interact with a mobile app—viewing, adding, or modifying data—even when there's no network connection. Changes are stored in a local database. Once the device is back online, these changes are synced with the remote backend.
Prior to starting this tutorial, you should have completed the Xamarin.iOS Quickstart Tutorial, which includes creating a suitable backend service.
To learn more about the offline sync feature, see the topic Offline Data Sync in Azure Mobile Apps.
Update the app to support offline sync
In online operation, you read to and write from a IRemoteTable<T>. When using offline sync, you read to and write from a IOfflineTable<T> instead. The IOfflineTable is backed by an on-device SQLite database, and synchronized with the backend database.
In Visual Studio:
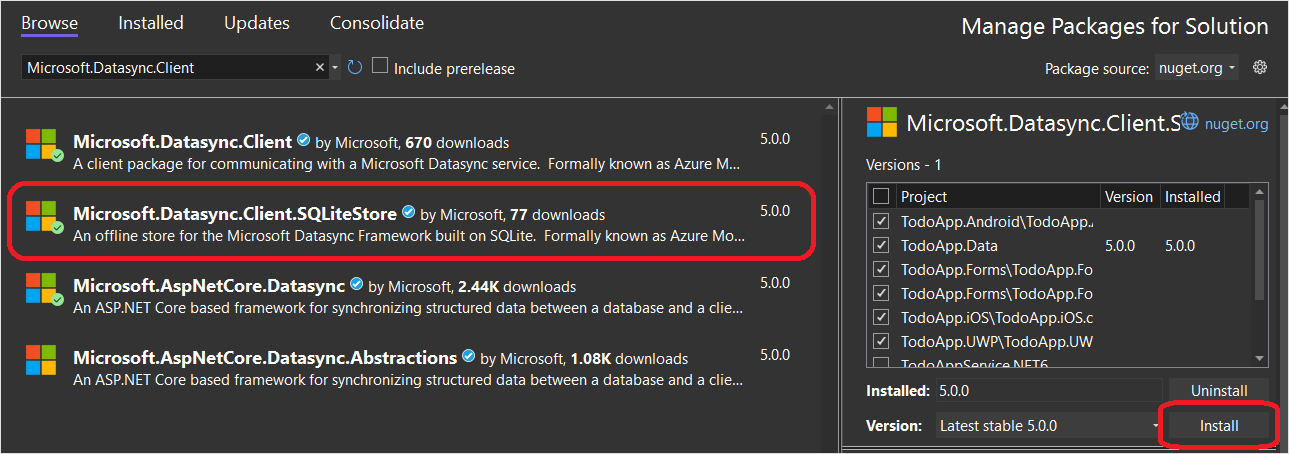
Right-click on the
TodoAppsolution, then select Manage NuGet Packages for Solution....In the new tab, select Browse, then enter Microsoft.Datasync.Client in the search box.

Select the
Microsoft.Datasync.Client.SQLiteStorepackage.In the right-hand pane, select all the client projects (except the
TodoAppService.NET6project).Select Install.
Accept the license agreement when prompted.
Update the remote service client
Open the TodoApp.Data project and locate the RemoteTodoService.cs class (within the Services directory). Update the class as follows:
Add the following
usingstatement to the top of the file:using Microsoft.Datasync.Client.SQLiteStore;Change the definition of
_tableto be anIOfflineTable<TodoItem>:/// <summary> /// Reference to the table used for datasync operations. /// </summary> private IOfflineTable<TodoItem> _table = null;Add a new property for storing the offline database location:
/// <summary>
/// The path to the offline database
/// </summary>
public string OfflineDb { get; set; }
Update the
InitializeAsyncmethod to define the offline database:// Create the offline store definition var connectionString = new UriBuilder { Scheme = "file", Path = OfflineDb, Query = "?mode=rwc" }.Uri.ToString(); var store = new OfflineSQLiteStore(connectionString); store.DefineTable<TodoItem>(); var options = new DatasyncClientOptions { OfflineStore = store, HttpPipeline = new HttpMessageHandler[] { new LoggingHandler() } }; // Create the datasync client. _client = TokenRequestor == null ? new DatasyncClient(Constants.ServiceUri, options) : new DatasyncClient(Constants.ServiceUri, new GenericAuthenticationProvider(TokenRequestor), options); // Initialize the database await _client.InitializeOfflineStoreAsync(); // Get a reference to the offline table. _table = _client.GetOfflineTable<TodoItem>(); // Set _initialized to true to prevent duplication of locking. _initialized = true;Update the
RefreshItemsAsync()to do offline synchronization:/// <summary> /// Refreshes the TodoItems list manually. /// </summary> /// <returns>A task that completes when the refresh is done.</returns> public async Task RefreshItemsAsync() { await InitializeAsync(); // First, push all the items in the table. await _table.PushItemsAsync(); // Then, pull all the items in the table. await _table.PullItemsAsync(); return; }
Set the offline database location
In the TodoApp.iOS project, edit the ViewControllers\HomeViewController.cs file. Change the definition of the RemoteTodoService in the constructor as follows:
TodoService = new RemoteTodoService(async () => await GetAuthenticationToken())
{
    OfflineDb = Xamarin.Essentials.FileSystem.AppDataDirectory + "/offline.db"
};
If you haven't completed the authentication tutorial, the definition should look like this instead:
TodoService = new RemoteTodoService()
{
    OfflineDb = Xamarin.Essentials.FileSystem.AppDataDirectory + "/offline.db"
};
Test the app
The app doesn't synchronize with the backend until the refresh icon is pressed. To test:
Open the Azure portal.
Open the resource group that contains the resources for the quickstart.
Select the
quickstartdatabase.Select the Query editor (preview).
Log in with SQL server authentication using the same credentials you set up for the database.
- If necessary, you'll be prompted to allow access for your IP address. Select the link to update the allowlist, then press OK to retry the login.
In the query editor, enter
SELECT * FROM [dbo].[TodoItems]. Then select Run.
A list of the current TodoItems will be displayed.

Now, make some changes through your app. DO NOT PRESS REFRESH (yet).
Repeat the SQL statement in the Azure portal and verify that no changes have been made to the data in the database.
Select the Refresh icon on your app to push the data in queue to the backend service. You'll see the HTTP transactions happening in the Output Debug window.
Repeat the SQL statement in the Azure portal and verify that your changes have been pushed to the remote service.
Clean up resources
Unless you're doing another quick start tutorial, you can delete the resources associated with the backend service now.
- Open the Azure portal.
- Select the resource group holding the quick start resources.
- Select Delete resource group.
- Follow the instructions to confirm the deletion.
You can also use the Azure CLI:
az group delete -g quickstart
If you used the Azure Developer CLI to deploy resources, you can use the azd down command instead.
The deletion will take a few minutes to complete.
Next steps
- Review the HOW TO documentation: