Set up managed identity for Power Platform (preview)
[This article is prerelease documentation and is subject to change.]
Power Platform managed identity allows Dataverse plug-ins to connect with Azure resources supporting managed identity without the need of credentials. This article helps you set up managed identity in your Power Platform environments.
Important
- This is a preview feature.
- Preview features aren’t meant for production use and may have restricted functionality. These features are subject to supplemental terms of use, and are available before an official release so that customers can get early access and provide feedback.
Prerequisites
- An Azure subscription with access to provision user-assigned managed identity (UAMI) or application registration.
- Plug-ins tools:
- Integrated Development Environment (IDE), like Visual Studio, to build plug-in
- Plug-in registration tool
- SignTool.exe (Sign Tool) to sign the plug-in assembly
- Power Platform CLI
- A valid certificate to sign the plug-in's assembly.
Set up managed identity
To configure Power Platform managed identity for Dataverse plug-in's, complete the following steps.
Create a new app registration or user-assigned managed identity.
Configure federated identity credentials.
Create and register Dataverse plug-ins.
Be sure to build the plug-in assembly and register the plug-in.
Create managed identity record in Dataverse.
Grant access to the Azure resources to application or user-assigned managed identity (UAMI).
Validate the plug-in integration.
Create a new app registration or user-assigned managed identity
You can create either user-assigned managed identity or an application in Microsoft Entra ID based on following scenarios.
If you want to have app identity associated with the plug-in that connects to the Azure resources, such as Azure Key Vault, use application registration. With app identity, you can apply Azure policies on the plug-in accessing Azure resources.
If you want to have a service principle to access the Azure resources, such as Azure Key Vault, you can provision user-assigned managed identity.
Note
Be sure to capture the following ID’s, as you'll use them in later steps.
- Application ID
- Tenant ID
Configure federated identity credentials
To configure managed identity, open the user-assigned managed identity or Microsoft Entra ID application in the Azure portal that you created in the previous section.
Go to the Azure portal.
Navigate to Microsoft Entra ID.
Select App registration.
Open the app you created in Set up managed identity.
Navigate to Certificates & Secrets.
Select the Federated credential tab and select Add credential.
Select issuer as Other issuer.
Enter the following information:
Issuer: The URL of the token issuer. Format similar to this:
https://[environment ID prefix].[environment ID suffix].environment.api.powerplatform.com/stsEnvironment ID prefix - The environment ID, except for the last two characters.
Environment ID suffix - The last two characters of the environment ID.
Example:
https://92e1c10d0b34e28ba4a87e3630f46a.06.environment.api.powerplatform.com/sts
Subject identifier: If a self-signed certificate is used for signing the assembly, use for non-production use cases.
Example:
component:pluginassembly,thumbprint:<<Thumbprint>>,environment:<<EnvironmentId>>
-Or-
Subject identifier: If a certificate is from a valid trusted issuer, which is recommended for production scenarios, then the subject identifier format must follow the example below.
Example:
component:pluginassembly,subject:<<certificateSubjectCommonName>>,issuer:<<issuerCommonName>>,environment:<<environmentId>>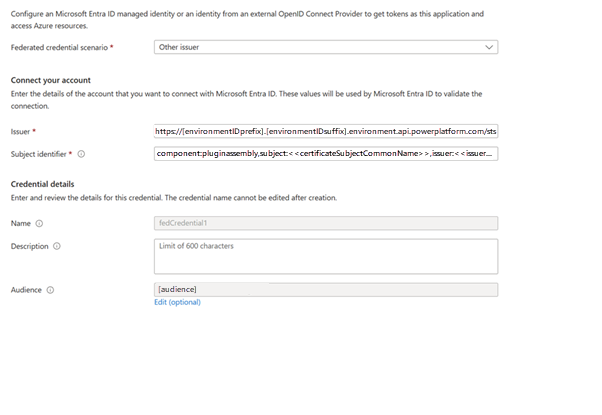
Create and register Dataverse plug-ins
Dataverse plug-ins
Build plug-in assembly
- Create a plug-in using Visual Studio. While building the plug-in, use the tenant ID from Create a new app registration or user-assigned managed identity and scopes as organization URL like
https://[OrgName].crm*.dymanics.com/.defaultor even more granular scopes. - Use IManagedIdentityService and acquire a token method to request a token with given scope.
- String AcquireToken(
IEnumerable<string>scopes). The method accepts a collection of scopes and returns the access token. - Sign the assembly with a certificate. For more information, see SignTool.exe (Sign Tool).
Note
A self-signed certificate should be used only for testing. It's not a supported option for use in production scenarios.
Register the plug-in
- Install the plug-in registration tool if you don’t have it on your machine already. For more information, see Dataverse development tools.
- Register the plug-in. For more information, see Register plug-in.
Create managed identity record in Dataverse
To provision managed identity record in Dataverse, complete the following steps.
Make a POST call using Insomia or any other tool of your choice. You can use a URL with payload in the following format.
POST https://<<orgURL>>/api/data/v9.0/managedidentitiesBe sure to replace orgURL with the URL of the organization.
Ensure that Credentialsource is set to 2 in the payload and SubjectScope is set to 1 for environment-specific scenarios.
 {
    "applicationid":"<<appId>>",
    "managedidentityid":"<<anyGuid>>",
    "credentialsource":2,
    "subjectscope":1,
    "tenantid":"<<tenantId>>"
 }
Make a patch call to bind the plug-in assembly ID with the managed identity record that's created through post call in step 1.
Plug-in assembly:
PATCH https:// <<orgURL>>/api/data/v9.0/pluginassemblies(<<PluginAssemblyId>>)Be sure to replace orgURL and PluginAssemblyId.
   {
      "managedidentityid@odata.bind": "/managedidentities(<<ManagedIdentityGuid>>)"
   }
Grant access to the Azure resources to application or user-assigned managed identity
If you need to give access to application ID to access Azure resource, such as Azure Key Vault, you need to grant access to application or user-assigned managed identity to that resource.
Validate the plug-in integration
Verify that your plug-in can securely request access to Azure resources that support managed identity, eliminating the need for separate credentials.