Set up sequential approvals
Some workflows require pre-approval before the final approver can sign off. For example, a company might have a sequential approval policy that requires pre-approval for invoices over $1,000.00 before the Finance department can approve them.
In this example, you set up a sequential approval for vacation requests. The requestor’s manager and the manager of the requestor’s manager must approve the vacation requests.
Create your flow
Create a flow that triggers when a new response is submitted to a form.
- Sign in to Power Automate.
- On the navigation pane to the left, select My flows.
- On the menu at the top, select New flow > Automated cloud flow.
- Give your flow a name.
- Under Choose your flow's trigger, select When a new response is submitted, and then select Create.
- Select the When a new response is submitted card to open the action configuration pane, and then select the Form Id of a form you previously created.
- Insert a step and then select the Get response details action.
- In the same action, place the same Form Id from the previous action.
- In the Response Id field, select the response ID from the previous Get response details action.
Get the manager for the person who created the vacation request
After you create the flow, you need to get the manager for the person who created the vacation request.
Note
It's a good idea to periodically save changes to your flow while you work.
- Select New step.
- In the Choose an action search field, type get manager.
- Find and select the Get manager (V2) - Office 365 Users action.
- Select the Get manager (V2) card to open the action configuration pane, and then insert the Responder’s Email token into the User (UPN) field.
- Rename the action to Get level 1 manager.
Get the manager of the requestor’s manager
After you get the manager for the person who created the vacation request, you need to get the manager of the requestor’s manager.
- Select New step.
- In the Choose an action search field, type get manager.
- Find and select the Get manager (V2) - Office 365 Users action.
- From the Get level 1 manager action, insert the Id token into the User (UPN) field on the Get manager card.
- Rename the action to Get level 2 manager.
Add an approval action for pre-approvals
Select New step.
In the Choose an action search field, type approval.
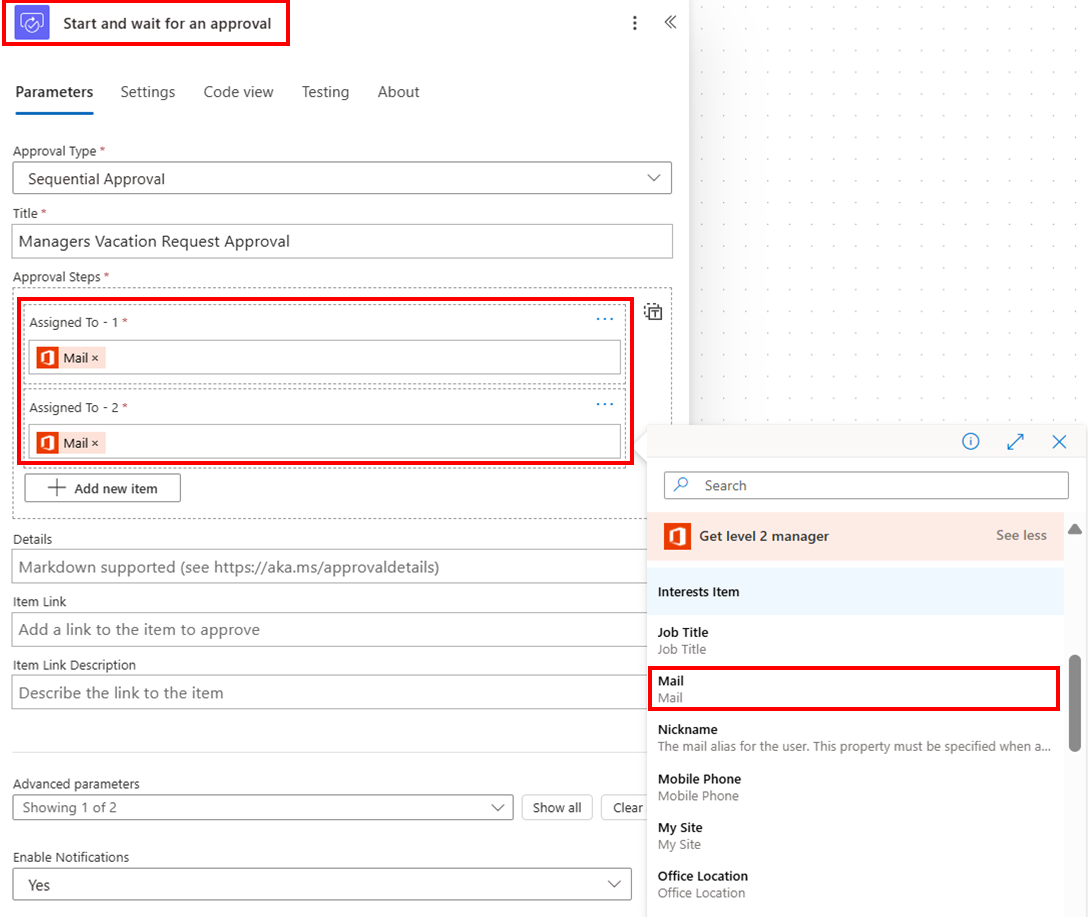
Select the Start and wait for an approval action.
Select the Sequential Approval type.
Give the approval a title.
In this example, you add two (2) steps.
In Assigned To – 1, enter the Mail token from the Get level 1 manager approval action.
To add an approval step, select Add new item.
Configure the Start and wait for an approval card to suit your needs.

Now, when the flow runs, it first goes to the level 1 manager. If that person approves it, then it goes to the level 2 manager for approval.
You can rename actions as you wish. You can also add other actions and subsequent actions after the approval, such as an email that sends the approval decision to the requestor. The following screenshot shows what your flow might look like with renamed actions and an email action at the end.
