Business approvals kit manual setup
The business approvals kit and guidance is targeted towards the person or department responsible for setting up approval system in your organization. Key sections walk you through the prerequisites, setup instructions, and individual components of the Approvals Kit.
Overview
The business approvals kit is a collection of components that are designed to help you get started with digitalizing your organization's approval processes using Microsoft Power Platform. More information about individual components can be found in the business approvals kit.
Note
The approvals kit can only be used currently in Dataverse environments, and setting up in Dataverse for Teams environments and default environments is not supported.
Prerequisites
Microsoft Dataverse environment (Default Environment can't be used)
Required licenses:
Power Apps per user or per app license for users who will:
Configure approvals
Approve requests AND need to check progress between each approval step
Create approval requests AND need to check progress between each approval step
Administer approval processes
Power Automate Process license for:
Approve requests but DO NOT need to check progress between each approval step using the template
Create approval requests but DO NOT need to check progress between each approval step using the template
Power Apps and Power Automate pay as you go plans offer alternatives to monthly user, application or flow licenses. More information: Licensing overview for Microsoft Power Platform
Data Loss Prevention Policy categorized to be usable for the following connectors in the same grouping (Business or Non Business):
Custom connectors with allowed pattern https://*.crm.dynamics.com (For multiple environment policy)
Approvals Kit custom connector (For environment level policy)
More information: Data loss prevention policies
Power Automate approvals connector capability enabled (see section on enabling Power Automate approvals capability for steps)
Persona licenses
Mapping persons from the User journey to licenses
| Persona | User Journey Reference | License |
|---|---|---|
| Approver | Rebecca | Microsoft Office 365 (For Office 365 or Microsoft Teams) or Power Platform standard user license (For Power Automate maker portal). |
| Approval administrator | Charlotte | Microsoft Power Apps license (per user, per app, or pay-as-you-go). |
| Maker | Charlotte or Gibson | Power Automate premium to author cloud flows. |
| Environment administrator | Gibson | Assigned Power Automate license to execute cloud flows with premium connectors included. |
Note
Refer to Compare Power Automate Plans for plans that include the ability to include premium connectors.
(Optional) Set up a new environment to install
Create an environment in which to set up the approvals kit.
a. Go to the Power Platform admin center.
b. Select Environments, then + New and enter a name, type, and purpose.
c. Select Yes to create the database, and then chooseNext.
d. Ensure Sample apps and data set is set to No.
e. Select Save.
Go to your new environment to import the Approvals Kit solution for a manual install.
Enable Power Automate approvals capability
The approvals kit relies on out of the box approvals functionality from Power Automate. If you're using the approvals function for the first time, you must enable the function first either by using the Power Platform Command Line interface or manually by running a cloud flow that includes an approval
Command line setup
Use Power Platform Command Line to install the flow approvals solution into the environment. In the environment allocated for the Approvals Kit, use the following PowerShell commands as a starter script:
$envs = (pac admin list --json | ConvertFrom-Json) | Where-Object { $_.DisplayName -eq "Your Environment Name"  }
pac application install --environment $envs[0].EnvironmentId --application-name "msdyn_FlowApprovals"
Manual Setup
In new environments, use the Power Platform Admin Center to install the Power Automate Approvals feature:
Open the Power Platform Admin center.
In the left navigation, select Resources.
Select Dynamics 365 apps.
From the list, select Microsoft Flow Approvals.
Select the ... menu for Microsoft Flow Approvals.
Select Install.
Select the environment that the Approvals Kit will be installed in.
Review the terms of service.
Agree to the terms of service and select Install.
Note
It can take up to 10 minutes to install.
Install the core components
We recommend that you set up a designated Approvals Kit environment for all users within your organization who need to access the Business Approvals process. Further information on environments is available in environments overview. If you're a business user, you'll typically need a person with administrative access to Power Platform to create an environment for you. Reach out to your IT department to ask for assistance on environment setup.
Note
- The Approvals Kit uses solution management capabilities of Dataverse to package up all assets.
- To ensure consistency and same experience for every customer, the template is provided as managed solutions.
- If you would like to extend the template, you will need to use a separate unmanaged solution because you can't directly modify this template.
Import the Creator Kit
Install the creator kit using one of the options in Install the Creator Kit.
Import the solution
Using an account with System Customizer permissions in an environment. Open https://make.powerapps.com. Go to the environment you either created or been allocated, in which the Approvals Kit should be hosted.
The first step of the installation process is to install the solution. This step is required for every other component in the Approvals Kit to work. You'll either need to create an environment or to import into the existing environment (excluding the Default environment).
Open the Power CAT business approvals kit GitHub release site.
From the expanded section Assets for the latest release, download the Approvals Kit file BusinessApprovalsKit_*_managed.zip.
Go to Power Apps.
On the left pane, select Solutions.
Select Import, then choose Browse.
Select the Approvals Kit core components solution from File Explorer.
Once the compressed (.zip) value is available, select Next.
Review the information, and then select Next.
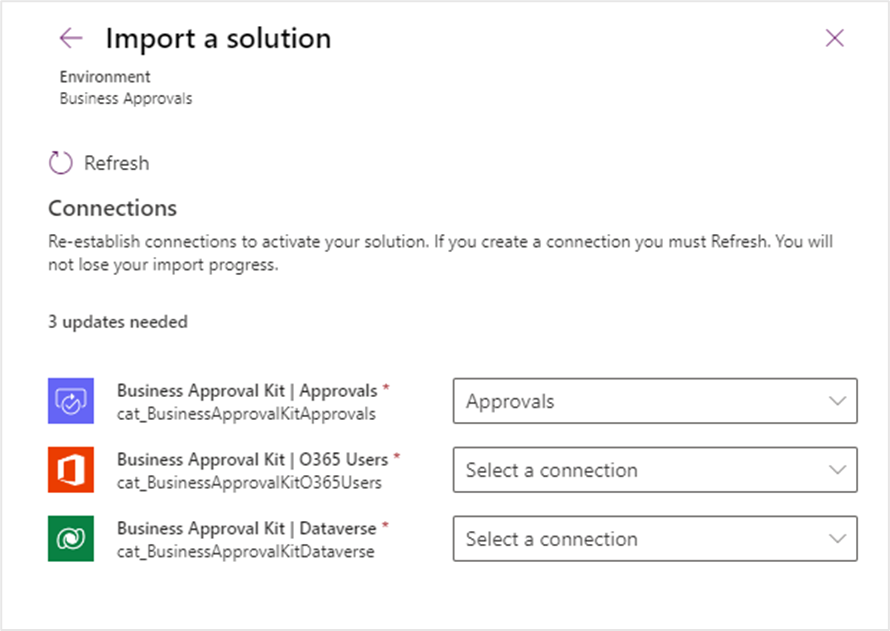
Establish connections to activate your solution. If the connections don't exist, create new connections to proceed with import.
Note
If you create a new connection, you must select Refresh.

Select Import.
Once import is complete, you should see business approvals kit in the list of solutions
Note
The import can take up to 10 minutes to complete.
After import steps
Once the approvals kit solution is imported to an environment successfully, you must update the Approvals kit custom connector to point to the target tenant Identity provider and turn on cloud flows.
Update custom connector
You must have an app registered to interact with Dataverse table and Custom API.
App Registration
Follow these steps to perform the app registration.
Open the Microsoft Entra admin center in a new window.
Select App Registration from the Application section under Identity.
Select New registration and provide a name, then select Register.
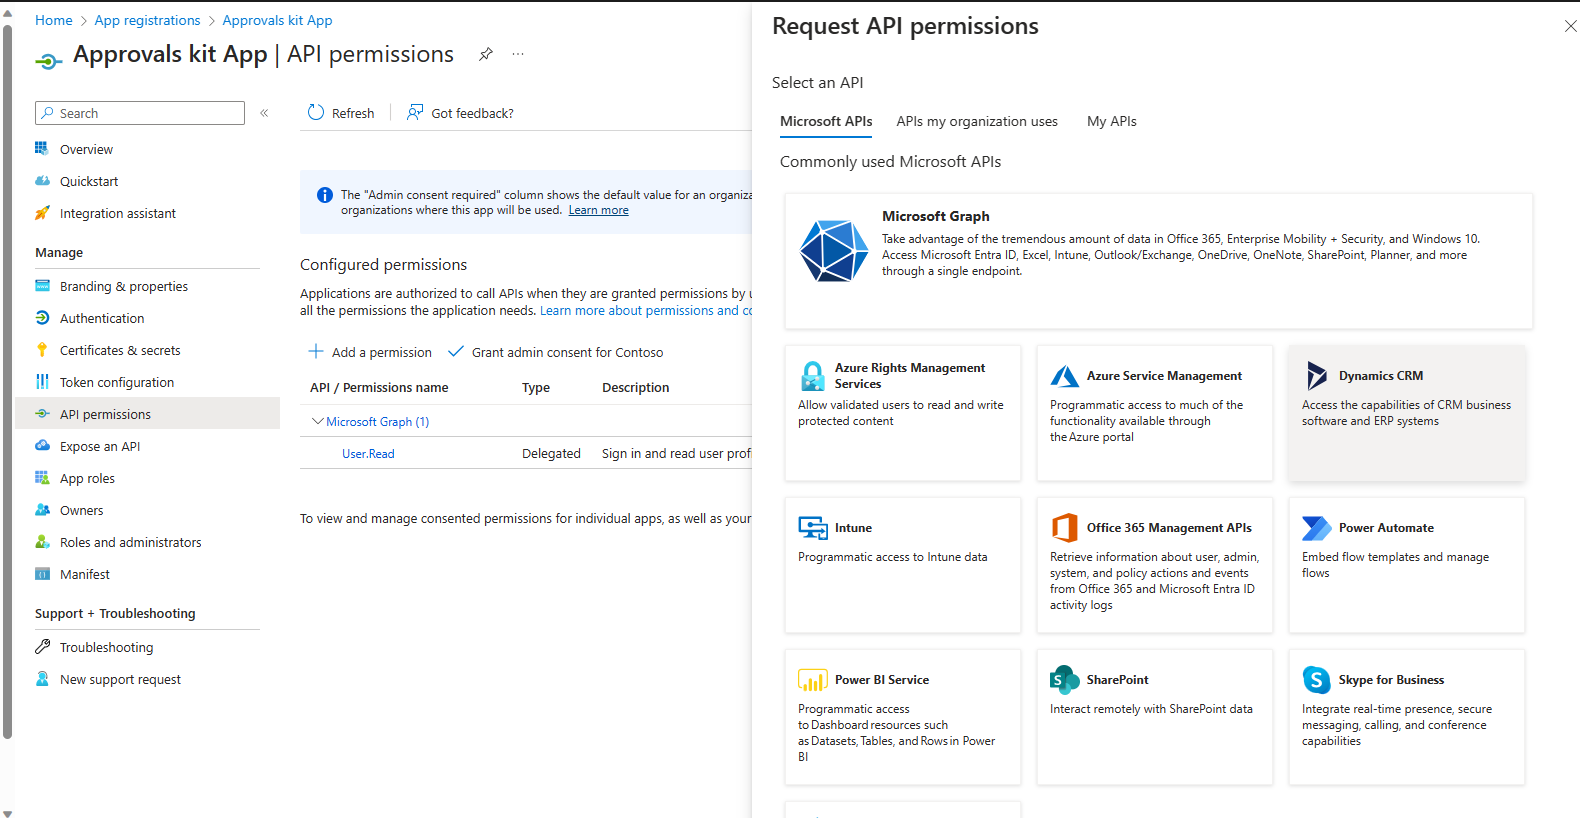
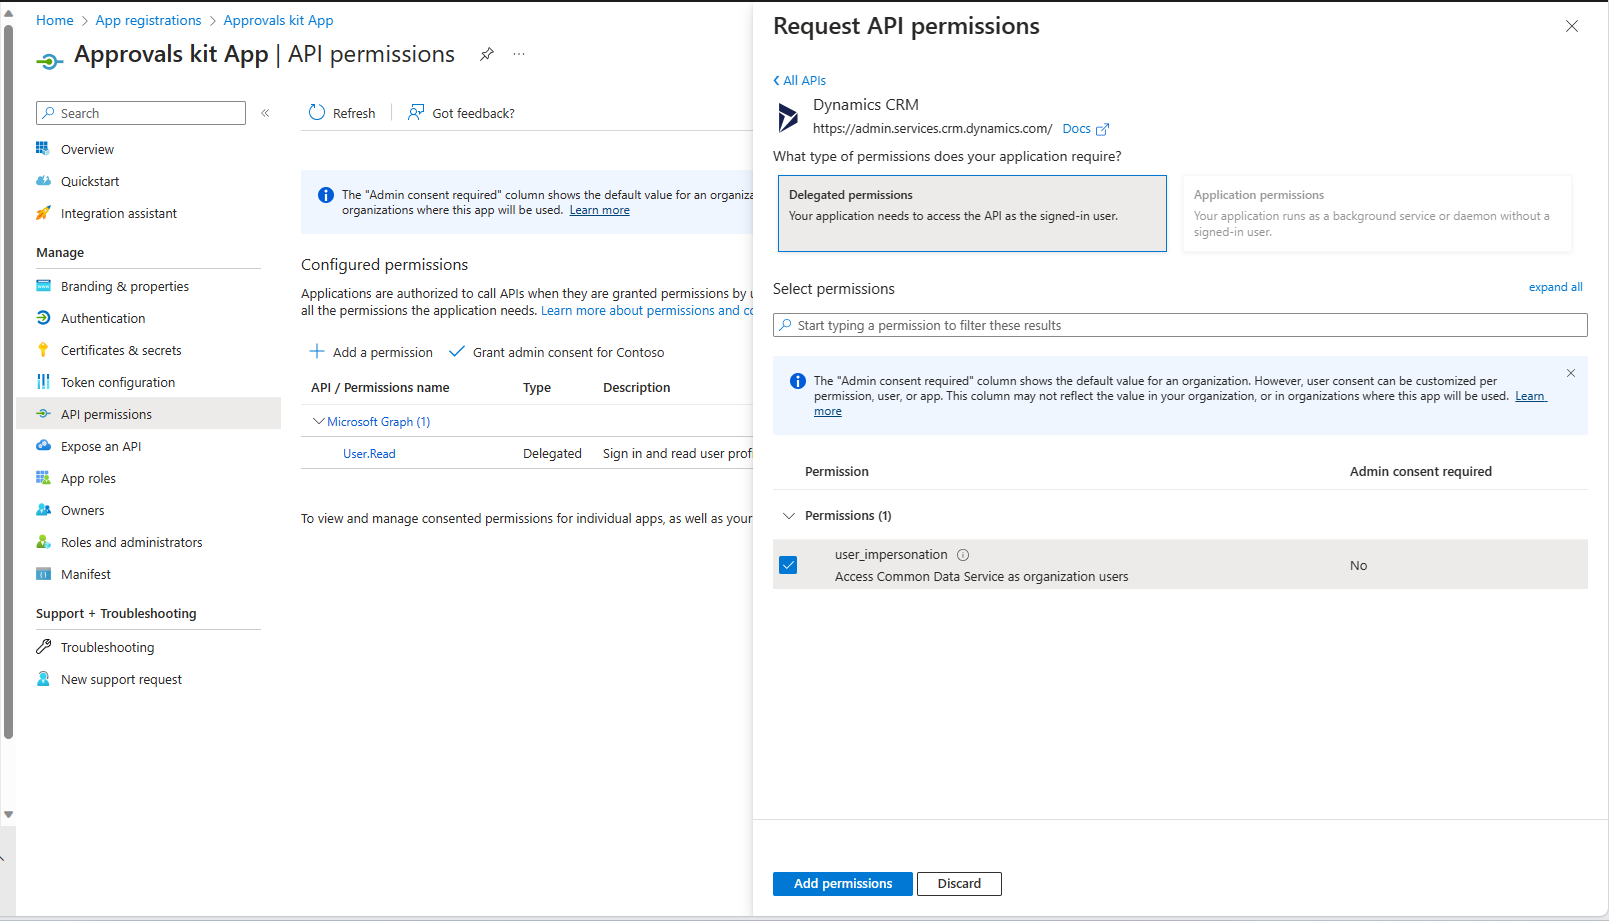
Under API permission, select Add a permission and choose Dynamic CRM.

Choose Delegated permission and select user_impersonation.
Select Add Permissions.

App registration admin consent
For the API permissions, you might need to grant tenant wide permissions for the created application. Follow the guidance in Grant Admin Consent to provide the required permissions.
If administrator consent isn't granted, when users attempt to create a connection with the custom connector they can receive an error similar to the following:
Note
user@contoso.com
Need admin approval
Needs permission to access resources in your organization that only an admin can grant. Please ask an admin to grant permission to this app before you can use it.
Have an admin account? Sign in with that account.
Return to the application without granting consent.
App registration secret
For the created application add the application secret that will be used by the custom connector using the following steps:
- Create a secret by moving to Certificates and Secrets section and selecting New client secret.
- Add a description and select an appropriate expiry date.
- Select Add.
Important
- Copy the secret value and save it. You'll use the copied value when configuring custom connector in the next section.
- You'll also need the Client ID from ths Overview section.
Update the Approvals kit with a custom connector
Now you'll edit the Approvals kit custom connector present inside Business Approval solution.
Under the General tab, modify the following:
- Specify that the Host is the host name of your dataverse instance. For example, contoso.crm.dynamics.com
Under the Security tab, modify the following:
- Select Authentication type as OAuth 2.0.
- Enter the Client ID
- Enter the Secret noted in previous section.
- Specify the environment URL under Resource URL section. This Resource url contains the link to your environment. This is in format https://yourenv.crm[x].dynamics.com where [x] is optional depending on your region
Copy the Redirect URL.
Open the created Entra App Registration.
Select Authentication.
In the Web Redirect URIs, add the Redirect URL.
Select Save to update the App Registration.
Switch back to the custom connector.
Select Update connector.
Under the Test tab, create a New connection.
- Specify the account details for the connection and allow access if prompted.
- Edit the Custom connector again and test the GetPublishedWorkflow operation.
The operation should run successfully with status as 200.
Note
- Not sure on your region? You can review /power-platform/admin/new-datacenter-regions
- You can obtain you environment url from https://aka.ms/ppac environments or the Power Apps Portal in the settings of the environment.
- Issue #144 [Business Approvals Kit - BUG] Approvals Kit Upgrade - Documents the need to update connector with OAuth Secret is tracking the need to update the custom connector after upgrade
Activate the core cloud flows
The template includes multiple core components that are used to manage the approval experience. To use the template, you must turn on the cloud flows that came with the template.
Open make.powerapps.com in a new window.
Select Solutions, and open the Business Approvals Kit solution to view the flows.
Activate cloud flows using in the list to ensure no errors occur as there are dependencies across the flows. Some cloud flows can be enabled when importing the solution in the previous steps.
- Turn on: BACore | Approval Time-out
- Turn on: BACore | Approver OOF
- Turn on: BACore | Cascade Process Status
- Turn on: BACore | Cascade Publishing Activation
- Turn on: BACore | Child | Get Dynamic Approver
- Turn on: BACore | Child | Get Dynamic Data Instance
- Turn on: BACore | Child | Get Default Settings
- Turn on: BACore | Child | Log Runs
- Turn on: BACore | Child | Evaluate Rule
- Turn on: BACore | Daily | Calculate Approval Timeouts
- Turn on: BACore | Publish Process
- Turn on: BACore | Runtime -- Start Approval
- Turn on: BACore | Runtime -- Start Node
- Turn on: BACore | Runtime -- Start Stage
- Turn on: BACore | Runtime -- Start Workflow
- Turn on: BACore | Runtime -- Update Approval
- Turn on: BACore | Runtime -- Update Node Instance
- Turn on: BACore | Runtime -- Update Stage Instance
- Turn on: BACore | Sync Approver OOF
Once installation is complete for the core components, your next step is to set up the approval processes in How to use Approvals Kit section.