Set up and learn about the Crisis Communication sample app in Power Apps
The Crisis Communication sample app provides a user-friendly experience to connect users with information about a crisis. Quickly get updates on internal company news, get answers to frequently asked questions, and get access to important information like links and emergency contacts. This app requires a small amount of setup to make it your own.
In this walkthrough, you'll learn how to:
- Create a location for your data.
- Import both the Crisis Communication app and its admin app.
- Create content for the app.
- Import flows to send notifications to users.
- Create a centrally managed Teams team to aggregate data and to effectively respond to issues.
Estimated time to complete these steps: 20–25 minutes.
Note
The Crisis Communication sample app is also available for the Power Apps US Government and Power Automate US Government plans. The service URLs for Power Apps and Power Automate US Government versions are different from the commercial versions. More information: Power Apps US Government service URLs and Power Automate US Government service URLs
Demo: Crisis Communication app
Watch how to use the Crisis Communication app.
Prerequisites
- Sign up for Power Apps.
- You must have a valid SharePoint Online license and permission to create lists.
- You must have a public SharePoint site where you can store the data for the app.
- Download the assets from aka.ms/CrisisCommunicationSolution.
Important
For any feedback or issues related to the Crisis Communication app, please use the following links:
Demo: Build and deploy the Crisis Communication app
Watch how to build and deploy the Crisis Communication app.
Create a home for your data
Data for the app is stored in lists, so the first step is to create a new SharePoint site.
Create a SharePoint site
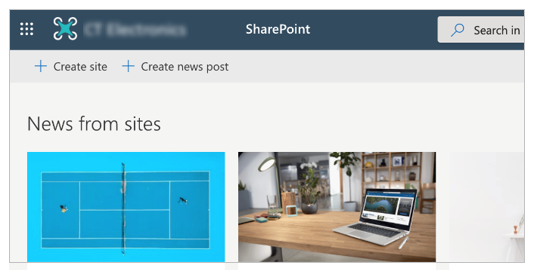
Sign in to Office online, and then select SharePoint.
Select Create site.
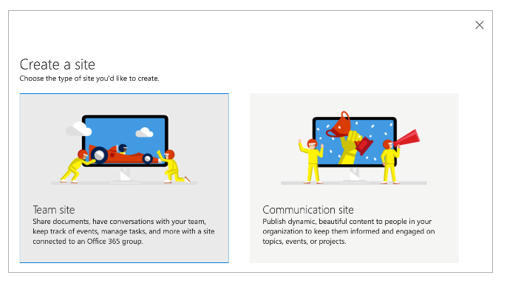
Select Team site.
Enter a name and description for your site.
Set Privacy settings to Public so that everyone in the company can get the necessary information.
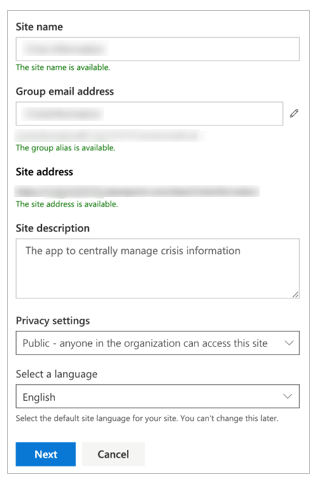
Select Next.
Add additional owners for the site (optional).
Select Finish.
Create lists in Microsoft Lists
The app uses multiple lists to store its data. You can use the DeploySPLists flow, available from the downloaded assets package, to automatically create these lists.
Import the list deployment flow
Go to make.powerautomate.com.
Select My flows from the left navigation pane.
Select Import on the command bar.
Upload the DeploySPLists.zip package from the GitHub repository.
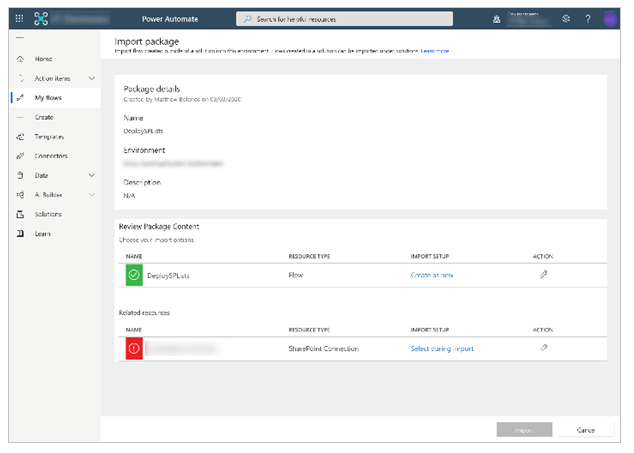
Add a SharePoint connection for the new flow by selecting the Select during import link and completing the form.
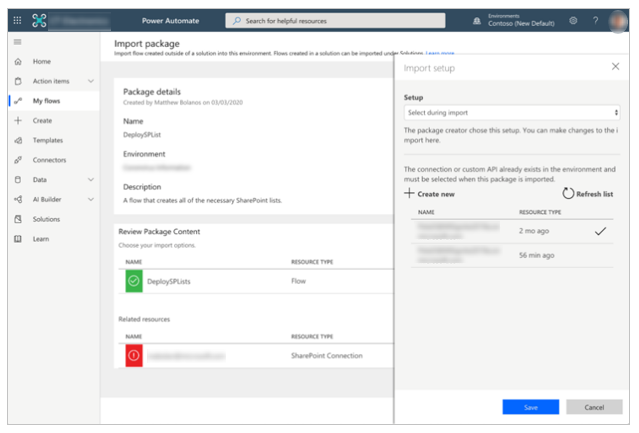
If you need to create a new SharePoint connection, select Create new in the Import setup pane.
Select New connection on the command bar.
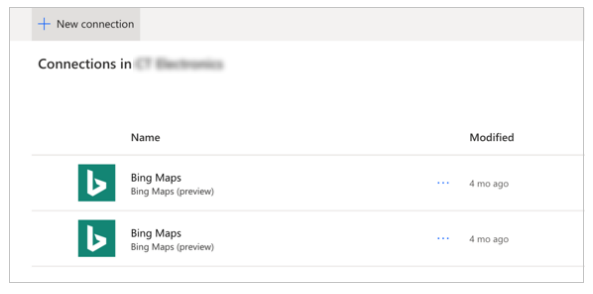
Search for the name of the connection, for example SharePoint.
Select the connection you created.
Select Save.
Select Import.
Edit the list deployment flow
After the import is done, go to My flows and refresh the list of flows.
Select the newly imported flow, DeploySPLists.
Select Edit on the command bar.
Open the Variable – Target Site for Lists card.
For Value, enter the name of your SharePoint site.
Open the Variable – App name card.
For Value, enter the name of your app; by default, the name is Crisis Communication.
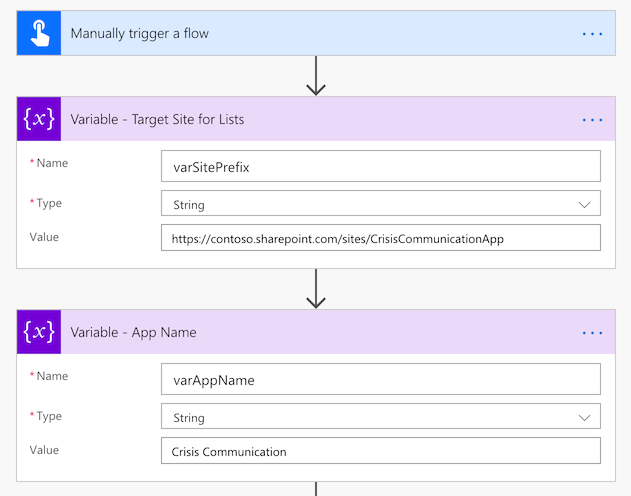
Select Save.
Run the list deployment flow
Go back to the detail screen for the DeploySPLists flow.
Select Run on the command bar.
Select Continue, and then select Run flow.
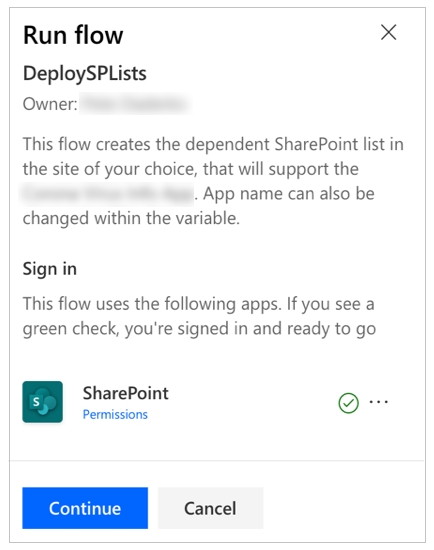
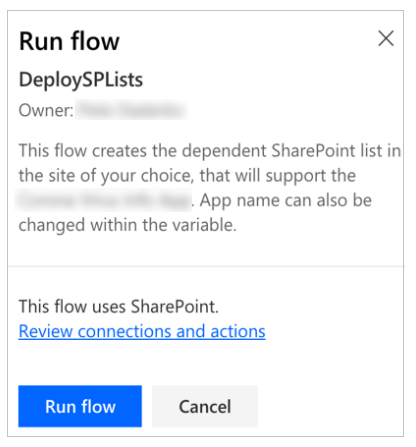
Note
You might receive an error stating that location services are required. If this occurs, allow location services to access Power Automate and refresh the page before trying again.
The flow creates the following lists in your SharePoint site.
| Display title | Purpose | Description |
|---|---|---|
| CI_LogosAssets | To hold the logo and/or other images to be referenced from the app. The logo will be referenced in Power Apps by a direct link or via the ID number of the logo you want to use. | The library for related logos and other image assets for the [App Name] app. |
| CI_configAdminSetup | Used for feature configuration by the admin of the app. Note: This list should be read-only for all members who aren't admins. |
Admin configuration list for the [App Name] app. |
| CI_Contacts | Using the default Contacts Content type to capture information about contacts. (No people picker is included, so this list might need to be manually maintained to ensure its data is up to date.) Note: This depends on the global contact list type's being a default content type in the list. |
The contacts list for the [App Name] app. |
| CI_CompanyNews | Collection of Company News items. | A list for managing the news items that appear in the [App Name] app. You can use the Deprecated column to remove news items from the app views, while retaining them as a record. |
| CI_FAQ | Frequently asked questions. | The list of frequently asked questions for the [App Name] app. You can use the Deprecated column to remove FAQ items from the app views, while retaining them as a record. |
| CI_UsefulLinks | Useful hyperlinks list. | The list of useful hyperlinks for the [App Name] app. You can use the Deprecated column to remove hyperlink items from the app views, while retaining them as a record. |
| CI_Employee | Tracking current employee presence status. Examples: working from home, out sick, on personal leave, and out on vacation. Note: The status coming to work is assumed and not included in the list options. | The list of messages that indicate the status of an employee's presence for the [App Name] app. You can use the Deprecated column to remove status messages from the app views, while retaining them as a record. |
| CI_HelpfulTips | Helpful tips that users have contributed for their peers. | List for the management of shared tips for the [App Name] App. You can use the Deprecated column to remove tips from the app views, while retaining them as a record. |
Note
- All these list columns should be considered as dependencies. Protect the lists from accidental schema changes (for example, adding new columns is allowed, but deleting columns might break the app.)
- Use caution when deleting list items; deleting list items deletes historical records. You can turn the deprecation value toggle from No to Yes to drop records from contacts, news, FAQs, or links.
Import and set up the Crisis Communication app
After all lists have been created, you can import the app and connect it to your new data sources.
Note
If you don't want to use the admin app, you can edit these same properties by editing the lists manually.
Import the app
Sign in to Power Apps.
Select Apps from the left navigation pane.
Select Import on the command bar.
Upload the CrisisCommunication.zip file from the GitHub repository.
Note
If your tenant is in a GCC environment, upload CrisisCommunicationGCC.zip.
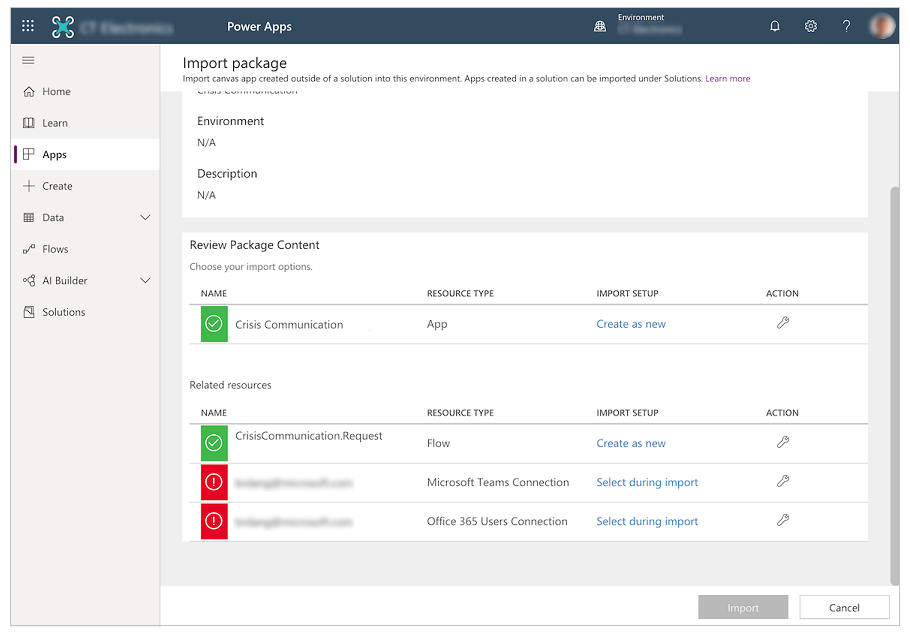
Complete the import setup for Microsoft Teams Connection and Office 365 Users Connection by selecting the appropriate connections by using the Select during import hyperlink. You might have to create a new connection, if it doesn't already exist.
Select Import.
Update the SharePoint connections
Go back to the Apps list.
Select More commands (...) for the Crisis Communication app.
Select Edit from the context menu.

Sign in or create any necessary connections, and then select Allow.
Go to the data sources in the left pane.
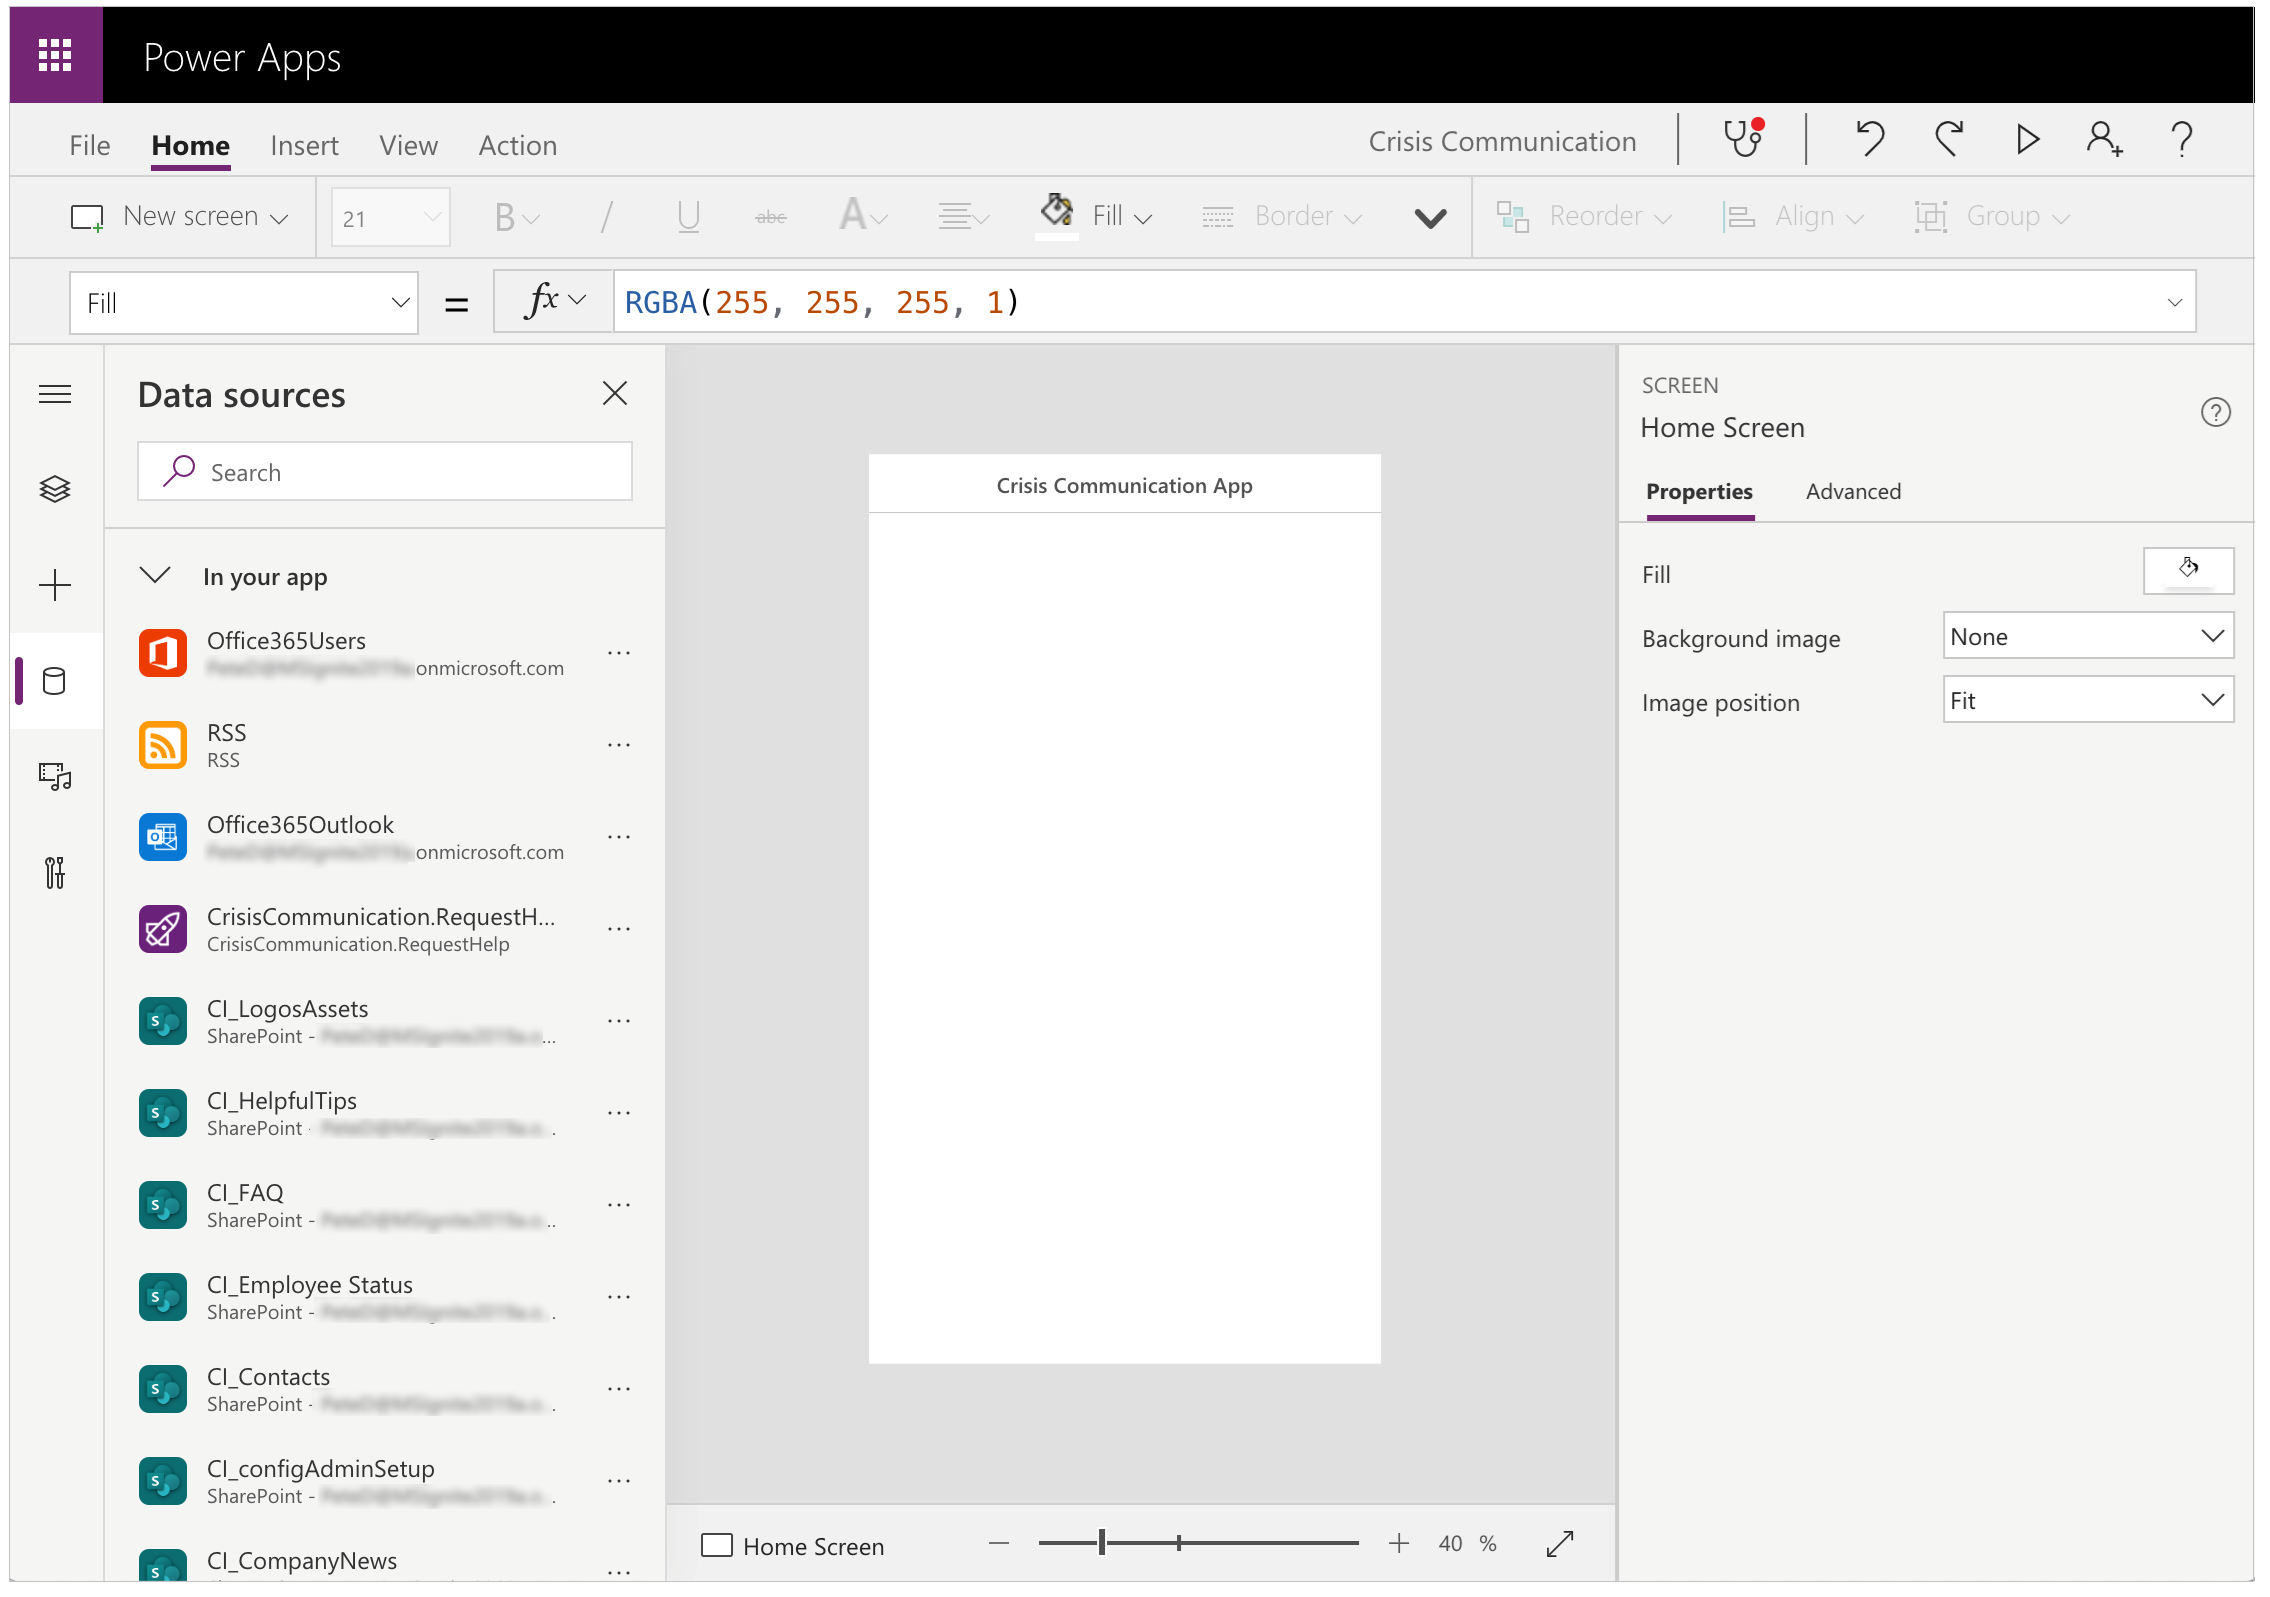
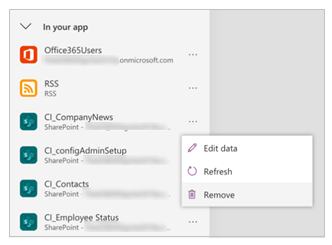
Remove existing lists inside the app, because they don't point to your current SharePoint site.
Add the lists from your own SharePoint site. Start by searching for SharePoint in the search bar.
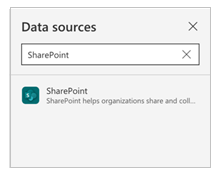
Select SharePoint, and then choose a connection.
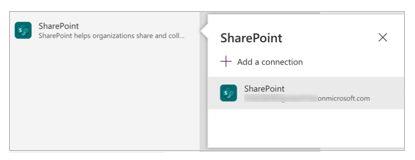
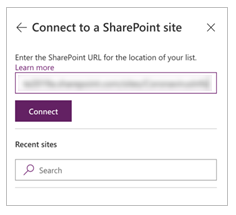
Copy and paste the URL to your SharePoint site in the text field, and then select Connect.
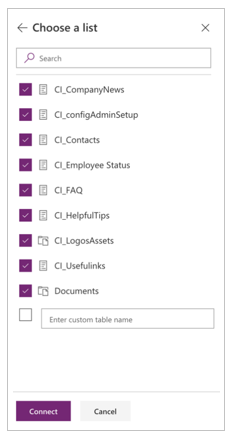
Select all the lists and libraries, and then select Connect.
Select Save, and then select Publish.
Optional: Enable location updates
This app allows you to record a user's location and store it in your SharePoint site whenever a user sets their status. Your crisis management team can view this data in a Power BI report.
Note
Enabling location updates is optional. You can skip this section if you don't want to track user location. Additionally, location tracking is currently not supported on Teams desktop.
To enable location updates
Search for the btnDateRange control.
Open the OnSelect property of the btnDateRange control in the formula bar.
Copy and paste the following snippet in the formula bar for the OnSelect property.
Note
The following snippet is intended to work with versions of the solution that are older than 2020.03.16. For newer versions, edit the code after // To implement location comment.
    UpdateContext({locSaveDates: true});
// Store the output properties of the calendar in static variables and collections.
ClearCollect(submittedDates,Sort(Filter(selectedDates,ComponentId=CalendarComponent.Id),Date,Ascending));
Set(varStartDate,First(submittedDates).Date);
Set(varEndDate,First(Sort(submittedDates,Date,Descending)).Date);
// Create a new record for work status for each date selected in the date range.
ForAll(
    Filter(
        RenameColumns(submittedDates,"Date","DisplayDate"),
        ComponentId=CalendarComponent.Id,
        !(DisplayDate in colDates.Date)
    ),
    Patch('CI_Employee Status',Defaults('CI_Employee Status'),
        {
            Title: varUser.userPrincipalName,
            Date: DisplayDate,
            Notes: "",
            PresenceStatus: LookUp(colWorkStatus,Value=WorkStatusComponent.Selected.Value)

            // To implement location, add a comma to the line above and uncomment the lines below for latitude and longitude.
            // Latitude: Text(Location.Latitude),
            // Longitude: Text(Location.Longitude)
        }
    )
);
    // Update existing dates with the new status.
    ForAll(
        AddColumns(
            Filter(
                RenameColumns(submittedDates,"Date","DisplayDate"),
                ComponentId=CalendarComponent.Id,
                DisplayDate in colDates.Date
            ),

            // Get the current record for each existing date.
            "LookUpId",LookUp(RenameColumns(colDates,"ID","DateId"),And(Title=varUser.userPrincipalName,Date=DisplayDate)).DateId
        ),
        Patch('CI_Employee Status',LookUp('CI_Employee Status',ID=LookUpId),
            {
                PresenceStatus: LookUp(colWorkStatus,Value=WorkStatusComponent.Selected.Value)
            }
        )
    );
    If(
        IsEmpty(Errors('CI_Employee Status')),

        // Update the list of work status for the logged-in user.
        ClearCollect(colDates,Filter('CI_Employee Status',Title=varUser.userPrincipalName));
        // Send an email receipt to the logged-in user.
        UpdateContext(
            {
                locReceiptSuccess:
                Office365Outlook.SendEmailV2(
                    // To: send an email to oneself
                    varUser.mail,
                    // Subject
                    Proper(WorkStatusComponent.Selected.Value) & ": " & varStartDate & If(varStartDate<>varEndDate," - " & varEndDate),
                    // Body
                    WorkStatusComponent.Selected.DateRangeReceipt & ": " &
                    // Create a bulleted list of dates
                    "<ul>" &
                        Concat(submittedDates,"<li>" & Date & Char(10)) &
                    "</ul>"
                )
            }
        );
        If(
            locReceiptSuccess,
            Notify("You successfully submitted your work status. An email has been sent to you with a summary.",NotificationType.Success,3000),
            Notify("There was an error sending an email summary, but you successfully submitted your work status.",NotificationType.Success,3000);
        );

        Navigate('Share to Team Screen',LookUp(colStyles,Key="navigation_transition").Value),

        // Case: Error submitting work status
        Notify(varString.WorkStatusError,NotificationType.Warning)
    );
    UpdateContext({locSaveDates: false})
Optional: Add additional work status messages
If you want to add more work status messages beyond work from home and out of office, you can do that by completing the following steps. To begin, you need to update your SharePoint site.
Go back to your SharePoint site, and then select Site contents.
Select CI_Employee Status.
If the PresenceStatus column isn't present, select Add column.
Select Show/hide columns.
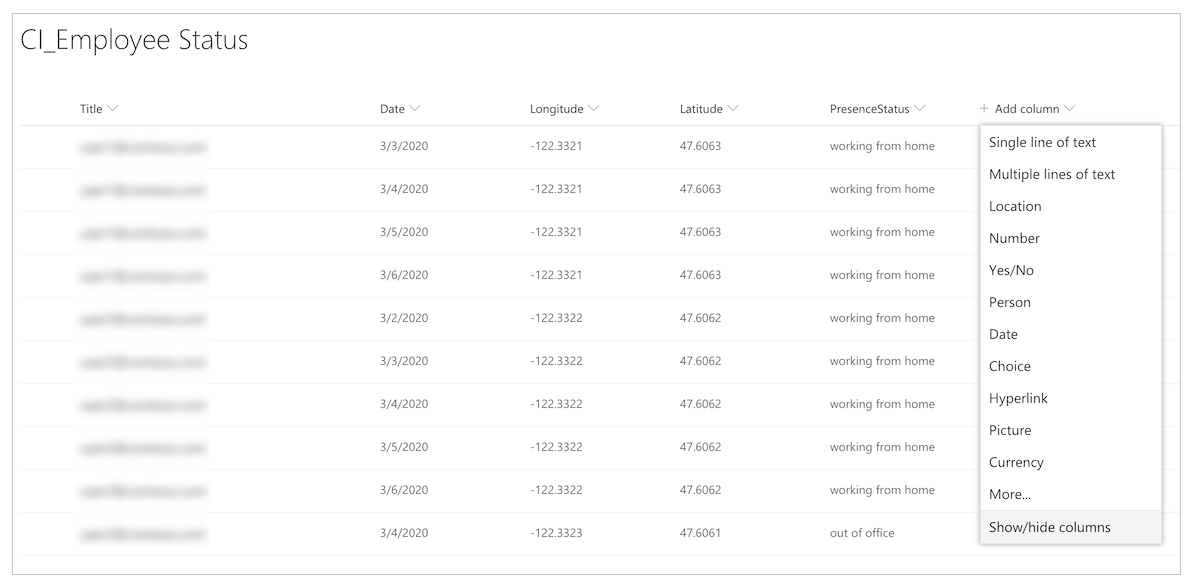
Select PresenceStatus.
Select Apply.
Select the PresenceStatus column.
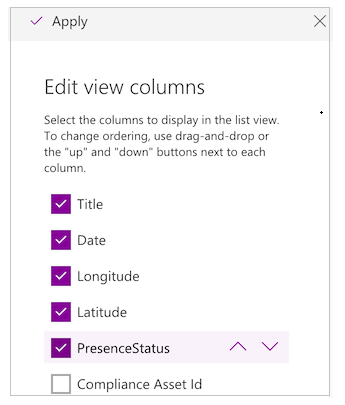
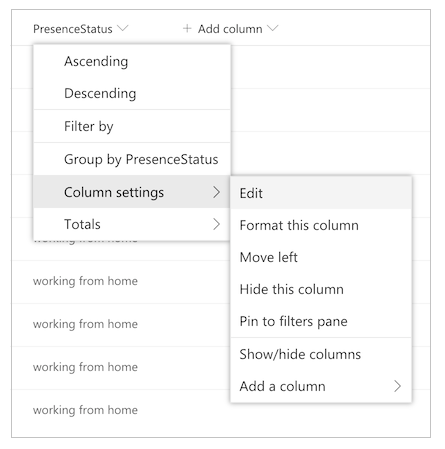
Select Column settings, and then select Edit.
Add your additional work status messages in the Choices field.
Note
Record the name of your new choices; you'll use them in subsequent steps.
Now you need to make a few adjustments to the app itself to show your new work status messages.
Open the app in Power Apps Studio.
Select the Work Status screen.
Set the formula bar to the OnVisible function.
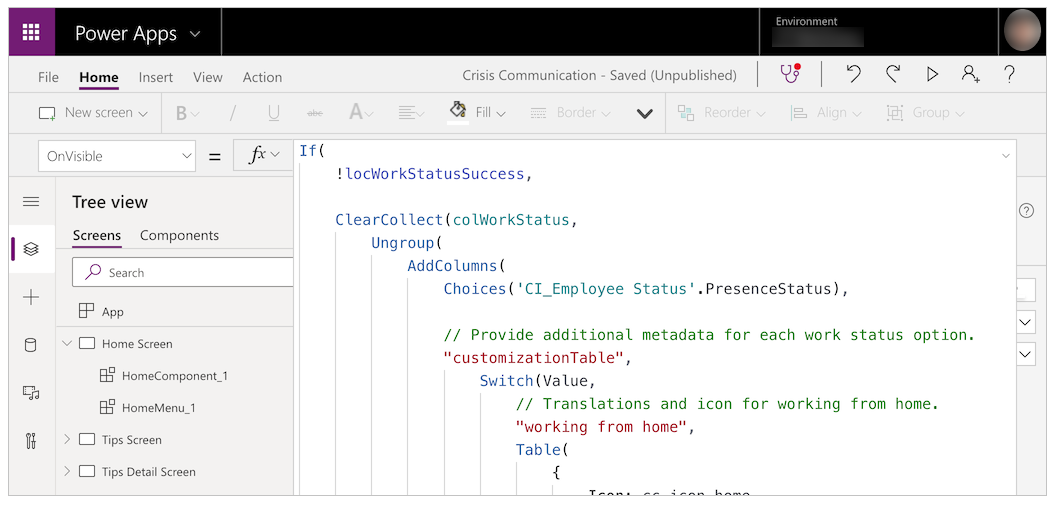
Edit the following template, and replace the values with your own.
    ,"<Name of option in list; case sensitive>",
    Table(
        {
            Icon: <Image file>,
            DateRangeQuestion: "Select the dates you'll be <Name of status>.",
            DateRangeReceipt: "You're currently <Name of status>.",
            ShareToTeamEmail: "I'll be <Name of status> on these dates",
            AutoReplyMessage: "I'll be <Name of status> on these dates"
        }
    )
Replace the
/* TEMPLATE FOR ADDITIONAL WORK STATUS OPTIONS */string with the template.Select Save, and then select Publish.
Update the Request for help flow
This flow sends an adaptive card to a central Teams team, requesting help.
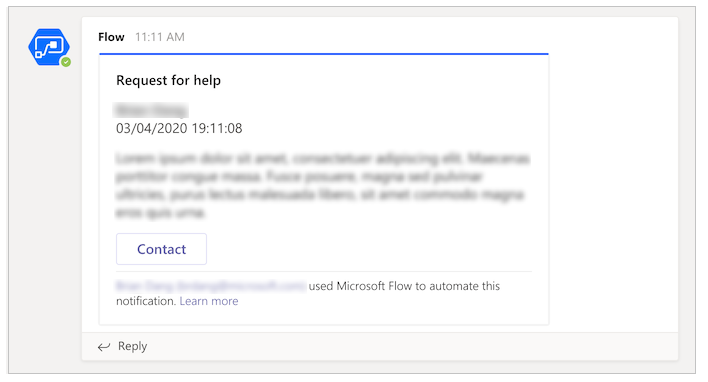
Before completing the following step, create a crisis management team in Teams. After you create the team, you can get the ID for it and bring it into your flow. More information about creating a Teams team: Create a central crisis management Teams team
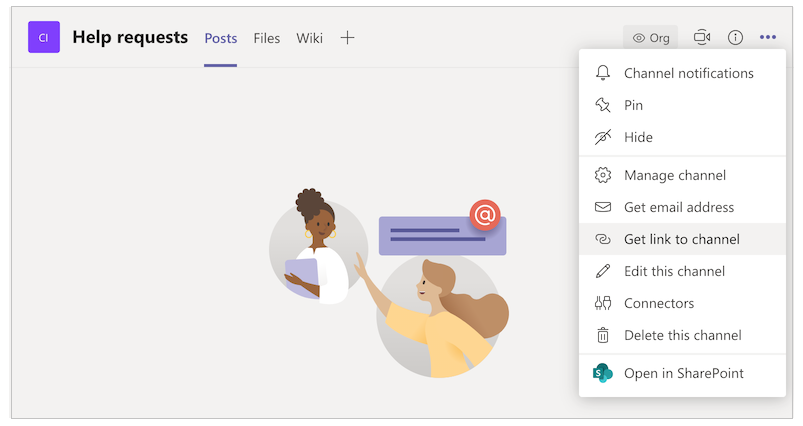
Go to the Teams channel that you want to post all your help requests to.
Select More options (...) for the channel.
Select Get link to channel.
Copy the link and paste it in a text editor.
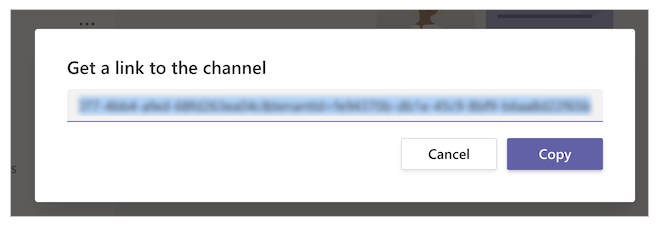
Extract the Team ID, which is everything after
groupId=and before&tenantId=.
For example, in the following URL, the group ID isaaaabbbb-0000-cccc-1111-dddd2222eeeehttps://teams.microsoft.com/l/channel/19%3ab2fa9fc20f3042a9b63fc5890e1813f8%40thread.tacv2/General?groupId=aaaabbbb-0000-cccc-1111-dddd2222eeee&tenantId=72f988bf-86f1-41af-91ab-2d7cd011db47Extract the Channel ID, which is everything after
https://teams.microsoft.com/l/channel/and before/General.
For example, in the following URL, the channel ID is
19%3ab2fa9fc20f3042a9b63fc5890e1813f8%40thread.tacv2https://teams.microsoft.com/l/channel/19%3ab2fa9fc20f3042a9b63fc5890e1813f8%40thread.tacv2/General?groupId=aaaabbbb-0000-cccc-1111-dddd2222eeee&tenantId=72f988bf-86f1-41af-91ab-2d7cd011db47,Go to make.powerautomate.com.
Select My flows from the left navigation pane.
Select More commands (...) for CrisisCommunication.Request, and then select Edit.

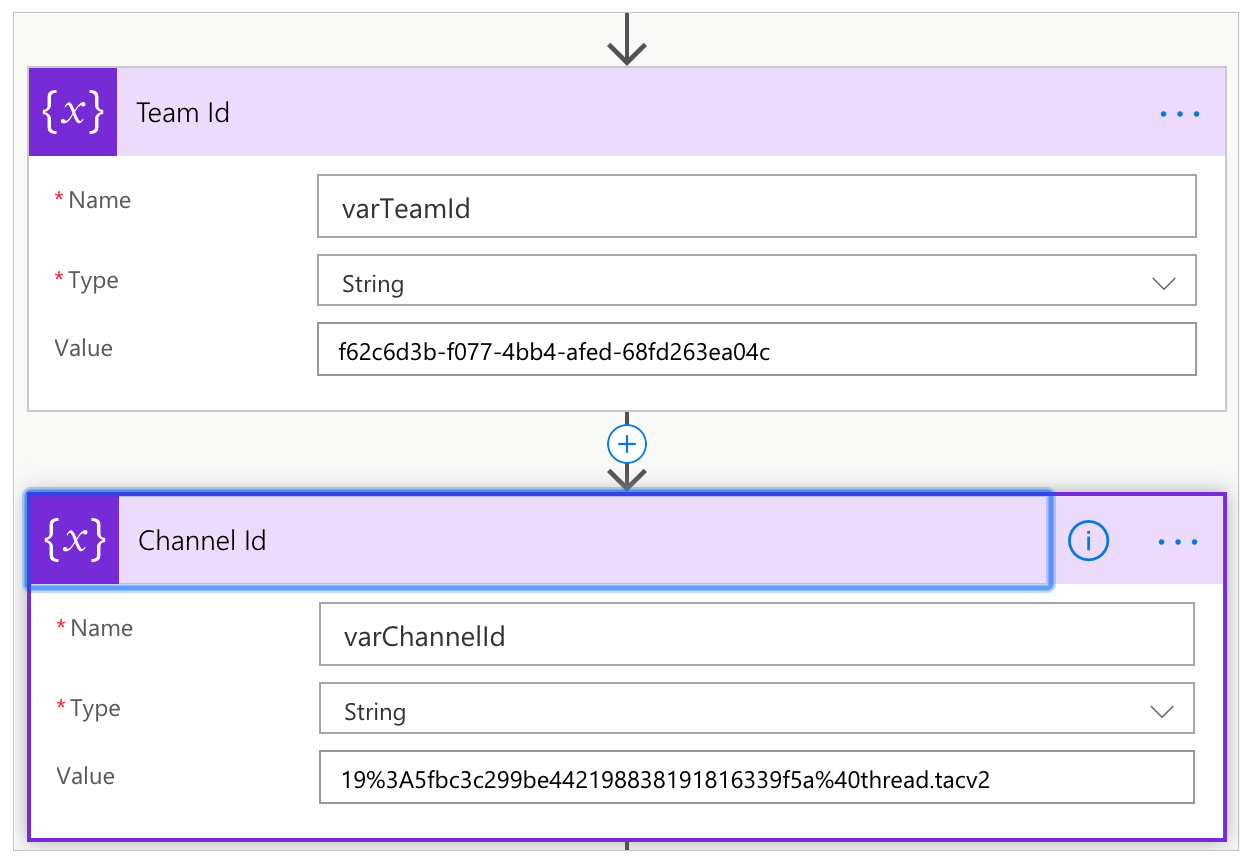
Open the Team Id card.
Paste the team ID into the Value field.
Open the Channel ID card.
Paste the channel ID into the Value field.
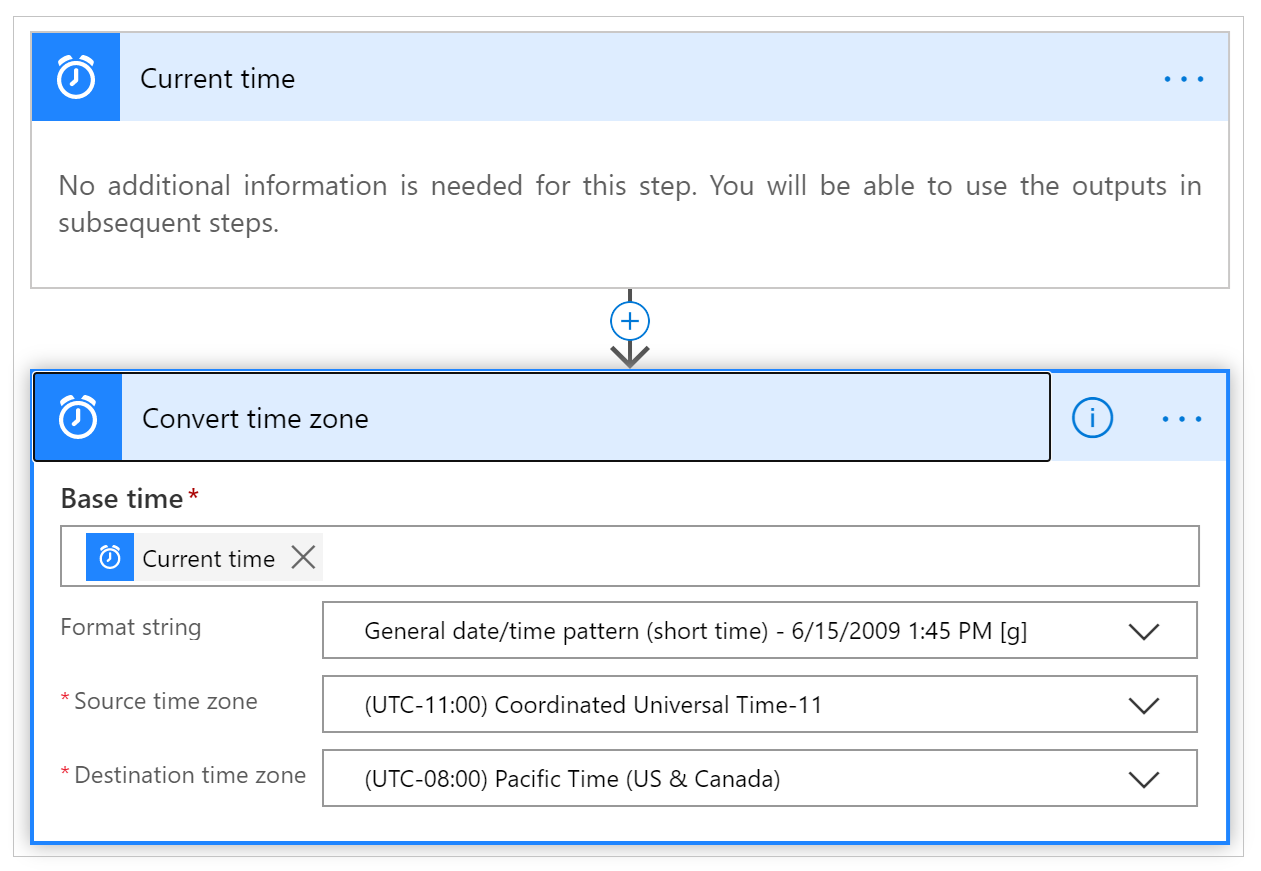
Scroll down to the Get Time actions and update the action for Convert time zone by using your choice of source and destination times.
Optional: Configure a shared inbox
The CrisisCommunication.Request flow pulls requests from your inbox before sending them to Teams. If you'd prefer to send request emails to a shared inbox, follow these steps.
Note
You can skip this section if you don't want to send request emails to a shared inbox.
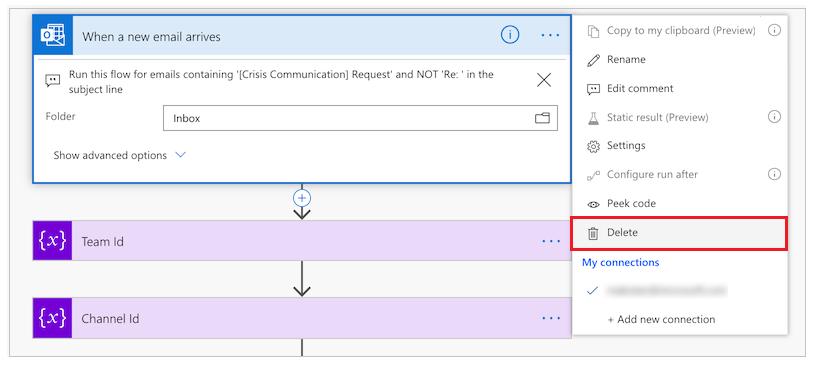
Open the CrisisCommunication.Request flow in Edit mode.
Select More commands (...) from When an email arrives V3.
Select Delete.
Search for and select When a new email arrives in a shared mailbox (V2).
Enter the shared inbox address in Mailbox Address.
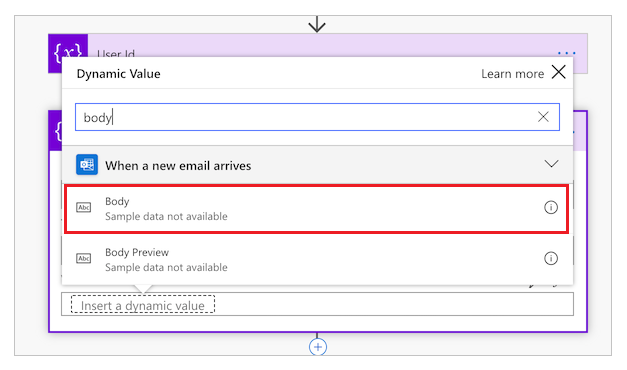
Open the Comments card.
Select Add a dynamic value for Value.
Search for and select Body.
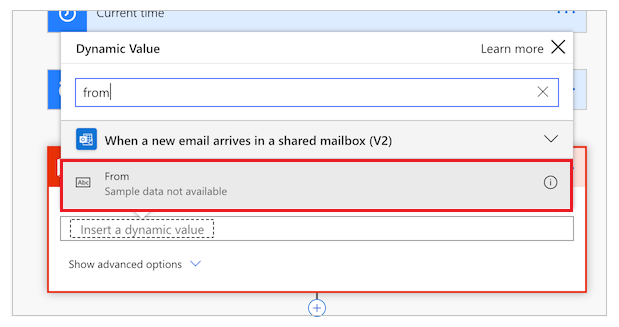
Open the Get user profile card (V2) card.
Select Add a dynamic value.
Search for and select From.
Import and set up the admin app
To manage the app you imported, repeat the same steps for the admin app.
Sign in to Power Apps.
Select Apps from the left navigation pane.
Select Import on the command bar.
Upload the CrisisCommunicationAdmin.zip file from the GitHub repository.
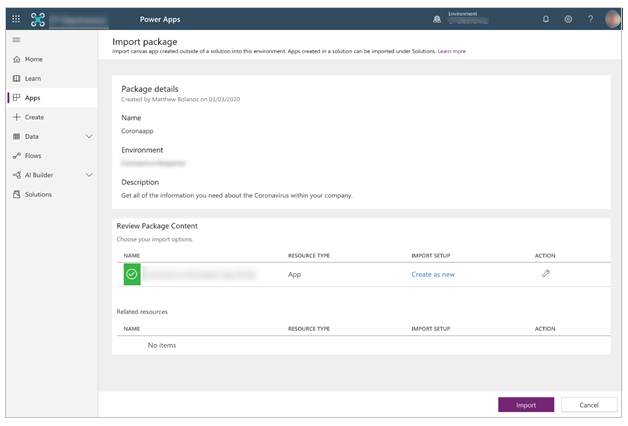
Select Import.
Update SharePoint connections for the admin app
Go back to the Apps list.
Select More Commands (...) for Crisis Communication Admin App.
Select Edit from the context menu.

Sign in or create any necessary connections, and then select Allow.
Go to the data sources in the left pane.

Remove existing lists inside the app, because they don't point to your current SharePoint site.

Add the lists from your own SharePoint site. Start by searching for SharePoint in the search bar.

Select SharePoint, and then choose a connection.

Copy and paste the URL to your SharePoint site in the text field, and then select Connect.

Select all lists and libraries, and then select Connect.

Select Save, and then select Publish.
Create initial content for the app
At this point, you've successfully imported both the Crisis Communication app and its admin app. You can now start creating the initial content. To start, open the Crisis Communication Admin app.
If you have a GCC environment, you need to enable GCC mode. More information: How to configure mobile clients for GCC environments.
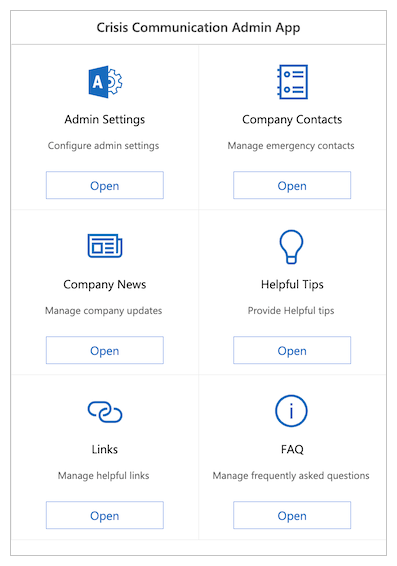
You use the admin app to customize all the information in the Crisis Communication app and also to configure key settings for the accompanying flows.
Note
As a reminder—if you don't want to use the admin app, you can edit these properties by editing the lists manually.
Set up key parameters under Admin Settings
To initialize your app, you need to provide all of the required fields by navigating to Admin Settings.
Complete all the fields as shown in the following table, and then select Save.
| Field name | Logical name in SharePoint | Purpose | Example |
|---|---|---|---|
| Admin email | AdminContactEmail | This is where email requests are sent. They should be set to your email address. If you'd like to send notifications to another inbox, see optional shared inbox configuration, earlier in this article. | admin@contoso.com |
| Logo URL | Logo | The logo of your app that appears in the upper-left corner. | https://contoso.com/logo.png |
| Microsoft Entra group ID | Microsoft Entra IDGroupID | Used to send notifications to users about internal company updates via the Notify users on new crisis communication news flow. Follow the instructions below to get the Microsoft Entra ID of your group. | c0ddf873-b4fe-4602-b3a9-502dd944c8d5 |
| APP URL | AppURL | The location of the user app, so that the Notify users on new crisis communication news flow can redirect users there after they select Read more. | https://apps.preview.powerapps.com/play/<app URL>?tenantId=<tenant ID> |
| Government RSS Feed | GovernmentRSSFeed | Used to populate the world news feature in the app. Useful if you want to provide additional information to your employees from a trusted source. | https://www.who.int/rss-feeds/news-english.xml |
| Notification method | PreferredSentNotification | Used by the Notify users on new crisis communication news flow to determine which distribution channel it should use when sending out notifications. This field is required. | Email, Teams notification, push notification |
| Feature flags | Feature1...8 | Used to disable or enable each feature in the application. |
Note
Teams notification and push notification are currently not supported in GCC.
Finding the Microsoft Entra ID for your distribution group
Go to aad.portal.azure.com.
Select Microsoft Entra ID from the left navigation pane.
Select Groups.
Search for and select your distribution group.
Copy the Object Id field.
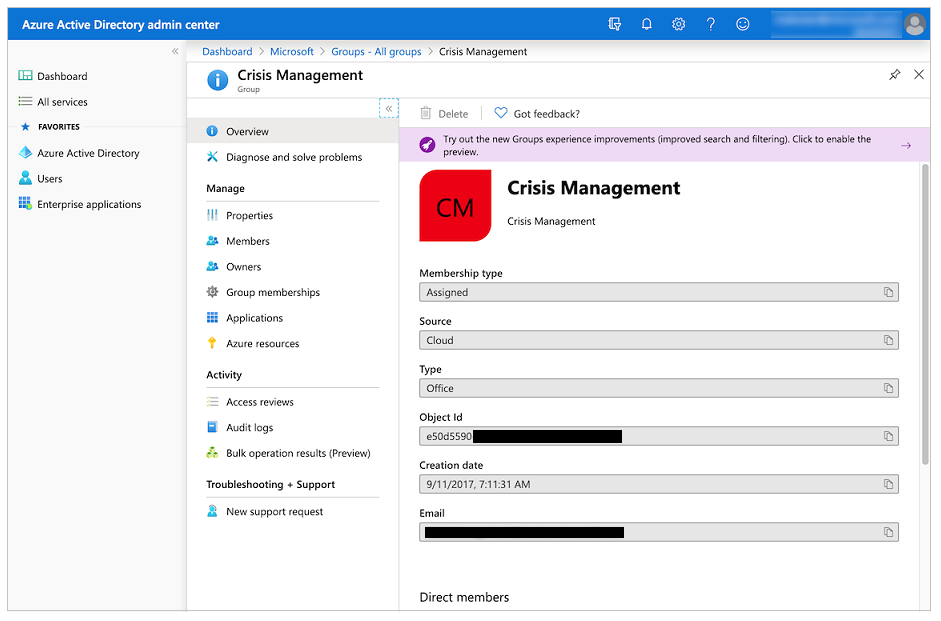
Paste the ID into the Microsoft Entra group ID field in the admin app.
Set up emergency contacts
- Go to Company Contacts.
- Select Create new contact.
- Complete the form by using the contact details.
List schema:
| Field name | Logical name in SharePoint | Purpose |
|---|---|---|
| Full name | FullName | The name of the contact. |
| The email address that's shown for the contact. | ||
| Country | Country | The country/region for the contact. This field is used to group the contacts; you can use other values to group contacts by if countries/regions don't make sense for you. |
| Comments | Comments | Shows additional information about the contact; useful to describe when to reach out to this contact. |
| Deprecated | Deprecated | Use to hide an existing emergency contact. |
Set up initial company news
- Go to Company News.
- Select Create new post.
- Complete the form.
List schema:
| Field name | Logical name in SharePoint | Purpose |
|---|---|---|
| Title | Title | The title of the update. |
| Details | Details | The full update. You can use HTML in this field. |
| Blurb | Blurb | A short message about the update. This is used in the Notify users on new crisis communication news flow and in the gallery of updates. |
| Deprecated | Deprecated | Use to hide an existing post. |
Set up helpful tips
- Go to Helpful tips.
- Select New tip.
- Complete the form.
List schema:
| Field name | Logical name in SharePoint | Purpose |
|---|---|---|
| Title | Title | The title of the helpful tip. |
| Resource URL | ResourceURL | A link to additional reading material. (Optional) |
| Sub title | SubTitle | A subtitle for the tip. (Optional) |
| Description | Description | The full description of the helpful tip. |
| Deprecated | Deprecated | Use to to hide a helpful tip. |
Set up links
- Go to Links.
- Select Create new link.
- Complete the form.
List schema:
| Field name | Logical name in SharePoint | Purpose |
|---|---|---|
| Title | Title | The text of the link. |
| URL | URL | The URL of the link. |
| Description | Description | Additional details about the link. (Optional) |
| Deprecated | Deprecated | Use to hide a link. |
Set up FAQs
- Go to FAQ.
- Select Create new FAQ.
- Complete the form.
List schema:
| Field name | Logical name in SharePoint | Purpose |
|---|---|---|
| Title | Title | The question in the FAQ. |
| Rank | Rank | The order of the question in the FAQ. |
| Answer | Answer | The answer to the question in the FAQ. |
| Deprecated | Deprecated | Use to hide a question in the FAQ. |
Test and share the app
Now that you've successfully set up all the data, you can test the app to make sure it works.
- Sign in to Power Apps.
- Select Apps from the left navigation pane.
- Select Crisis Communication to play the app.
After you've successfully tested the app, you can share it with everyone in your company.
Import and set up the notification flow
The app uses a flow to send notifications to end users whenever there is a new company update.
Import the news notification flow
Go to make.powerautomate.com.
Select My flows from the left navigation pane.
Select Import on the command bar.
Upload the CrisisCommunicationNewsNotification.zip package from the GitHub repository.
Note
If your tenant is in a GCC environment, upload CrisisCommunicationNewsNotificationGCC.zip.
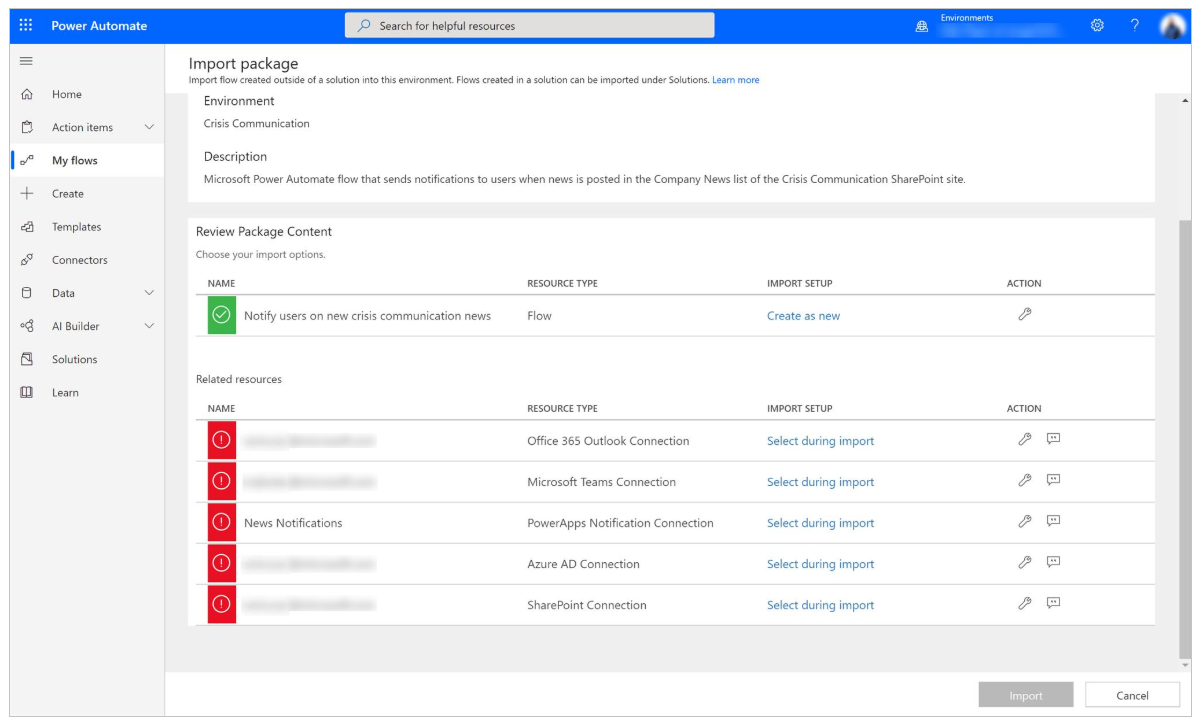
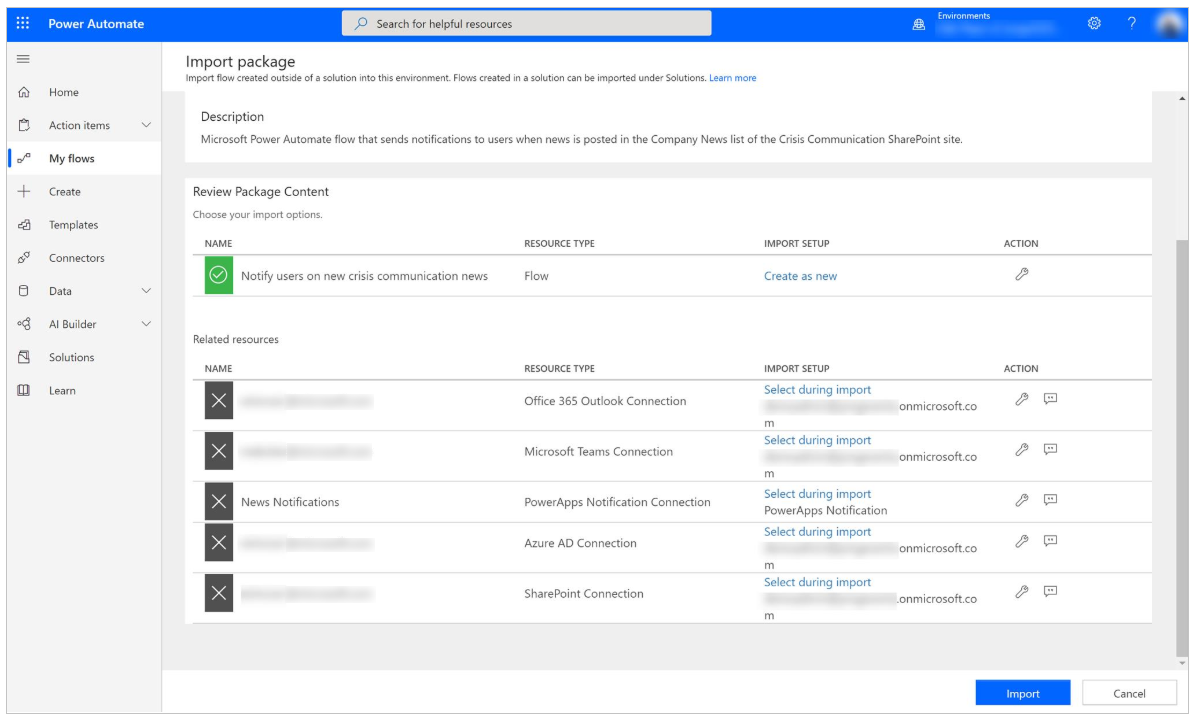
Add connections for the new flow by selecting the Select during import link for each connection, and then completing the form.
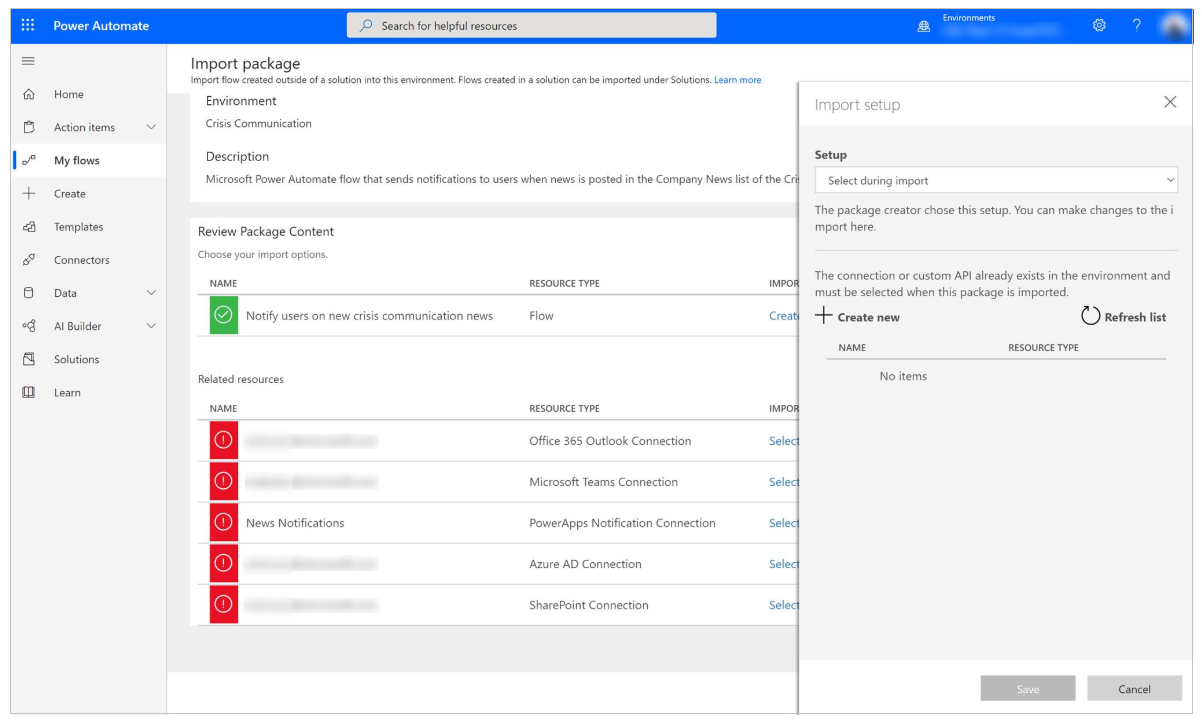
If you need to create a new connection, select Create new in the Import setup pane.
Select New connection on the command bar.

Search for the name of the connection; for example, PowerApps Notification (preview).

Select the connection you want.
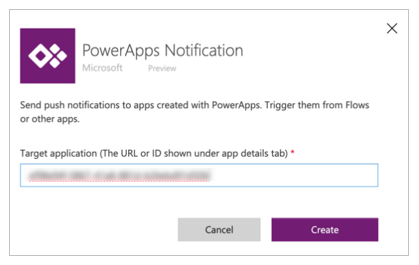
If you're creating a connection to PowerApps Notifications (preview), you'll see the dialog box as illustrated in the following image.
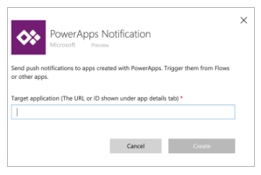
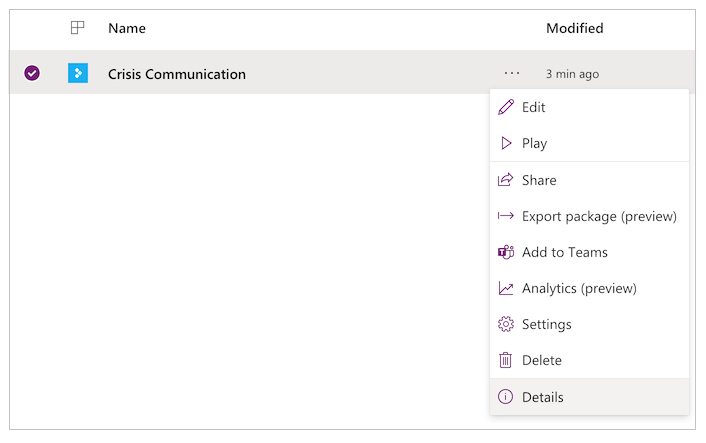
To get the ID, go to your Apps list.
Select More Commands (...) for the Crisis Communication app, and then select Details.
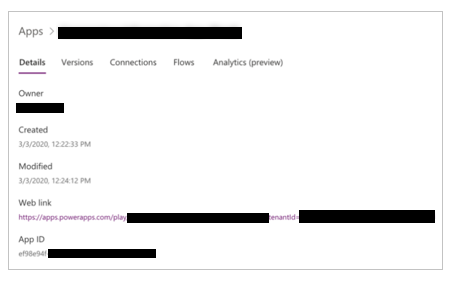
Copy the App ID.
Paste the app ID into the connection creation dialog box, and then select Create.
After you've created your new connection, go back to the Import setup pane and then select Refresh list.
Your new connection should now appear. Select it, and then select Save.
After you've finished adding all your connections, select Import.
Edit the news notification flow
After the import is done, go to My flows.
Select the newly imported flow, Notify users on new crisis communication news.
Note
If you uploaded the GCC package, the flow name is Notify users on new crisis communication news GCC.
Select Edit on the command bar.
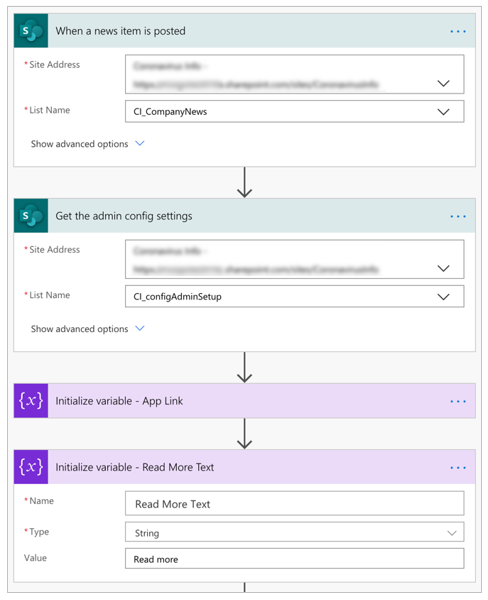
Open the When a new item is posted card.
For Site Address, enter the name of your SharePoint site.
For List name, enter CI_CompanyNews.
Open the Get the admin config settings card.
For Site Address, enter the name of your SharePoint site.
For List name, enter CI_configAdminSetup.
Open the Initialize variable – Read more text card.
For Value, enter Read more (in your native language).
Select Save.
Note
You might receive an error if one of your connections hasn't been authorized yet. If this occurs, please open the card with the unauthorized connection and reauthorize.
Optional: Sending notifications to more than 5000 users
The current Get group members action is limited to pulling 5000 users for the Office license of Power Automate. Even for the premium license, you may hit throttling limits with the Teams connector if you try to send notifications to too many users. To distribute to more users, you can alter to the flow to send an email to a distribution list instead.
Delete the following cards: Get group members and Switch on preferred send notification setting:
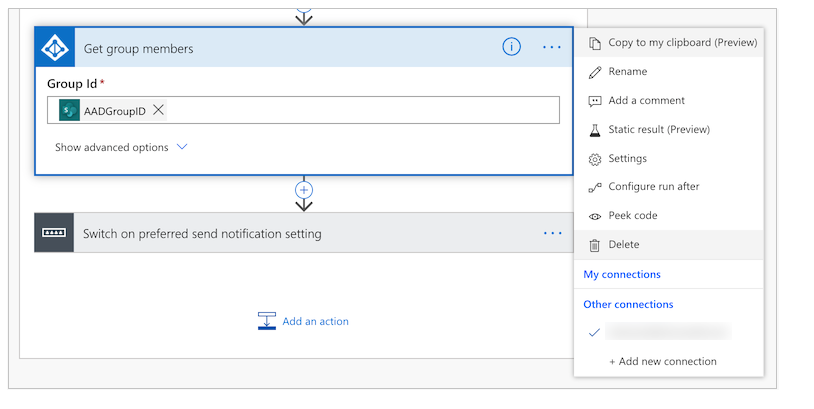
Add a new action.
Search for and select Send an email (V2):
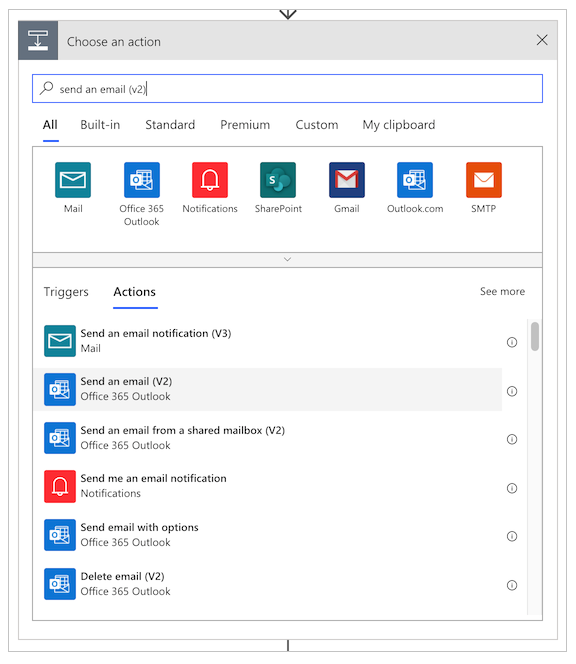
In the To field, type in the name of your distribution group.
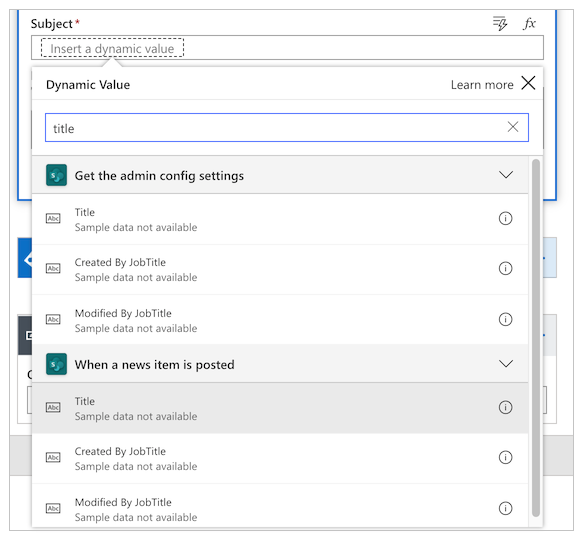
In the Subject field, select the Add a dynamic value button and add the Title field from the When a news item is posted card:
In the Body field, select the Add a dynamic value button and add the Details field from the When a news item is posted card.
Select Save.
Optional: Deep link Teams notification into Teams app
If you would like your Teams notification to open directly into the canvas app inside of Teams, follow these steps:
Update the app URL to point to the Teams deep link in the admin app.
In the admin app, change the app URL to the following, whereApp IDis the ID of your app.https://teams.microsoft.com/l/entity/<APP ID>/<APP ID>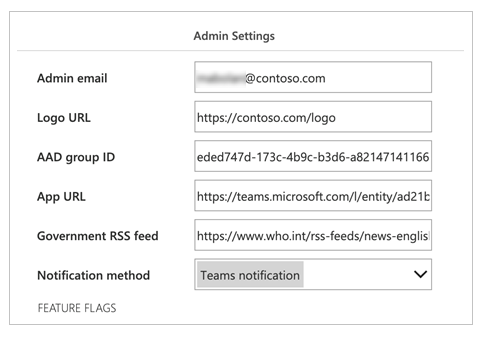
Update the app link generated inside of the notification flow.
Open the Set App Link Variable card and change the expression for Value to the following:concat(items('Apply_to_each')?['AppUrl'], if(greater(indexOf(items('Apply_to_each')?['AppUrl'], '?'),0),'&','?'), 'context=%7B%22subEntityId%22%3A%22',triggerBody()?['ID'],'%22%7D')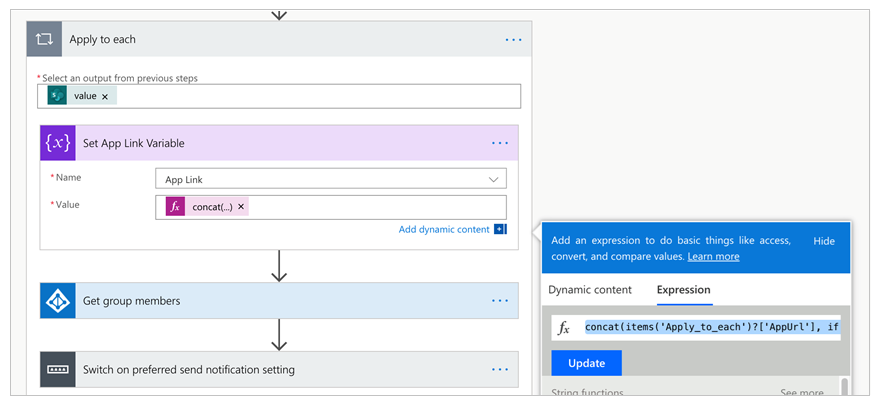
Update the canvas app to consume the teams context variable to deep link to the correct news article.
For the OnStart property of the app, change the Param fromnewsidtosubEntityId.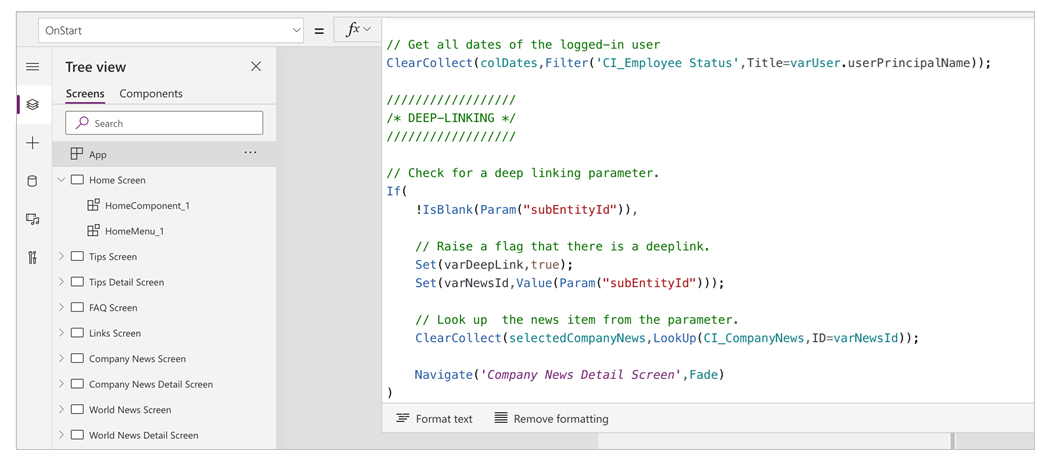
Test the news notification flow
To test the news notification flow, go to the admin app and create a new internal company update. Later, all of the users in your distribution list will receive an update by your preferred notification method.
Note
If you run into errors, make sure that you've successfully entered the group ID of your distribution list in the settings for the admin app.
Monitor office absences with Power BI
After you've deployed the app and people start to send notifications that they'll be out of the office for various reasons (such
as being sick or working from home), you can use a Power BI report to track how many people have sent notifications and where they're located.
Note that you need to enable location tracking to make the map control work.
Important
For the Power BI report to work, you must have at least one entry in the CI_Employee Status list.
We'll need some information from the CI_Employee Status list we created earlier, so let's get to it first. Open the list in your site, and then select List Settings under the Settings icon.

Make a note of the site name and list ID on the browser address bar, as shown in the following image.

At this point, we're ready to open the Power BI report. Open Power BI, and then open the Presence status report.pbix file. Hover over the right-hand side of the CI_Employee Status data source until you see the ellipsis. Select it, and then select Edit query.

After the Power Query editor is opened, right-click the CI_Employee Status data source, and then select Advanced Editor.
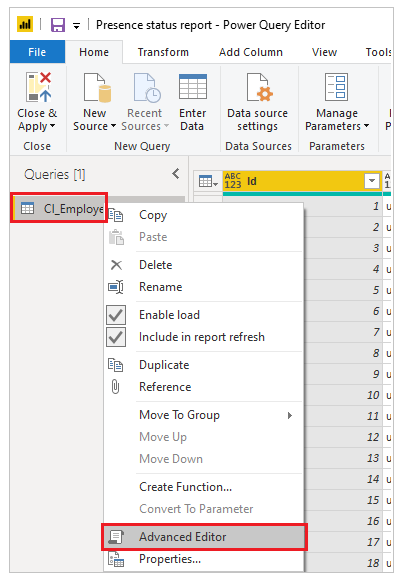
This is where we use the site name and list ID from the list.
Copy the new SharePoint site into the SharePoint.Tables string as shown in the following illustration and the list ID in the three places where the GUID is highlighted, and then select Done.

If you see any connection errors after updating the connection information, you might need to update the credentials used to connect to the list.
To update the connection
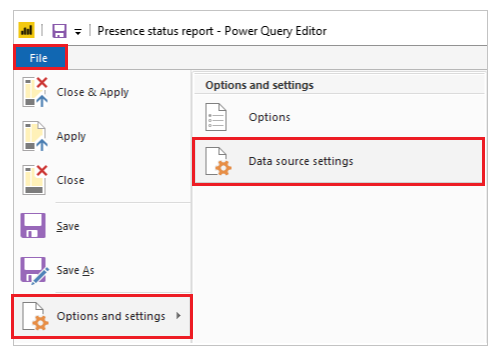
On the File menu, select Options and settings, and then select Data source settings.
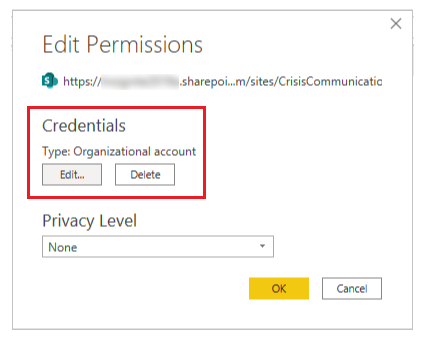
Select Edit permissions.
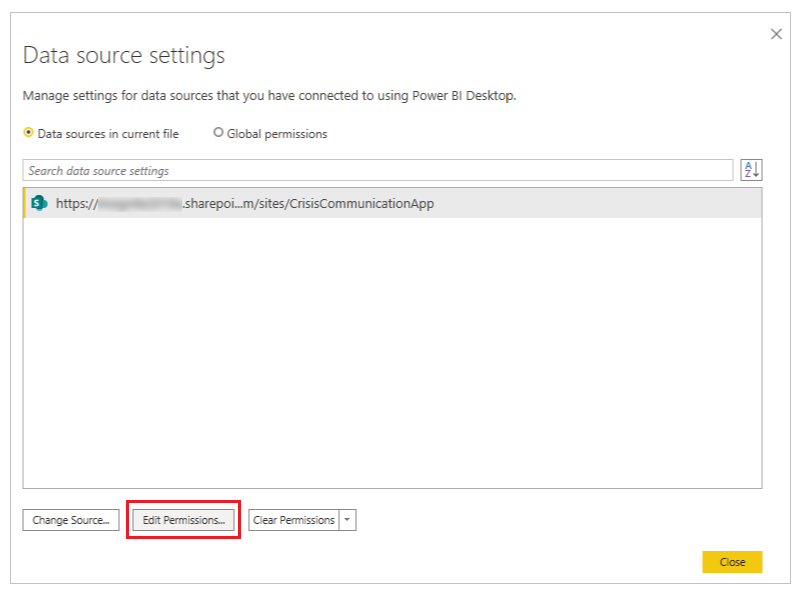
Ensure the Credentials type is set to Organizational account, and use the credentials to access the list.
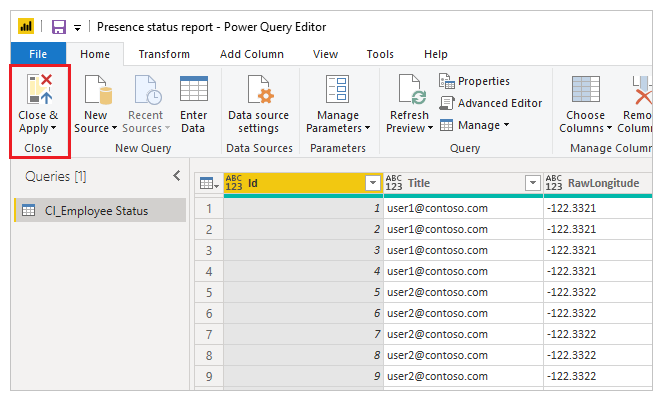
Select Close & Apply to update the report to pull data from your list.
We now have a Power BI report that shows both the geographical information for office absences for the current day and a trend of such absences over several days. We can publish the report so other people in the organization can see it.

Your report is now published. You can share it with others in your organization. You can also schedule the report refresh frequency.
Integrate your app into Teams
Now that you have a functioning app that has been shared with everyone, you can deploy the app by creating a crisis management team within Teams to respond to issues.
Deploy the app to the app bar
If you're a Teams admin, you can push the app to all your users in the Teams app bar.
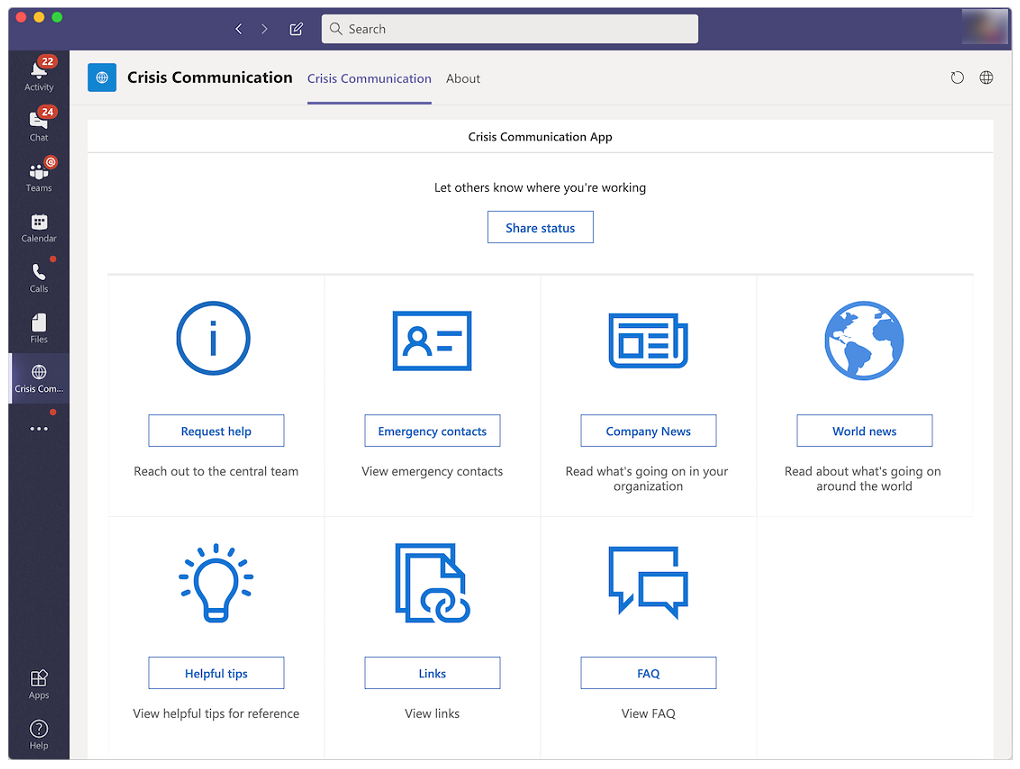
Sign in to Power Apps.
Select Apps from the left navigation pane.
Select More commands (...) for the Crisis Communication app.
Select Add to Teams.
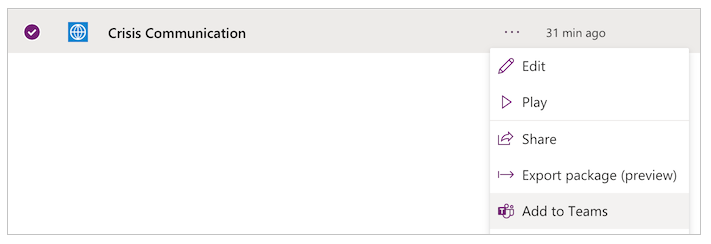
Select Download app.
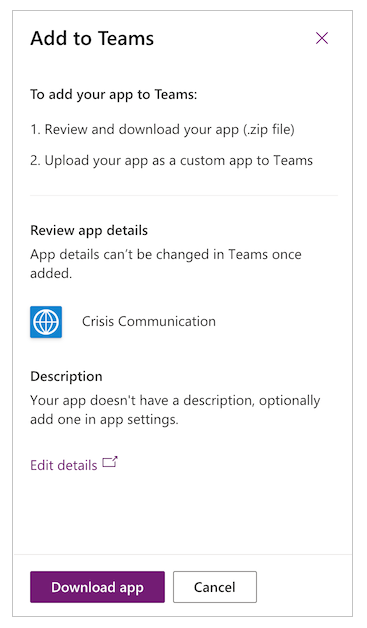
Open Teams.
Go to Apps on the app bar.
Select Upload a custom app.
If you're a Teams admin, you'll be able to upload an app for your entire tenant. Select Upload for Contoso (where Contoso represents the name of your tenant).
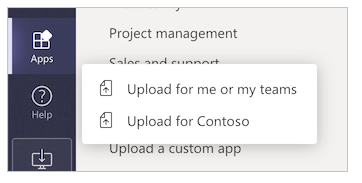
Upload the file that you downloaded from Power Apps.
Go to the Teams admin center.
In the left navigation pane under Teams apps, select Setup policies.
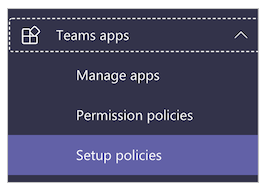
Select Global (Org-wide setup).
Select Add apps.
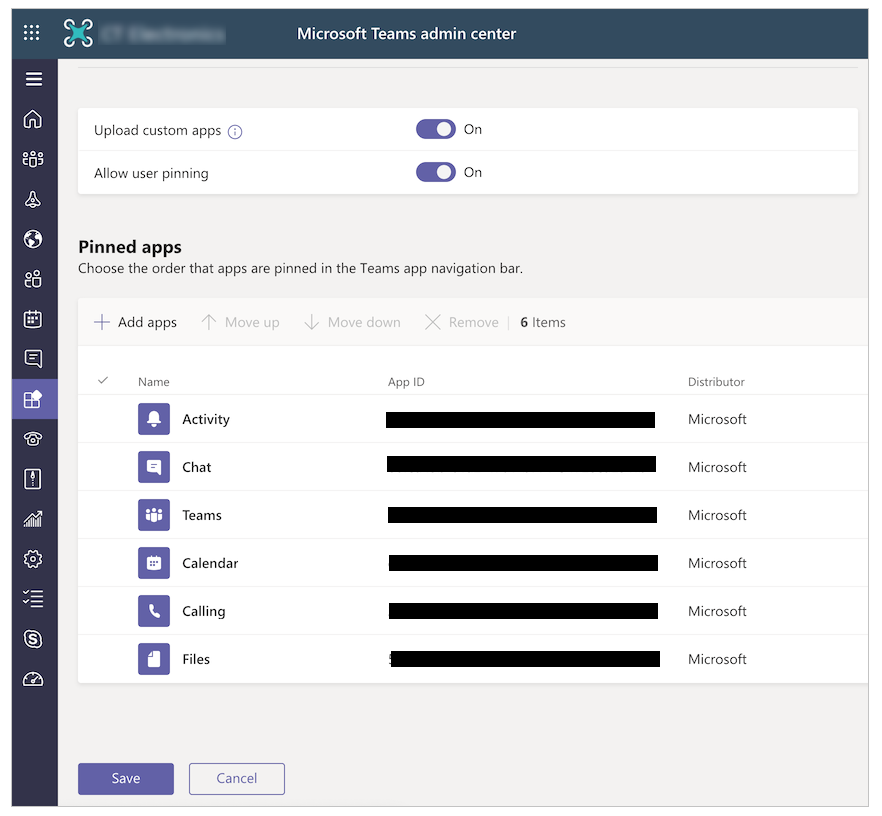
Search for and select the Crisis Information app you uploaded.
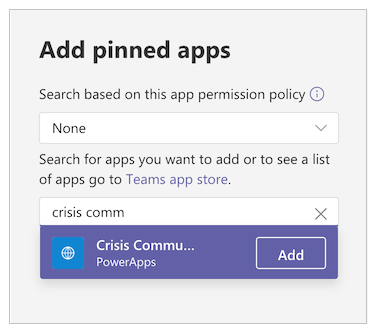
Select Add.
Select Save.
Note
It can take up to 24 hours for users to see the app automatically pinned in their app bar.
Create a central crisis management team in Teams
To coordinate your crisis response, you'll want to create a central crisis management team in Teams and populate it with all relevant information. This team only needs to be shared with the central response team.
Go to Teams.
Select Teams from the left app bar.
Select Join or create a Team.
Select Create team, and then complete the remaining steps.
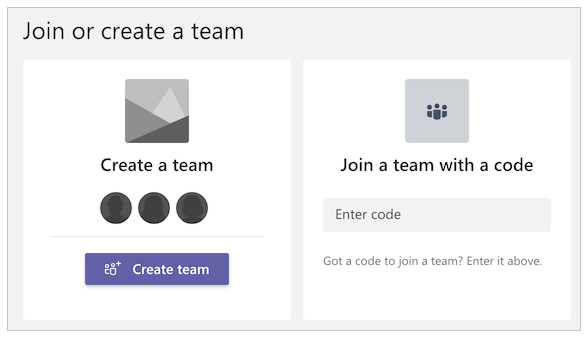
After you've successfully created your team, you can pin relevant information as tabs. For example, you might want to pin the crisis management admin app or the Power BI report to your team.
To add the admin app as a tab
Select the + button.
Search for and select Power Apps.
Search for and select Crisis Information Admin.
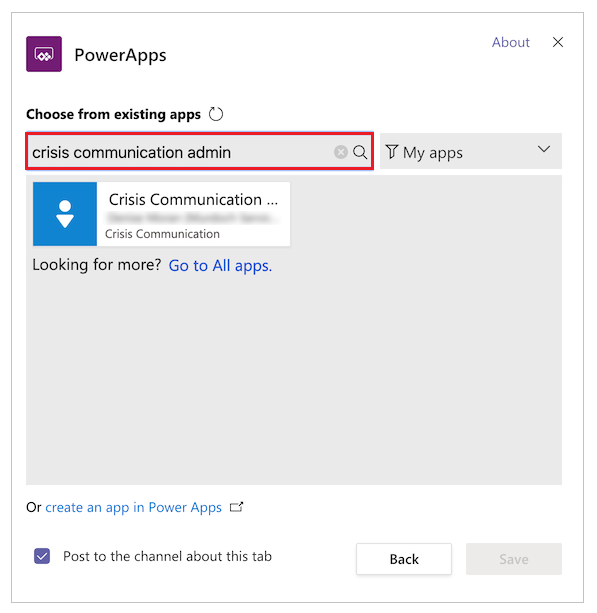
Select Save.
To add the Power BI report as a tab
- Select the + button.
- Search for and select Power BI.
- Search for and select your Power BI report.
- Select Save.
FAQ
What licenses do I need to run this solution?
- The solution in this app uses Office connectors, therefore a seeded Power Apps license from Office is sufficient to run and play the user and admin apps. More information: Power Platform licensing overview
- If you want to use the Power BI report (packaged as part of the solution), you'll need a Power BI license. More information: Power BI pricing
Where should I go if I have feedback about the solution?
We'd love to hear about your experience deploying and customizing this solution. To share your experience, go to aka.ms/crisis-communication-feedback.
It looks like I found a bug with the app; where should I go?
To file a bug with the solution, go to aka.ms/crisis-communication-issues.
What features aren't currently supported in GCC?
The Power Automate bot connector for Teams and the Push Notification connector are currently not available for GCC. Use the email option to alert users about internal news updates instead.
How can I update the application?
If you would like to update the application, please follow the steps outlined on aka.ms/CrisisCommunicationSolution.
Issues and feedback
- For feedback about the Crisis Communication sample template, go to aka.ms/crisis-communication-feedback.
- To report an issue with the Crisis Communication app, go to aka.ms/crisis-communication-issues.
Disclaimer: This app is a sample and may be used with Microsoft Power Apps and Teams for dissemination of reference information only. This app is not intended or made available for use as a medical device, clinical support, diagnostic tool, or other technology intended to be used in the diagnosis, cure, mitigation, treatment, or prevention of disease or other conditions, and no license or right is granted by Microsoft to use this app for such purposes. This app is not designed or intended to be a substitute for professional medical advice, diagnosis, treatment, or judgement and should not be used as such. Customer bears the sole risk and responsibility for any use of this app. Microsoft does not warrant that the app or any materials provided in connection therewith will be sufficient for any medical purposes or meet the health or medical requirements of any person.