Prepare Azure container technical assets for a Kubernetes app
This article gives technical resources and recommendations to help you create a container offer on Azure Marketplace for a Kubernetes application.
For a comprehensive example of the technical assets required for a Kubernetes app-based Container offer, see Azure Marketplace Container offer samples for Kubernetes.
Fundamental technical knowledge
Designing, building, and testing these assets takes time and requires technical knowledge of both the Azure platform and the technologies used to build the offer.
In addition to your solution domain, your engineering team should have knowledge about the following Microsoft technologies:
- Basic understanding of Azure Services
- How to design and architect Azure applications
- Working knowledge of Azure Resource Manager
- Working knowledge of JSON
- Working knowledge of Helm
- Working knowledge of createUiDefinition
- Working knowledge of Azure Resource Manager (ARM) templates
Prerequisites
Your application must be Helm chart-based.
The Helm chart should not include
.tgzarchive files; all files should be unpacked.If you have multiple charts, you can include other helm charts as subcharts aside from the main helm chart.
All the image references and digest details must be included in the chart. No other charts or images can be downloaded at runtime.
You must have an active publishing tenant or access to a publishing tenant and Partner Center account.
You must have created an Azure Container Registry (ACR) that belongs to the active publishing tenant above. You'll upload the Cloud Native Application Bundle (CNAB) to that. For more information, see Create an Azure Container Registry.
Install the latest version of the Azure CLI.
The application must be deployable to Linux environment.
The images must be free of vulnerabilities. For guidance specifying vulnerability scanning requirements, see Troubleshoot container certification. To learn about scanning for vulnerabilities, see Vulnerability assessments for Azure with Microsoft Defender Vulnerability Management.
If running the packaging tool manually, Docker needs to be installed a local machine. For more information, see the WSL 2 backend section at Docker documentation for Windows or Linux. This is only supported in Linux/Windows AMD64 machines.
Limitations
- Container Marketplace supports only Linux platform-based AMD64 images.
- Container Marketplace offer supports deployment to Managed AKS and Arc-Enabled Kubernetes . A single offer can only target one cluster type, either Managed AKS or Arc-Enabled Kubernetes.
- Offers for Arc-Enabled Kubernetes clusters only supports pre-defined billing models. For more information on billing models, see Plan an Azure Container offer.
- Single containers aren't supported.
- Linked Azure Resource Manager templates aren't supported.
Publishing overview
The first step to publish your Kubernetes app-based Container offer on the Azure Marketplace is to package your application as a Cloud Native Application Bundle (CNAB). The CNAB, comprised of your application's artifacts, is first published to your private Azure Container Registry (ACR), and later pushed to a Microsoft-owned public ACR, and is used as the single artifact you reference in Partner Center.
From there, vulnerability scanning is performed to ensure images are secure. Finally, the Kubernetes application is registered as an extension type for an Azure Kubernetes Service (AKS) cluster.
Once your offer is published, your application leverages the cluster extensions for AKS feature to manage your application lifecycle inside an AKS cluster.

Grant access to your Azure Container Registry
As part of the publishing process, Microsoft deep copies your CNAB from your ACR to a Microsoft-owned, Azure Marketplace-specific ACR. The images are uploaded to a public registry that is accessible to all. This step requires you to grant Microsoft access to your registry. The ACR must be in the same Microsoft Entra tenant that is linked to your Partner Center account.
Microsoft has a first-party application responsible for handling this process with an id of 32597670-3e15-4def-8851-614ff48c1efa. To begin, create a service principal based off of the application:
Note
If your account doesn't have permission to create a service principal, az ad sp create returns an error message containing "Insufficient privileges to complete the operation". Contact your Microsoft Entra admin to create a service principal.
az login
Verify if a service principal already exists for the application:
az ad sp show --id 32597670-3e15-4def-8851-614ff48c1efa
If the previous command doesn't return any results, create a new service principal:
az ad sp create --id 32597670-3e15-4def-8851-614ff48c1efa
Make note of the service principal's ID to use in the following steps.
Next, obtain your registry's full ID:
az acr show --name <registry-name> --query "id" --output tsv
Your output should look similar to the following:
...
},
"id": "/subscriptions/aaaa0a0a-bb1b-cc2c-dd3d-eeeeee4e4e4e/resourceGroups/myResourceGroup/providers/Microsoft.ContainerRegistry/registries/myregistry",
...
Next, create a role assignment to grant the service principal the ability to pull from your registry using the values you obtained earlier:
To assign Azure roles, you must have:
Microsoft.Authorization/roleAssignments/writepermissions, such as User Access Administrator or Owner
az role assignment create --assignee <sp-id> --scope <registry-id> --role acrpull
Finally, register the Microsoft.PartnerCenterIngestion resource provider on the same subscription used to create the Azure Container Registry:
az provider register --namespace Microsoft.PartnerCenterIngestion --subscription <subscription-id> --wait
Monitor the registration and confirm it has completed before proceeding:
az provider show -n Microsoft.PartnerCenterIngestion --subscription <subscription-id>
Gather artifacts to meet the package format requirements
Each CNAB is composed of the following artifacts:
- Helm chart
- CreateUiDefinition
- ARM Template
- Manifest file
Update the Helm chart
Ensure the Helm chart adheres to the following rules:
All image names and references are parameterized and represented in
values.yamlas global.azure.images references. Update your Helm chart template filedeployment.yamlto point these images. This ensures the image block can be updated to reference Azure Marketplace's ACR images.

If you have multiple charts, you can include other helm charts as subcharts aside from the main helm chart. All dependent helm charts image references will need updates and should point to the images included in the main chart's
values.yaml.When referencing images, you can utilize tags or digests. However, it's important to note that the images are internally retagged to point to the Microsoft-owned Azure Container Registry (ACR). When you update a tag, a new version of the CNAB must be submitted to the Azure Marketplace. This is so that the changes can be reflected in customer deployments.

Available billing models
For all available billing models, refer to the licensing options for Azure Kubernetes Applications.
Make updates based on your billing model
After reviewing the available billing models, select one appropriate for your use case and complete the following steps:
Complete the following steps to add identifier in the Per core, Per pod, Per node billing models:
Add a billing identifier label
azure-extensions-usage-release-identifierto the Pod spec in your workload yaml files.If the workload is specified as Deployments or Replicasets or Statefulsets or Daemonsets specs, add this label under .spec.template.metadata.labels.
If the workload is specified directly as Pod specs, add this label under .metadata.labels.
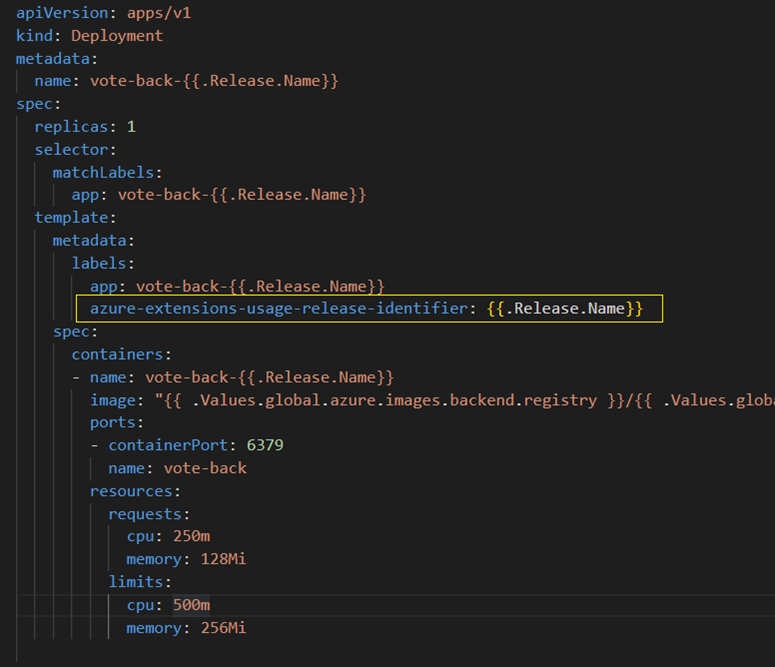
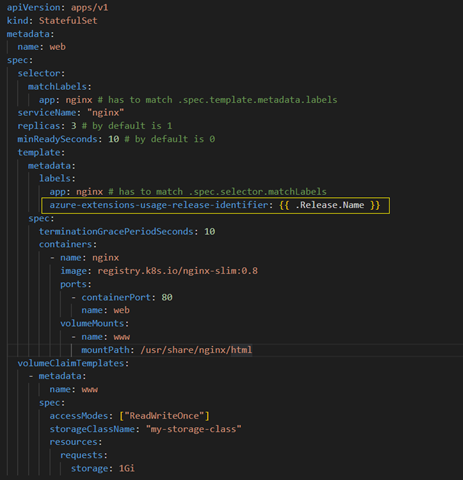
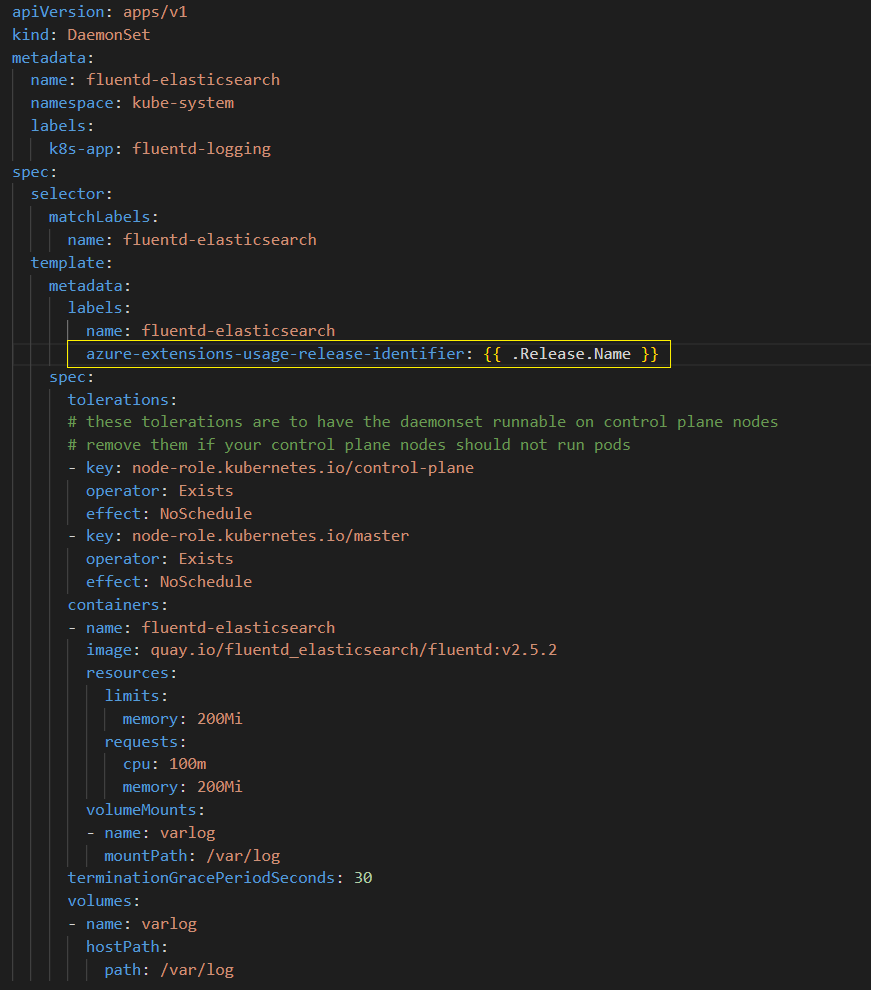
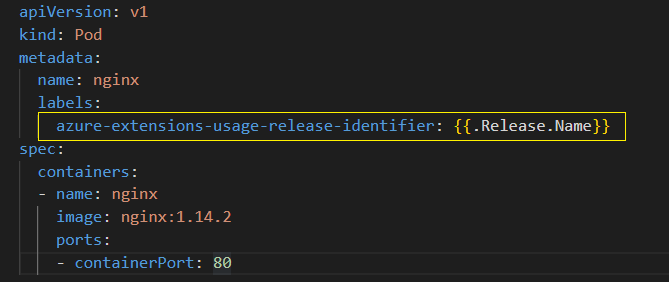
For perCore billing model, specify CPU Request by including the
resources:requestsfield in the container resource manifest. This step is only required for perCore billing model.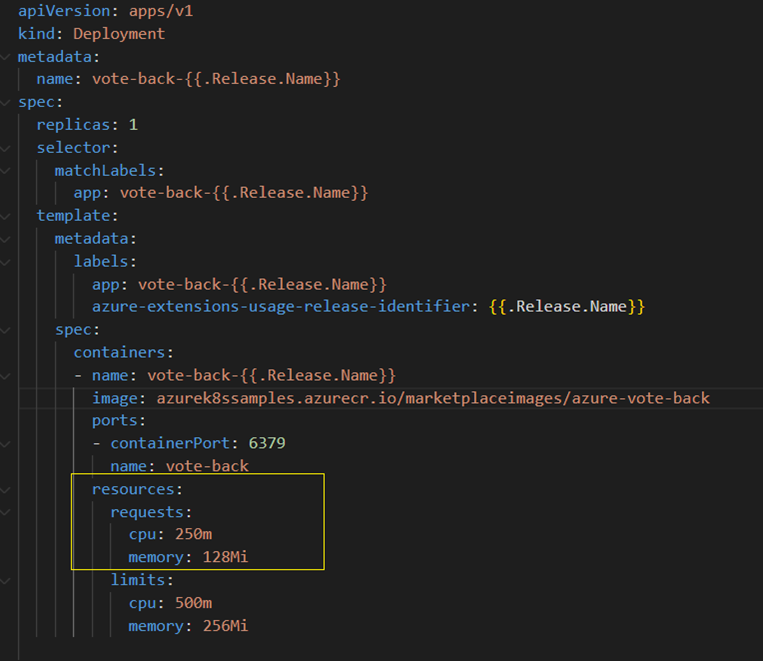
At deployment time, the cluster extensions feature replaces the billing identifier value with the extension instance name.
For examples configured to deploy the Azure Voting App, see the following:
For custom meters billing model, add the fields listed below in your helm template's values.yaml file
- clientId should be added under global.azure.identity
- planId key should be added under global.azure.marketplace. planId
- resourceId should be added under global.azure.extension.resrouceId
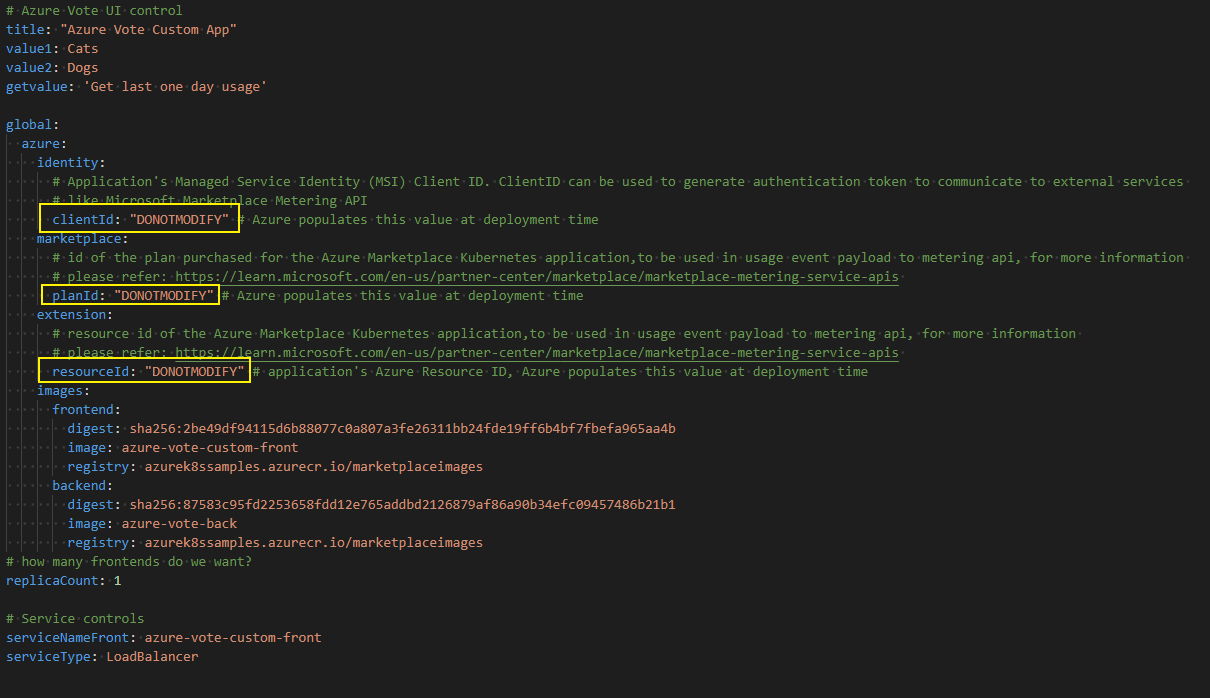
At deployment time, the cluster extensions feature replaces these fields with the appropriate values. For examples, see the Azure Vote Custom Meters based app.
Validate the Helm chart
To ensure the Helm chart is valid, test that it's installable on a local cluster. You can also use helm install --generate-name --dry-run --debug to detect certain template generation errors.
Create and test the createUiDefinition
A createUiDefinition is a JSON file that defines the user interface elements for the Azure portal when deploying the application. For more information, see:
or see an example of a UI definition that asks for input data for a new or existing cluster choice and passes parameters into your application.
After creating the createUiDefinition.json file for your application, you need to test the user experience. To simplify testing, copy your file contents to the sandbox environment. The sandbox presents your user interface in the current full-screen portal experience. The sandbox is the recommended way to preview the user interface.
Create the Azure Resource Manager (ARM) template
An ARM template defines the Azure resources to deploy. By default, you'll deploy a cluster extension resource for the Azure Marketplace application. Optionally, you can choose to deploy an AKS cluster.
We currently only allow the following resource types:
Microsoft.ContainerService/managedClustersMicrosoft.KubernetesConfiguration/extensions
For example, see this sample ARM template designed to take results from the sample UI definition linked previously and pass parameters into your application.
User parameter flow
It's important to understand how user parameters flow throughout the artifacts you're creating and packaging. In the Azure Voting App example, parameters are initially defined when creating the UI through a createUiDefinition.json file:
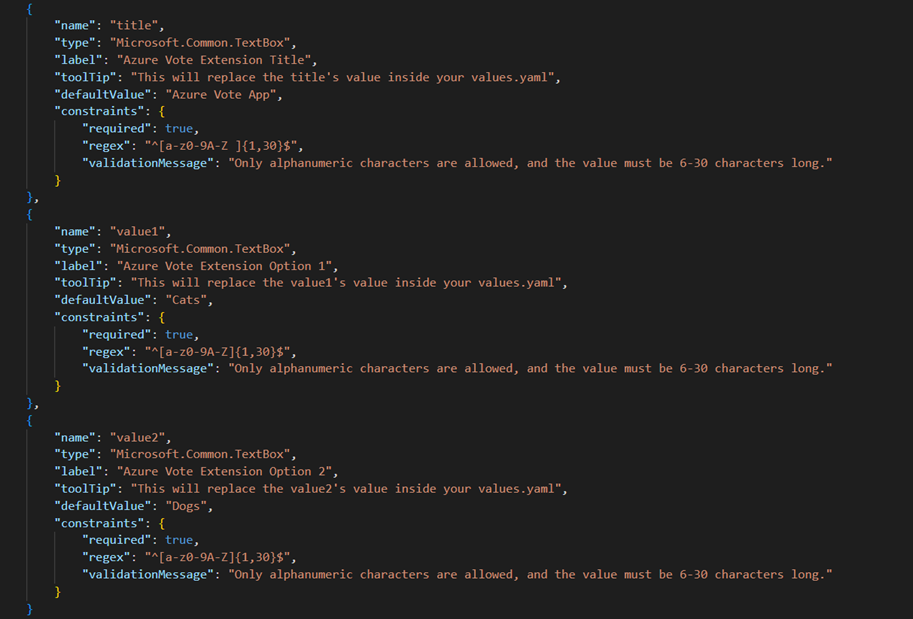
Parameters are exported via the outputs section:

From there, the values are passed to the Azure Resource Manager template and are propagated to the Helm chart during deployment:
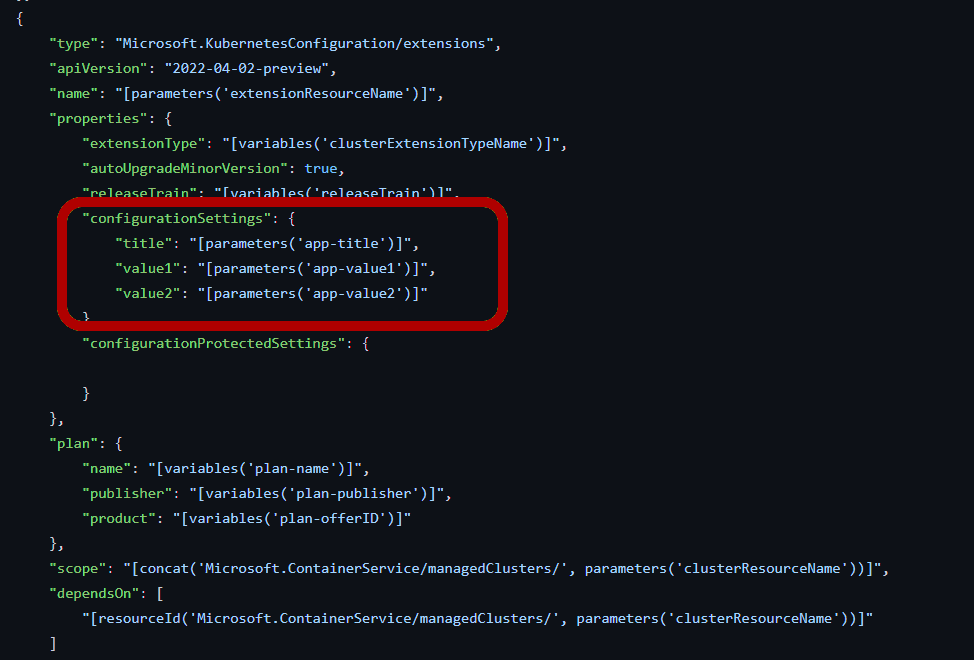
Finally, the values are passed into the Helm chart through values.yaml as shown.

Note
In this example, extensionResourceName is also parameterized and passed to the cluster extension resource. Similarly, other extension properties can be parameterized, such as enabling auto upgrade for minor versions. For more on cluster extension properties, see optional parameters.
Create the manifest file
The package manifest is a yaml file that describes the package and its contents, and tells the packaging tool where to locate the dependent artifacts.
The fields used in the manifest are as follows:
| Name | Data type | Description |
|---|---|---|
| applicationName | String | Name of the application |
| publisher | String | Name of the Publisher |
| description | String | Short description of the package |
| version | String in #.#.# format |
Version string that describes the application package version, might or might not match the version of the binaries inside. |
| helmChart | String | Local directory where the Helm chart can be found relative to this manifest.yaml |
| clusterARMTemplate | String | Local path where an ARM template that describes an AKS cluster that meets the requirements in restrictions field can be found |
| uiDefinition | String | Local path where a JSON file that describes an Azure portal Create experience can be found |
| registryServer | String | The ACR where the final CNAB bundle should be pushed |
| extensionRegistrationParameters | Collection | Specification for the extension registration parameters. Include at least defaultScope and as a parameter. |
| defaultScope | String | The default scope for your extension installation. Accepted values are cluster or namespace. If cluster scope is set, then only one extension instance is allowed per cluster. If namespace scope is selected, then only one instance is allowed per namespace. As a Kubernetes cluster can have multiple namespaces, multiple instances of extension can exist. |
| namespace | String | (Optional) Specify the namespace the extension installs into. This property is required when defaultScope is set to cluster. For namespace naming restrictions, see Namespaces and DNS. |
| supportedClusterTypes | Collection | (Optional) Specify the cluster types supported by the application. Allowed types are – "managedClusters", "connectedClusters". "managedClusters" refers to Azure Kubernetes Service (AKS) clusters. "connectedClusters" refers to Azure Arc-enabled Kubernetes clusters. If supportedClusterTypes isn't provided, all distributions of 'managedClusters' is supported by default. If supportedClusterTypes is provided, and a given top level cluster type isn't provided, then all distributions and Kubernetes versions for that cluster type is treated as unsupported. For each cluster type, specify a list of one or more distributions with the following properties: - distribution - distributionSupported - unsupportedVersions |
| distribution | List | An array of distributions corresponding to the cluster type. Provide the name of specific distributions. Set the value to ["All"] to indicate all distributions are supported. |
| distributionSupported | Boolean | A boolean value representing whether the specified distributions are supported. If false, providing UnsupportedVersions causes an error. |
| unsupportedVersions | List | A list of versions for the specified distributions that are unsupported. Supported operators: - "=" Given version isn't supported. For example, "=1.2.12" - ">" All versions greater than the given version aren't supported. For example, ">1.1.13" - "<" All versions less than the given version aren't supported. For example, "<1.3.14" - "..." All versions in the range are unsupported. For example, "1.1.2...1.1.15" (includes the right-side value and excludes the left-side value) |
For a sample configured for the voting app, see the following manifest file example.
Structure your application
Place the createUiDefinition, ARM template, and manifest file beside your application's Helm chart.
For an example of a properly structured directory, see Azure Vote sample.
For a sample of the voting application that supports Azure Arc-enabled Kubernetes clusters, see ConnectedCluster-only sample .
For more information on how to set up an Azure Arc-enabled Kubernetes cluster for validating the application, see Quickstart: Connect an existing Kubernetes cluster to Azure Arc.
Use the container packaging tool
Once you've added all the required artifacts, run the packaging tool container-package-app to validate the artifacts, build the package, and upload the package to the Azure Container Registry.
Since CNABs are a new format and have a learning curve, we've created a Docker image for container-package-app with bootstrapping environment and tools required to successfully run the packaging tool.
You have two options to use the packaging tool. You can use it manually or integrate it into a deployment pipeline.
Manually run the packaging tool
The latest image of the packaging tool can be pulled from mcr.microsoft.com/container-package-app:latest.
The following Docker command pulls the latest packaging tool image and also mounts a directory.
Assuming ~\<path-to-content> is a directory containing the contents to be packaged, the following docker command mounts ~/<path-to-content> to /data in the container. Be sure to replace ~/<path-to-content> with your own app's location.
docker pull mcr.microsoft.com/container-package-app:latest

docker run -it -v /var/run/docker.sock:/var/run/docker.sock -v ~/<path-to-content>:/data --entrypoint "/bin/bash" mcr.microsoft.com/container-package-app:latest
Run the following commands in the container-package-app container shell. Be sure to replace <registry-name> with the name of your ACR:
export REGISTRY_NAME=<registry-name>

az login

az acr login -n $REGISTRY_NAME

cd /data/<path-to-content>
To authenticate the ACR, there are two options. One option is by using az login as shown earlier, and the second option is through docker by running docker login 'yourACRname'.azurecr.io. Enter your username and password (username should be your ACR name and the password is the generated key provided in Azure portal) and run.
docker login <yourACRname.azurecr.io>

Next, run cpa verify to iterate through the artifacts and validate them one by one and address any failures. Run cpa buildbundle when you're ready to package and upload the CNAB to your Azure Container Registry. The cpa buildbundle command runs the verification process, builds the package, and uploads the package to your Azure Container Registry.
cpa verify

cpa buildbundle
Note
Use cpa buildbundle --force only if you want to overwrite an existing tag. If you've already attach this CNAB to an Azure Marketplace offer, instead increment the version in the manifest file.
Integrate into an Azure Pipeline
For an example of how to integrate container-package-app into an Azure Pipeline, see the Azure Pipeline example