Enable and collect Outlook logs to troubleshoot profile creation issues
Original KB number: 4495260
Summary
This article describes the different diagnostic information collecting options available in Outlook if you have issues creating a new profile in Outlook.
Configure and retrieve Outlook logs
Outlook logs are helpful in investigations into free busy issues, connectivity problems, and unexpected authentication prompts.
Outlook 2016, Outlook 2013, and Outlook 2010
In Outlook, go to the File tab, then Options, and then Advanced.
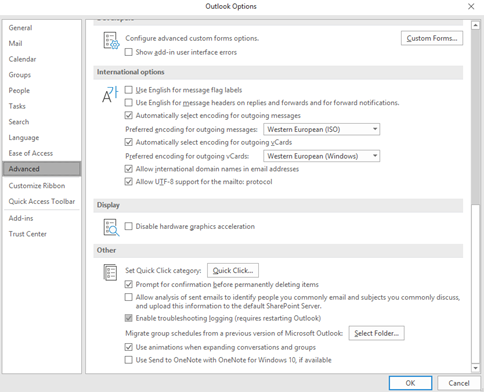
Under Other, select or clear the check box Enable troubleshooting logging (this will require an Outlook restart).

Select OK and restart Outlook.
If you are troubleshooting a profile with the creation of a new profile, you can enable logging through the registry:
Important
Follow the steps in this section carefully. Serious problems might occur if you modify the registry incorrectly. Before you modify it, back up the registry for restoration in case problems occur.
Select Start, type regedit in the Start search box, and then select regedit.exe in the Programs list.
In Registry Editor, locate the following subkey for Outlook:
HKEY_CURRENT_USER\Software\Microsoft\Office\<1x.0>\Outlook\Options\MailNote
In this subkey, <1x.0> represents the program version number (15.0 = Outlook 2013, 14.0 = Outlook 2010, 12.0 = Outlook 2007, 11.0 = Outlook 2003).
In the right side pane, right-click EnableLogging, and then select Modify.
In the Edit DWORD Value dialog box, type 1 under Value data, and then select OK.
Exit Registry Editor.
Note
It is important to close Outlook after you have reproduced the behavior. Outlook stores diagnostic information in memory until the application is shut down.
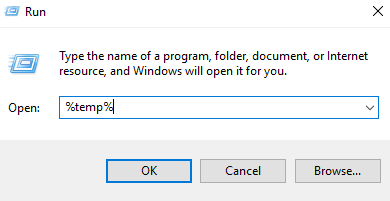
The log files will be in the user's temp directory that can be found by typing %temp% in the Run box or File Explorer:

In File Explorer, select on the Outlook Logging folder and sort by Date Modified:

In most cases, you will only have to collect the Outlook*.etl for analysis by Microsoft. To do this:
- Exit Outlook so the data you captured is written to the file.
- Copy the most recent Outlook*.etl file to your Desktop or other temporary folder. This file can be compressed into a .zip file if it's too large to easily share.
- Restart Outlook and send it to Microsoft, or upload to the secure location if that was specified.
Check Outlook connection status
The Outlook connection status may be used to investigate connectivity issues.
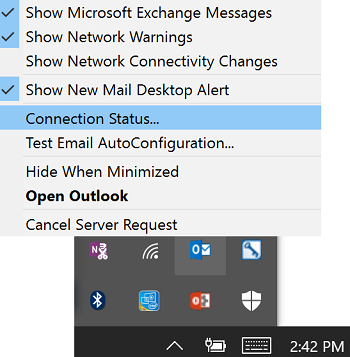
Locate the Outlook icon in the task bar. Hold down the Ctrl key and right-select the icon. Then, select Connection Status.

Expand ALL columns, and then take screenshots of all the information.
Note
You will have to scroll to the right side of the screen to capture all columns.

Provide the screen shots to the support agent as requested.
Check Autodiscover status
The Autodiscover status may also be used to investigate connectivity issues.
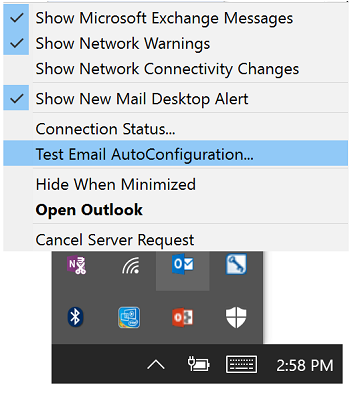
Locate the Outlook icon in the task bar. Hold down the Ctrl key and right-select the icon. Select Test Email AutoConfiguration.

Enter the email address of the user's mailbox, if that field isn't already auto-completed.
Clear the check boxes for Use Guessmart and Secure Guessmart Authentication, and then select Test. After the test is complete, the results will appear in three tabs: Results, Log, and XML.
Take screenshots of each tab. You may have to take multiple screenshots of each tab by scrolling down to access all the data.

Provide the screenshots to the support agent as requested.