Sharing calendar and contacts in Microsoft 365
Original KB number: 10157
This article discusses the following two topics:
- How to set up a shared calendar or contacts list for your entire organization or large group of users.
- How to Share calendar or contacts with specific users.
Who is it for?
Microsoft 365 users who want to share calendar or contacts list to others.
How does it work?
We'll begin by asking you the task you want to do. Then we'll take you through a series of steps that are specific to your situation.
Estimated time of completion:
30-60 minutes.
Welcome to the guide
Select the scenario that you are trying to configure for your users. After you select the scenario, follow the step-by-step instructions.
- Set up a shared calendar or contacts list for my entire organization or large group of users
- Share calendar or contacts with specific users
Which Microsoft 365 plan do you use
Select the plan that your organization subscribes to in Microsoft 365.
Not sure which Microsoft 365 plan your organization uses? Go to https://portal.microsoftonline.com and login using your Microsoft 365 administrator credentials.) and login using your Microsoft 365 administrator credentials.
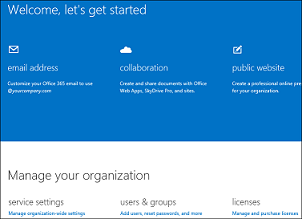
Small Business:
If you see the below administrative interface, then you are using the Small Business plan.
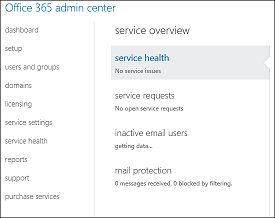
Enterprise | Midsize | Education:
If you see the below administrative interface, then you are using the Enterprise/Midsize or Education plan.
Create a new shared mailbox and assign permissions
To set up a common, shared calendar or contacts list that people in your organization can access and edit, you simply need to create a shared mailbox. After you create the shared mailbox, users that are members of the shared mailbox will be able to access the shared calendar and contacts.
Note
Because, creating a mailbox to be used for shared calendar or contacts list involves creating a shared mailbox, the people that can access the shared calendar or contacts list can also access and respond to email sent to the shared mailbox.
Before you begin, sign in to the Microsoft 365 portal, and then select Admin in the top navigation.
Go to Admin > Users & Groups.
On the Users & Groups page, select Shared Mailboxes, and then select Add
 .
.On the Add a shared mailbox page, enter the following information:
- Mailbox name: This name appears in the address book, on the To field in email, and in the list of shared mailboxes on the Shared Mailboxes page. It's required and should be user-friendly so people recognize what it is.
- Email address: Enter the email address for the shared mailbox. It's required.
Select Next.
On the Add members page, select Add
 .
.In the search field, type a person's name and then select Search. The person is added to the list of members.
When you're done adding members, select Finish.
Note
If new users are created in your organization, who need access to this shared calendar or contact list, you'll need to add them to the membership list of shared mailbox.
How do I access a shared mailbox
Depending on the email client you choose, the detailed instructions for accessing the shared calendar or contact list are listed below:
Outlook
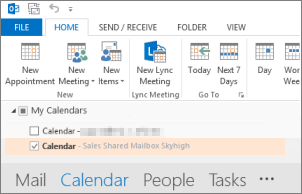
Open a shared calendar in Outlook
If you have permissions to a shared mailbox, the shared calendar associated with the shared mailbox is automatically added to your My Calendars list.
In Outlook, select Calendar.
In the folder pane, under My Calendars, select the shared calendar.
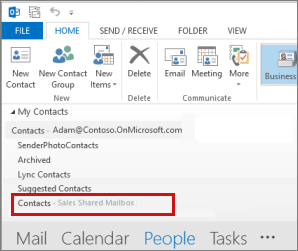
Open a shared contacts list in Outlook
If you have permissions to a shared mailbox, the contacts folder from the shared mailbox is automatically added to your My Contact list.
In Outlook, select People.
Under My Contacts, select the contacts folder for the shared contacts list.
Outlook Web App
Note
You cannot access shared contacts list for a shared mailbox from Outlook Web App.
Open a shared calendar using Outlook Web App
Sign in to your Microsoft 365 account using a Web browser. Select Calendar.
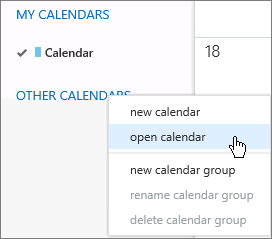
Right-click OTHER CALENDARS, and then select Open calendar.
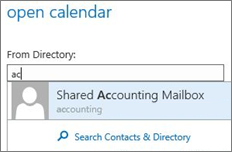
In From Directory, search for the shared calendar you want to open. Select the shared mailbox you want to open and select Open.
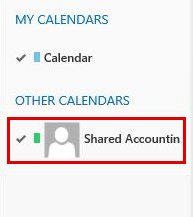
The shared calendar displays in your Calendar folder list.
Did this solve your problem?
- If yes, congratulations! Your scenario is complete.
- If no, see The issue was not resolved.
Create a security group for your organization or group of users
To set up a shared calendar or contacts list that people in your organization can access and edit, you need to first create a security group that includes the people that you want to be able to access the shared calendar or contacts list.
Note
If you already have a security group that contains the people that you want to be able to access the shared calendar or contacts, you can skip to this section.
Before you begin, sign in to the Exchange admin center (EAC) at https://outlook.office365.com/ecp/ using your Microsoft 365 tenant administrator credentials. As a Microsoft 365 Enterprises, Midsize, or Education admin, you can also access EAC by clicking Admin > Exchange in the Microsoft Online Portal.
- In the EAC, navigate to Recipients > Groups.
- Select New
 > Security group.
 - On the New security group page, provide the appropriate details for the security group, including the membership for the new security group.
Note
If new users are created in your organization, who need access to this shared calendar or contact, you'll need to add them to the security group.
Create a shared mailbox and assign Full Access permission for the security group
After you have a security group that includes the people that you want to be able to access the shared calendar or contact list, you need to create a shared mailbox and use the security group that you created in the previous step as the membership list.
After you set up the shared mailbox, users that are members of the security group will be able to access the shared calendar and contacts list.
Note
Because, creating a mailbox to be used for shared calendar or contacts list involves creating a shared mailbox, the people that can access the shared calendar or contacts list will also be able to access and respond to email sent to the shared mailbox.
Before you begin, sign in to the Exchange admin center (EAC) at https://outlook.office365.com/ecp/ using your Microsoft 365 tenant administrator credentials. As a Microsoft 365 Enterprises, Midsize, or Education admin, you can also access EAC by clicking Admin > Exchange in the Microsoft Online Portal.) using your Microsoft 365 tenant administrator credentials. As a Microsoft 365 Enterprises, Midsize, or Education admin, you can also access EAC by clicking Admin > Exchange in the Microsoft Online Portal.
Step 1: Create the shared mailbox
Go to Recipients > Shared > Add
 .
.Type values in the required Display name and Email address fields.
Note
The Send As permission field is not required to let your users access the shared calendar and shared contacts list. To provide the members of the security group access to the shared calendar and contacts list, you need to assign them Full Access permission to the shared mailbox by editing the shared mailbox after you have created it.
Select Save, select Yes in the No permission granted warning dialog box.
Step 2: Assign the security group Full Access permission to the shared mailbox
In EAC, under Recipients > Shared, double-click the shared mailbox that you created in the previous step, and then select Mailbox delegation. Under Full Access, select Add
 , and then select the security group that you want to be able to access the shared calendar and contacts list for the shared mailbox.
Select Save to save your changes and create the shared mailbox. These steps will allow the members of the security group to access the shared calendar and contact list.
How do I access a shared mailbox
Depending on the email client you choose, the detailed instructions for accessing the shared calendar or contact list are listed below:
Outlook
Open a shared calendar in Outlook
If you have permissions to a shared mailbox, the shared calendar associated with the shared mailbox is automatically added to your My Calendars list.
In Outlook, select Calendar.
In the folder pane, under My Calendars, select the shared calendar.

Open a shared contacts list in Outlook
If you have permissions to a shared mailbox, the contacts folder from the shared mailbox is automatically added to your My Contact list.
In Outlook, select People.
Under My Contacts, select the contacts folder for the shared contacts list.

Outlook Web App
Note
You cannot access shared contacts list for a shared mailbox from Outlook Web App.
Open a shared calendar using Outlook Web App
Sign in to your Microsoft 365 account using a Web browser. Select Calendar.
Right-click OTHER CALENDARS, and then select Open calendar.

In From Directory, search for the shared calendar you want to open. Select the shared mailbox you want to open and select Open.

The shared calendar displays in your Calendar folder list.

Did this solve your problem?
- If yes, congratulations! Your scenario is complete.
- If no, see The issue was not resolved.
What do you want to share
Specify if you would like to share either your calendar or contacts with specific users.
Note
Contacts can only be shared via the Microsoft Office Outlook email client.
Which email client is in use (if you want to share calendar)
Individual users can share calendar with specific users using either Microsoft Office Outlook client or Outlook Web App. Specify which client you would like to use to start sharing.
What is the organizational location of the user you are sharing your calendar with in Outlook
You can share your calendar with specific users who can be located both within your organization or any external organization (such as an outside partner, vendor etc.)
Share calendar within the organization using Microsoft Outlook
To share your calendar
Select Calendar.

Select Home > Share Calendar.

In the email that opens, type the name of the person in your organization that you want to share your calendar with in the To box. In Details, specify the level of details that you want to share with the person in your organization, and then select Send.
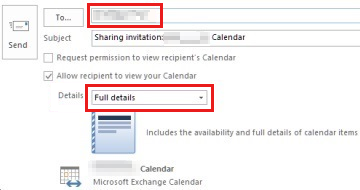
The person in your organization receives the sharing invitation in email, and then select Open this calendar.

The shared calendar displays in the person's Calendar list.
To change calendar sharing permissions
Select Calendar.

Select Home > Calendar Permissions.

On the Permissions tab, make any changes to the calendar sharing permissions.
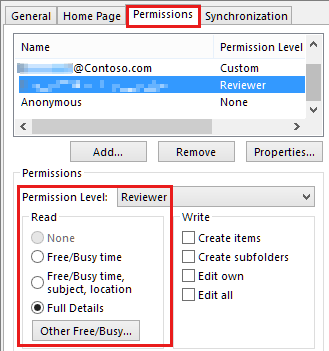
Select OK.
Did this solve your problem?
- If yes, congratulations! Your scenario is complete.
- If no, see The issue was not resolved.
Share calendar outside the organization using Microsoft Outlook
To share your calendar
Select Calendar.

Select Home > Share Calendar.

In the email that opens, type the name of the person outside of your organization that you want to share your calendar with in the To box. In Details, specify the level of details that you want to share with the person outside of your organization, and then click Send.

If the following error displays when you try to send your sharing invitation, you have tried to share more details than is supported by the settings in your organization. If this occurs, under Details, choose to share a different level of details. Only an admin in your organization can change the sharing policy settings for your organization. For more information, see the end of this section.

The person outside of your organization receives the sharing invitation in email, and then clicks Open this calendar.

The shared calendar displays in the person's Calendar list.
To change calendar sharing permissions
Select Calendar.

Select Home > Calendar Permissions.

On the Permissions tab, make any changes to the calendar sharing permissions.

Select OK.
Did you get the error when trying to share your contacts with people outside your organization?
- If yes, see Share calendar and contacts outside the organization using Microsoft Outlook.
- If no, see Complete sharing calendar outside the organization.
What is the organizational location of the user you are sharing your calendar with in Outlook Web App
You can share your calendar with specific users who can be located both within your organization or any external organization (such as an outside partner, vendor etc.)
Share calendar within the organization using Outlook Web App (OWA)
To share your calendar
Sign in to your Microsoft 365 account using a web browser. Select Calendar > Share.

Type the name or email address of the person you want to share your calendar with in the Share with box. This box works just like the To box in an email message. You can add more than one person to share your calendar with.
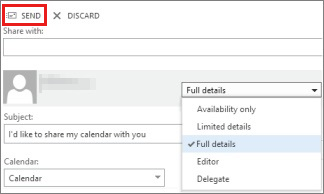
After you've added who you want to share your calendar with, select how much information you want them to see. Full details will show the time, subject, location, and other details of all items in your calendar. Limited details will show the time, subject, and location, but no other information. Availability only will show only the time of items on your calendar.
You can edit the Subject if you want.
By default, your primary calendar will be shared. If you have created other calendars, you can select one of them to share instead.
After you've finished adding people to share with, setting their access levels, and choosing which calendar to share with them, select Send. If you decide not to share your calendar right now, select Discard.
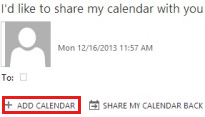
Each person in your organization that you shared your calendar with will receive an email message telling them that you've shared your calendar with them. People inside your organization will have two buttons on the invitation - one to add your calendar to their calendar view, and another to share their calendar with you. The email will also include a URL that can be used to access the calendar.
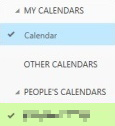
The calendar will display under PEOPLE'S CALENDARS.
To change calendar sharing permissions
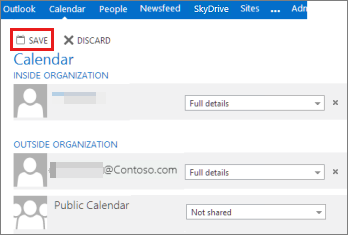
Right-click the calendar you want to change permission for, and then select Permissions.

Do one of the following, and then select Save:
Use the drop-down menu to change the level of details that you are sharing with a person.
Select the delete icon
 to stop sharing your calendar with a person.
Did this solve your problem?
- If yes, congratulations! Your scenario is complete.
- If no, see The issue was not resolved.
Share calendar outside the organization using Outlook Web App (OWA)
To share your calendar
Sign in to your Microsoft 365 account using a web browser. Select Calendar > Share.

Type the name or email address of the person you want to share your calendar with in the Share with box. This box works just like the To box in an email message. You can add more than one person to share your calendar with.

After you've added who you want to share your calendar with, select how much information you want them to see. Full details will show the time, subject, location, and other details of all items in your calendar. Limited details will show the time, subject, and location, but no other information. Availability only will show only the time of items on your calendar.
You can edit the Subject if you want.
By default, your primary calendar will be shared. If you have created other calendars, you can select one of them to share instead.
After you've finished adding people to share with, setting their access levels, and choosing which calendar to share with them, select Send. If you decide not to share your calendar right now, select Discard.
If your organization and the organization of the person you are sharing your calendar with are federated through Microsoft 365 or Exchange, the invitation will also have two buttons - one to add your calendar to their calendar view, and another to share their calendar with you.

If the external user's organization and your organization are federated through Microsoft 365 or Exchange, the person will see your calendar under PEOPLE's CALENDARS. However, if the external user's organization and your organization are not federated through Microsoft 365 or Exchange, the user will need to access your mailbox by clicking the URL in the body of the message.

To change calendar sharing permissions
Right-click the calendar you want to change permission for, and then select Permissions.

Do one of the following, and then select Save:
Use the drop-down menu to change the level of details that you are sharing with a person.
Select the delete icon
 to stop sharing your calendar with a person.
Did this solve your problem?
- If yes, congratulations! Your scenario is complete.
- If no, see The issue was not resolved.
Which email client is in use (if you want to share contact)
You can share contacts with specific users using only Microsoft Office Outlook client.
Note
Outlook Web App (OWA) does not currently support sharing a contacts folder with other people.
What is the organizational location of the user you are sharing your contacts with
You can share a contacts folder with people that are located in your organization or outside of your organization by using Microsoft Outlook. For example, you may want to share a contacts folder with a partner or vendor.
Share contacts within your organization using Microsoft Outlook
To share your contacts
In People, in the Folder Pane, select the contact folder that you want to share with a person in your organization.
Select Home. Then, in the Share group, select Share Contacts.

In the To box, enter the name of the recipient for the sharing invitation message. If you want to, you can change the Subject.
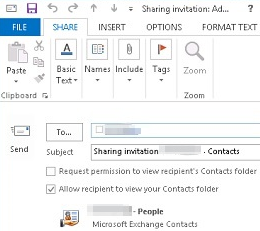
If you want to, request permission to view the recipient's default People folder. To do so, select the Request permission to view recipient's Contacts folder check box.
Note
If you want to request access to a contacts folder other than the recipient's default People folder, you must send an email message that asks for permissions to that particular folder. This option only requests access to the recipient's default People folder.
In the message body, type any information that you want to include, and then select Send. Review the confirmation dialog box, and then if correct, select OK.
The person in your organization receives the sharing invitation in email, and select Open this Contacts folder.

To change contact folder sharing permissions
In People, in the Folder Pane, select the contact folder for which you want to change permissions.
Select Folder. Then, in the Properties group, select Folder Permissions.
On the Permissions tab, do one of the following:
Revoke or change access permissions for everyone In the Name box, select Default. Under Permissions, in the Permission Level list, select None to revoke permissions or any of the other options to change permissions.
Revoke or change access permissions for one person In the Name box, select the name of the person whose access permissions you want to change. Under Permissions, in the Permission Level list, select None to revoke permissions or any of the other options to change permissions.
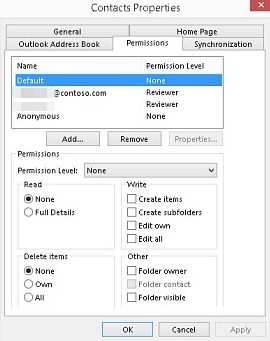
select OK.
Did this solve your problem?
- If yes, congratulations! Your scenario is complete.
- If no, see The issue was not resolved.
Share contacts outside your organization using Microsoft Outlook
To share your contacts
In People, in the Folder Pane, select the contact folder that you want to share with a person in your organization.
Select Home. Then, in the Share group, select Share Contacts.

In the To box, enter the name of the recipient for the sharing invitation message. If you want to, you can change the Subject.

If you want to, request permission to view the recipient's default People folder. To do so, select the Request permission to view recipient's Contacts folder check box.
Note
If you want to request access to a contacts folder other than the recipient's default People folder, you must send an email message that asks for permissions to that particular folder. This option only requests access to the recipient's default People folder.
In the message body, type any information that you want to include, and then select Send. Review the confirmation dialog box, and then if correct, select OK.
If the following error displays when you try to send the sharing invitation, sharing contacts with people outside of your organization is not supported by the sharing policy for your organization. Only an admin in your organization can change the sharing policy for your organization. For more information, see the end of this section.
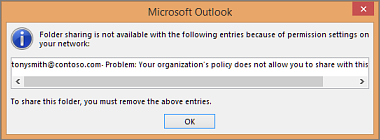
The person in your organization receives the sharing invitation in email, and clicks **Open this Contacts folder.

To change contact folder sharing permissions
In People, in the Folder Pane, select the contact folder for which you want to change permissions.
select Folder. Then, in the Properties group, select Folder Permissions.
On the Permissions tab, do one of the following:
Revoke or change access permissions for everyone In the Name box, select Default. Under Permissions, in the Permission Level list, select None to revoke permissions or any of the other options to change permissions.
Revoke or change access permissions for one person In the Name box, select the name of the person whose access permissions you want to change. Under Permissions, in the Permission Level list, select None to revoke permissions or any of the other options to change permissions.

select OK.
Did you get the error when trying to share your contacts with people outside your organization?
- If yes, see Share calendar and contacts outside the organization using Microsoft Outlook.
- If no, see Complete sharing calendar outside the organization.
The issue was not resolved
Sorry, we couldn't resolve your issue with this guide. Provide feedback on this walkthrough, and then use the resources below to continue troubleshooting.
Visit the Microsoft 365 Community for self-help support. Do one of the following:
- Use search to find a solution to your issue.
- Use the Help Center or the Troubleshooting tool that are both available from the top of every community page.
- Sign in with your Microsoft 365 admin credentials, and then post a question to the community.
Share calendar and contacts outside the organization using Microsoft Outlook
If you receive sharing policy errors when you try to send calendar or contact folder sharing requests to people outside of your organization, the required sharing policy settings are not configured in your organizations sharing policy. Sharing contact and calendar information with people outside of your organization must be enabled by a Microsoft 365 administrator in your organization.
Select the role you are in your organization to continue.
Share calendar outside the organization using Microsoft Outlook (End user)
If you are an end user and not a Microsoft 365 administrator, contact your Microsoft 365 administrator and let them know you receive an error when trying to share your calendar or contacts with people outside of your organization. After external sharing has been enabled, you'll be able to share your calendar and contacts with people outside of your organization.
Did this solve your problem?
- If yes, congratulations! Your scenario is complete.
- If no, see The issue was not resolved.
Change the default sharing policy in Microsoft 365
If you are a Microsoft 365 administrator, you can change the default sharing policy for your organization if you want to allow people in your organization to share full calendar details with people outside of your organization. You can also allow people in your organization to share a contacts folder with people outside of your organization. Select the plan that your organization subscribes to in Microsoft 365.
Microsoft 365 Small Business Plan
Before you begin, sign in to the Exchange admin center (EAC) at https://outlook.office365.com/ecp/ using your Microsoft 365 tenant administrator credentials. As a Microsoft 365 Small Business admin, you need to access EAC by using the direct URL. The Microsoft 365 Small Business Microsoft Online Portal does not have an option to access EAC. As a Microsoft 365 Small Business admin, you need to access EAC by using the direct URL. The Microsoft 365 Small Business Microsoft Online Portal does not have an option to access EAC.
Navigate to Organization > Sharing.
In the list view, under Individual Sharing, select the Default Sharing Policy, and then select Edit
 .
.In the Sharing Policy dialog box, select Sharing with all domains, and then select Edit
 .
.To let your users share full calendar details with people outside of your organization, select Share your calendar folder. Then, under Specify what information you want to share, select All calendar appointment information, including time, subject, location and title.
To let your users share a contact folder with people outside of your organization, under Specify what information you want to share, select Share your contacts folder.
In the Sharing Rule dialog box, select Save.
In the Sharing Policy dialog box, select Save to set the rules for the sharing policy.
Microsoft 365 Enterprise | Midsize | Education plan
Before you begin, sign in to the Exchange admin center (EAC) at https://outlook.office365.com/ecp/ using your Microsoft 365 tenant administrator credentials. As a Microsoft 365 admin for Enterprises, Midsize, or Education, you can also access EAC by clicking Admin > Exchange in the Microsoft Online Portal.
Navigate to Organization > Sharing.
In the list view, under Individual Sharing, select the Default Sharing Policy, and then select Edit
 .
.In the Sharing Policy dialog box, select Sharing with all domains, and then select Edit
 .
.To let your users share full calendar details with people outside of your organization, select Share your calendar folder. Then, under Specify what information you want to share, select All calendar appointment information, including time, subject, location and title.
To let your users share a contact folder with people outside of your organization, under Specify what information you want to share, select Share your contacts folder.
In the Sharing Rule dialog box, select Save.
In the Sharing Policy dialog box, select Save to set the rules for the sharing policy.
After you change the sharing policy, people in your organization will be able to successfully share their full calendar details and contacts with people outside your organization.
Did this solve your problem?
- If yes, congratulations! Your scenario is complete.
- If no, see The issue was not resolved.
Complete sharing calendar outside the organization
If you didn't receive an error when you sent the sharing invitation to a person outside of your organization, the required sharing policy settings are already enabled for your organization. You were able to successfully share calendar and contacts with people outside your organization.
Did this solve your problem?
- If yes, congratulations! Your scenario is complete.
- If no, see The issue was not resolved.