Publish an agent to Facebook
You can add your agent to Facebook Messenger to use the Facebook experience to engage with your customers.
Facebook Messenger and related services are subject to Facebook's own terms and conditions. For support related to Facebook Messenger, contact Facebook directly.
Important
This article is intended for experienced IT professionals who manage your organization's Facebook page.
Note
By publishing your agent to a Facebook page, some of your data such as agent content and user chat content will be shared with Facebook (meaning that your data will flow outside of your organization's compliance and geographic or regional boundaries).
For more information, see Facebook's Platform Policies.
Add your agent to Facebook Messenger
You need a Facebook app, and an associated developer account, to connect your Copilot Studio agent to Facebook Messenger on your Facebook pages.
To connect your agent to Facebook Messenger:
Configure Facebook app settings: retrieve your Facebook app information, enable API access, add Facebook Messenger to your app, and configure the Facebook pages your app should appear on.
Configure the Facebook publication channel in Copilot Studio.
Connect your Facebook app to Copilot Studio using webhooks.
You must submit your app for Facebook review before you can publish your app and make it public.
Configure Facebook app settings
Retrieve Facebook app information
Sign in to the Facebook app that you want to add your agent to at Facebook for Developers.
Under Settings on the side menu pane, select Basic .
Copy the App ID and App Secret. You need these values when you configure the Facebook channel in Copilot Studio.

Enable API access for your Facebook app
Sign in to the Facebook app that you want to add your agent to at Facebook for Developers.
Under Settings on the side menu pane, select Advanced.
Make sure Allow API Access to App Settings is set to Yes.
Select Save Changes to confirm your changes.

Add Facebook Messenger to your app
Sign in to the Facebook app that you want to add your agent to at Facebook for Developers.
Go to the Dashboard. Under the Add a Product section, select Set Up on the Messenger tile.

Configure Facebook pages
Sign in to the Facebook App that you want to add your agent to at Facebook for Developers.
Select Settings under Products and Messenger on the side menu pane.
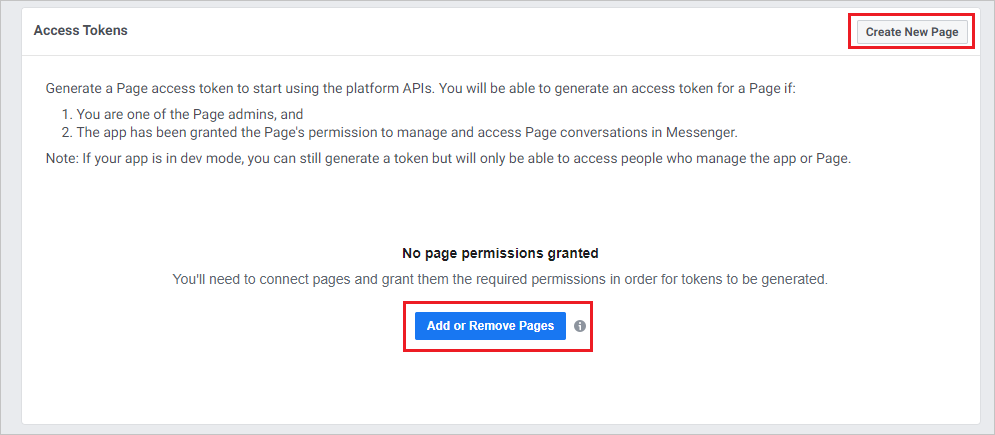
Add the pages you want to add the agent to by selecting Add or Remove Pages under the Access Tokens section. You can also create a new page by selecting Create New Page.
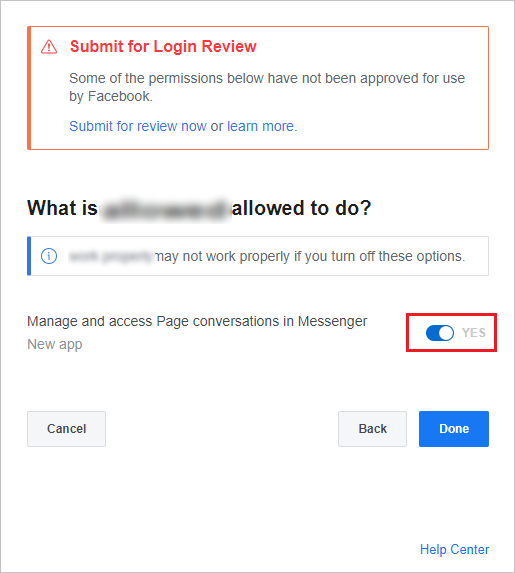
When adding pages, make sure Manage and access Page conversations in Messenger is set to Yes.
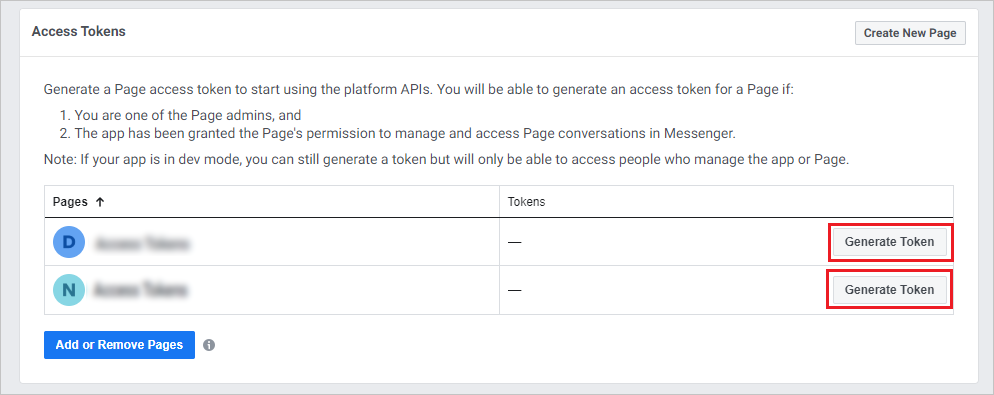
Copy the Page ID and Token for each of the pages that you want to add the agent to. Select Generate Token for each page. You'll need these tokens when you configure the Facebook channel in Copilot Studio.
Configure the Facebook channel in Copilot Studio
Open your agent in Copilot Studio.
On the top menu bar, select Channels.
Select the Facebook tile to open the configuration window.
Paste the Facebook app ID, app secret, page ID, and page access token you retrieved earlier, into the corresponding fields.
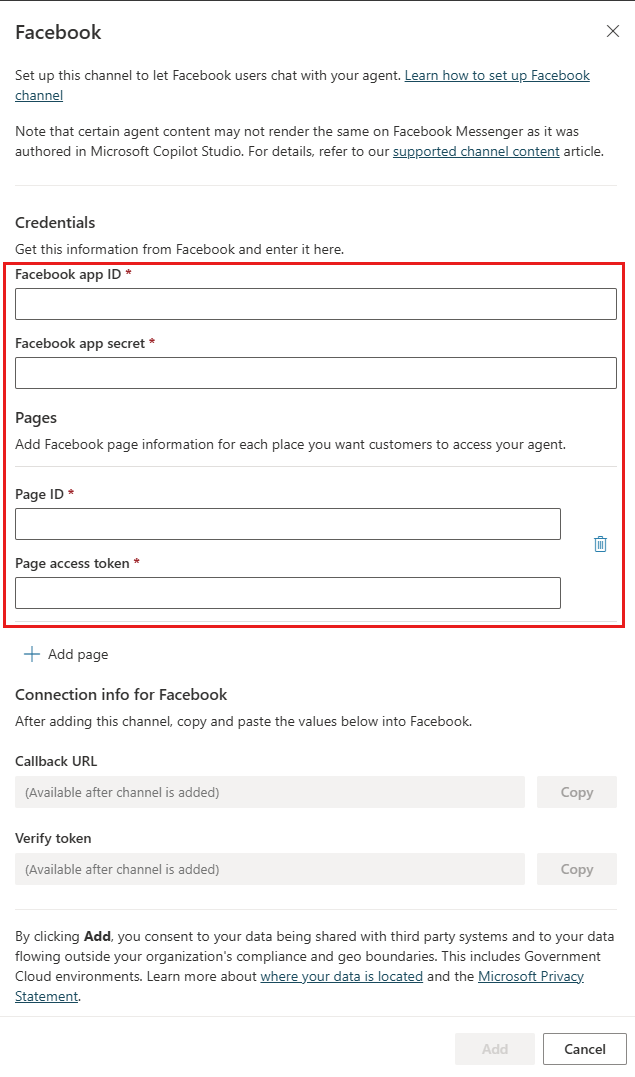
At least one page is required, but you can select Add page to add more pages.
Select Add and wait for the success confirmation message. Once successful, copy the Callback URL and Verify token. You need these elements when you connect your Facebook app to Copilot Studio.
Connect your Facebook app to Copilot Studio
Sign in to the Facebook app that you want to add your agent to at Facebook for Developers.
Select Settings under Products and Messenger on the side menu pane.
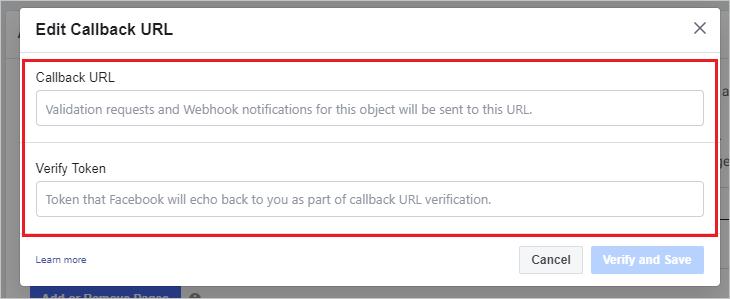
Under the Webhooks section, select Add Callback URL.

Provide the Callback URL and Verify token from the Configure the Facebook channel in Copilot Studio section and select Verify and Save.
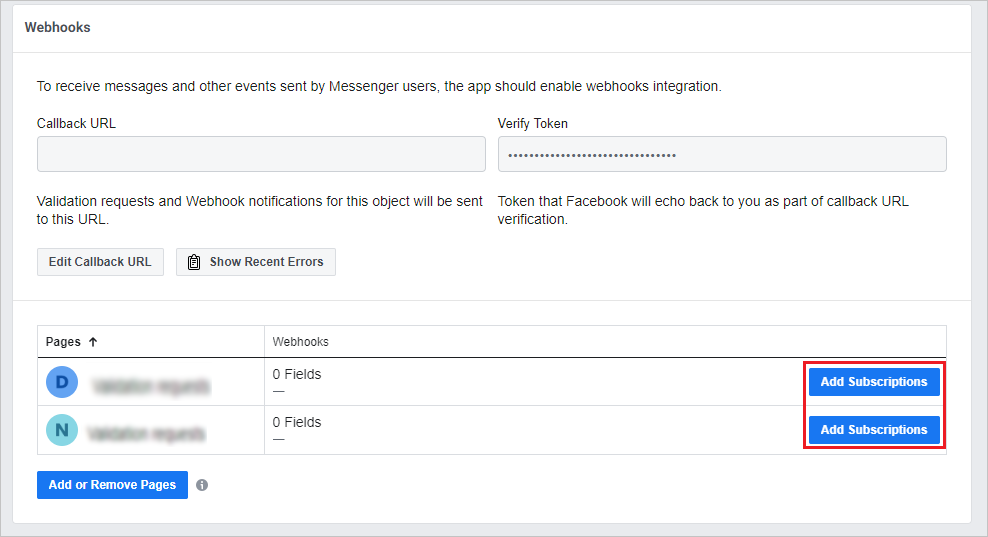
Select Add Subscriptions for each page that you want to add the agent to.
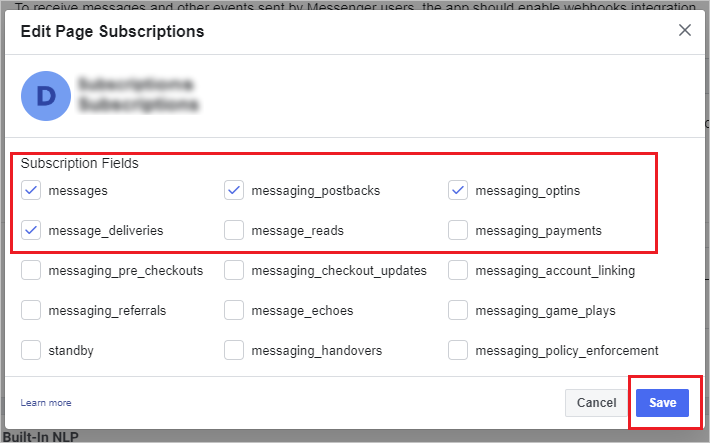
Select the following fields:
- messages
- messaging_postbacks
- messaging_optins
- message_deliveries
Select Save.
Submit for Facebook review
You must submit your app for Facebook review before you can make your Facebook app public. Facebook requires a Privacy Policy URL and Terms of Service URL. You must provide those elements on the Facebook basic app settings page (after signing in to your app at Facebook for Developers, select Basic under Settings on the side menu pane).
The Code of Conduct page contains non-Microsoft resources to help create a privacy policy. The Terms of Service page contains sample terms to help create an appropriate Terms of Service document.
Facebook has its own review process for apps that are published to Messenger. You can learn more about it at Sample submissions and Common rejection reasons. Your agent will be tested to ensure it's compliant with Facebook's Platform Policies before Facebook approves it to become public.
Make the app public and publish the page
Until the app is published, it's in Development Mode. The agent isn't public and it only works for admins, developers, and testers.
After the review is successful, in the app's Dashboard under App Review, set the app to Public. Ensure that the Facebook Page associated with the agent is published. The status appears in the Pages settings.
Remove your agent from Facebook Messenger
When you don't want the agent to be reachable in Facebook Messenger, you can remove the agent from Facebook.
Open your agent in Copilot Studio.
On the top menu bar, select Channels.
Select the Facebook tile to open the configuration window.
Select Delete.
Updating agent content for existing conversations on Facebook
To prevent disruptions during a chat between a user and the agent, existing conversations aren't updated to the latest agent content immediately after a new publish. Instead, the content is updated after the conversation has been idle for 30 minutes.
New conversations between a user and the agent have the latest published agent content.
Known limitations
- You need to create a new agent if the Customer Satisfaction (CSAT) survey shows up as a non-interactive card image for an agent created during public preview to access the latest CSAT content.
- It might take a few minutes before the agent becomes reachable by users on Facebook pages after the Facebook channel is added.
- After you remove the Facebook channel, it might take a few minutes before the agent is removed fully and becomes unreachable on Facebook Messenger.
- After you remove a Facebook page, it might take a few minutes before the agent becomes unreachable by visitors to the removed page through Facebook Messenger.