Display data from arrays in Adaptive Cards
Adaptive Cards are a versatile tool used to create interactive and engaging conversations in Copilot Studio, and can be used to display an array of items. In this article, for simplicity, we use a hard-coded example. However, you would likely get the data from a more dynamic source, like a SharePoint list, by using Power Automate.
Initialize a variable with the task list
In this scenario, you have a list of tasks in an array, and you want to show the list of tasks in the agent.
Select Add node (+) to add a node, and then select Variable management > Set a variable value.
Select the box under Set variable, and then select Create new.
Select the new variable (for example,
Var1) to display the Variable properties panel.Name your variable something meaningful, such as
EmployeeTaskList.Paste the following JSON in the To value field:
{
    "employeeName": "Alice",
    "employeeID": "E12345",
    "employeeDepartment": "HR",
    "employeeTasks": [
        {
            "taskID": "T001",
            "taskDescription": "Review employee benefits",
            "dueDate": "2023-10-15"
        },
        {
            "taskID": "T002",
            "taskDescription": "Conduct new hire orientation",
            "dueDate": "2023-09-30"
        },
        {
            "taskID": "T003",
            "taskDescription": "Update HR policies",
            "dueDate": "2023-11-05"
        }
    ]
}
Parse the JSON data into a table
This variable management node is used to convert the JSON string into a table that can be used later in the Adaptive Card.
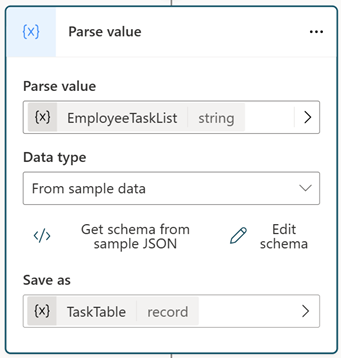
Select Add node (+) and Variable management > Parse value.
Under Parse value, select the
EmployeeTaskListvariable you created in the previous section.Under Data type, select From sample data.
Select </> Get schema from sample JSON, then copy and paste the same JSON into the From sample data section of the Data type settings. The sample data automatically generates the schema and datatype. Select Confirm.
Under Save as, select Create a new variable.
Select the new variable, and change the Variable name to
TaskTable.

Display the data in an Adaptive Card
To display the data in an Adaptive Card, use a Message node.
Select Add, and select Adaptive Card from the dropdown.
Select the Media section to show the Adaptive Card properties panel.
Inside the Adaptive Card properties panel on the right, select the </> Edit JSON dropdown and change it to Formula.
Paste the following code.
{
  type: "AdaptiveCard",
  version: "1.5",
  body: [
    {
      type: "TextBlock",
      text: "Employee Information",
      weight: "bolder",
      size: "large"
    },
    {
      type: "TextBlock",
      text: "Employee Name: " & Topic.TaskTable.employeeName,
      separator: true
    },
    {
      type: "TextBlock",
      text: "Employee ID: " & Topic.TaskTable.employeeID,
      separator: true
    },
    {
      type: "TextBlock",
      text: "Department: " & Topic.TaskTable.employeeDepartment,
      separator: true
    },
    {
      type: "TextBlock",
      text: "Tasks",
      weight: "bolder",
      size: "medium",
      separator: true
    },
    {
      type: "Container",
      items:
        ForAll(Topic.TaskTable.employeeTasks,
          {
            type: "TextBlock",
            text: "- Task ID: " & taskID & ",  Description: " & taskDescription & ", Due Date: " & dueDate ,
            wrap: true
          }
      )
    }
  ]
}
Now we can refer the JSON record properties using expressions like
Topic.TaskTable.employeeName.To display array items in an Adaptive Card, use the Container element with the items property.
The items property accepts an array of elements as its value. Each element in the array is displayed in the Adaptive Card, using the 'ForAll' function. Reference the Topic.TaskTable.employeeTasks array, as it allows access to each of its properties.
If you want to create the topic without following these instructions, you can select Open code editor from the top right command bar, and paste the following YAML code in the code editor view.
kind: AdaptiveDialog
beginDialog:
  kind: OnRecognizedIntent
  id: main
  intent:
    displayName: Untitled
    triggerQueries:
      - array

  actions:
    - kind: SetVariable
      id: setVariable_uFs69M
      variable: Topic.EmployeeTaskList
      value: "{     \"employeeName\": \"Alice\",     \"employeeID\": \"E12345\",     \"employeeDepartment\": \"HR\",     \"employeeTasks\": [         {             \"taskID\": \"T001\",             \"taskDescription\": \"Review employee benefits\",             \"dueDate\": \"2023-10-15\"         },         {             \"taskID\": \"T002\",             \"taskDescription\": \"Conduct new hire orientation\",             \"dueDate\": \"2023-09-30\"         },         {             \"taskID\": \"T003\",             \"taskDescription\": \"Update HR policies\",             \"dueDate\": \"2023-11-05\"         }     ] }"

    - kind: ParseValue
      id: 58zKdp
      variable: Topic.TaskTable
      valueType:
        kind: Record
        properties:
          employeeDepartment: String
          employeeID: String
          employeeName: String
          employeeTasks:
            type:
              kind: Table
              properties:
                dueDate: String
                taskDescription: String
                taskID: String

      value: =Topic.EmployeeTaskList

    - kind: SendActivity
      id: sendActivity_oNXY1r
      activity:
        attachments:
          - kind: AdaptiveCardTemplate
            cardContent: |-
              ={
                type: "AdaptiveCard",
                version: "1.5",
                body: [
                  {
                    type: "TextBlock",
                    text: "Employee Information",
                    weight: "bolder",
                    size: "large"
                  },
                  {
                    type: "TextBlock",
                    text: "Employee Name: " & Topic.TaskTable.employeeName,
                    separator: true
                  },
                  {
                    type: "TextBlock",
                    text: "Employee ID: " & Topic.TaskTable.employeeID,
                    separator: true
                  },
                  {
                    type: "TextBlock",
                    text: "Department: " & Topic.TaskTable.employeeDepartment,
                    separator: true
                  },
                  {
                    type: "TextBlock",
                    text: "Tasks",
                    weight: "bolder",
                    size: "medium",
                    separator: true
                  },
                  {
                    type: "Container",
                    items:
                      ForAll(Topic.TaskTable.employeeTasks,
                        {
                          type: "TextBlock",
                          text: "- Task ID: " & taskID & ",  Description: " & taskDescription & ", Due Date: " & dueDate ,
                          wrap: true
                        }
                    )
                  }
                ]
              }