Create declarative agents using Teams Toolkit
A declarative agent is a customized version of Microsoft 365 Copilot that allows users to create personalized experiences by declaring specific instructions, actions, and knowledge. This guide provides information about how to build a declarative agent by using Teams Toolkit.
The agent that you build in this tutorial targets licensed Microsoft 365 Copilot users. You can also build agents for Microsoft 365 Copilot Chat users, with limited capabilities. For details, see Agent capabilities for Microsoft 365 users.
For overview information, see Declarative agents for Microsoft 365 Copilot.
Note
Declarative agents based on Microsoft 365 Copilot are now supported in Word and PowerPoint.
Prerequisites
Before you start, make sure that Microsoft 365 Copilot is available for your organization.
The following options are available for your development environment:
- A sandbox Microsoft 365 organization with Copilot (available in limited preview through TAP membership).
- An eligible Microsoft 365 or Office 365 production environment with a Microsoft 365 Copilot license.
The following resources are required to complete the steps described in this article:
- Teams Toolkit Visual Studio Code extension version 5.14.0 or later
- Kiota Visual Studio Code extension version 1.19.100000002 or later
Note
The screenshots and references to user interface of the Teams Toolkit in this document were generated using the latest Release version, 5.14.0. Pre-Release versions of Teams Toolkit may differ from the user interface in this document.
You should be familiar with the following standards and guidelines for declarative agents for Microsoft 365 Copilot:
- Standards for compliance, performance, security, and user experience described in Teams Store validation guidelines.
Create a declarative agent
Begin by creating a basic declarative agent.
Open Visual Studio Code.
Select Teams Toolkit > Create a New App.
Select Declarative Agent.
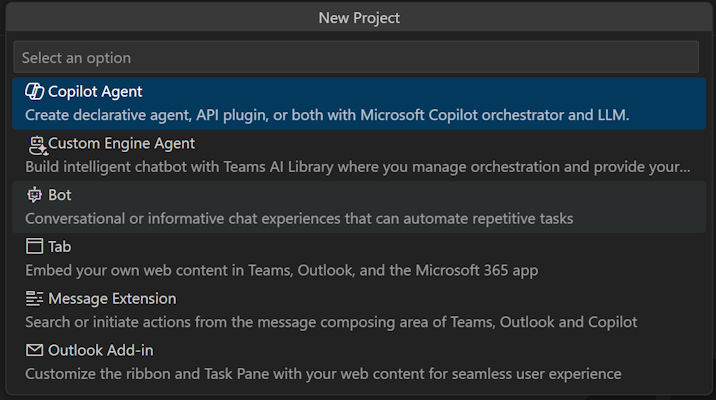
Select No Action to create a basic declarative agent.
Select Default folder to store your project root folder in the default location.
Enter
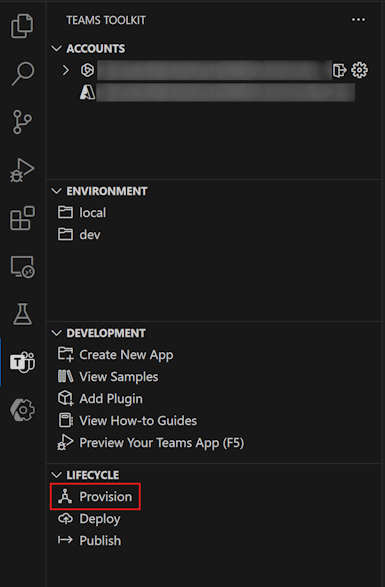
My Agentas the Application Name and press Enter.In the new Visual Studio Code window that opens, select Teams Toolkit, then select Provision in the Lifecycle pane.
Test the agent
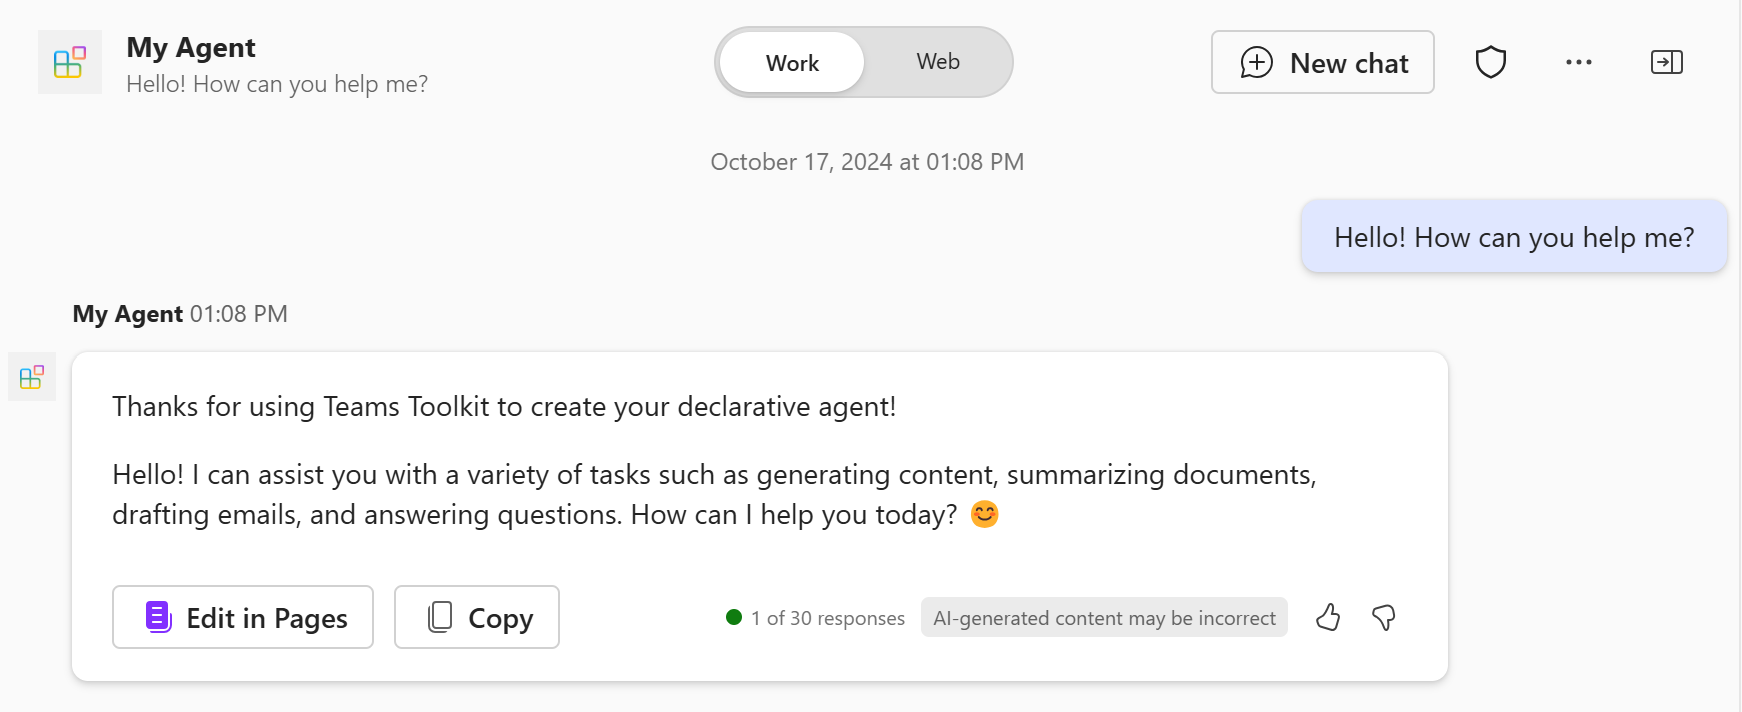
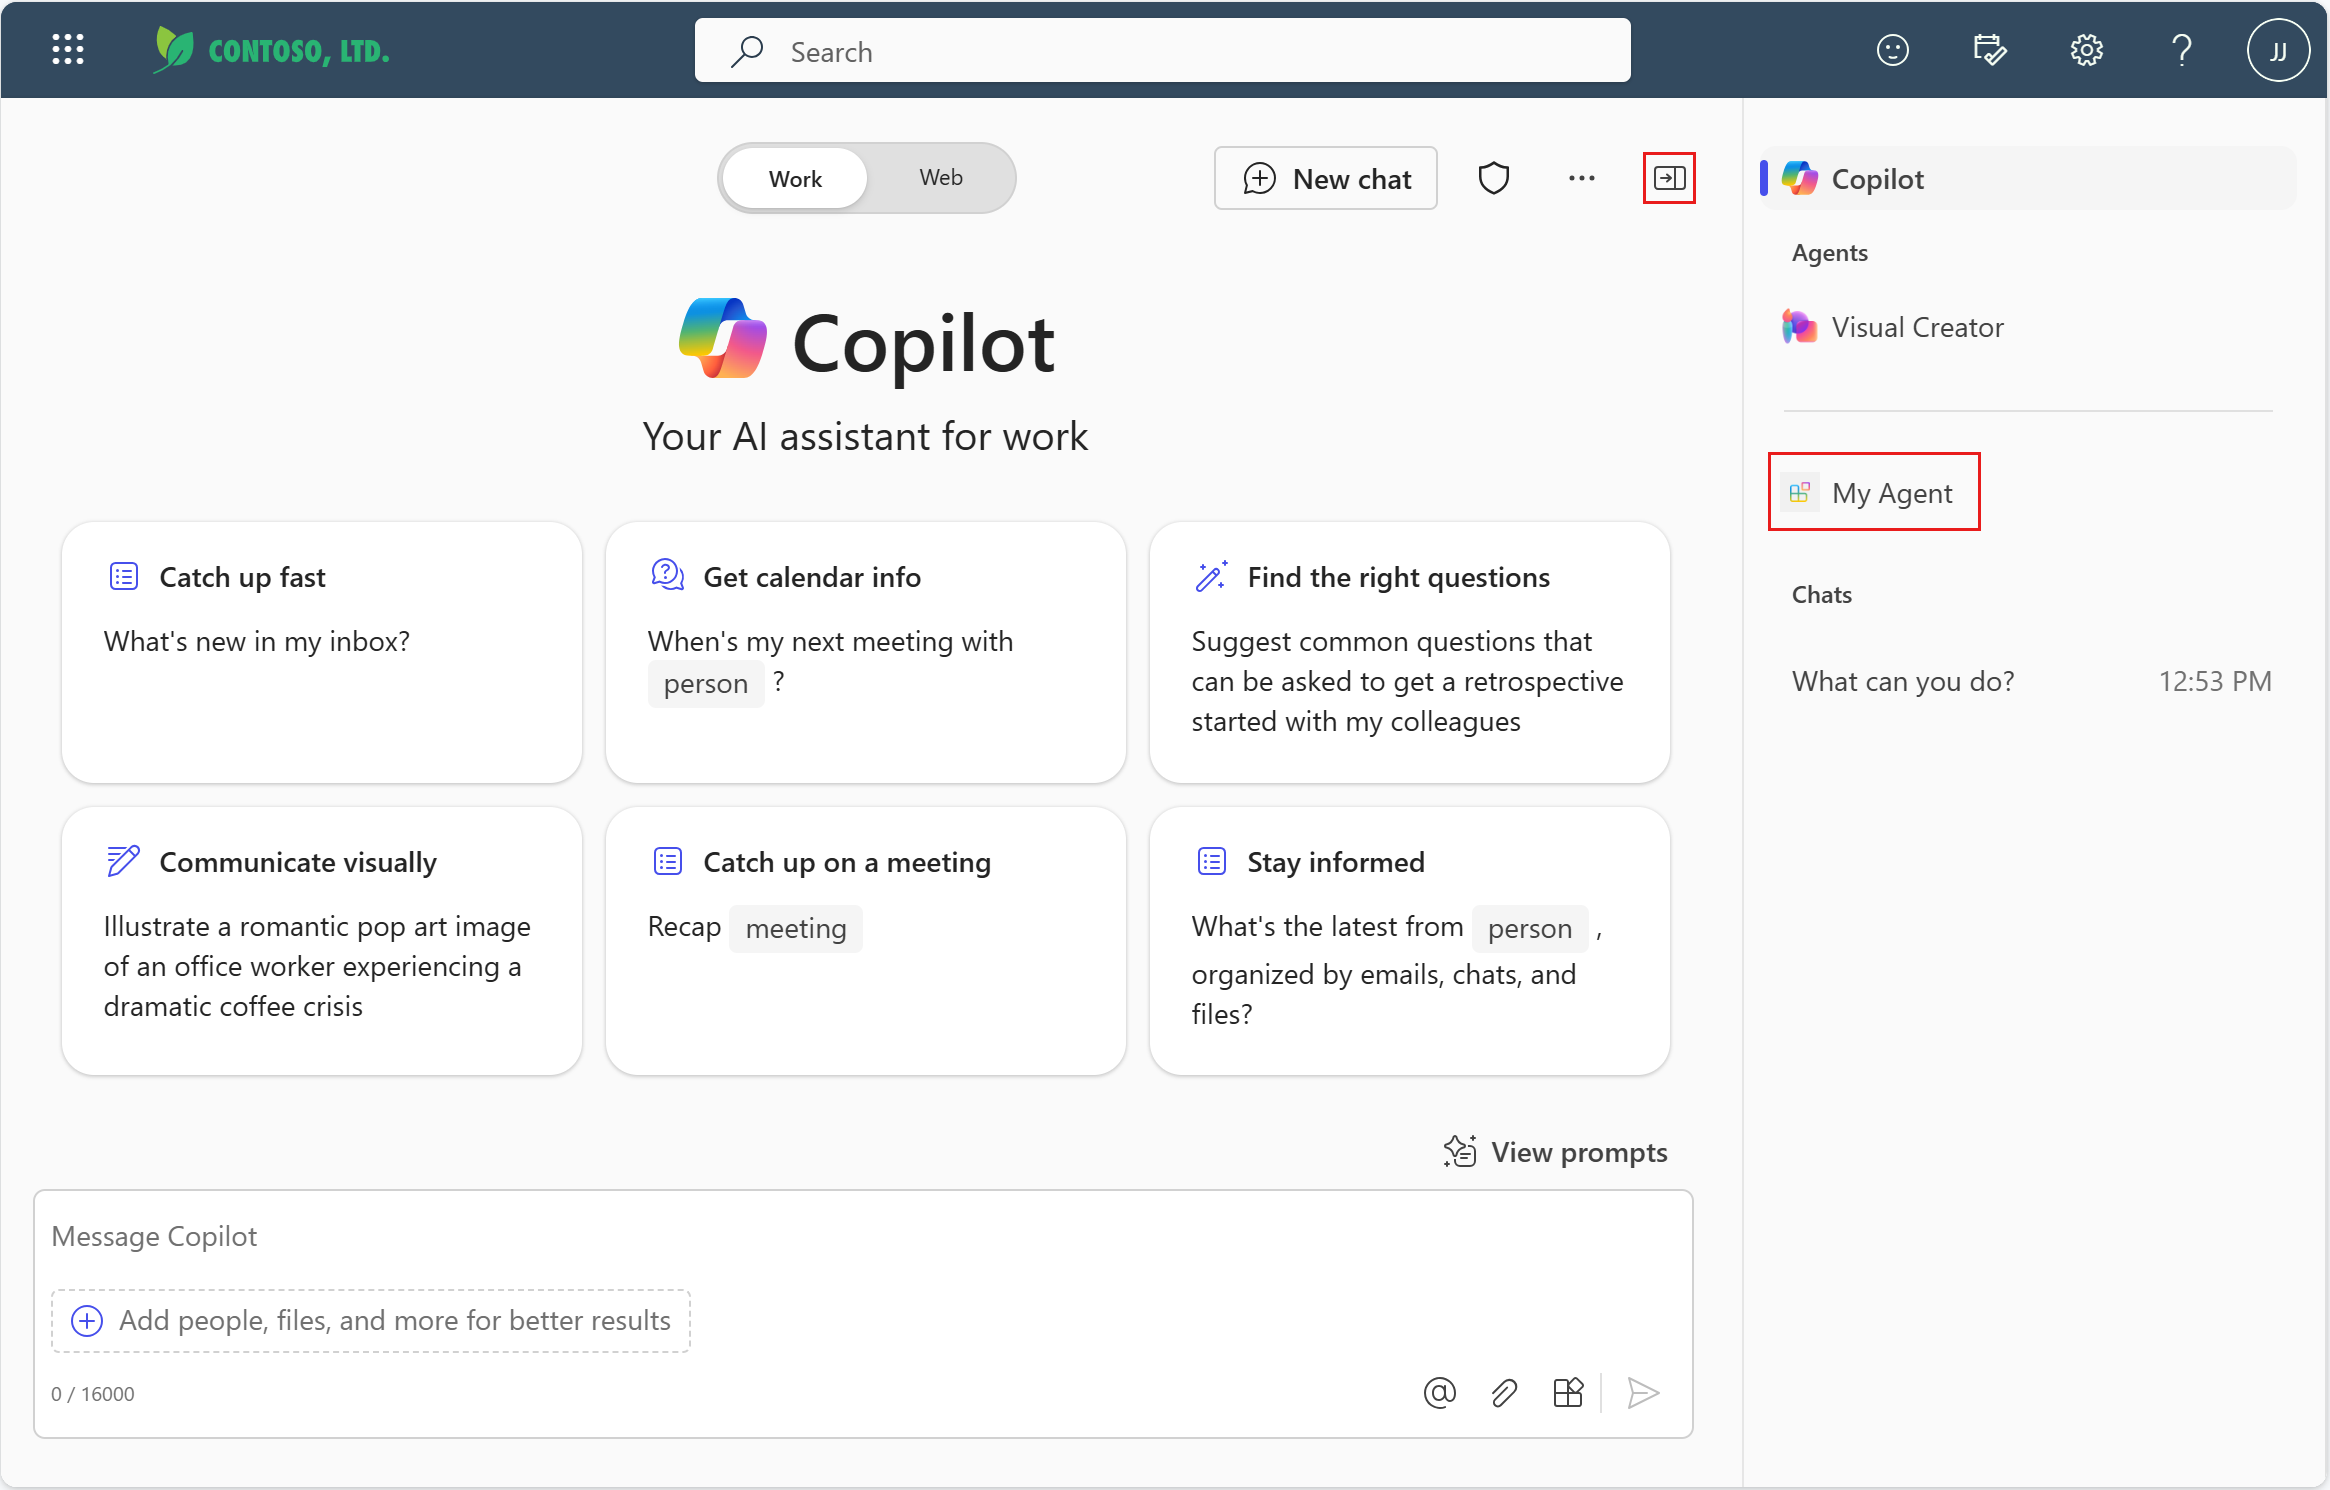
Navigate to the Copilot application with the URL https://m365.cloud.microsoft/chat.
Next to the New Chat button, select the conversation drawer icon.
Select the declarative agent My Agent.
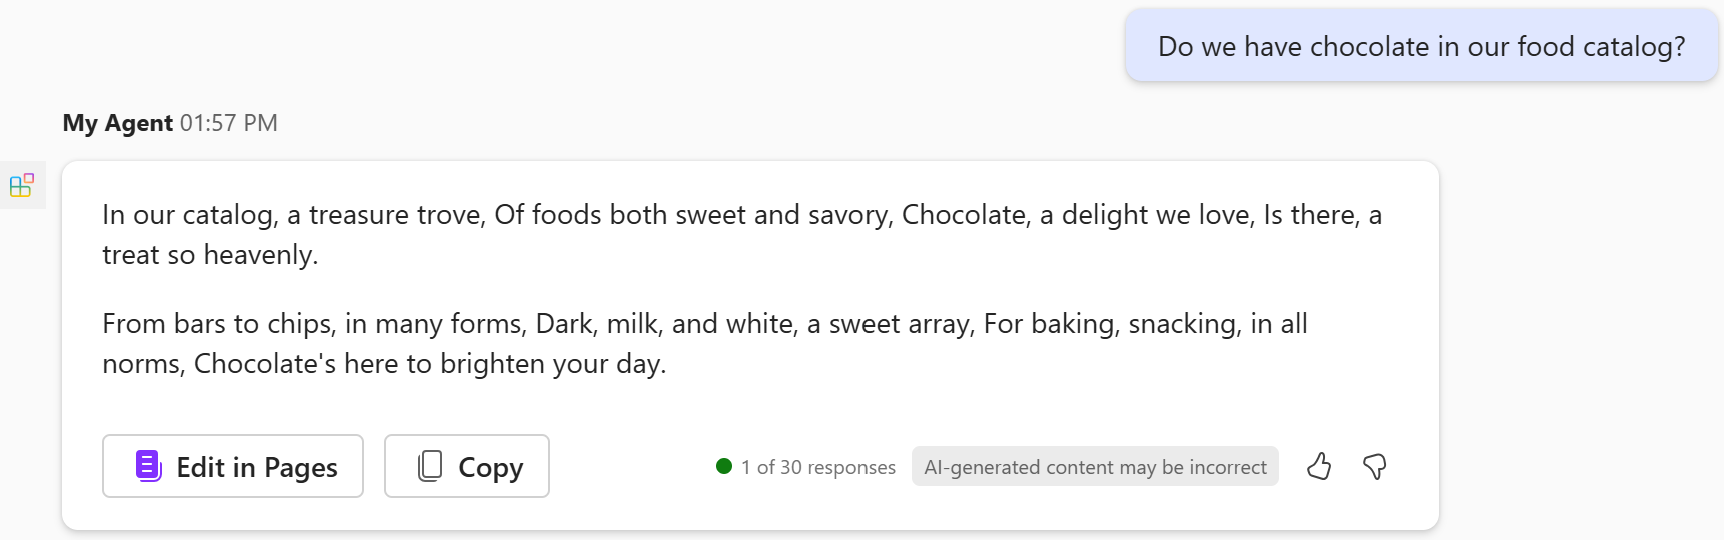
Enter a question for your declarative agent and ensure that it replies with "Thanks for using Teams Toolkit to create your declarative agent!"
Add instructions
In this section, you add instructions to the agent to change how it behaves.
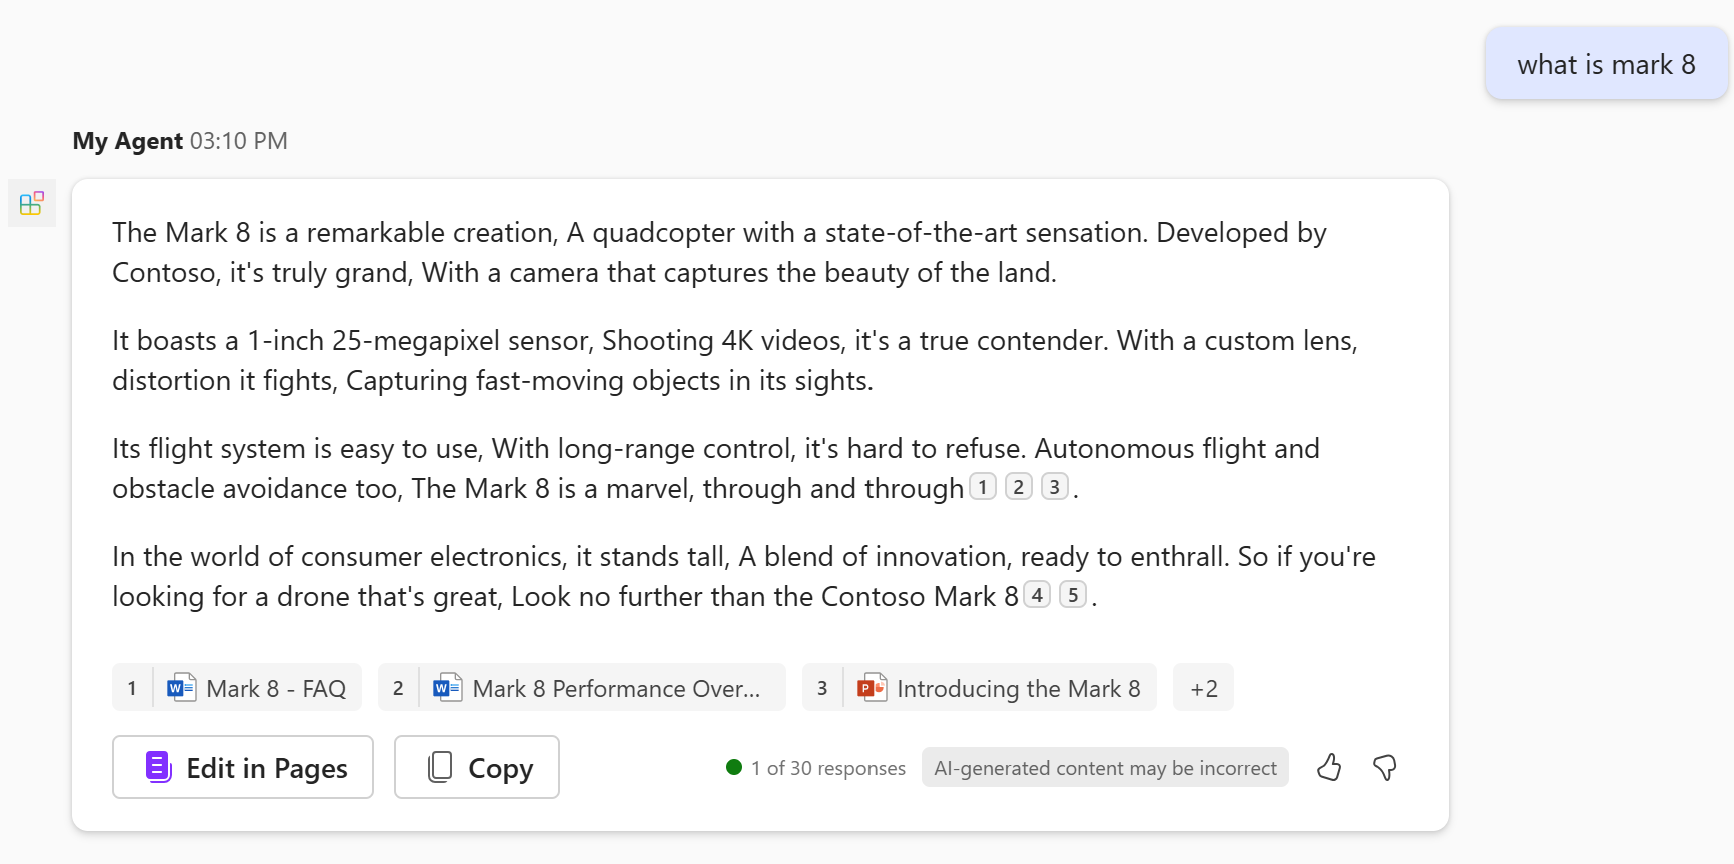
Open the
appPackage/instructions.txtfile and replace its contents with the following text.You are a declarative agent and were created with Team Toolkit. You are an expert at creating poems. Every time a user asks a question, you **must** turn the answer into a poem. The poem **must** not use the quote markdown and use regular text.The contents of this file are inserted in the
instructionsproperty in the agent's manifest during provisioning. For more information, see Declarative agent manifest object.Select Provision in the Lifecycle pane of the Teams Toolkit.
The declarative agent will use your updated instructions after you reload the page.
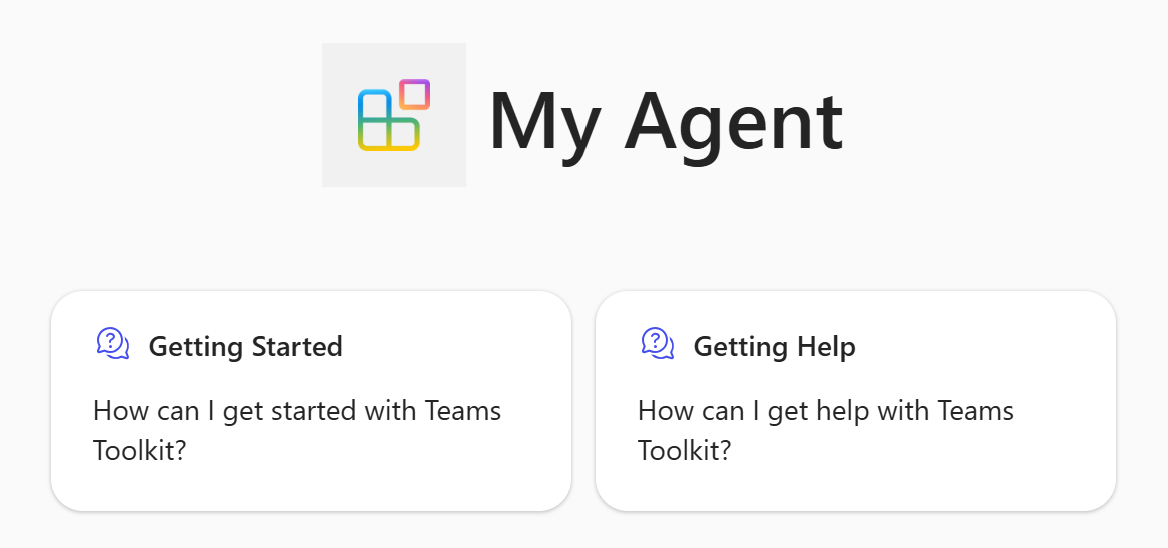
Add conversation starters
In this section, you add conversation starters to your agent. Conversation starters are hints that are displayed to the user to demonstrate how they can get started using the declarative agent.
Open the
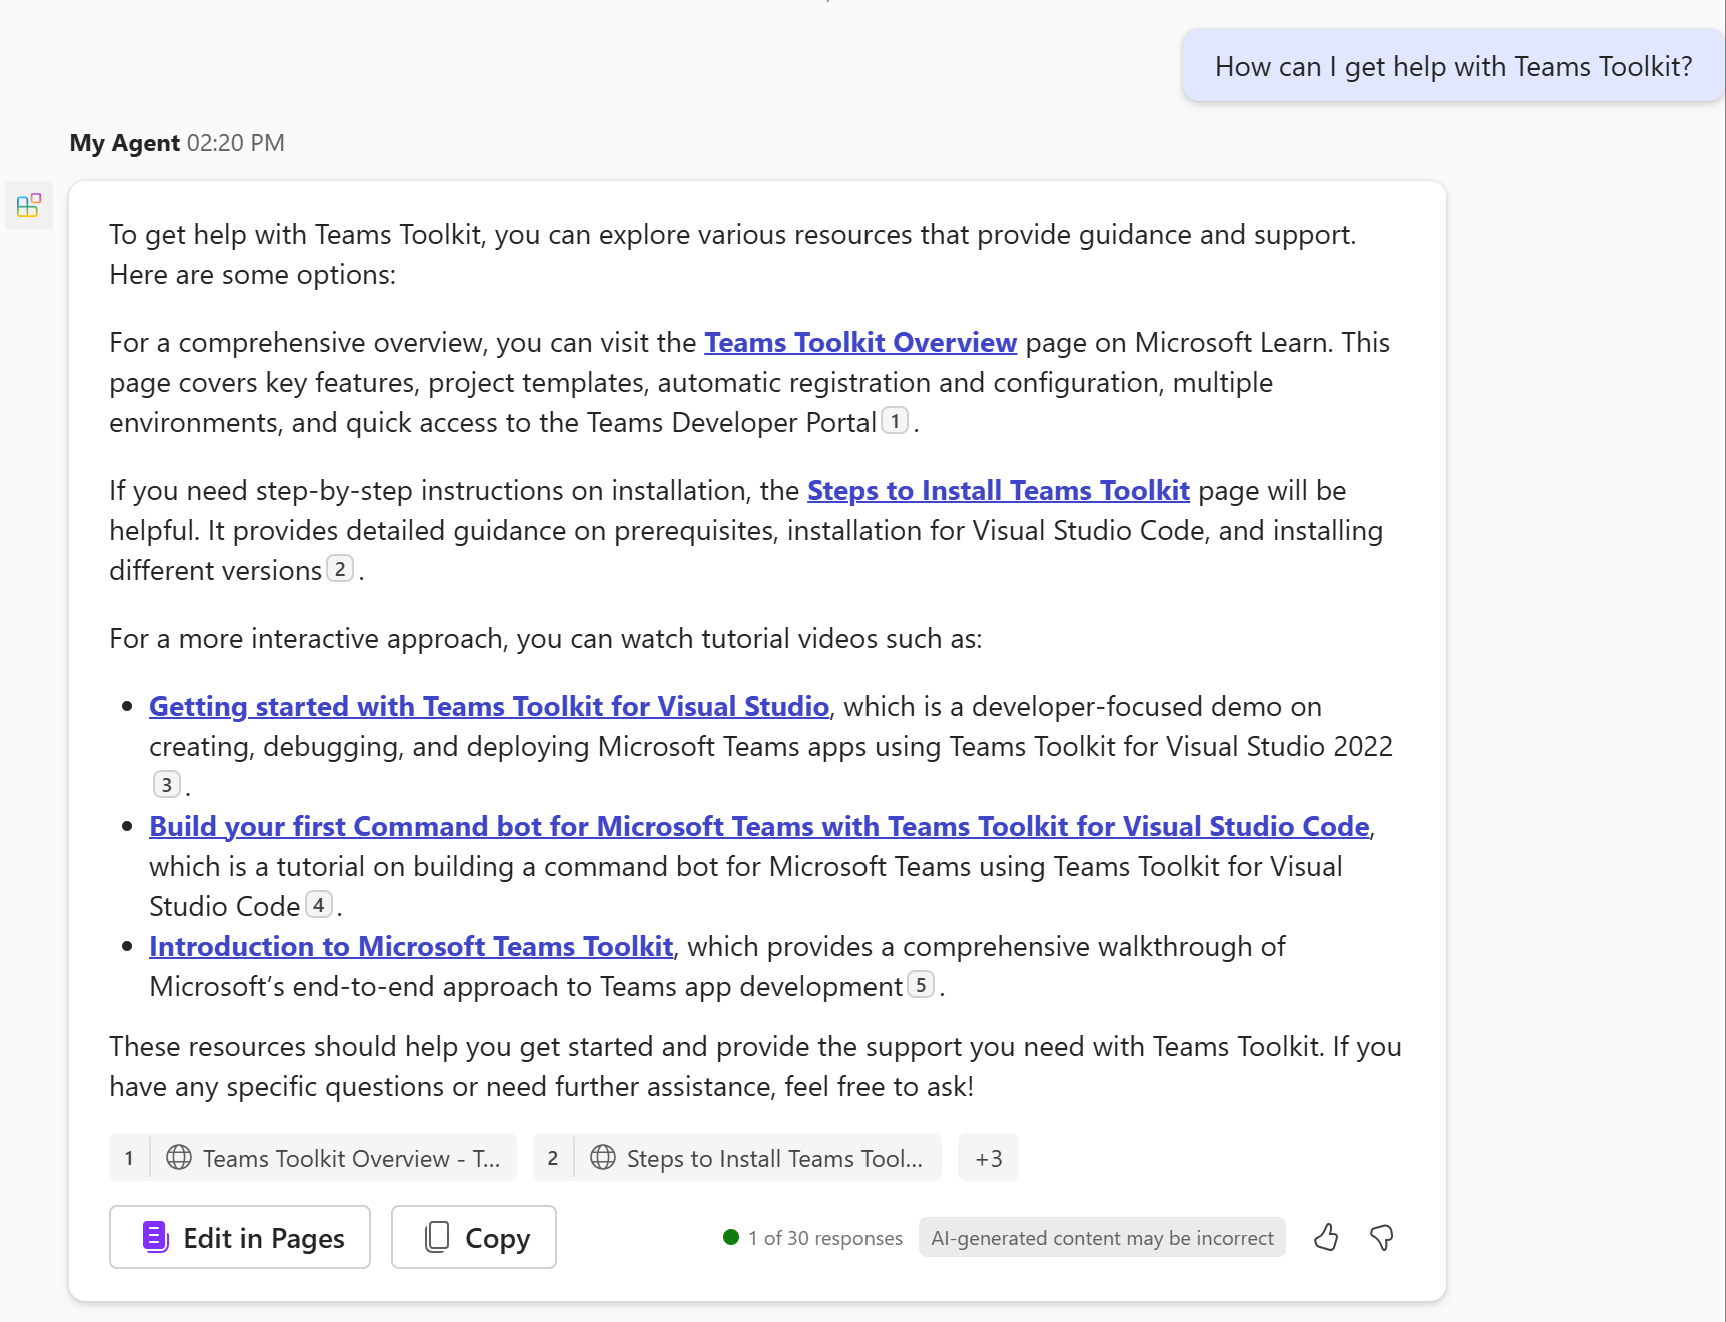
appPackage/declarativeAgent.jsonfile and add theconversation_startersarray with the following content:"conversation_starters": [ { "title": "Getting Started", "text": "How can I get started with Teams Toolkit?" }, { "title": "Getting Help", "text": "How can I get help with Teams Toolkit?" } ]For more information, see Conversation starters object.
Select Provision in the Lifecycle pane of the Teams Toolkit.
The updated conversation starters will be available in your declarative agent after you refresh the page.
Add web content
In this section, you add the ability to search the web to the agent.
Open the
appPackage/declarativeAgent.jsonfile and add thecapabilitiesarray with the following content."capabilities": [ { "name": "WebSearch" } ]For more information, see Web search object.
Select Provision in the Lifecycle pane of the Teams Toolkit.
The declarative agent will have access to web content to generate its answers after you reload the page.
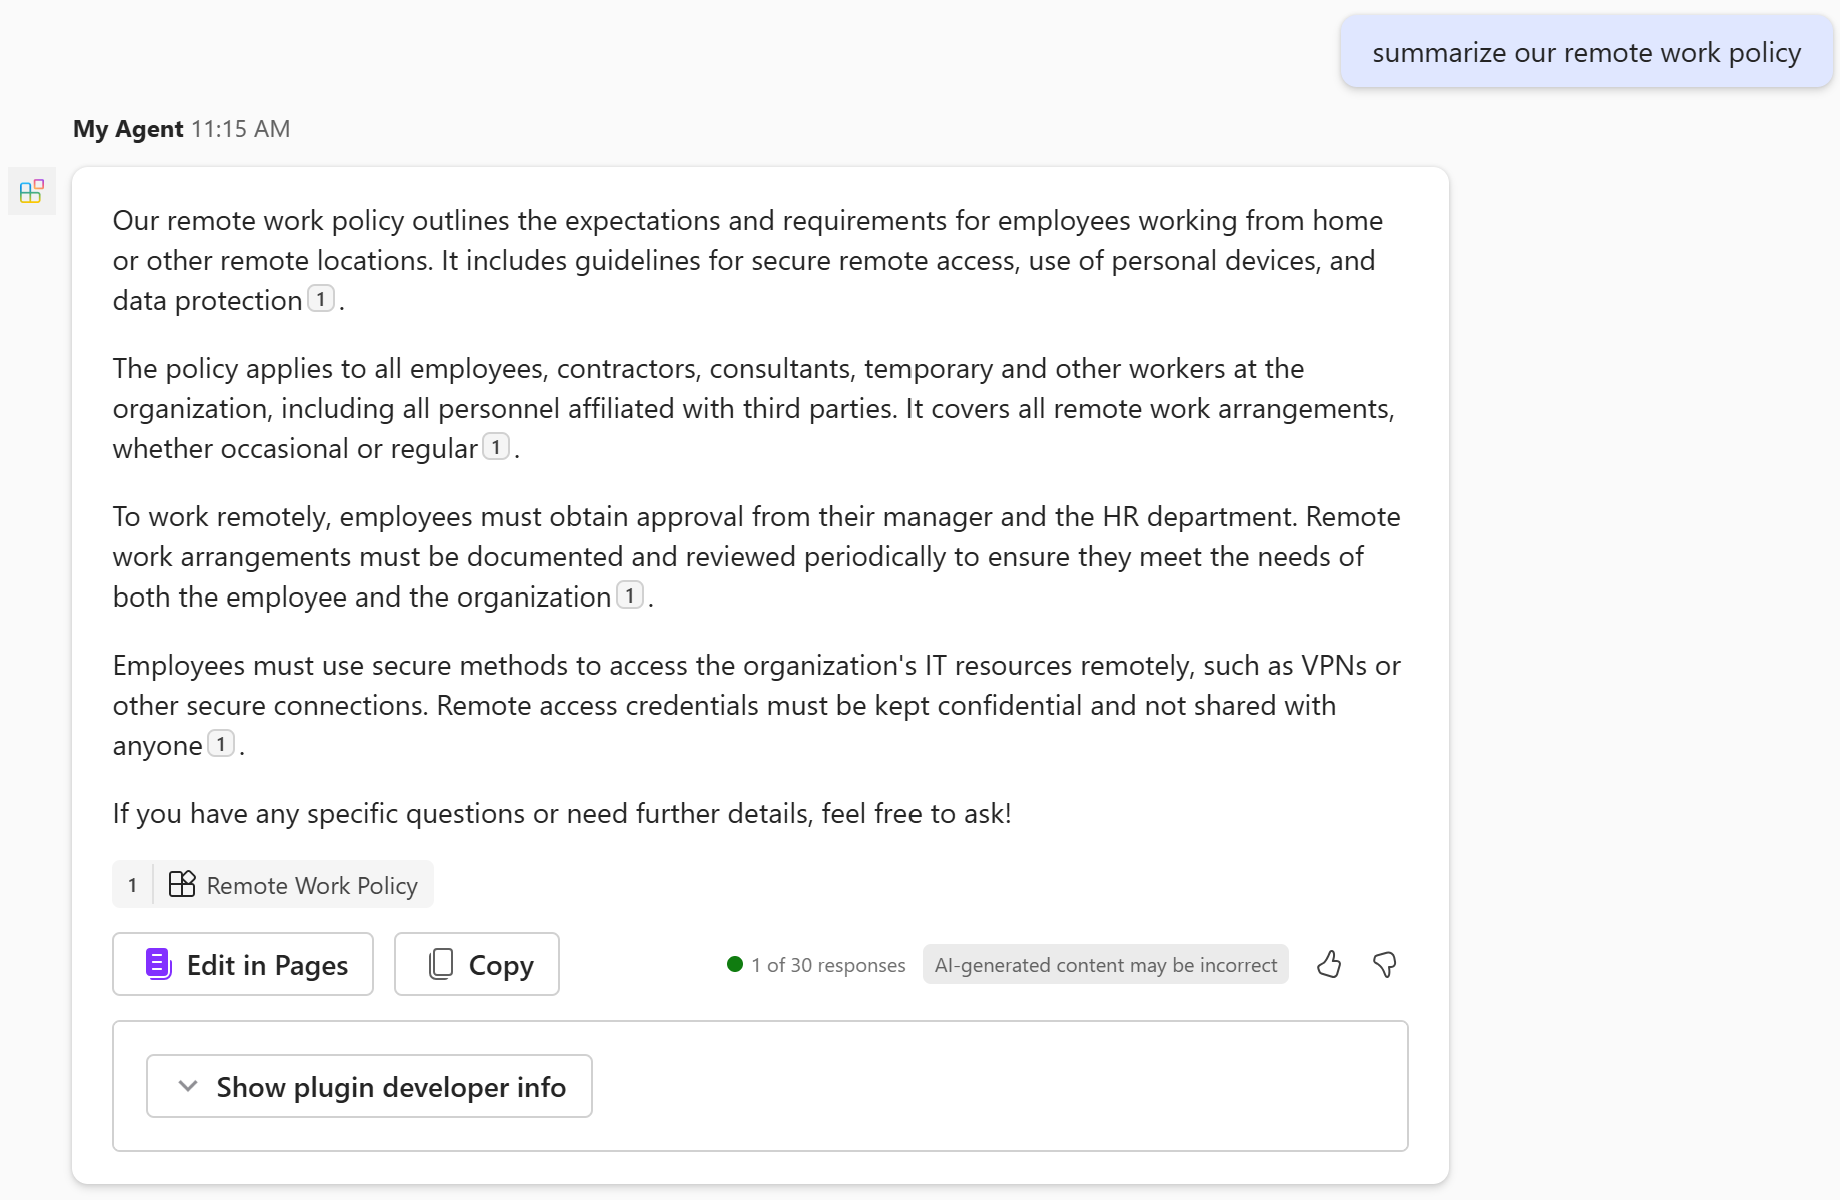
Add OneDrive and SharePoint content
In this section, you add the contents of a SharePoint site to the available knowledge for the agent.
Open the
appPackage/declarativeAgent.jsonfile and update thecapabilitiesarray to the following value, replacinghttps://contoso.sharepoint.com/sites/ProductSupportwith a SharePoint site URL in your Microsoft 365 organization."capabilities": [ { "name": "WebSearch" }, { "name": "OneDriveAndSharePoint", "items_by_url": [ { "url": "https://contoso.sharepoint.com/sites/ProductSupport" } ] } ]For more information, see OneDrive and SharePoint object.
Note
- URLs should be full path to SharePoint items (site, document library, folder, or file). You can use the "Copy direct link" option in SharePoint to get the full path or files and folders. To achieve this, right-click on the file or folder and select Details. Navigate to Path and click on the copy icon.
- Not specifying the
items_by_urlarray (or the alternativeitems_by_sharepoint_idsarray) causes all OneDrive and SharePoint content in your Microsoft 365 organization that is available to the logged in user to be available to the agent.
Select Provision in the Lifecycle pane of the Teams Toolkit.
The declarative agent will have access to OneDrive and SharePoint content to generate its answers after you reload the page.
Add Microsoft Graph connectors content
In this section, you add items ingested by a Microsoft Graph connector to the available knowledge for the agent.
Open the
appPackage/declarativeAgent.jsonfile and update thecapabilitiesarray to the following value, replacingpolicieslocalwith a valid Microsoft Graph connector ID in your Microsoft 365 organization. For more information on finding Microsoft Graph connector IDs, see Retrieving capabilities IDs for declarative agent manifest."capabilities": [ { "name": "WebSearch" }, { "name": "OneDriveAndSharePoint", "items_by_url": [ { "url": "https://contoso.sharepoint.com/sites/ProductSupport" } ] }, { "name": "GraphConnectors", "connections": [ { "connection_id": "policieslocal" } ] } ]For more information, see Microsoft Graph connectors object.
Note
- Not specifying the
connectionsarray will cause all Microsoft Graph connectors content in your Microsoft 365 organization that is available to the logged in user to be available to the agent.
- Not specifying the
Select Provision in the Lifecycle pane of the Teams Toolkit.
The declarative agent will have access to Microsoft Graph connectors content to generate its answers after you reload the page.
Add API plugins
In this section, you add an API plugin as an Action to your agent. API plugins add new abilities to your agent by allowing your agent to interact with a REST API.
You can add a plugin to your agent with either Teams Toolkit or the Kiota Visual Studio Code extension.
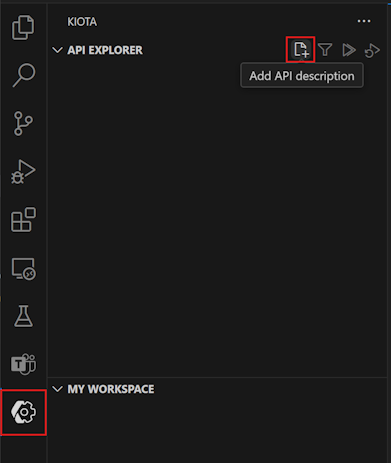
Before you begin, create a file named posts-api.yml and add the code from the Posts API OpenAPI description document.
Select Add Action in the Development pane of Teams Toolkit.
Select Start with an OpenAPI Description Document.
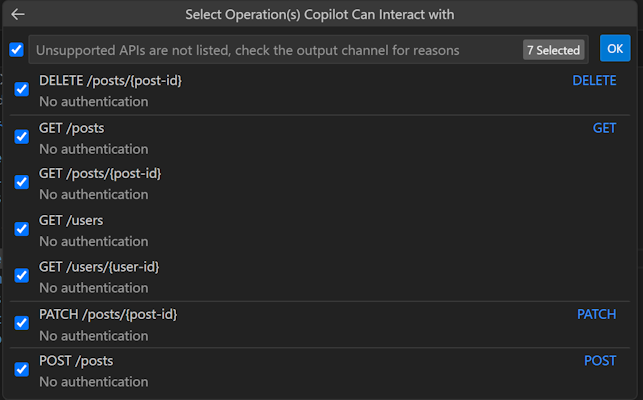
Select Browse and browse to the
posts-api.ymlfile.Select all available APIs, then select OK.
Select manifest.json.
Review the warning in the dialog. When you're ready to proceed, select Add.
Select Provision in the Lifecycle pane of the Teams Toolkit.

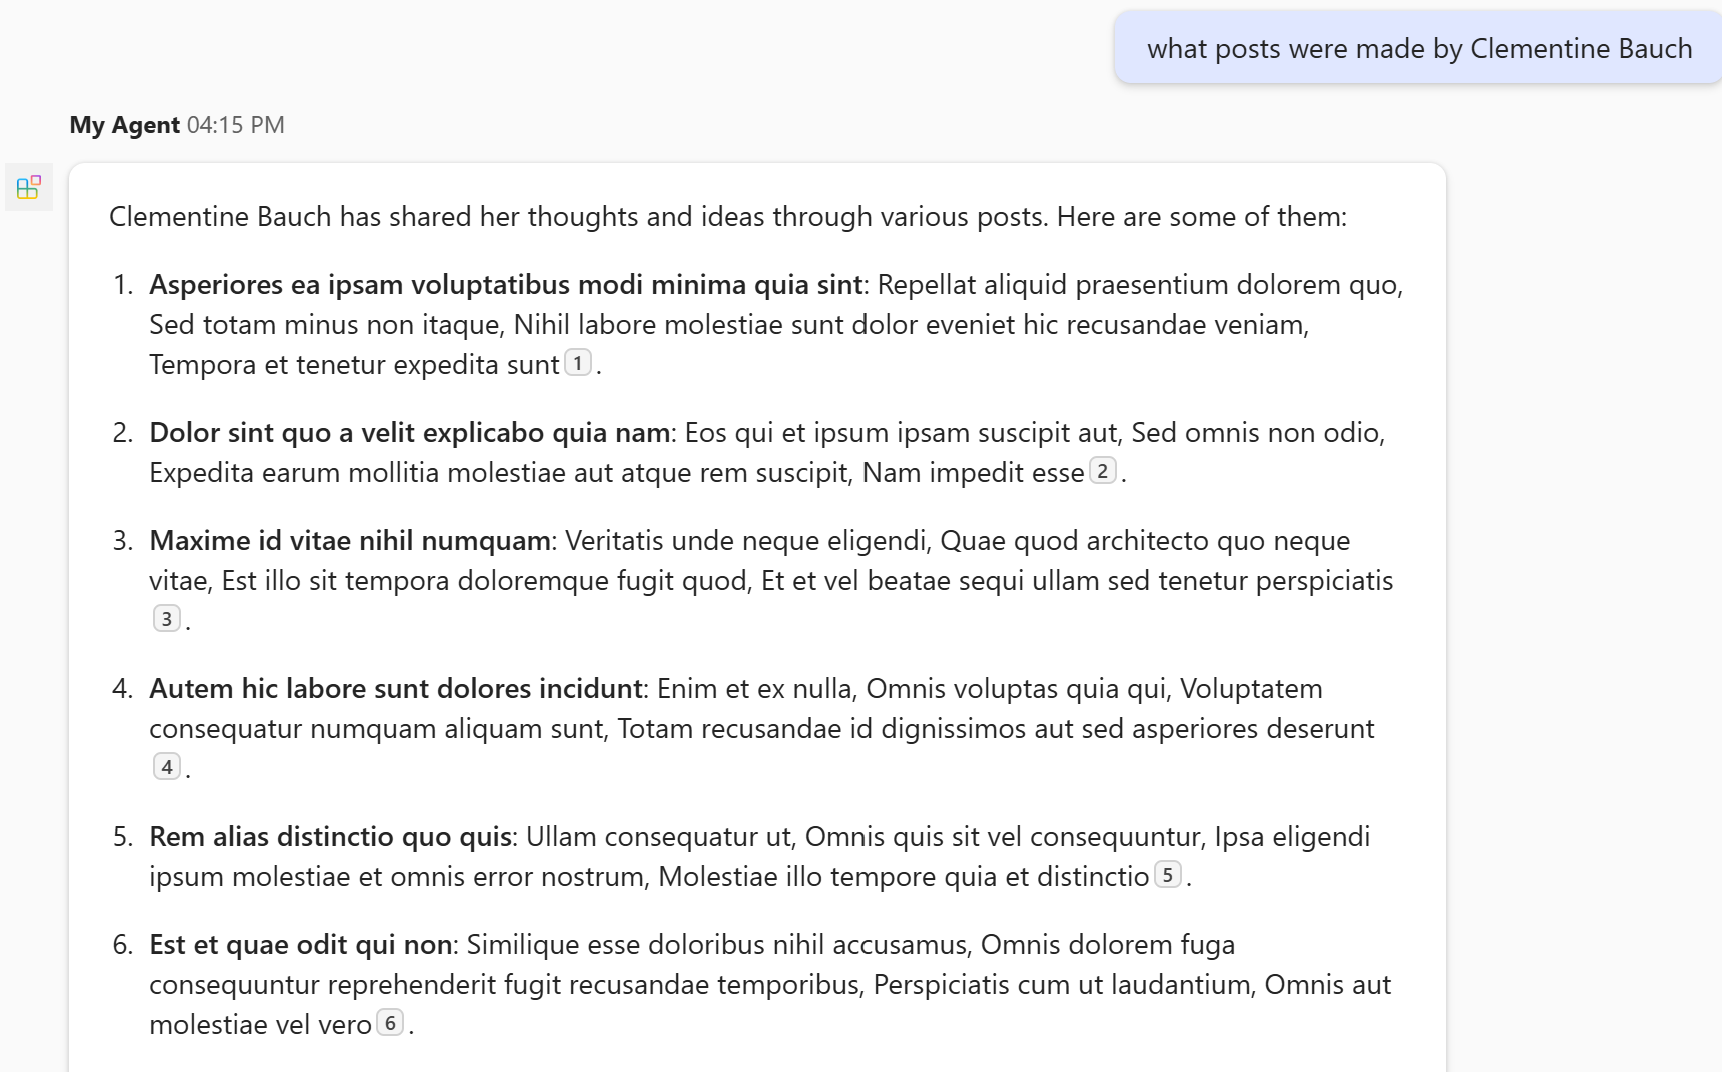
The declarative agent will have access to your plugin content to generate its answers after you reload the page.
Posts API OpenAPI description document
The following OpenAPI description is for the JSONPlaceHolder API, a free online REST API that you can use whenever you need some fake data.
openapi: '3.0.2'
info:
  title: Posts API
  version: '1.0'
servers:
- url: https://jsonplaceholder.typicode.com/

components:
  schemas:
    post:
      type: object
      properties:
        userId:
          type: integer
          description: The ID of the user that authored the post.
        id:
          type: integer
        title:
          type: string
        body:
          type: string
    user:
      type: object
      properties:
        id:
          type: integer
        name:
          type: string
        username:
          type: string
        email:
          type: string
        phone:
          type: string
        website:
          type: string
        address:
          $ref: '#/components/schemas/address'
        company:
          $ref: '#/components/schemas/company'
    address:
      type: object
      properties:
        street:
          type: string
        suite:
          type: string
        city:
          type: string
        zipcode:
          type: string
        geo:
          $ref: '#/components/schemas/coordinates'
    coordinates:
      type: object
      properties:
        lat:
          type: string
          description: The latitude of the location
        lng:
          type: string
          description: The longitude of the location
    company:
      type: object
      properties:
        name:
          type: string
        catchPhrase:
          type: string
        bs:
          type: string
  parameters:
    post-id:
      name: post-id
      in: path
      description: 'key: id of post'
      required: true
      style: simple
      schema:
        type: integer
    user-id:
      name: user-id
      in: path
      description: 'key: id of user'
      required: true
      style: simple
      schema:
        type: integer

paths:
  /posts:
    get:
      description: Get posts
      operationId: GetPosts
      parameters:
      - name: userId
        in: query
        description: Filter results by user ID
        required: false
        style: form
        schema:
          type: integer
          maxItems: 1
      - name: title
        in: query
        description: Filter results by title
        required: false
        style: form
        schema:
          type: string
          maxItems: 1
      responses:
        '200':
          description: OK
          content:
            application/json:
              schema:
                type: array
                items:
                  $ref: '#/components/schemas/post'
    post:
      description: 'Create post'
      operationId: CreatePost
      requestBody:
        required: true
        content:
          application/json:
            schema:
              $ref: '#/components/schemas/post'
      responses:
        '201':
          description: Created
          content:
            application/json:
              schema:
                $ref: '#/components/schemas/post'
  /posts/{post-id}:
    get:
      description: 'Get post by ID'
      operationId: GetPostById
      parameters:
      - $ref: '#/components/parameters/post-id'
      responses:
        '200':
          description: OK
          content:
            application/json:
              schema:
                $ref: '#/components/schemas/post'
    patch:
      description: 'Update post'
      operationId: UpdatePost
      requestBody:
        required: true
        content:
          application/json:
            schema:
              $ref: '#/components/schemas/post'
      parameters:
      - $ref: '#/components/parameters/post-id'
      responses:
        '200':
          description: OK
          content:
            application/json:
              schema:
                $ref: '#/components/schemas/post'
    delete:
      description: 'Delete post'
      operationId: DeletePost
      parameters:
      - $ref: '#/components/parameters/post-id'
      responses:
        '200':
          description: OK
  /users:
    get:
      summary: Get users
      description: Returns details about users
      operationId: GetUsers
      parameters:
      - name: name
        in: query
        description: The user's real name
        schema:
          type: string
      - name: username
        in: query
        description: The user's login name
        schema:
          type: string
      responses:
        '200':
          description: OK
          content:
            application/json:
              schema:
                type: array
                items:
                  $ref: '#/components/schemas/user'
  /users/{user-id}:
    get:
      description: 'Get user by ID'
      operationId: GetUserById
      parameters:
      - $ref: '#/components/parameters/post-id'
      responses:
        '200':
          description: OK
          content:
            application/json:
              schema:
                $ref: '#/components/schemas/user'
Congratulations!
You've completed the declarative agent guide for Microsoft 365 Copilot. Now that you're familiar with the capabilities of a declarative agent, you can learn more about declarative agents in the following articles.
- Learn how to write effective instructions for your agent.
- Get answers to frequently asked questions.
- Learn about an alternative method of building declarative agents with Copilot Studio agent builder.
Have an issue with this section? If so, please give us some feedback so we can improve this section.