Setup for Interactable type Equippable
Terminology
In this article, "hover" means "when the cursor (PC or Mac) or controller pointer (Quest) is over the object."
To "equip" an object means to hold the object in your hand. Objects that can be grabbed and held are "equippable". When an avatar is holding an object, we say that the object is "equipped".
Testing limitations
Important: In the Object Positioning, Hand Positioning, and Presets features described in this article, you have the ability to make adjustments to the position and rotation of an object relative to the avatar's hand or chest. Note that in the Unity Editor, you can only see the results using the Mesh Emulator avatar, which is limited. In order to see the results of these adjustments with a full Mesh event avatar, you must build and publish your project, then create a Mesh event, and then join the event and grab and hold the object in the scene.
Interaction Settings
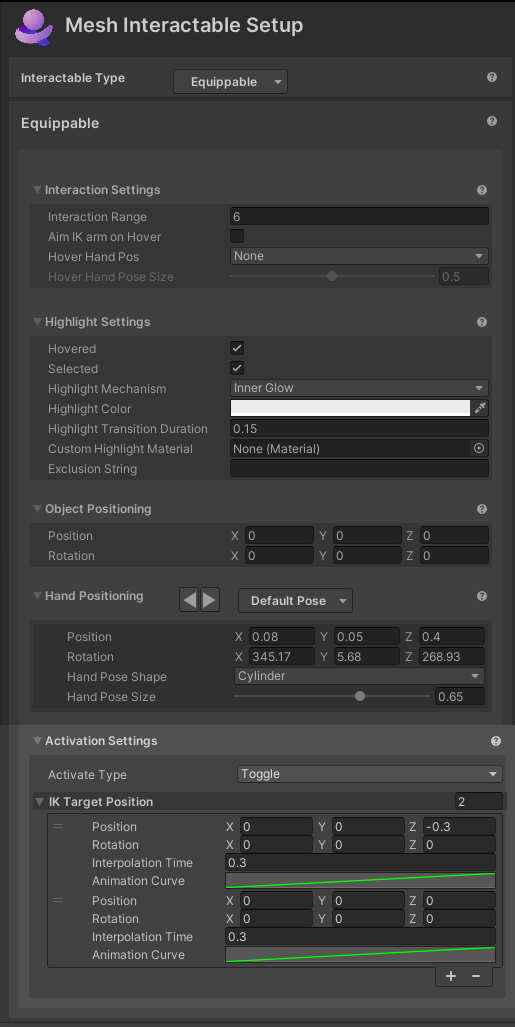
Interaction Range: Furthest distance, in meters, the avatar can be to interact with this object.
Aim IK arm on Hover: Whether or not the avatar's arm will reach towards the object while hovering using IK targeting.
Hover Hand Pos: The hand pose shape to put the avatar's hand into when hovering over the object.
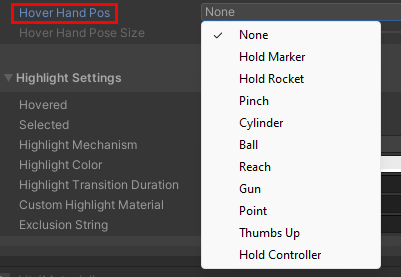
For example, if you choose Pinch, when the avatar reaches for the object, its hand will assume the pinch position.
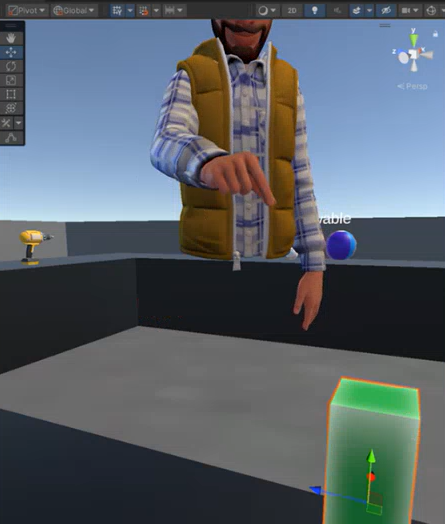
Hover Hand Pose Size: This determines the spacing of the avatar fingers on a scale of 0 to 1. At zero, the fingers will be touching; increasing the value of the slider makes the fingers further apart.Note that this is directly influenced by the shape chosen in the Hover Hand Pos drop-down.
Highlight Settings
Highlight Settings
Hovered/Selected: Whether or not to highlight the object if it's highlighted or selected.
Highlight Mechanism
Menu item 1: Shader Properties
- Highlight Color: The color to set the material's color properties when the object is highlighted.
- Highlight Transition Duration: The amount of time to fade the highlight in/out when transitioning.
- Highlight Amount Properties: The material's properties to set the amount of highlight when highlighted. This is a float value.
- Highlight Color Properties: The material's properties to set the color of highlight when highlighted. This is a color value.
Menu item 2: Mesh Outline: Adds an automatic outline of the specified color/width to objects.
- Highlight Color: The color of the outline.
- Highlight Transition Duration: The amount of time to fade the outline in/out when transitioning.
- Highlight Outline Width: How thick (in meters) should the outline be. Overrides the "Extrusion Value" in the Graphics Tools/Standard material.
- Custom Outline Material: The material used to render the outline.
- Custom Stencil Write Material: The material used write a value to the stencil buffer
- Outline Exclusion Mode: Option to filter out renderers you don’t want included in the outline.
Menu item 3: Inner Glow: Applies a highlight with a glow effect using the given properties.
- Highlight Color: The color of the inner glow.
- Highlight Transition Duration: The amount of time to fade the inner glow in/out when transitioning
- Custom highlight material: Override option specific to this object to set the material used for the glow. If this isn't set, the default material from the settings asset will be used.
- Exclusion string: If this is set then any Game Object with a name containing the exclusion string will be excluded from the highlight.
Object Positioning
- Position and Rotation: Use these settings to fine-tune the position and rotation of the object relative to the avatar's hand. Small adjustments here can significantly improve the realism of how the object is held.
Hand Positioning
These settings determine the position of the avatar's hand (specifically, the wrist) relative to the position of its chest.
Presets
In addition to the default pose for the avatar's hand, there are nine presets that give you a variety of pose choices. For example, if you choose Preset 1, the avatar will hold the object with its palm facing up.
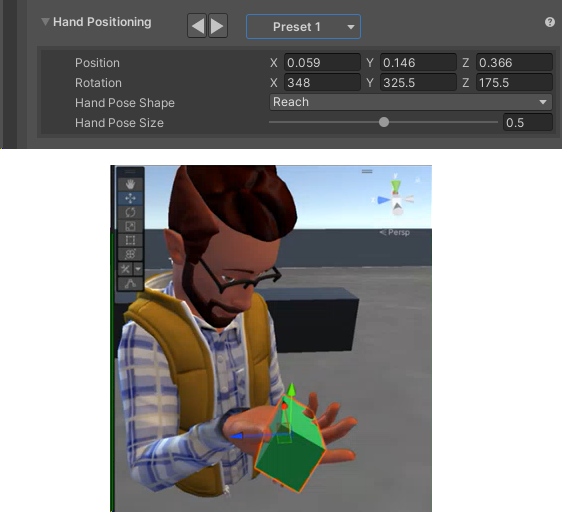
To select a preset: Do one of the following:
Click the button that displays Default Pose, and then select a preset from the list.

-or-
Click the forward/backward arrows to the right of Hand Positioning.

Change a preset's settings
Navigate through the preset list using the forward/backward buttons and note that each preset has its own unique settings.

- Position: The distance from the avatar's hand to its chest when an object is equipped.
- Rotation: The amount to rotate the wrist when an object is equipped.
- Hand Pose Shape: This is a drop-down that provides a range of hand pose shapes to put the avatar's hand into when equipped. You can also choose none.
- Hand Pose Size: Size of the hand pose from 0 – 1.
If you find that a preset doesn't give you the precise pose you're looking for, you can change these settings for further improvement. As soon as you make any changes, a message appears telling you that you can restore the default preset settings by clicking the Reset button.
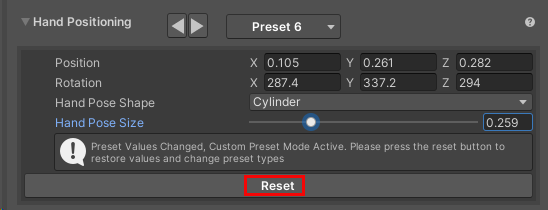
If, after changing one or more settings, you select a different object in the scene, and then re-select the object whose settings you changed, the word "Custom" appears in place of the Presets drop-down.

You can continue making changes, but you can't save the changes as a new preset. However, you can create a unique new preset as explained below.
Create your own presets
If you have an object in your scene that doesn't quite look right with any of the existing presets, you can make your own custom preset. You can't copy a file that's located in a package, so our first step will be to copy the whole EquipablePresets folder and work with the files in that copied folder. This will be the folder that the presets drop-down looks in for its presets.
In the Project tab, navigate to the Packages > Microsoft Mesh Interactables > Interactables Core > Resources > EquipablePresets folder.
Note that the presets are stored in this folder as Scriptable Objects.
Drag the folder and drop it on the Assets folder to copy it there.
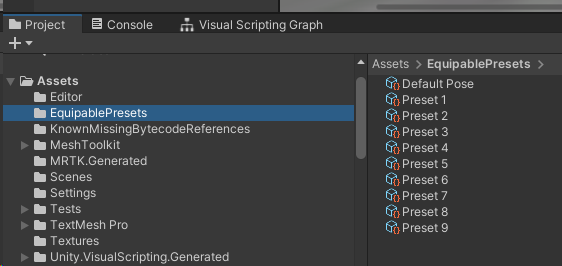
Select the preset you want to copy--in this example, we'll use Preset 9--and then press Ctrl + D to make a copy, which is automatically named Preset 10.
Rename the copied preset to something more descriptive. In our example, we intend to apply the preset to a jug in the scene, so we'll rename the preset to "Jug".
With Jug selected, in the Inspector, make the changes you want. The changes will be persistent; if you click another preset and then click Preset 10 again, you'll see that it still retains the changes you made.
In the Hierarchy or the Scene window, select the GameObject you want to apply the preset to.
In the Inspector, navigate to the GameObject's Mesh Interactable Setup component.
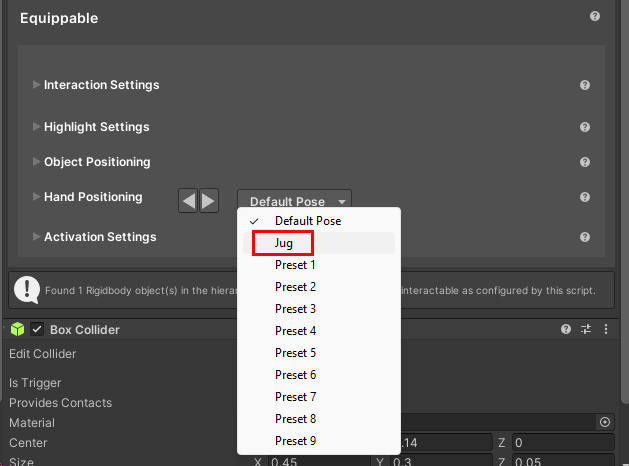
Click the presets drop-down (it displays Default Post), and then choose Jug from the list.
Activation Settings
Activation is explained in detail in the Hold objects realistically with Equippables article.
Activate Type
- None: This item can't be activated.
- Toggle: This item toggles between active/not active every time the activate control is clicked.
- Single: This item is activated when the activate control is clicked and then automatically deactivated once it reaches its last target pose.
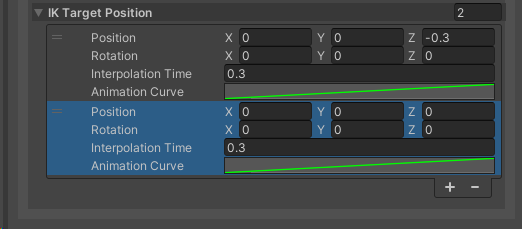
IK Target Position
This section contains a list of up to two target poses used to place the avatar's hand when an item is activated. Each pose consists of four properties: Position, Rotation, Interpolation time, and Animation Curve. The position and rotation offsets are relative to the avatar's chest. The avatar will interpolate using the animation curve from the previous pose to the current one sequentially down the list for the amount of time defined in the Interpolation time property, staying at the final pose until deactivated. When deactivated, the avatar hand pose will move backwards through the list.
If the list contains a single pose, you can add an additional one by clicking the "+" button. To remove a pose, select it and then click the "-" button. The number to the right of IK Target Position tells you how many poses are in the list. Important: You can add more than two poses to the list with the "+" button, but only two will be registered.
