Create a Microsoft Graph JSON Batch Custom Connector for Power Automate
There are more than 230 out of box connectors for Microsoft Power Automate. Many of these connectors use the Microsoft Graph to communicate with specific endpoints of Microsoft products. Furthermore, there are other scenarios where we may need to call the Microsoft Graph directly from Power Automate using basic building blocks of the service, since there is no connector that communicates directly with the Microsoft Graph to cover the entire API.
In addition to addressing scenarios for calling the Microsoft Graph directly, a number of Microsoft Graph API endpoints only support delegated permissions. The HTTP connector in Microsoft Power Automate enables very flexible integrations, including calling the Microsoft Graph. However, the HTTP connector lacks the capability of caching a user's credentials to enable specific delegated permission scenarios. In these cases, a custom connector can be created to provide a wrapper around the Microsoft Graph API and enable consuming the API with delegated permissions.
This lab covers both of the scenarios above. First, you will create a custom connector to enable integrations with Microsoft Graph which require delegated permissions. Second, you will use the $batch request endpoint, to provide access to the full power of the Microsoft Graph while using the delegated permissions that require an app to have a "signed-in" user present.
Note
This is a tutorial on creating a custom connector for use in Microsoft Power Automate and Azure Logic Apps. This tutorial assumes you have read the custom connector overview to understand the process.
Prerequisites
To complete this exercise in this post you will need the following:
- Administrator access to a Microsoft 365 tenancy. If you don't have a Microsoft 365 tenant, you might qualify for one through the Microsoft 365 Developer Program; for details, see the FAQ. Alternatively, you can sign up for a 1-month free trial or purchase a Microsoft 365 plan.
- Access to Microsoft Power Automate with a Premium license. See Power Automate licensing FAQ for details. If you do not have a Premium license, you can sign up for a 90-day trial.
Feedback
Please provide any feedback on this tutorial in the GitHub repository.
Create an Azure AD app registration
In this exercise, you will create a new Azure Active Directory Application which will be used to provide the delegated permissions for the custom connector.
Open a browser and navigate to the Microsoft Entra admin center and login using a Global administrator account.
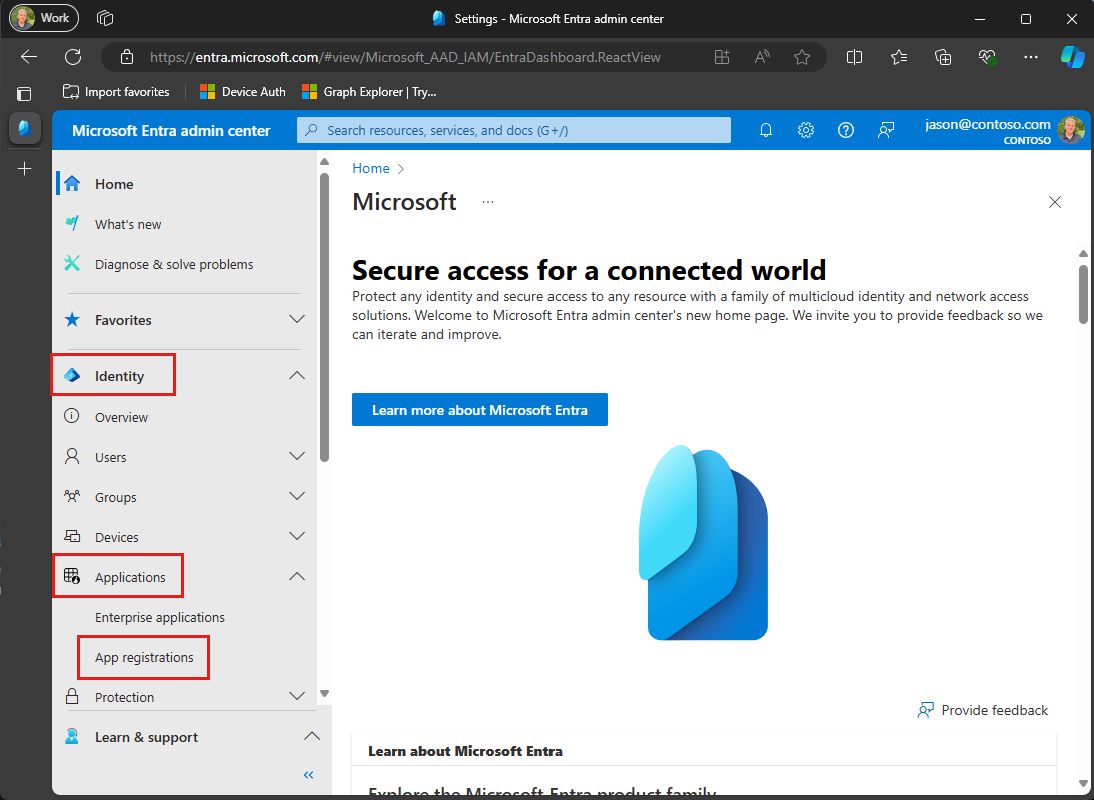
Select Microsoft Entra ID in the left-hand navigation, expand Identity, expand Applications, then select App registrations.
Choose the New registration menu item at the top of the App Registrations blade.

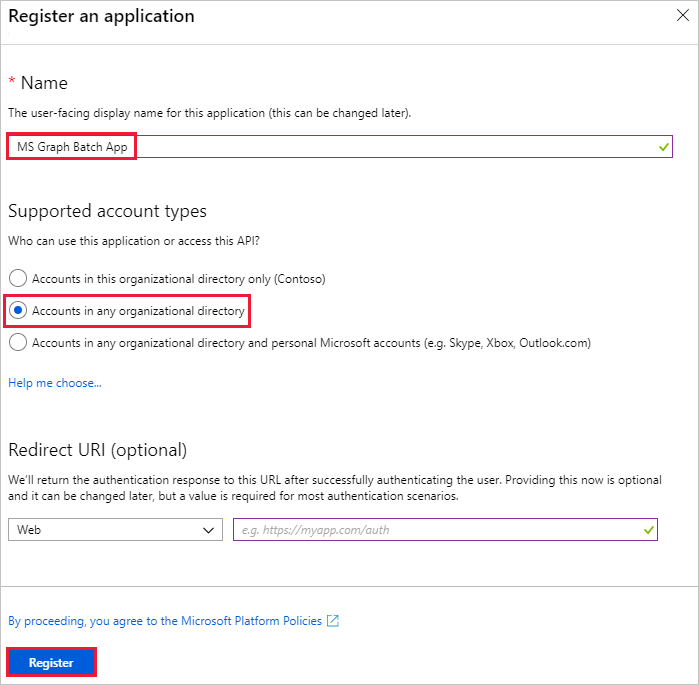
Enter MS Graph Batch App in the Name field. In the Supported account types section, select Accounts in any organizational directory. Leave the Redirect URI section blank and choose Register.
On the MS Graph Batch App blade, copy the Application (client) ID. You'll need this in the next exercise.

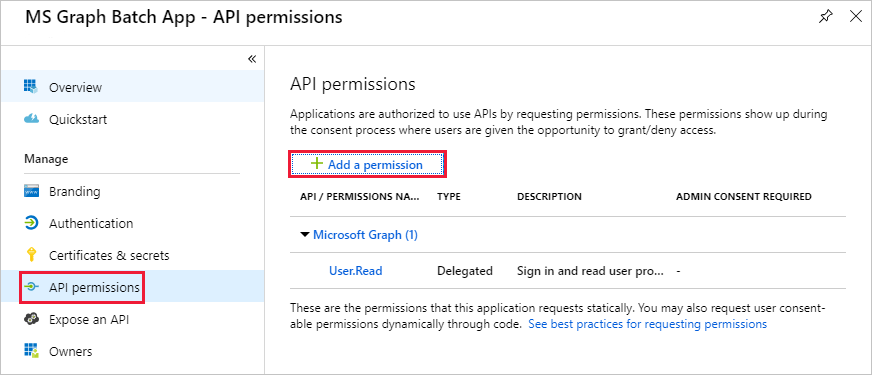
Choose the API permissions entry in the Manage section of the MS Graph Batch App blade. Choose Add a permission under API permissions.
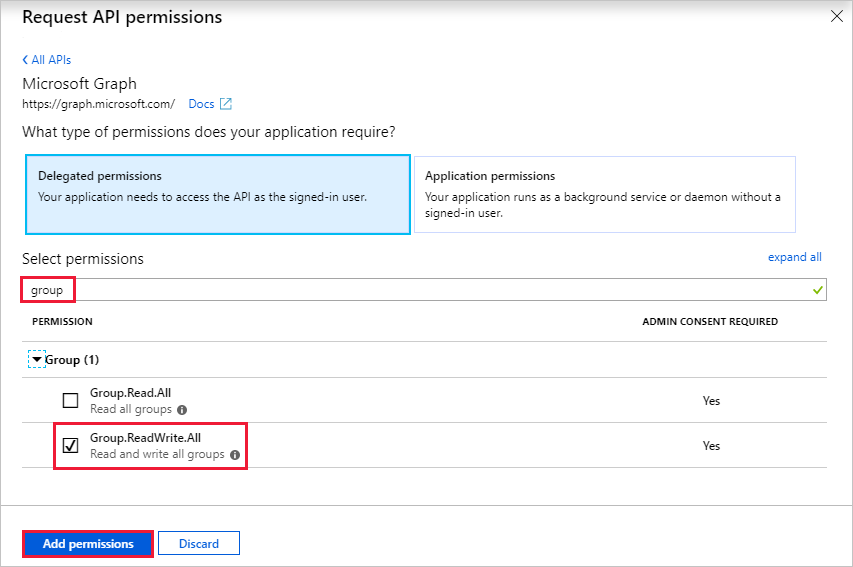
In the Request API permissions blade, choose the Microsoft Graph, then choose Delegated permissions. Search for group, then select the Read and write all groups delegated permission. Choose Add permissions at the bottom of the blade.
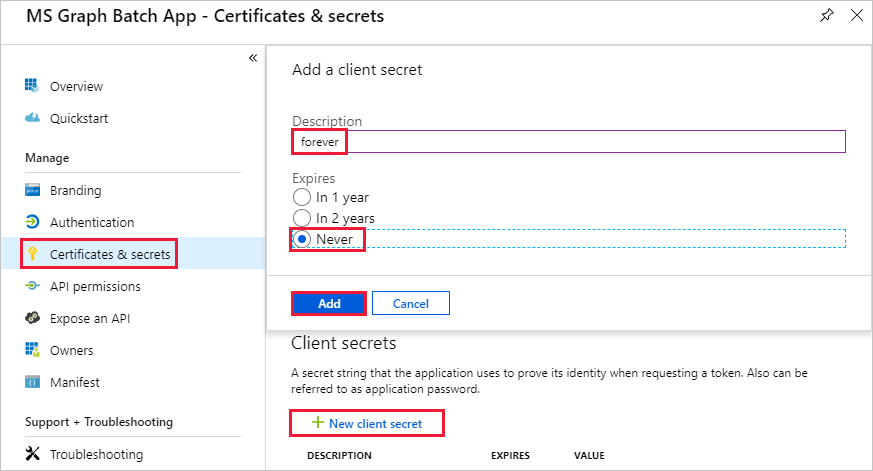
Choose the Certificates and secrets entry in the Manage section of the MS Graph Batch App blade, then choose New client secret. Enter a description, choose a duration, and select Add.
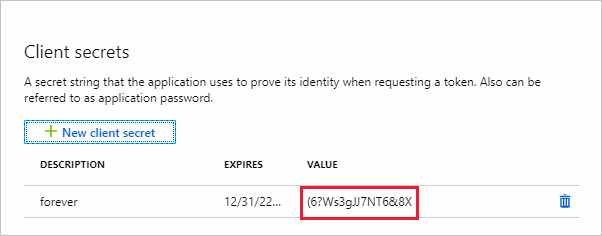
Copy the value for the new secret. You'll need this in the next exercise.
Important
This step is critical as the secret will not be accessible once you close this blade. Save this secret to a text editor for use in upcoming exercises.
To enable management of additional services accessible via the Microsoft Graph, including Teams properties, you would need to select additional, appropriate scopes to enable managing specific services. For example, to extend our solution to enable creating OneNote Notebooks or Planner plans, buckets and tasks you would need to add the required permission scopes for the relevant APIs.
Create a custom connector
In this exercise, you will create a new custom connector which can be used in Microsoft Power Automate or in Azure Logic Apps. The OpenAPI definition file is prebuilt with the correct path for the Microsoft Graph $batch endpoint and additional settings to enable simple import.
Open a browser and navigate to Microsoft Power Automate. Sign in with your Microsoft 365 tenant administrator account. Choose Custom connectors on the left-hand side menu. If Custom connectors isn't present in the menu, select More, then Discover all.
There are two options to create a custom connector for Microsoft Graph:
- Create from blank
- Import an OpenAPI file
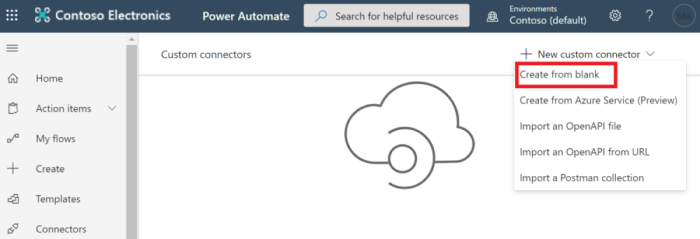
On the Custom Connectors page choose the New custom connector link in the top right, then select the Create from blank item in the drop-down menu.
Enter MS Graph Batch Connector in the Connector name text box. Choose Continue.
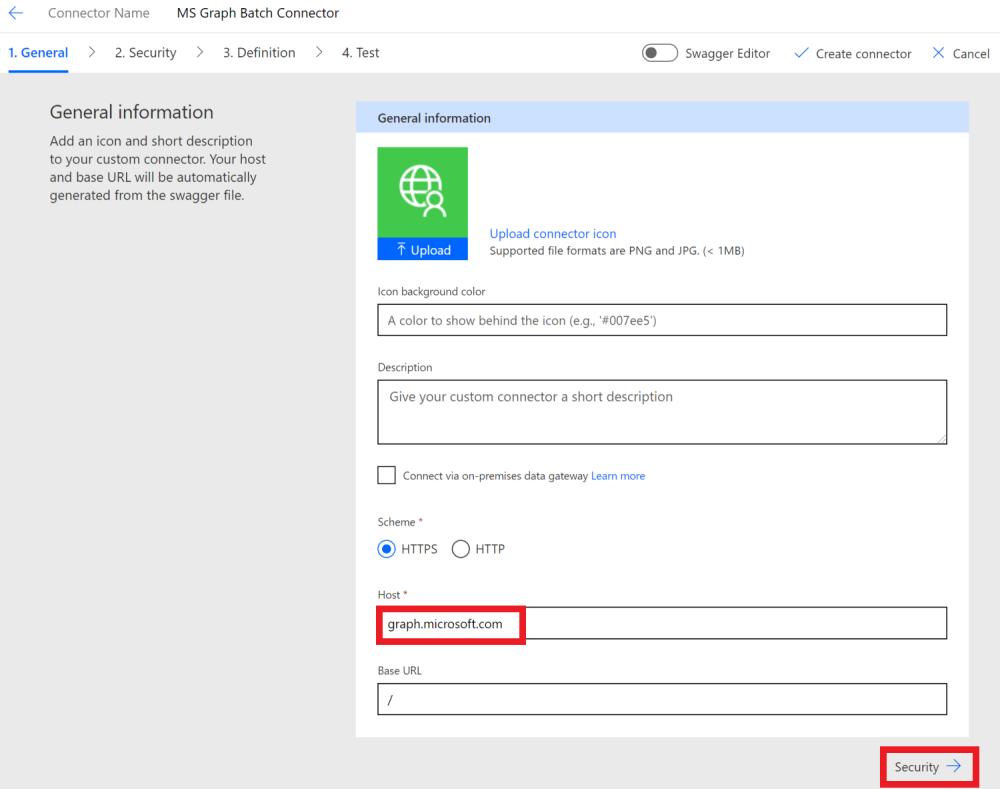
On the connector configuration General page, fill in the fields as follows.
- Scheme: HTTPS
- Host:
graph.microsoft.com - Base URL:
/
Choose Security button to continue.
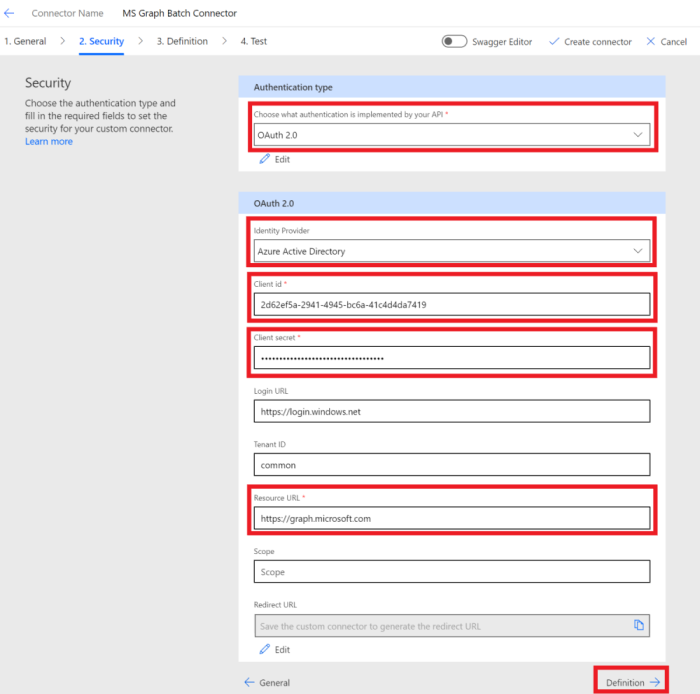
On the Security page, fill in the fields as follows.
- Choose what authentication is implemented by your API:
OAuth 2.0 - Identity Provider:
Azure Active Directory - Client id: the application ID you created in the previous exercise
- Client secret: the key you created in the previous exercise
- Login url:
https://login.windows.net - Tenant ID:
common - Resource URL:
https://graph.microsoft.com(no trailing /) - Scope: Leave blank
Choose Definition button to continue.
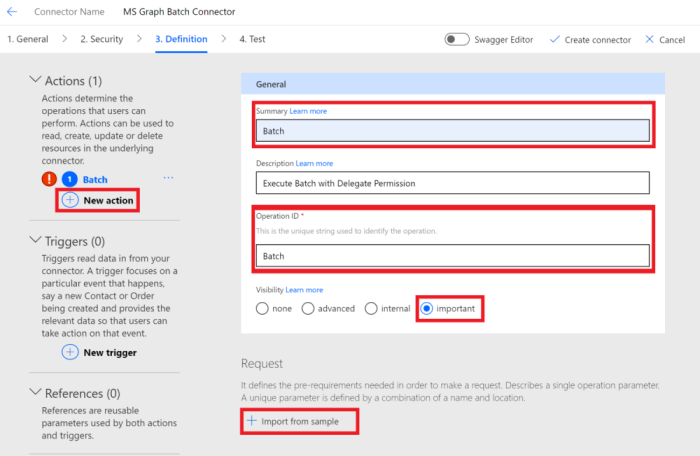
On the Definition page, select New Action and fill in the fields as follows.
- Summary:
Batch - Description:
Execute Batch with Delegate Permission - Operation ID:
Batch - Visibility:
important
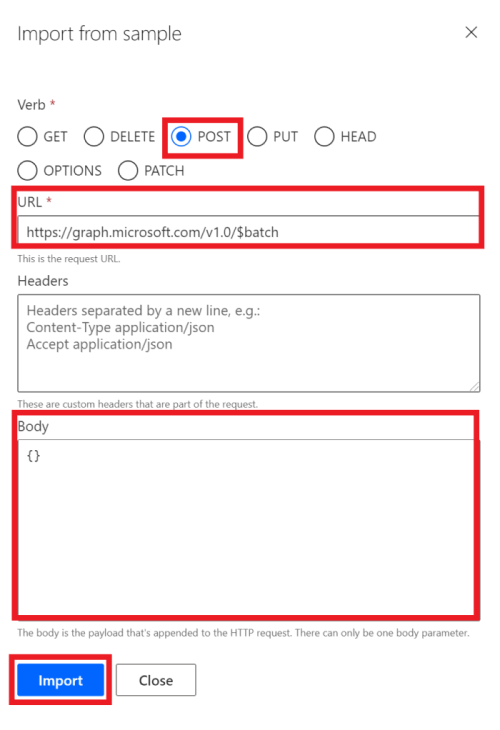
Create Request by selecting Import from Sample and fill in the fields as follows.
- Verb:
POST - URL:
https://graph.microsoft.com/v1.0/$batch - Headers: Leave blank
- Body:
{}
Select Import.
Choose Create Connector on the top-right.
After the connector has been created, copy the generated Redirect URL from the Security tab.

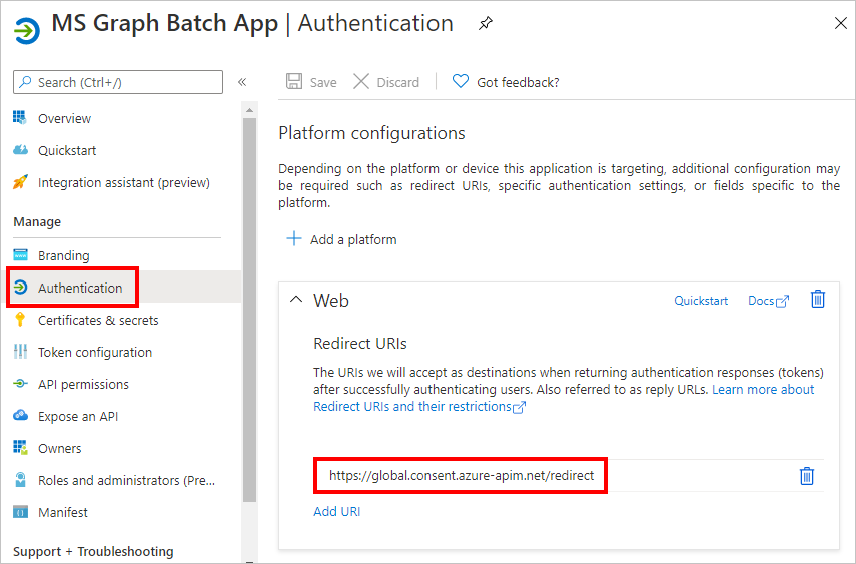
Go back to the registered application in the Microsoft Entra Portal you created in the previous exercise. Select Authentication on the left-hand side menu. Select Add a platform, then select Web. Enter the redirect URL copied from the previous step in the Redirect URIs, then select Configure.
Authorize the connector
The final configuration step to ensure the connector is ready for use is to authorize and test the custom connector to create a cached connection.
Important
The following steps requires that you are logged in with administrator privileges.
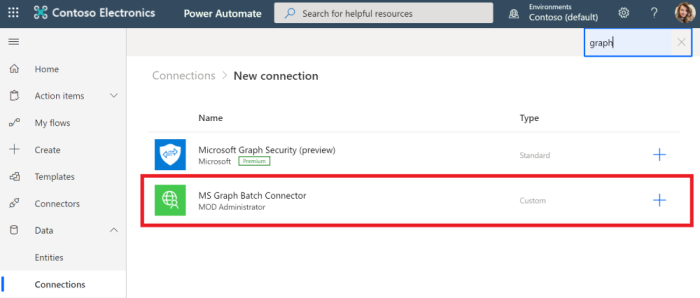
In Microsoft Power Automate, choose Connections on the left-hand side menu. If Connections isn't present in the menu, select More. Select the New connection link.
Find your custom connector and complete the connection by selecting it, then choosing Create. Sign in with your Microsoft 365 tenant administrator's Azure Active Directory account.
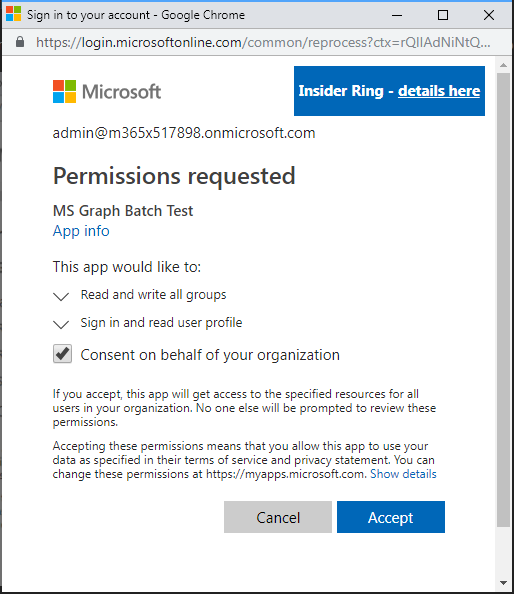
When prompted for the requested permissions, check Consent on behalf of your organization and then choose Accept to authorize permissions.
After you authorize the permissions, a connection is created in Power Automate.
The custom connector is now configured and enabled. There may be a delay in permissions being applied and available, but the connector is now configured.
Test batching in Graph Explorer
Before creating a Flow to consume the new connector, use Microsoft Graph Explorer to discover some of the capabilities and features of JSON batching in Microsoft Graph.
Open the Microsoft Graph Explorer in your browser. Sign in with your Microsoft 365 tenant administrator account. Search for for Batch from the Sample queries.
Select the Perform parallel GETs sample query in the left menu. Choose the Run Query button at the top right of the screen.
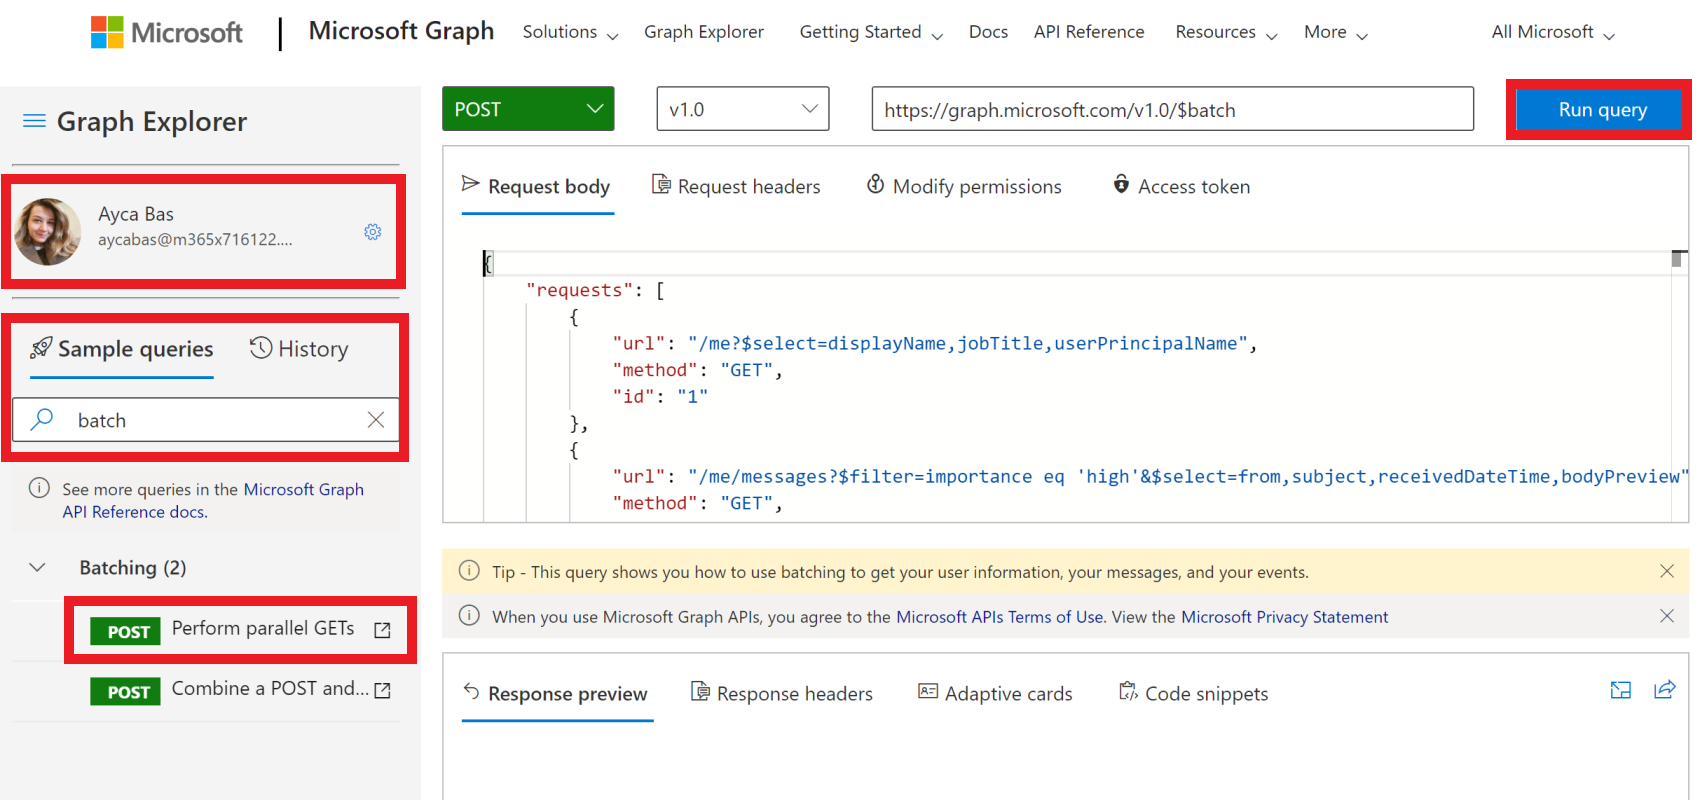
The sample batch operation batches three HTTP GET requests and issues a single HTTP POST to the /v1.0/$batch Graph endpoint.
{
    "requests": [
        {
            "url": "/me?$select=displayName,jobTitle,userPrincipalName",
            "method": "GET",
            "id": "1"
        },
        {
            "url": "/me/messages?$filter=importance eq 'high'&$select=from,subject,receivedDateTime,bodyPreview",
            "method": "GET",
            "id": "2"
        },
        {
            "url": "/me/events",
            "method": "GET",
            "id": "3"
        }
    ]
}
The response returned is shown below. Note the array of responses that is returned by Microsoft Graph. The responses to the batched requests may appear in a different order than the order of the requests in the POST. The id property should be used to correlate individual batch requests with specific batch responses.
Note
The response has been truncated for readability.
{
  "responses": [
    {
      "id": "1",
      "status": 200,
      "headers": {...},
      "body": {...}
    },
    {
      "id": "3",
      "status": 200,
      "headers": {...},
      "body": {...}
    }
    {
      "id": "2",
      "status": 200,
      "headers": {...},
      "body": {...}
    }
  ]
}
Each response contains an id, status, headers, and body property. If the status property for a request indicates a failure, the body contains any error information returned from the request.
To ensure an order of operations for the requests, individual requests can be sequenced using the dependsOn property.
In addition to sequencing and dependency operations, JSON batching assumes a base path and executes the requests from a relative path. Each batch request element is executed from either the /v1.0/$batch OR /beta/$batch endpoints as specified. This can have significant differences as the /beta endpoint may return additional output which may NOT be returned in the /v1.0 endpoint.
For example, execute the following two queries in the Microsoft Graph Explorer.
- Query the
/v1.0/$batchendpoint using the url/me(copy and paste request below).
{
  "requests": [
    {
      "id": 1,
      "url": "/me",
      "method": "GET"
    }
  ]
}
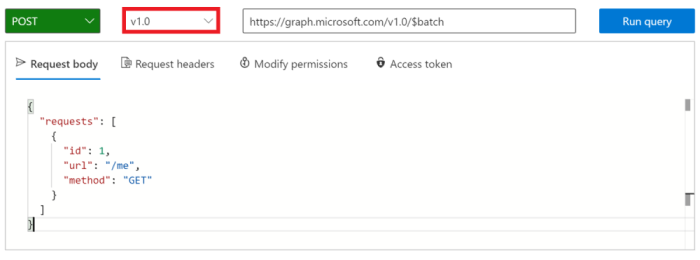
Now use the version selector drop-down to change to the beta endpoint, and make the exact same request.
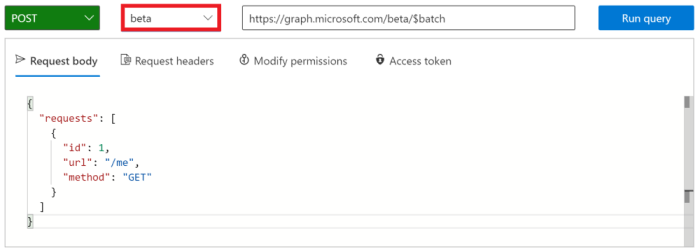
What are the differences in the results returned? Try some other queries to identify some of the differences.
In addition to different response content from the /v1.0 and /beta endpoints, it is important to understand the possible errors when a batch request is made for which permission consent has not been granted. For example, the following is a batch request item to create a OneNote Notebook.
{
  "id": 1,
  "url": "/groups/65c5ecf9-3311-449c-9904-29a2c76b9a50/onenote/notebooks",
  "headers": {
    "Content-Type": "application/json"
  },
  "method": "POST",
  "body": {
    "displayName": "Meeting Notes"
  }
}
However, if the permissions to create OneNote Notebooks has not been granted, the following response is received. Note the status code 403 (Forbidden) and the error message which indicates the OAuth token provided does not include the scopes required to completed the requested action.
{
  "responses": [
    {
      "id": "1",
      "status": 403,
      "headers": {
        "Cache-Control": "no-cache"
      },
      "body": {
        "error": {
          "code": "40004",
          "message": "The OAuth token provided does not have the necessary scopes to complete the request.
            Please make sure you are including one or more of the following scopes: Notes.ReadWrite.All,
            Notes.Read.All (you provided these scopes: Group.Read.All,Group.ReadWrite.All,User.Read,User.Read.All)",
          "innerError": {
            "request-id": "92d50317-aa06-4bd7-b908-c85ee4eff0e9",
            "date": "2018-10-17T02:01:10"
          }
        }
      }
    }
  ]
}
Each request in your batch will return a status code and results or error information. You must process each of the responses in order to determine success or failure of the individual batch operations.
Create a flow
In this exercise, you will create a flow to use the custom connector you created in previous exercises to create and configure a Microsoft Team. The flow will use the custom connector to send a POST request to create an Office 365 Unified Group, will pause for a delay while the group creation completes, and then will send a PUT request to associate the group with a Microsoft Team.
In the end your flow will look similar to the following image:
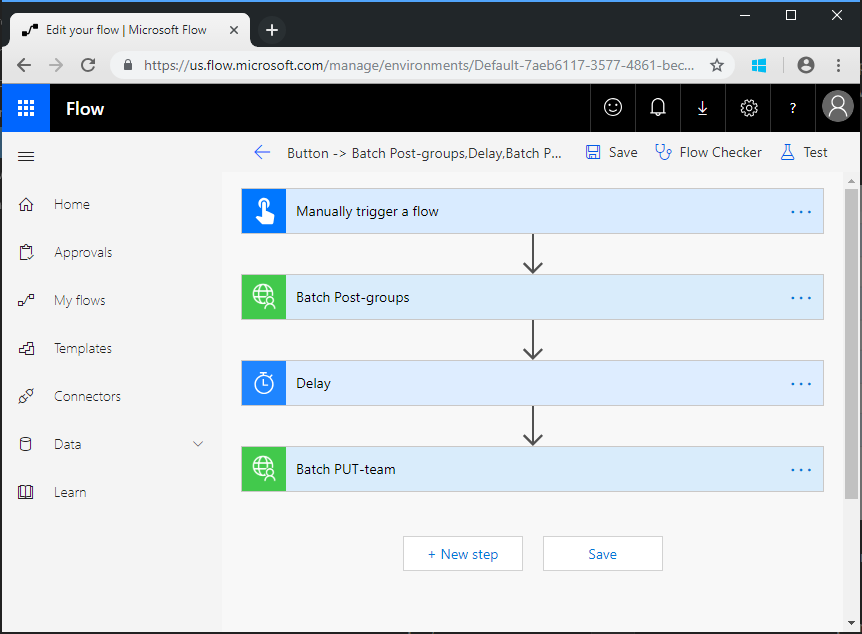
Open Microsoft Power Automate in your browser and sign in with your Office 365 tenant administrator account. Choose My flows in the left-hand navigation. Choose New flow, then Instant cloud flow. Enter Create Team for Flow name, then select Manually trigger a flow under Choose how to trigger this flow. Choose Create.
Select the Manually trigger a flow item, then choose Add an input, select Text and enter Name as the title.

Choose + under the Manually trigger a flow item, then select Add an action. Type Batch in the search box, and set the Runtime dropdown to Custom. Add the MS Graph Batch Connector action. Choose the ellipsis and rename this action to Batch POST-groups.
In the Advanced parameters dropdown, select body. Add the following code into the Body text box of the action.
{
  "requests": [
    {
      "url": "/groups",
      "method": "POST",
      "id": 1,
      "headers": { "Content-Type": "application/json" },
      "body": {
        "description": "REPLACE",
        "displayName": "REPLACE",
        "groupTypes": ["Unified"],
        "mailEnabled": true,
        "mailNickname": "REPLACE",
        "securityEnabled": false
      }
    }
  ]
}
Replace each REPLACE placeholder by selecting the Name value from the manual trigger from the Add dynamic content menu.
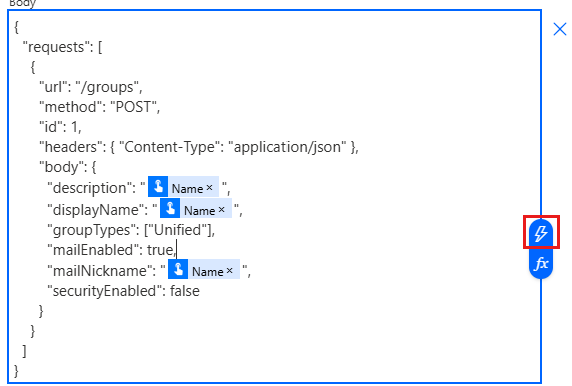
Choose + under the Batch POST-groups item, then select Add an action. Search for delay and add a Delay action and configure for 1 minute.
Choose + under the Delay item, then select Add an action. Add the MS Graph Batch Connector action. Choose the ellipsis and rename this action to Batch PUT-team.
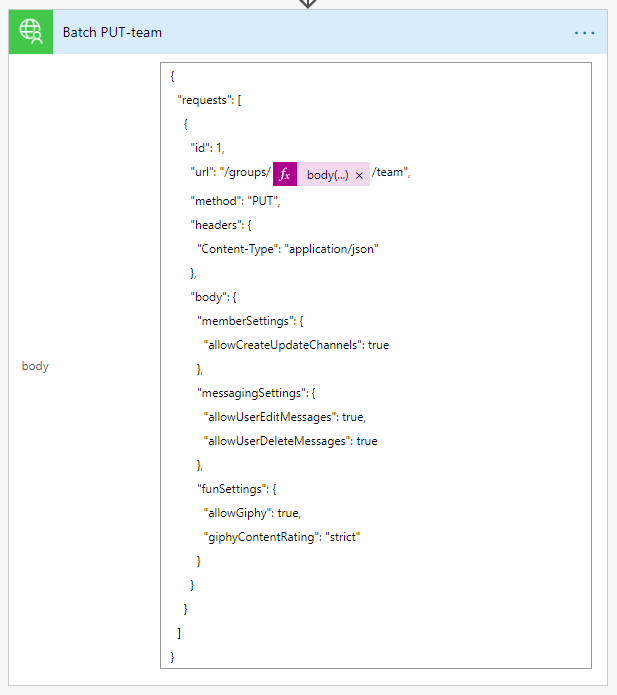
In the Advanced parameters dropdown, select body. Add the following code into the Body text box of the action.
{
  "requests": [
    {
      "id": 1,
      "url": "/groups/REPLACE/team",
      "method": "PUT",
      "headers": {
        "Content-Type": "application/json"
      },
      "body": {
        "memberSettings": {
          "allowCreateUpdateChannels": true
        },
        "messagingSettings": {
          "allowUserEditMessages": true,
          "allowUserDeleteMessages": true
        },
        "funSettings": {
          "allowGiphy": true,
          "giphyContentRating": "strict"
        }
      }
    }
  ]
}
Select the REPLACE placeholder, then select Expression in the dynamic content pane. Add the following formula into the Expression.
body('Batch_POST-groups').responses[0].body.id
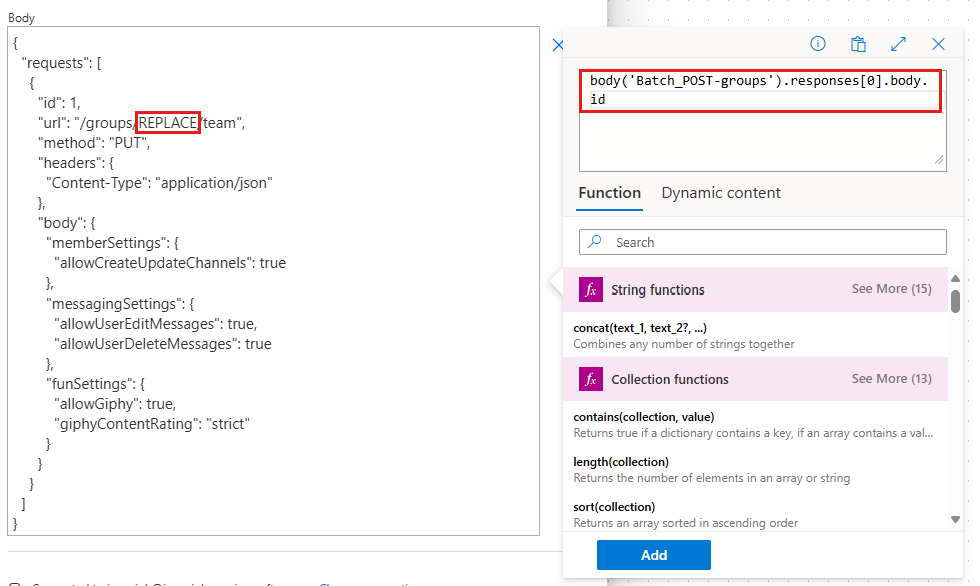
This formula specifies that we want to use the group ID from the result of the first action.
Choose Save, then choose Test to execute the flow.
Tip
If you receive an error like The template validation failed: 'The action(s) 'Batch_POST-groups' referenced by 'inputs' in action 'Batch_2' are not defined in the template', the expression is incorrect and likely references a flow action it cannot find. Ensure that the action name you are referencing matches exactly.
Choose the Manually action radio button and choose Test. Provide a name without spaces, and choose Run flow to create a Team.
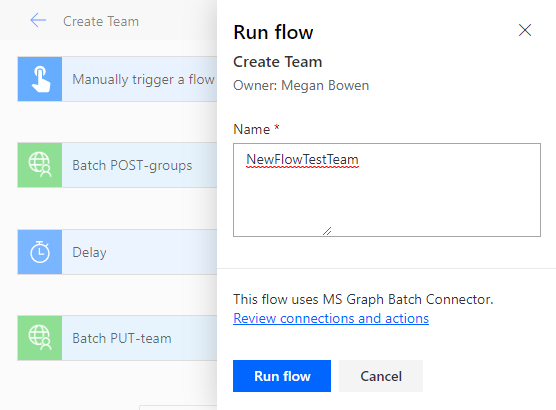
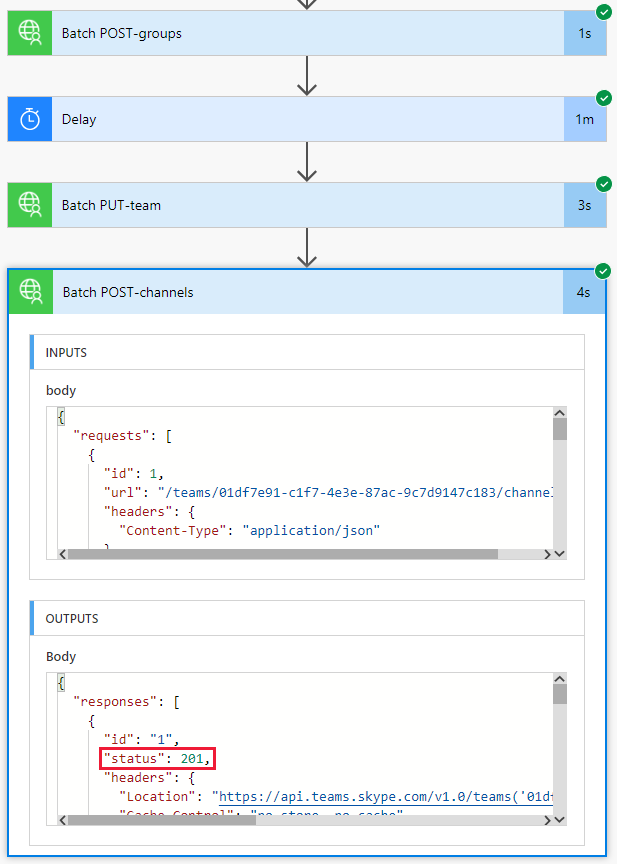
Finally, choose the Done to see the activity log. Once the flow completes, your Office 365 Group and Team have been configured. Select the Batch action items to view the results of the JSON Batch calls. The outputs of the Batch PUT-team action should have a status code of 201 for a successful Team association similar to the image below.

Extend the flow
The Flow you created in the previous exercise uses the $batch API to make two individual requests to the Microsoft Graph. Calling the $batch endpoint this way provides some benefit and flexibility, but the true power of the $batch endpoint comes when executing multiple requests to Microsoft Graph in a single $batch call. In this exercise, you will extend the example of creating a Unified Group and associating a Team to include creating multiple default Channels for the Team in a single $batch request.
Open Microsoft Power Automate in your browser and sign in with your Microsoft 365 tenant administrator account. Select the Flow you created in the previous step and choose Edit.
Choose New step and type Batch in the search box. Add the MS Graph Batch Connector action. Choose the ellipsis and rename this action to Batch POST-channels.
Add the following code into the body text box of the action.
{
  "requests": [
    {
      "id": 1,
      "url": "/teams/REPLACE/channels",
      "headers": {
        "Content-Type": "application/json"
      },
      "method": "POST",
      "body": {
        "displayName": "Marketing Collateral",
        "description": "Marketing collateral and documentation."
      }
    },
    {
      "id": 2,
      "dependsOn": [
        "1"
      ],
      "url": "/teams/REPLACE/channels",
      "headers": {
        "Content-Type": "application/json"
      },
      "method": "POST",
      "body": {
        "displayName": "Vendor Contracts",
        "description": "Vendor documents, contracts, agreements and schedules."
      }
    },
    {
      "id": 3,
      "dependsOn": [
        "2"
      ],
      "url": "/teams/REPLACE/channels",
      "headers": {
        "Content-Type": "application/json"
      },
      "method": "POST",
      "body": {
        "displayName": "General Client Agreements",
        "description": "General Client documents and agreements."
      }
    }
  ]
}
Notice the three requests above are using the dependsOn property to specify a sequence order, and each will execute a POST request to create a new channel in the new Team.
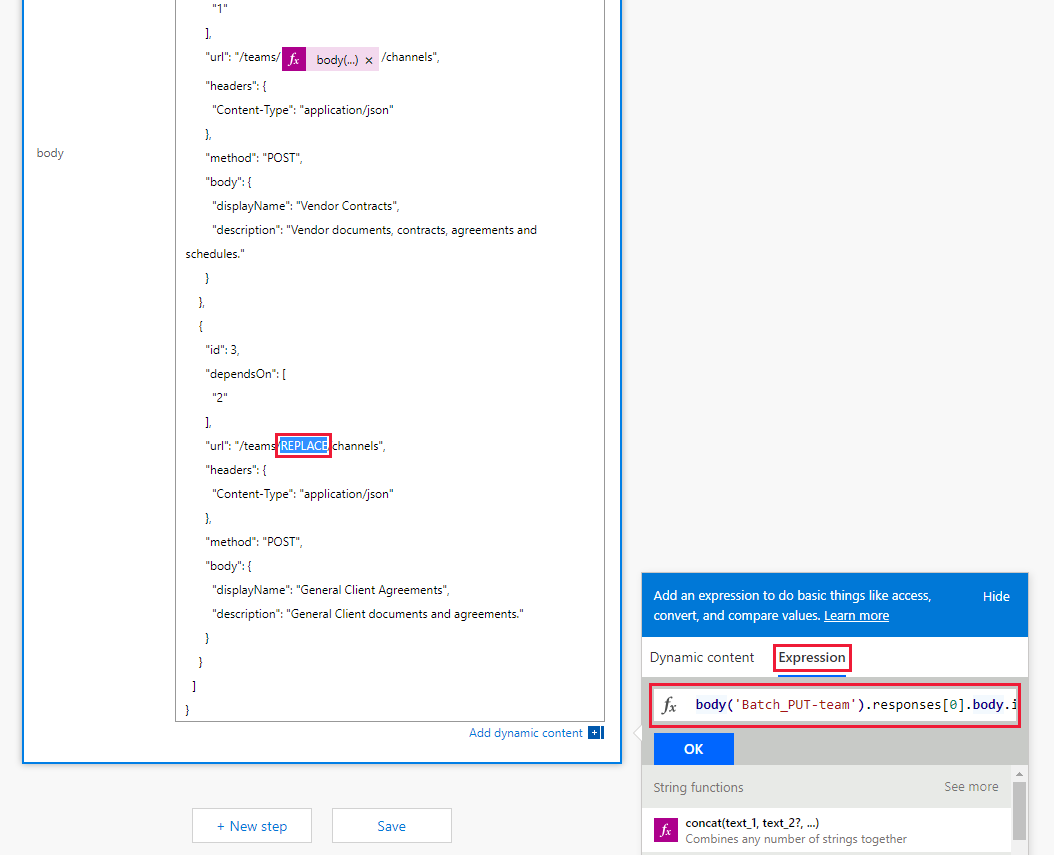
Select each instance of the REPLACE placeholder, then select Expression in the dynamic content pane. Add the following formula into the Expression.
body('Batch_PUT-team').responses[0].body.id
Choose Save, then choose Test to execute the Flow. Select the I'll perform the trigger action radio button, then choose Save & Test. Enter a unique group name in the Name field without spaces, and choose Run flow to execute the Flow.
Once the Flow starts, choose the Done button to see the activity log. When the Flow completes, the final output for the Batch POST-channels action has a 201 HTTP Status response for each Channel created.
Browse to Microsoft Teams and sign in with your Microsoft 365 tenant administrator account. Verify that the team you just created appears and includes the three channels created by the $batch request.
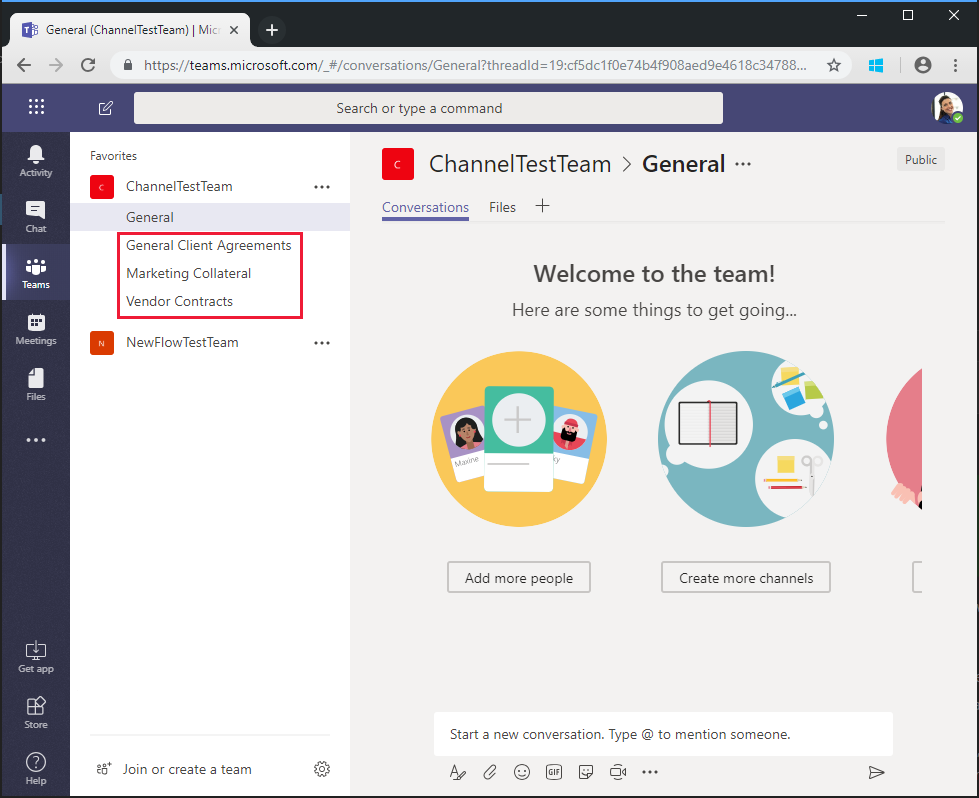
While the above Batch POST-channels action was implemented in this tutorial as a separate action, the calls to create the channels could have been added as additional calls in the Batch PUT-team action. This would have created the Team and all Channels in a single batch call. Give that a try on your own.
Finally, remember that JSON Batching calls will return an HTTP status code for each request. In a production process, you may want to combine post processing of the results with an Apply to each action and validate each individual response has a 201 status code or compensate for any other status codes received.
Congratulations!
You've completed the Power Automate Microsoft Graph tutorial. Now that you have a working custom connector that calls Microsoft Graph, you can experiment and add new features. Visit the Overview of Microsoft Graph to see all of the data you can access with Microsoft Graph.
Feedback
Please provide any feedback on this tutorial in the GitHub repository.
Have an issue with this section? If so, please give us some feedback so we can improve this section.