Tutorial: Configure Microsoft Fabric mirrored databases from Azure Databricks (Preview)
Database mirroring in Microsoft Fabric is an enterprise, cloud-based, zero-ETL, SaaS technology. This guide helps you establish a mirrored database from Azure Databricks, which creates a read-only, continuously replicated copy of your Azure Databricks data in OneLake.
Prerequisites
- You must enable external data access on the metastore. For more information, see Enable external data access on the metastore.
- Create or use an existing Azure Databricks workspace with Unity Catalog enabled.
- You must have the
EXTERNAL USE SCHEMAprivilege on the schema in Unity Catalog that contains the tables that will be accessed from Fabric. - Turn on the tenant setting "Mirrored Azure Databricks Catalog (Preview)" at the tenant or capacity level for this feature.
- You need to use Fabric's permissions model to set access controls for catalogs, schemas, and tables in Fabric.
- Azure Databricks workspaces can't be behind a private endpoint.
Create a mirrored database from Azure Databricks
Follow these steps to create a new mirrored database from your Azure Databricks Unity Catalog.
Navigate to https://powerbi.com.
Select + New and then Mirrored Azure Databricks catalog.
Select an existing connection if you have one configured.
- If you don't have an existing connection, create a new connection and enter all the details. You can authenticate to your Azure Databricks workspace using 'Organizational account' or 'Service principal.' To create a connection, you must be either a user or an admin of the Azure Databricks workspace.
- To access Azure Data Lake Storage (ADLS) Gen2 accounts behind a firewall, you must follow the steps to Enable network security access for your Azure Data Lake Storage Gen2 account later in this article.
Once you connect to an Azure Databricks workspace, on the Choose tables from a Databricks catalog page, you're able to select the catalog, schemas, and tables via the inclusion/exclusion list that you want to add and access from Microsoft Fabric. Pick the catalog and its related schemas and tables that you want to add to your Fabric workspace.
- You can only see the catalogs/schemas/tables that you have access to as per the privileges that are granted to them as per the privilege model described at Unity Catalog privileges and securable objects.
- By default, the Automatically sync future catalog changes for the selected schema is enabled. For more information, see Mirroring Azure Databricks Unity Catalog (Preview).
- When you have made your selections, select Next.
By default, the name of the item will be the name of the catalog you're trying to add to Fabric. On the Review and create page, you can review the details and optionally change the mirrored database item name, which must be unique in your workspace. Select Create.
A Databricks catalog item is created and for each table, a corresponding Databricks type shortcut is also created.
- Schemas that don't have any tables aren't shown.
You can also see a preview of the data when you access a shortcut by selecting the SQL analytics endpoint. Open the SQL analytics endpoint item to launch the Explorer and Query editor page. You can query your mirrored Azure Databricks tables with T-SQL in the SQL Editor.
Create Lakehouse shortcuts to the Databricks catalog item
You can also create shortcuts from your Lakehouse to your Databricks catalog item to use your Lakehouse data and use Spark Notebooks.
- First, we create a lakehouse. If you already have a lakehouse in this workspace, you can use an existing lakehouse.
- Select your workspace in the navigation menu.
- Select + New > Lakehouse.
- Provide a name for your lakehouse in the Name field, and select Create.
- In the Explorer view of your lakehouse, in the Get data in your lakehouse menu, under Load data in your lakehouse, select the New shortcut button.
- Select Microsoft OneLake. Select a catalog. This is the data item that you created in the previous steps. Then select Next.
- Select tables within the schema, and select Next.
- Select Create.
- Shortcuts are now available in your Lakehouse to use with your other Lakehouse data. You can also use Notebooks and Spark to perform data processing on the data for these catalog tables that you added from your Azure Databricks workspace.
Create a semantic model
Tip
For the best experience, it's recommended that you use Microsoft Edge Browser for Semantic Modeling Tasks.
Learn more about the default Power BI semantic model.
In addition to the default Power BI semantic model, you have the option of updating the default Power BI semantic model if you choose to add/remove tables from the model or create a new Semantic Model. To update the Default semantic model:
- Navigate to your Mirrored Azure Databricks item in your workspace.
- Select the SQL analytics endpoint from the dropdown list in the toolbar.
- Under Reporting, select Manage default semantic model.
Manage your semantic model relationships
- Select Model Layouts from the Explorer in your workspace.
- Once Model layouts are selected, you're presented with a graphic of the tables that were included as part of the Semantic Model.
- To create relationships between tables, drag a column name from one table to another column name of another table. A popup is presented to identify the relationship and cardinality for the tables.
Enable network security access for your Azure Data Lake Storage Gen2 account
This section guides you on configuring network security for your Azure Data Lake Storage (ADLS) Gen2 account, when an Azure Storage firewall is configured.
Prerequisites
- Create or use an existing Azure Databricks workspace with Unity Catalog enabled.
- To enable the workspace identity authentication type (recommended), the Fabric workspace must be associated with any F capacity. To create a workspace identity, see Authenticate with workspace identity.
- This section is for reaching an Azure Data Lake Storage (ADLS) Gen2 storage account behind an Azure Storage firewall. Azure Databricks workspace storage behind an Azure Storage firewall is not supported.
- A catalog must be associated with a single storage account.
Enable network security access
When creating a new Mirrored Azure Databricks Catalog, in the Choose data step, select the Network Security tab.
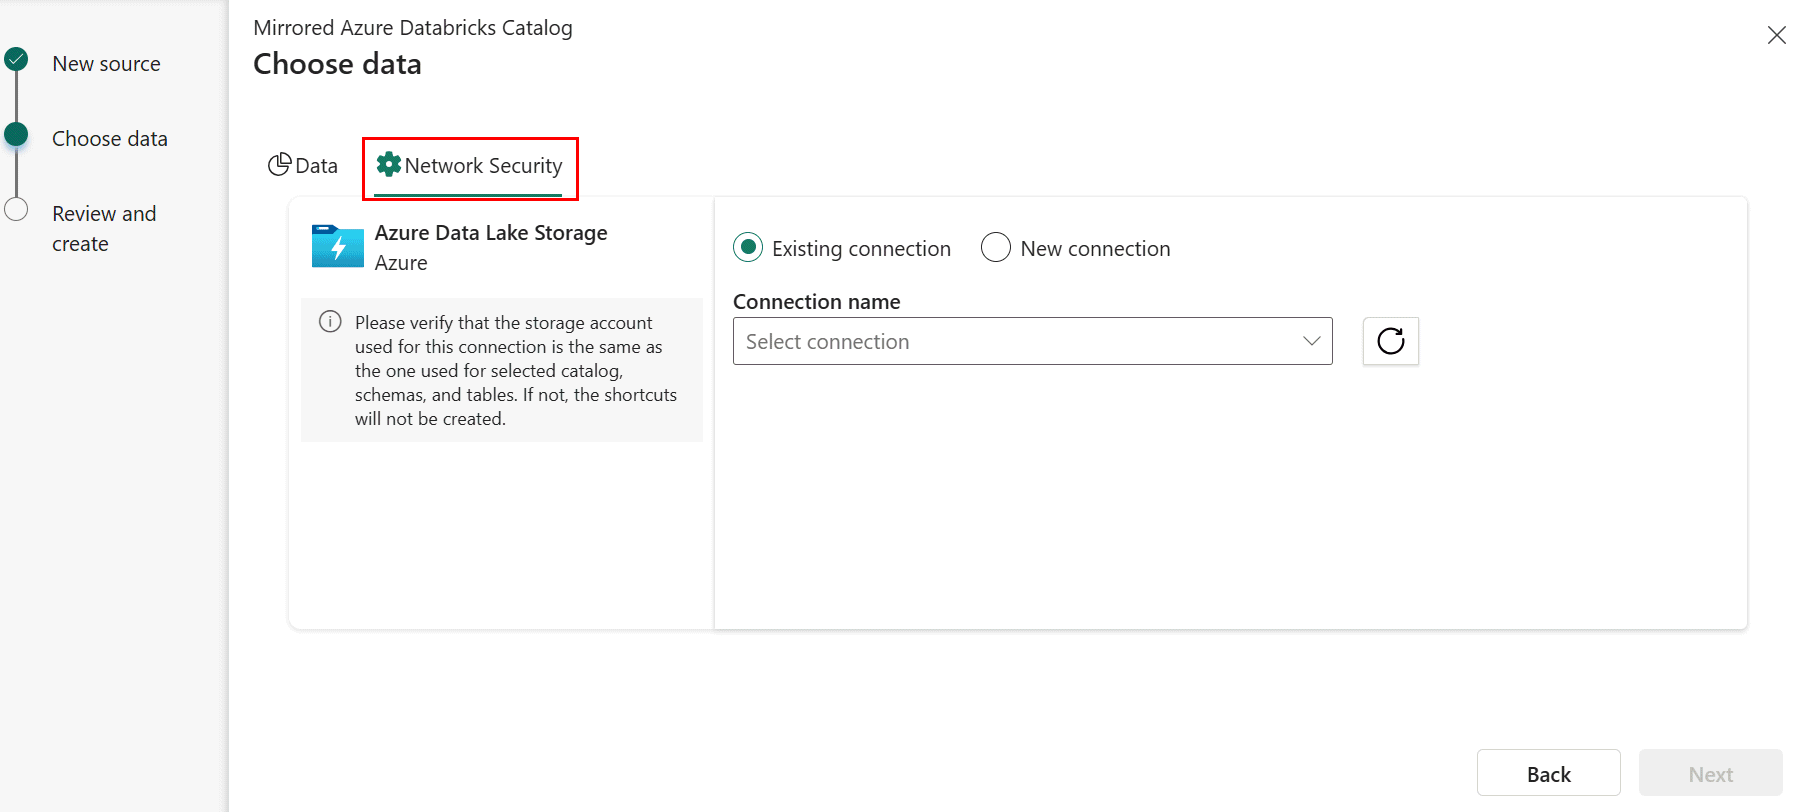
Select an Existing connection to the storage account if you have one configured.
- If you don't have an existing ADLS connection, create a New connection.
- The URL of the storage endpoint is where the selected catalog's data is stored. The endpoint should be the specific folder where the data is stored, rather than specifying the endpoint to be at the storage account level. For example, provide
https://<storage account>.dfs.core.windows.net/container1/folder1rather thanhttps://<storage account>.dfs.core.windows.net/. - Provide the connection credentials. The authentication types supported are Organizational account, Service principal, and Workspace Identity (recommended).
In the Azure portal, provide access rights to the storage account based on the authentication type you picked in the previous step. Navigate to the storage account in the Azure portal. Select Access Control (IAM). Select +Add and Add role assignment. For more information, see Assign Azure roles using the Azure portal.
- If you specified the storage account as part of the connection, the chosen authentication object needs to have the Storage Blob Data Reader role on the storage account.
- If you specified a specific container as part of the connection, chosen authentication object needs to have Storage Blob Data Reader role on the container.
- If you specified a specific folder within a container (recommended), chosen authentication object needs to have the Read (R) and Execute (E) at the folder level. If you're using Service Principal or Workspace Identity as the authentication type, you need to give that Service Principal or Workspace Identity Execute permissions to the root folder of the container, and to each folder in the hierarchy of folders that lead to the folder that you specified.
For more information and steps to grant ADLS access, see ADLS Access control.
Enable Trusted Workspace Access to access firewall-enabled Azure Data Lake Storage (ADLS) Gen2 accounts in a secure manner.
A shortcut to Unity Catalog tables is created for the tables whose storage account name matches the storage account specified in the ADLS connection. For any tables whose storage account name doesn't match the storage account specified in the ADLS connection, shortcuts for those tables won't be created.
Important
If you plan to use the ADLS connection outside the Mirrored Azure Databricks catalog item scenarios, you need to also give the Storage Blob Delegator role on the storage account.
Related content
- Secure Fabric mirrored databases from Azure Databricks
- Limitations in Microsoft Fabric mirrored databases from Azure Databricks (Preview)
- Frequently asked questions for mirrored databases from Azure Databricks (Preview) in Microsoft Fabric
- Mirroring Azure Databricks Unity Catalog (Preview)
- Control external access to data in Unity Catalog