How to configure certificate authorities for Microsoft Entra certificate-based authentication
The best way to configure the certificate authorities (CAs) is with the PKI-based trust store (Preview). You can delegate configuration with a PKI-based trust store to least privileged roles. For more information see, Step 1: Configure the certificate authorities with PKI-based trust store (Preview).
As an alternative, a Global Administrator can follow steps in this topic to configure CAs by using the Microsoft Entra admin center, or Microsoft Graph REST APIs and the supported software development kits (SDKs), such as Microsoft Graph PowerShell.
Important
Microsoft recommends that you use roles with the fewest permissions. This practice helps improve security for your organization. Global Administrator is a highly privileged role that should be limited to emergency scenarios or when you can't use an existing role.
The public key infrastructure (PKI) infrastructure or PKI admin should be able to provide the list of issuing CAs.
To make sure you configured all the CAs, open the user certificate and click Certification path tab. Make sure every CA until the root is uploaded to the Microsoft Entra ID trust store. Microsoft Entra certificate-based authentication (CBA) fails if there are missing CAs.
Configure certificate authorities using the Microsoft Entra admin center
To configure certificate authorities to enable CBA in the Microsoft Entra admin center, complete the following steps:
Important
Microsoft recommends that you use roles with the fewest permissions. This practice helps improve security for your organization. Global Administrator is a highly privileged role that should be limited to emergency scenarios or when you can't use an existing role.
Sign in to the Microsoft Entra admin center as a Global Administrator.
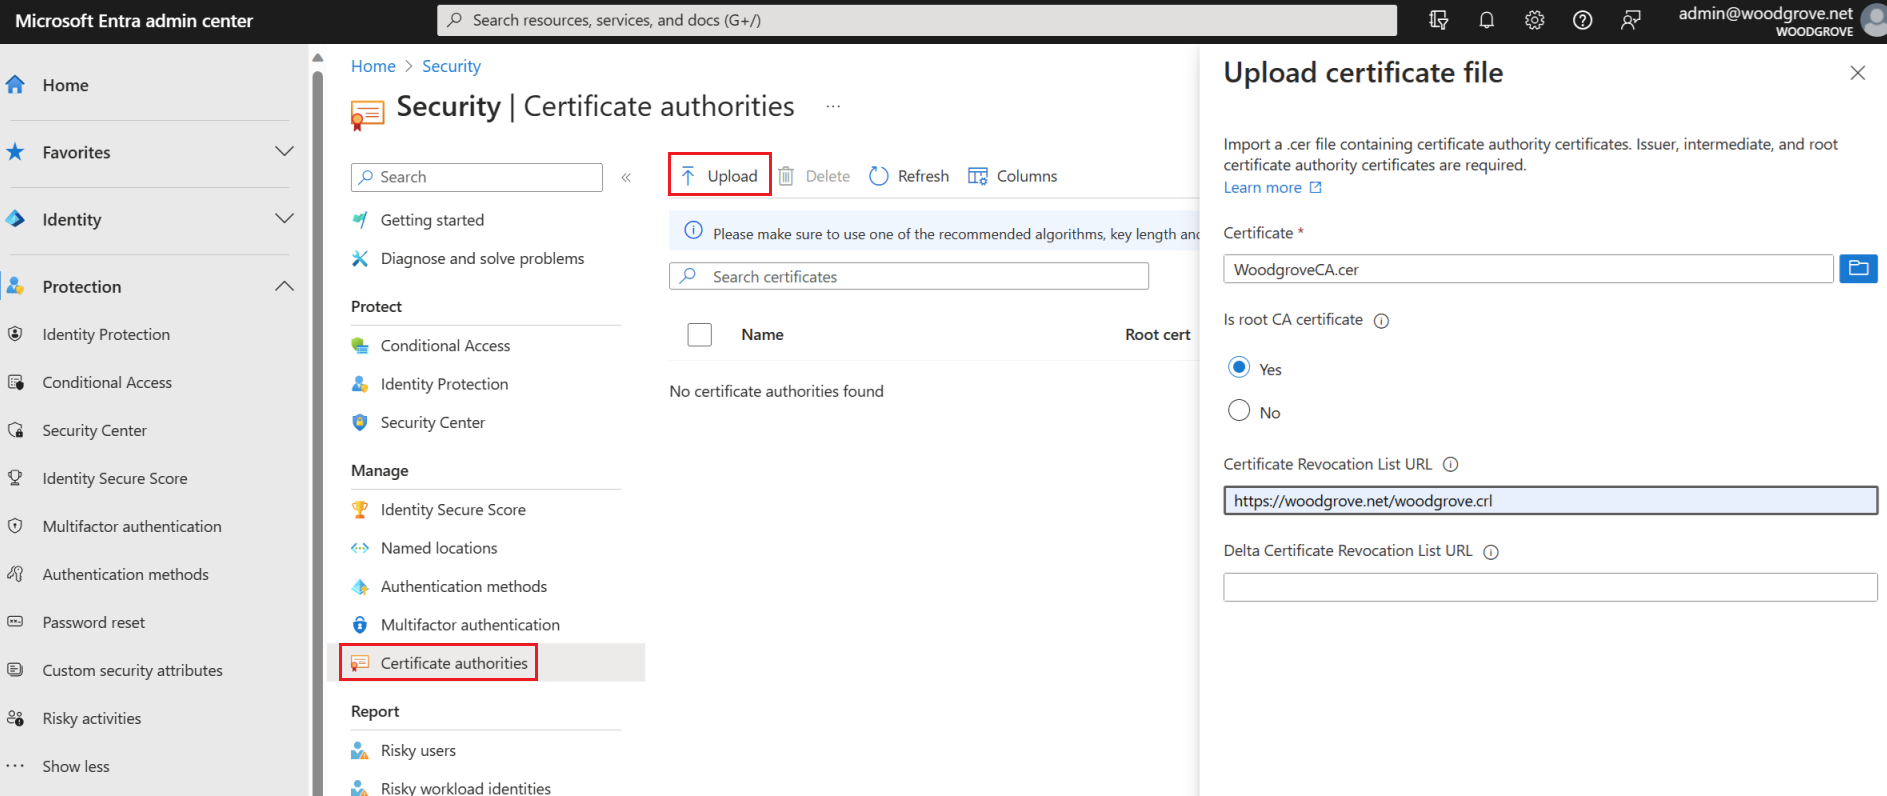
Browse to Protection > Show more > Security Center (or Identity Secure Score) > Certificate authorities.
To upload a CA, select Upload:
Select the CA file.
Select Yes if the CA is a root certificate, otherwise select No.
For Certificate Revocation List URL, set the internet-facing URL for the CA base CRL that contains all revoked certificates. If the URL isn't set, authentication with revoked certificates doesn't fail.
For Delta Certificate Revocation List URL, set the internet-facing URL for the CRL that contains all revoked certificates since the last base CRL was published.
Select Add.

To delete a CA certificate, select the certificate and select Delete.
Select Columns to add or delete columns.
Note
Upload of a new CA fails if any existing CA expired. You should delete any expired CA, and retry to upload the new CA.
Configure certificate authorities (CA) using PowerShell
Only one CRL Distribution Point (CDP) for a trusted CA is supported. The CDP can only be HTTP URLs. Online Certificate Status Protocol (OCSP) or Lightweight Directory Access Protocol (LDAP) URLs aren't supported.
To configure your certificate authorities in Microsoft Entra ID, for each certificate authority, upload the following:
- The public portion of the certificate, in .cer format
- The internet-facing URLs where the Certificate Revocation Lists (CRLs) reside
The schema for a certificate authority looks as follows:
    class TrustedCAsForPasswordlessAuth
    {
       CertificateAuthorityInformation[] certificateAuthorities;
    }

    class CertificateAuthorityInformation

    {
        CertAuthorityType authorityType;
        X509Certificate trustedCertificate;
        string crlDistributionPoint;
        string deltaCrlDistributionPoint;
        string trustedIssuer;
        string trustedIssuerSKI;
    }

    enum CertAuthorityType
    {
        RootAuthority = 0,
        IntermediateAuthority = 1
    }
For the configuration, you can use Microsoft Graph PowerShell:
Start Windows PowerShell with administrator privileges.
Install Microsoft Graph PowerShell:
Install-Module Microsoft.Graph
As a first configuration step, you need to establish a connection with your tenant. As soon as a connection to your tenant exists, you can review, add, delete, and modify the trusted certificate authorities that are defined in your directory.
Connect
To establish a connection with your tenant, use Connect-MgGraph:
Connect-MgGraph
Retrieve
To retrieve the trusted certificate authorities that are defined in your directory, use Get-MgOrganizationCertificateBasedAuthConfiguration.
Get-MgOrganizationCertificateBasedAuthConfiguration
Add
Note
Upload of new CAs will fail when any of the existing CAs are expired. Tenant Admin should delete the expired CAs and then upload the new CA.
Follow the preceding steps to add a CA in the Microsoft Entra admin center.
AuthorityType
- Use 0 to indicate a Root certificate authority
- Use 1 to indicate an Intermediate or Issuing certificate authority
crlDistributionPoint
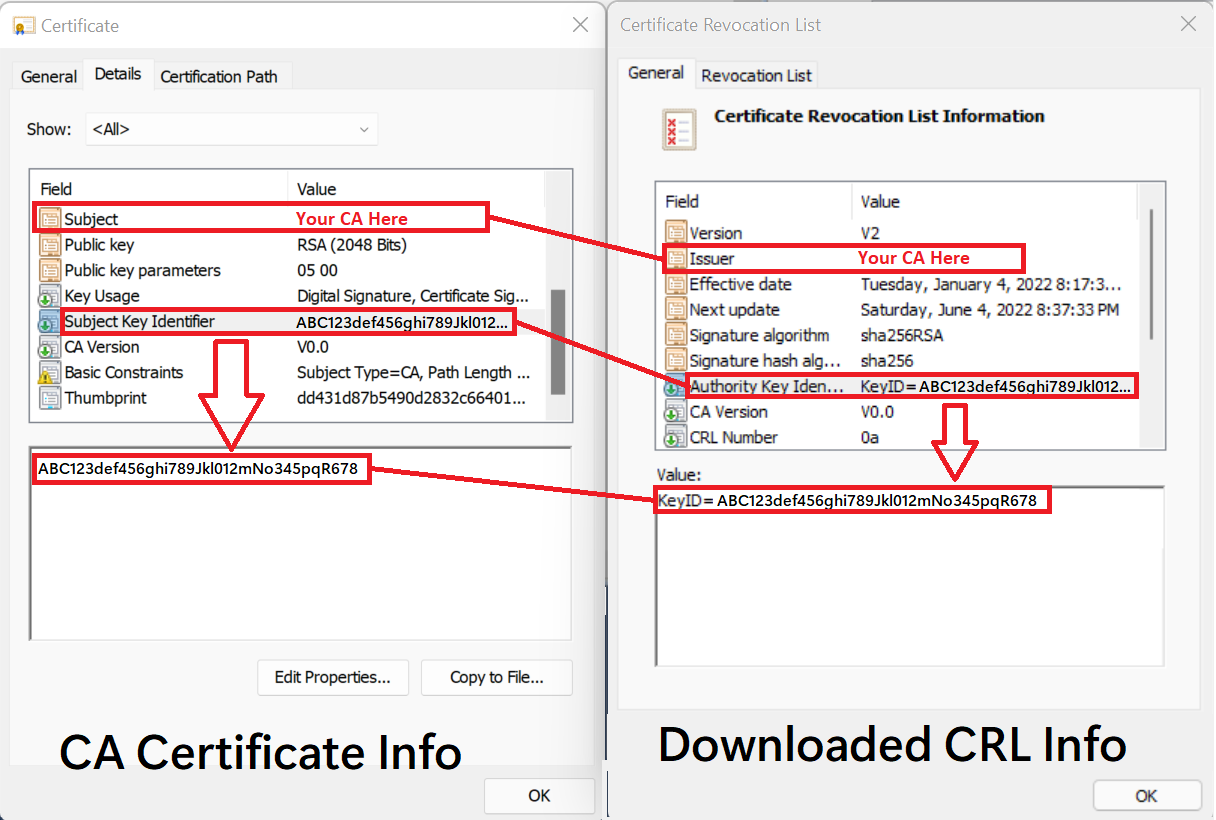
Download the CRL and compare the CA certificate and the CRL information. Make sure the crlDistributionPoint value in the preceding PowerShell example is valid for the CA you want to add.
The following table and graphic show how to map information from the CA certificate to the attributes of the downloaded CRL.
| CA Certificate Info | = | Downloaded CRL Info |
|---|---|---|
| Subject | = | Issuer |
| Subject Key Identifier | = | Authority Key Identifier (KeyID) |

Tip
The value for crlDistributionPoint in the preceding example is the http location for the CA’s Certificate Revocation List (CRL). This value can be found in a few places:
- In the CRL Distribution Point (CDP) attribute of a certificate issued from the CA.
If the issuing CA runs Windows Server:
- On the Properties of the CA in the certificate authority Microsoft Management Console (MMC).
- On the CA by running
certutil -cainfo cdp. For more information, see certutil.
For more information, see Understanding the certificate revocation process.
Configure certificate authorities using the Microsoft Graph APIs
Microsoft Graph APIs can be used to configure certificate authorities. To update the Microsoft Entra Certificate Authority trust store, follow the steps at certificatebasedauthconfiguration MSGraph commands.
Validate Certificate Authority configuration
Make sure the configuration allows Microsoft Entra CBA to:
- Validate the CA trust chain
- Get the certificate revocation list (CRL) from the configured certificate authority CRL distribution point (CDP)
To validate the CA configuration, install the MSIdentity Tools PowerShell module, and run Test-MsIdCBATrustStoreConfiguration. This PowerShell cmdlet reviews the Microsoft Entra tenant CA configuration. It reports errors and warnings for common misconfigurations.
Related content
How to configure Microsoft Entra certificate-based authentication