How to use the Global Secure Access enriched Microsoft 365 logs
With your Microsoft traffic flowing through the Microsoft Entra Private Internet service, you want to gain insights into the performance, experience, and availability of the Microsoft 365 apps your organization uses. The enriched Microsoft 365 logs provide you with the information you need to gain these insights. You can integrate the logs with a third-party security information and event management (SIEM) tool for further analysis.
This article describes the information in the logs and how to export them.
Prerequisites
To use the enriched logs, you need the following roles, configurations, and subscriptions:
Roles and Permissions
- A Global Administrator role is required to enable the enriched Microsoft 365 logs.
Configurations
- Microsoft Profile - Ensure the Microsoft traffic profile is enabled. Microsoft traffic forwarding profile is required to capture traffic directed to Microsoft 365 services, which is fundamental for log enrichment.
- Microsoft 365 Common and Office Online Traffic Policy - Required for log enrichment. Ensure it's enabled.
- Tenant sending data - Confirms that traffic, as configured in forwarding profiles, is accurately tunneled to the Global Secure Access service.
- Diagnostic Settings Configuration - Set up Microsoft Entra diagnostic settings to channel the logs to a designated endpoint, like a Log Analytics workspace. The requirements for each endpoint differ and are outlined in the Configure Diagnostic settings section of this article.
Subscriptions
- The product requires licensing. For details, see the licensing section of What is Global Secure Access. If needed, you can purchase licenses or get trial licenses.
You must configure the endpoint for where you want to route the logs prior to configuring Diagnostic settings. The requirements for each endpoint vary and are described in the Configure Diagnostic settings section.
What the logs provide
The enriched Microsoft 365 logs provide information about Microsoft 365 workloads, so you can review network diagnostic data, performance data, and security events relevant to Microsoft 365 apps. For example, if access to Microsoft 365 is blocked for a user in your organization, you need visibility into how the user's device is connecting to your network.
These logs provide:
- Improved latency
- Additional information added to original logs
- Accurate IP address
These logs are a subset of the logs available in the Microsoft 365 audit logs. The logs are enriched with more information, including the device ID, operating system, and original IP address. Enriched SharePoint logs provide information on files that were downloaded, uploaded, deleted, modified, or recycled. Deleted or recycled list items are also included in the enriched logs.
How to view the logs
Viewing the enriched Microsoft 365 logs is a two-step process. First, you need to enable the log enrichment from Global Secure Access. Second, you need to configure Microsoft Entra diagnostic settings to route the logs to an endpoint, such as a Log Analytics workspace.
Note
At this time, only SharePoint Online logs are available for log enrichment.
Enable the log enrichment
To enable the Enriched Microsoft 365 logs:
- Sign in to the Microsoft Entra admin center as a Global Administrator.
- Browse to Global Secure Access > Settings > Logging.
- Select the type of Microsoft 365 logs you want to enable.
- Select Save.
The enriched logs take up to 72 hours to fully integrate with the service.
Configure Diagnostic settings
To view the enriched Microsoft 365 logs, you must export or stream the logs to an endpoint, such as a Log Analytics workspace or a SIEM tool. The endpoint must be configured before you can configure Diagnostic settings.
Configure an endpoint
To integrate logs with Log Analytics, you need a Log Analytics workspace.
To stream logs to a SIEM tool, you need to create an Azure event hub and an event hub namespace.
To archive logs to a storage account, you need an Azure storage account that you have
ListKeyspermissions for.
Send logs to an endpoint
With your endpoint created, you can configure Diagnostic settings.
Sign in to the Microsoft Entra admin center as at least a Security Administrator.
Browse to Identity > Monitoring & health > Diagnostic settings.
Select Add Diagnostic setting.
Give your diagnostic setting a name.
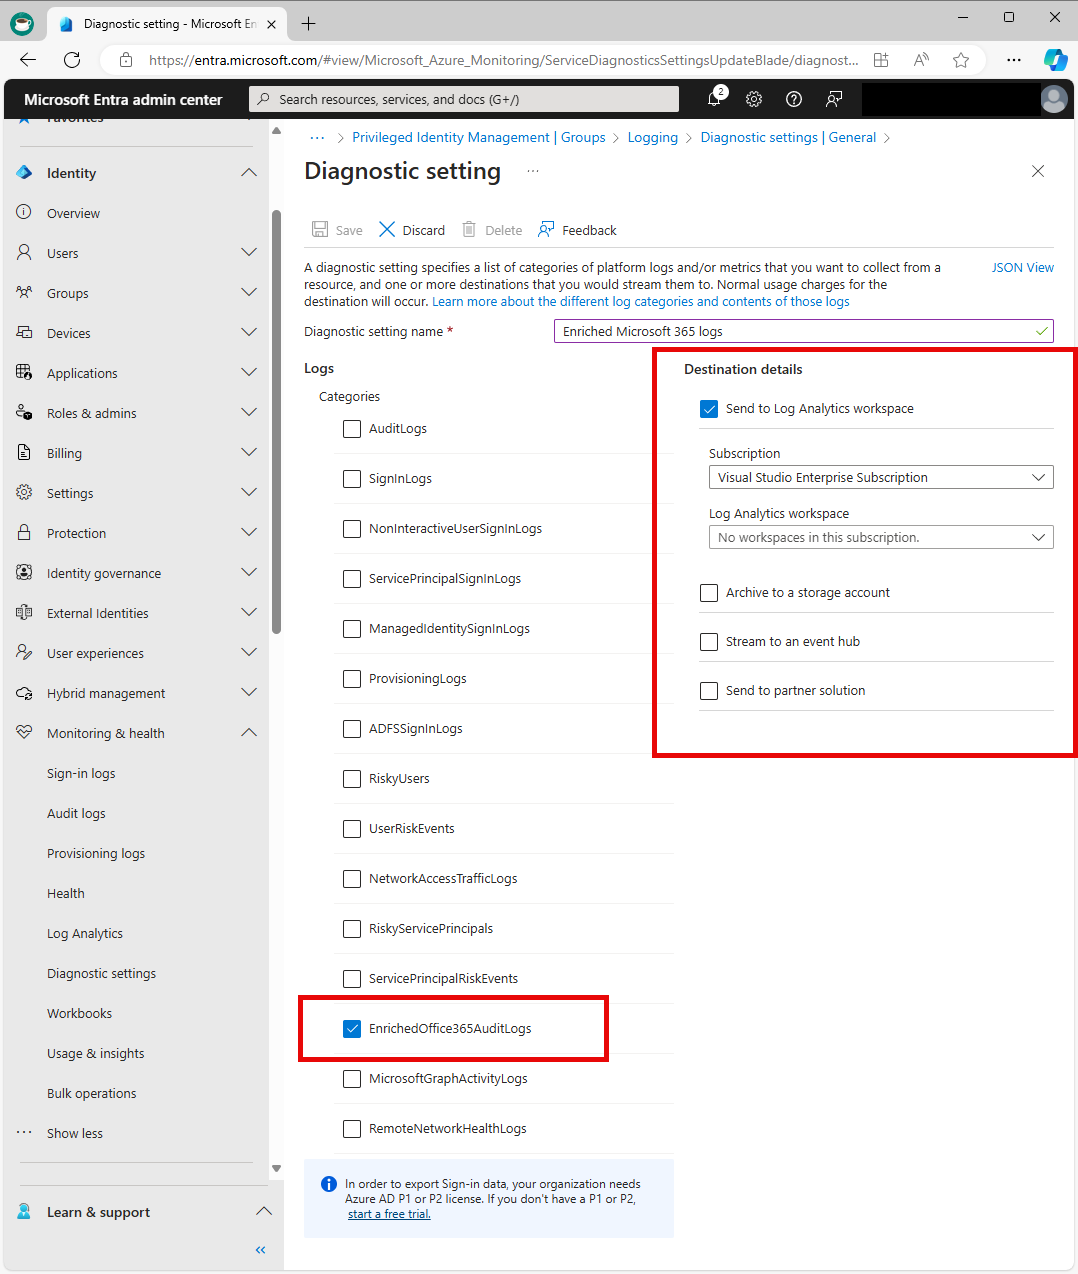
Select
EnrichedOffice365AuditLogs.Select the Destination details for where you'd like to send the logs. Choose any or all of the following destinations. More fields appear, depending on your selection.
- Send to Log Analytics workspace: Select the appropriate details from the menus that appear.
- Archive to a storage account: Provide the number of days you'd like to retain the data in the Retention days boxes that appear next to the log categories. Select the appropriate details from the menus that appear.
- Stream to an event hub: Select the appropriate details from the menus that appear.
- Send to partner solution: Select the appropriate details from the menus that appear.
The following example is sending the enriched logs to a Log Analytics workspace, which requires selecting the Subscription and Log Analytics workspace from the menus that appear.
