Simulate remote network connectivity using Azure vWAN
This article explains how to simulate remote network connectivity using a remote virtual wide-area network (vWAN). If you want to simulate remote network connectivity using an Azure virtual network gateway (VNG), see the article, Simulate remote network connectivity using Azure VNG.
Prerequisites
To complete the steps in this process, you must have the following prerequisites in place:
- An Azure subscription and permission to create resources in the Azure portal.
- A basic understanding of virtual wide area networks (vWAN).
- A basic understanding of site-to-site VPN connections.
- A Microsoft Entra tenant with the Global Secure Access Administrator role assigned.
- A basic understanding of Azure virtual desktops or Azure virtual machines.
This document uses the following example values, along with the values in the images and steps. Feel free to configure these settings according to your own requirements.
- Subscription: Visual Studio Enterprise
- Resource group name: GlobalSecureAccess_Documentation
- Region: South Central US
High-level steps
The steps to create a remote network using Azure vWAN require access to both the Azure portal and the Microsoft Entra admin center. To switch between them easily, keep Azure and Microsoft Entra open in separate tabs. Because certain resources can take more than 30 minutes to deploy, set aside at least two hours to complete this process. Reminder: Resources left running can cost you money. When done testing, or at the end of a project, it's a good idea to remove the resources that you no longer need.
- Set up a vWAN in the Azure portal
- Create a vWAN
- Create a virtual hub with a site-to-site VPN gateway The virtual hub takes about 30 minutes to deploy.
- Obtain VPN gateway information
- Create a remote network in the Microsoft Entra admin center
- Create a VPN site using the Microsoft gateway
- Create a VPN site
- Create a site-to-site connection The site-to-site connection takes about 30 minutes to deploy.
- Check border gateway protocol connectivity and learned routes in Microsoft Azure portal
- Check connectivity in Microsoft Entra admin center
- Configure security features for testing
- Create a virtual network
- Add a virtual network connection to the vWAN
- Create an Azure virtual Desktop The Azure virtual Desktop takes about 30 minutes to deploy. The Bastion takes another 30 minutes.
- Test security features with Azure virtual Desktop (AVD)
Set up a vWAN in the Azure portal
There are three main steps to set up a vWAN:
Create a vWAN
Create a vWAN to connect to your resources in Azure. For more information about vWAN, see the vWAN Overview.
- From the Microsoft Azure portal, in the Search resources bar, type vWAN in the search box and select Enter.
- Select vWANs from the results. On the vWANs page, select + Create to open the Create WAN page.
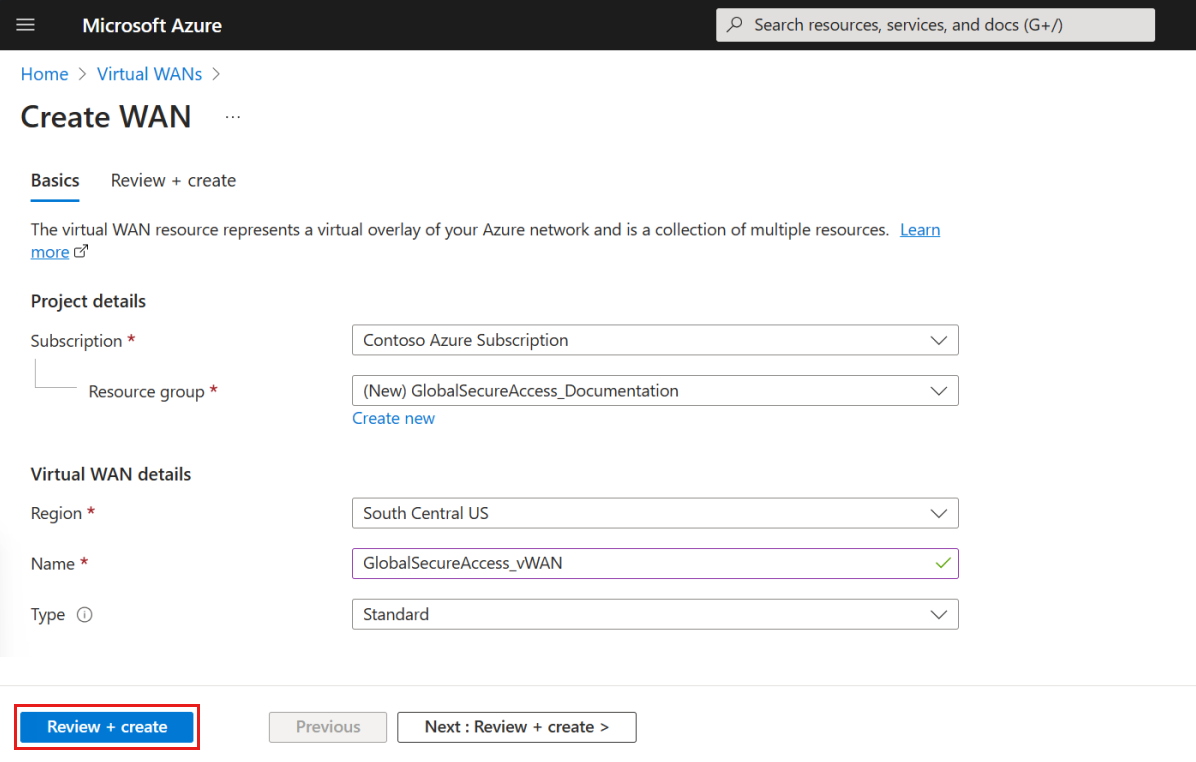
- On the Create WAN page, on the Basics tab, fill in the fields. Modify the example values to apply to your environment.
- Subscription: Select the subscription that you want to use.
- Resource group: Create new or use existing.
- Resource group location: Choose a resource location from the dropdown. A WAN is a global resource and doesn't live in a particular region. However, you must select a region to manage and locate the WAN resource that you create.
- Name: Type the Name that you want to call your vWAN.
- Type: Basic or Standard. Select Standard. If you select Basic, understand that Basic vWANs can only contain Basic hubs. Basic hubs can only be used for site-to-site connections.
- After filling out the fields, at the bottom of the page, select Review + create.
- Once validation passes, select the Create button.
Create a virtual hub with a VPN gateway
Next, create a virtual hub with a site-to-site virtual private network (VPN) gateway:
- Within the new vWAN, under Connectivity, select Hubs.
- Select + New Hub.
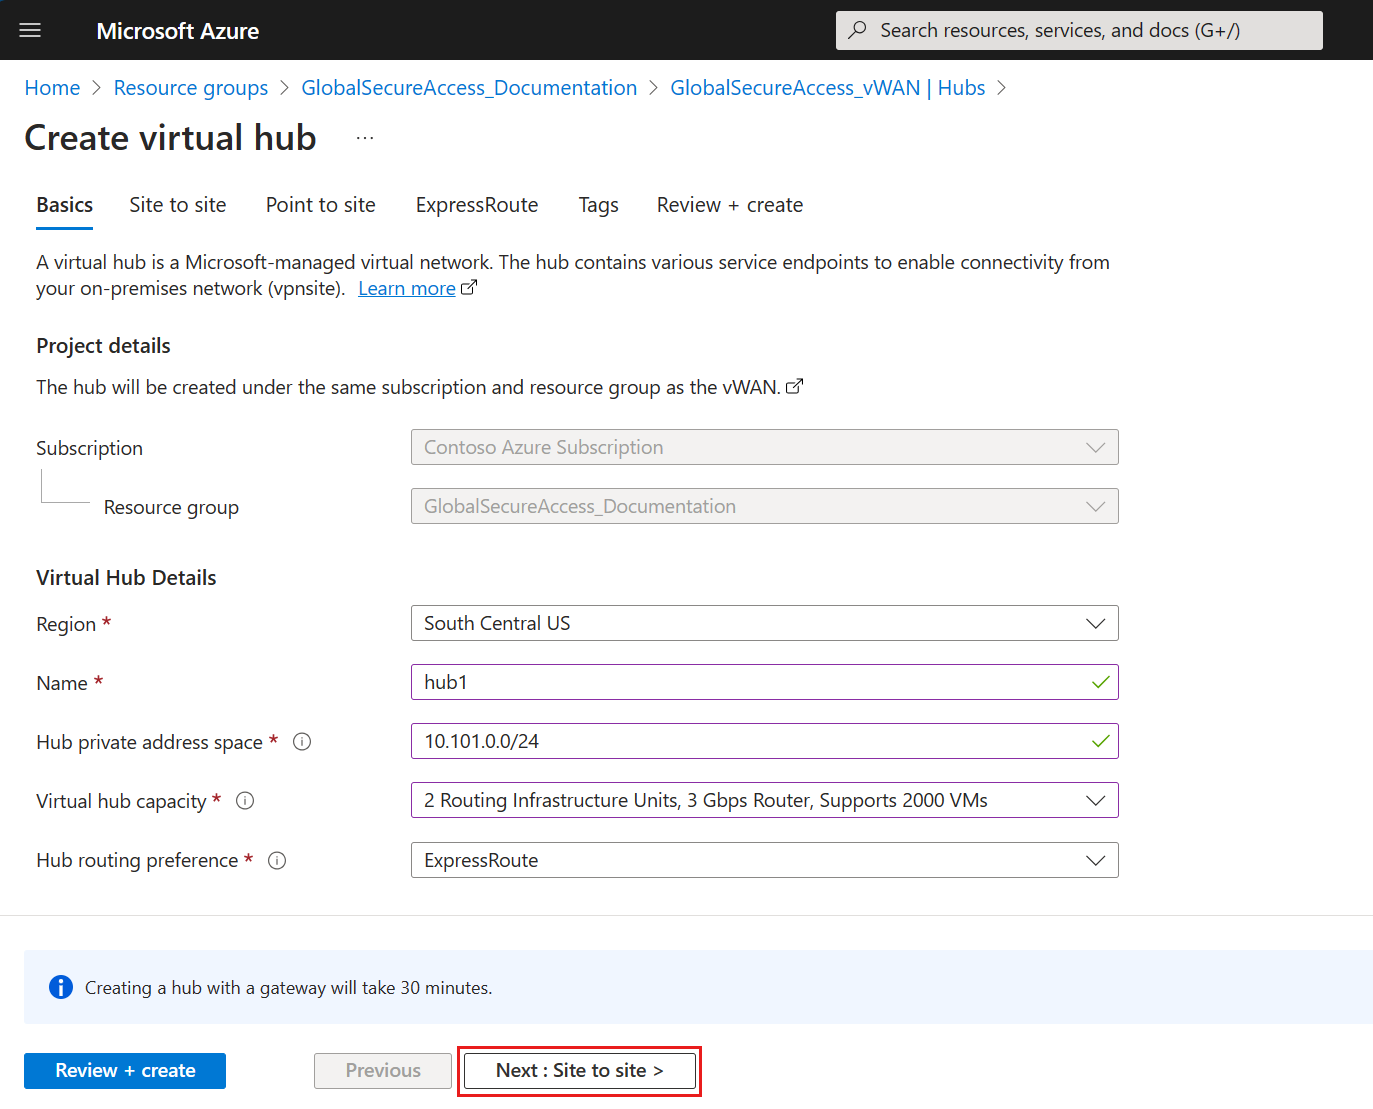
- On the Create virtual hub page, on the Basics tab, fill in the fields according to your environment.
- Region: Select the region in which you want to deploy the virtual hub.
- Name: The name by which you want the virtual hub to be known.
- Hub private address space: For this example, use 10.101.0.0/24. To create a hub, the address range must be in Classless Inter-Domain Routing (CIDR) notation and have a minimum address space of /24.
- Virtual hub capacity: For this example, select 2 Routing Infrastructure Units, 3 Gbps Router, Supports 2000 VMs. For more information, see Virtual hub settings.
- Hub routing preference: Leave as default. For more information, see Virtual hub routing preference.
- Select Next : Site to site >.
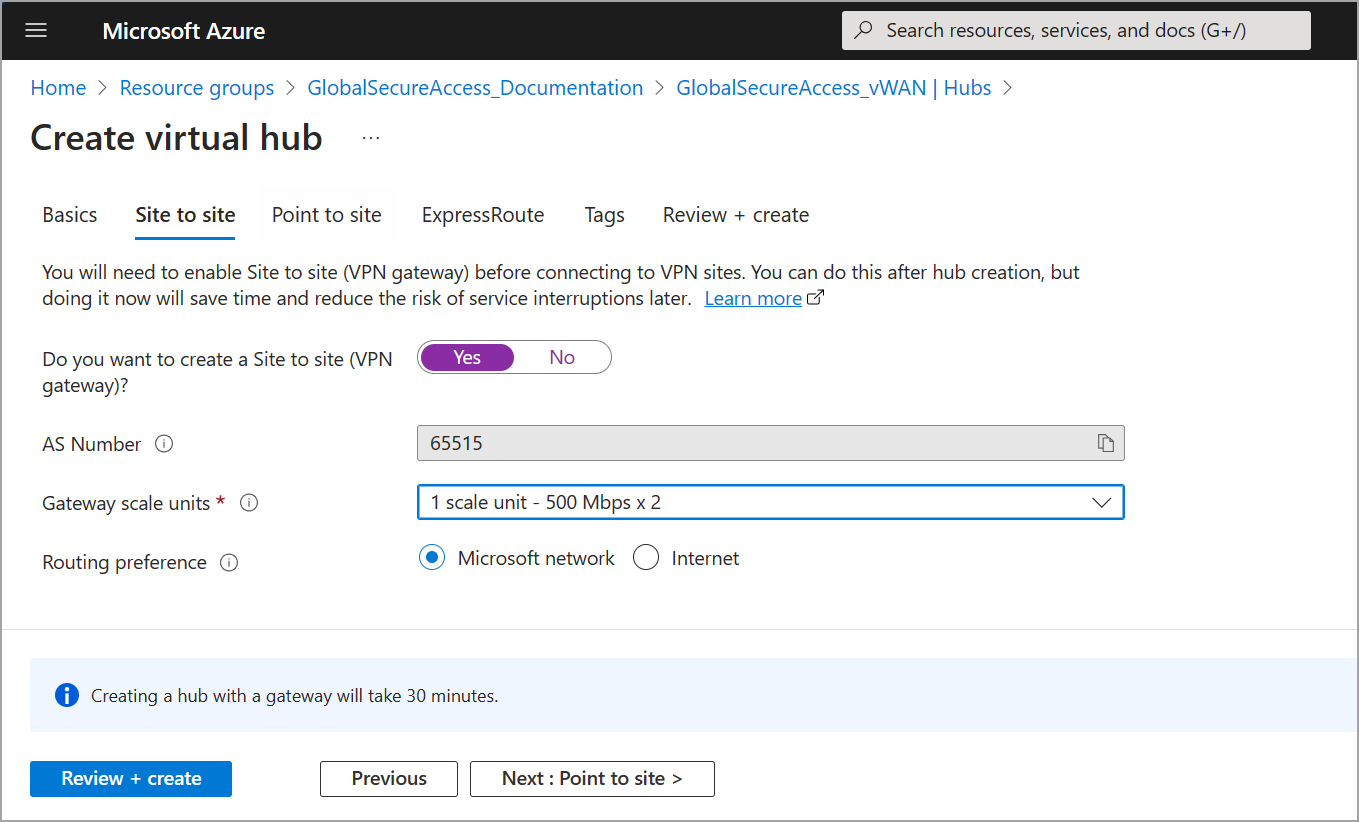
- On the Site to site tab, complete the following fields:
- Select Yes to create a Site-to-site (VPN gateway).
- AS Number: The AS Number field can't be edited.
- Gateway scale units: For this example, select 1 scale unit - 500 Mbps x 2. This value should align with the aggregate throughput of the VPN gateway being created in the virtual hub.
- Routing preference: For this example, select Microsoft network for how to route your traffic between Azure and the internet. For more information about routing preference via a Microsoft network or Internet Service Provider (ISP), see the Routing preference article.
- Leave the remaining tab options set to their defaults and select Review + create to validate.
- Select Create to create the hub and gateway. This process can take up to 30 minutes.
- After 30 minutes, Refresh to view the hub on the Hubs page, and then select Go to resource to navigate to the resource.
Obtain VPN gateway information
To create a remote network in the Microsoft Entra admin center, you need to view and record the VPN gateway information for the virtual hub you created in the previous step.
- Within the new vWAN, under Connectivity, select Hubs.
- Select the virtual hub.
- Select VPN (Site to site).
- On the Virtual Hub page, select the VPN Gateway link.
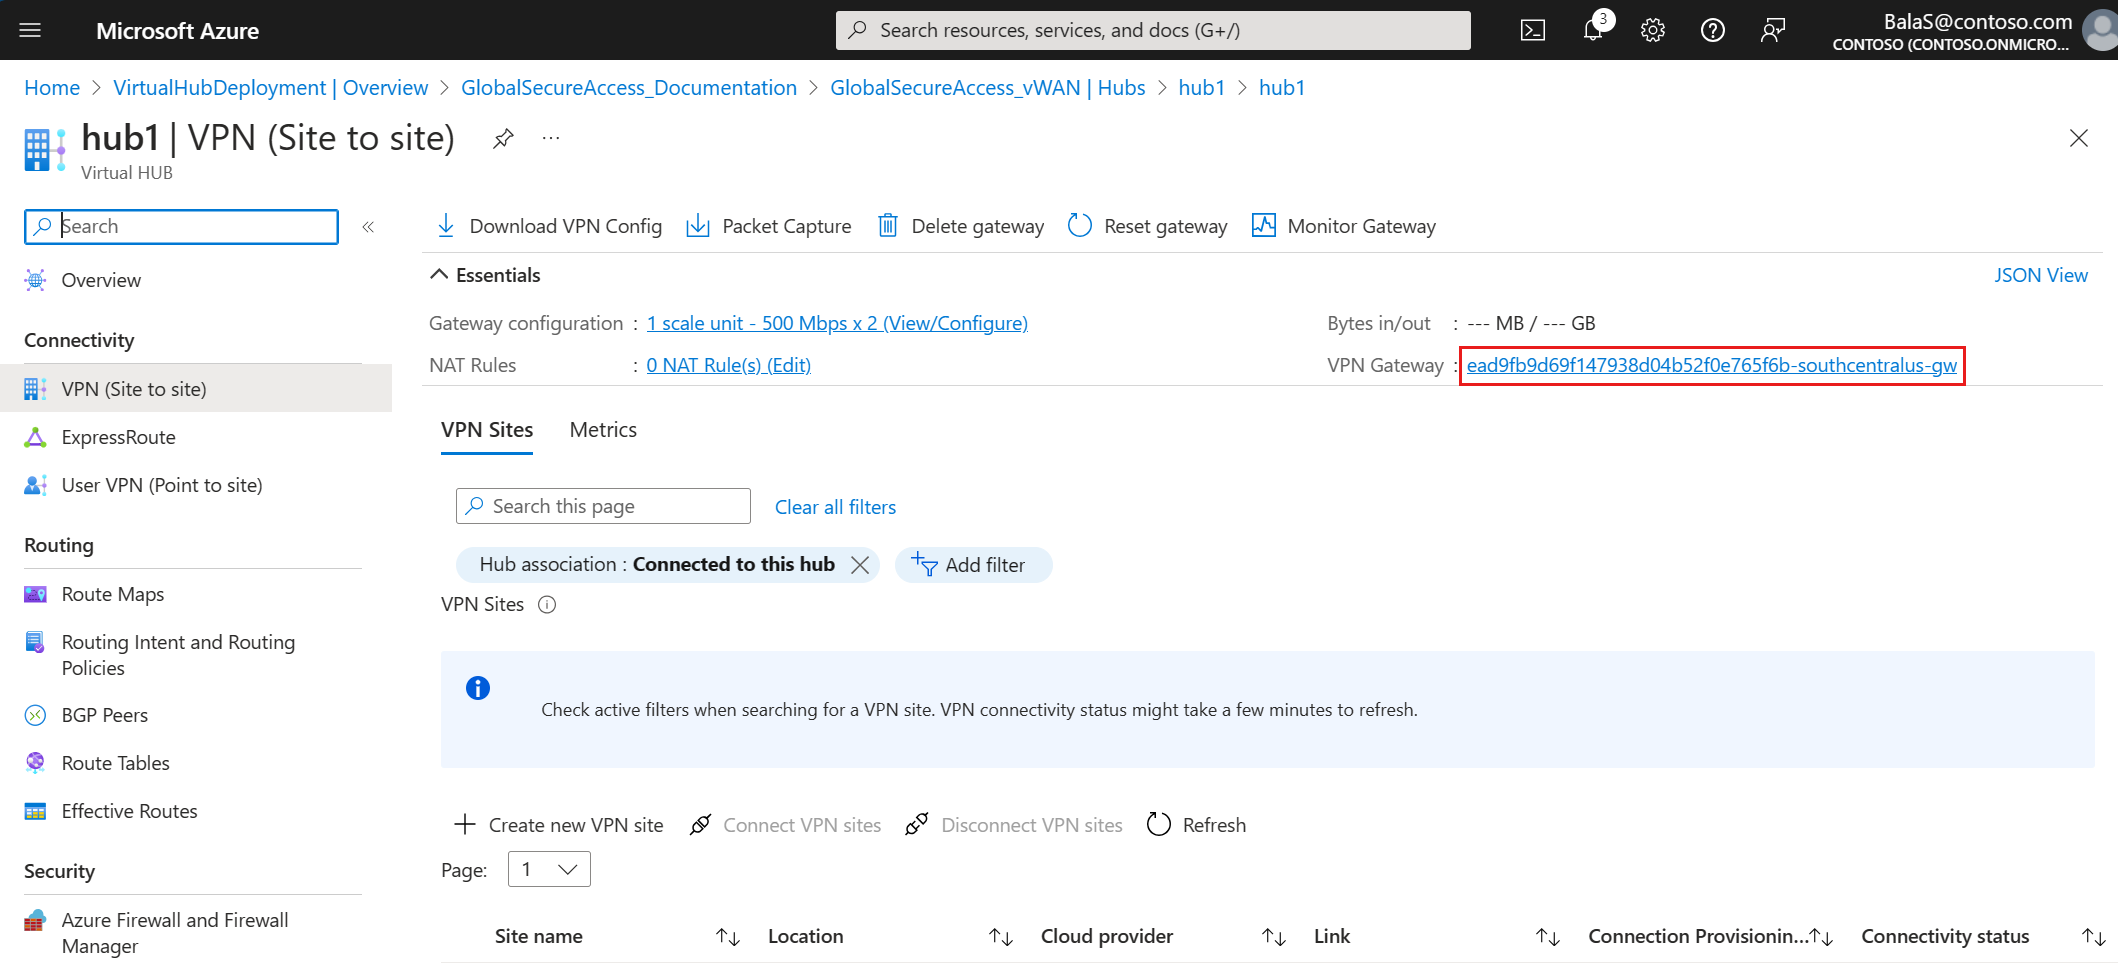
- On the VPN Gateway page, select JSON View.
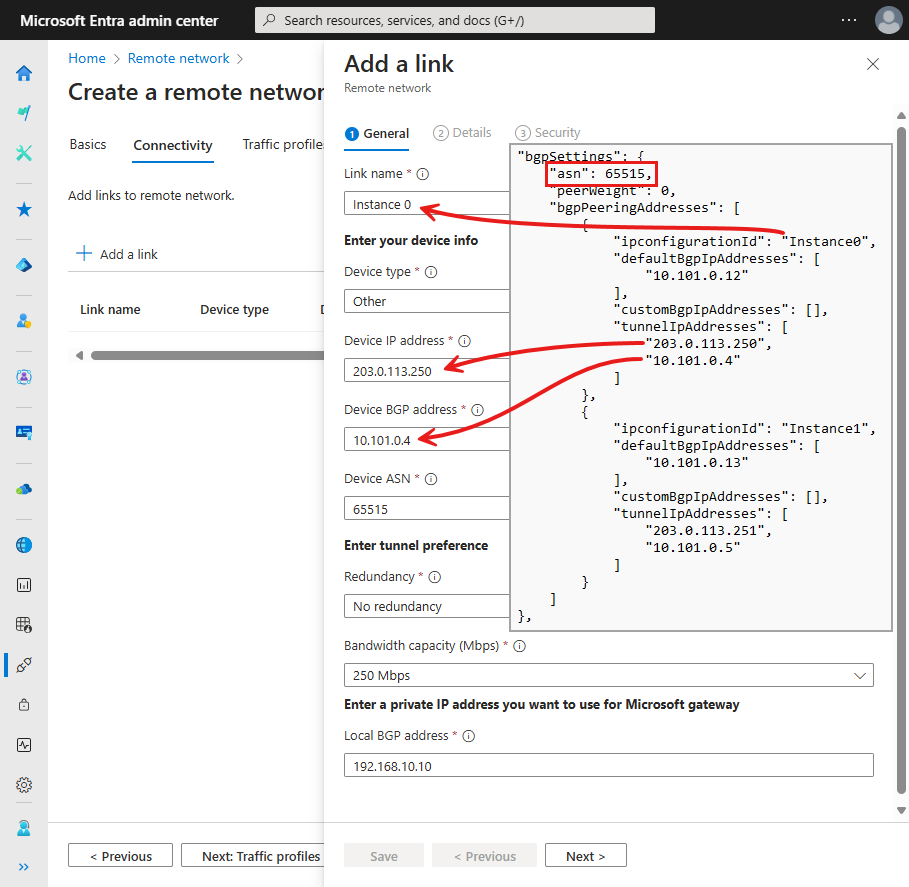
- Copy the JSON text into a file for reference in upcoming steps. Make note of the autonomous system number (ASN), device IP address, and the device border gateway protocol (BGP) address to use in the Microsoft Entra admin center in the next step.
   "bgpSettings": {
        "asn": 65515,
        "peerWeight": 0,
        "bgpPeeringAddresses": [
            {
                "ipconfigurationId": "Instance0",
                "defaultBgpIpAddresses": [
                    "10.101.0.12"
                ],
                "customBgpIpAddresses": [],
                "tunnelIpAddresses": [
                    "203.0.113.250",
                    "10.101.0.4"
                ]
            },
            {
                "ipconfigurationId": "Instance1",
                "defaultBgpIpAddresses": [
                    "10.101.0.13"
                ],
                "customBgpIpAddresses": [],
                "tunnelIpAddresses": [
                    "203.0.113.251",
                    "10.101.0.5"
                ]
            }
        ]
    }
Tip
You cannot change the ASN value.
Create a remote network in the Microsoft Entra admin center
In this step, use the network information from the VPN gateway to create a remote network in the Microsoft Entra admin center. The first step is to provide the name and location of your remote network.
- Sign in to the Microsoft Entra admin center as at least a Security Administrator.
- Navigate to Global Secure Access > Connect > Remote networks.
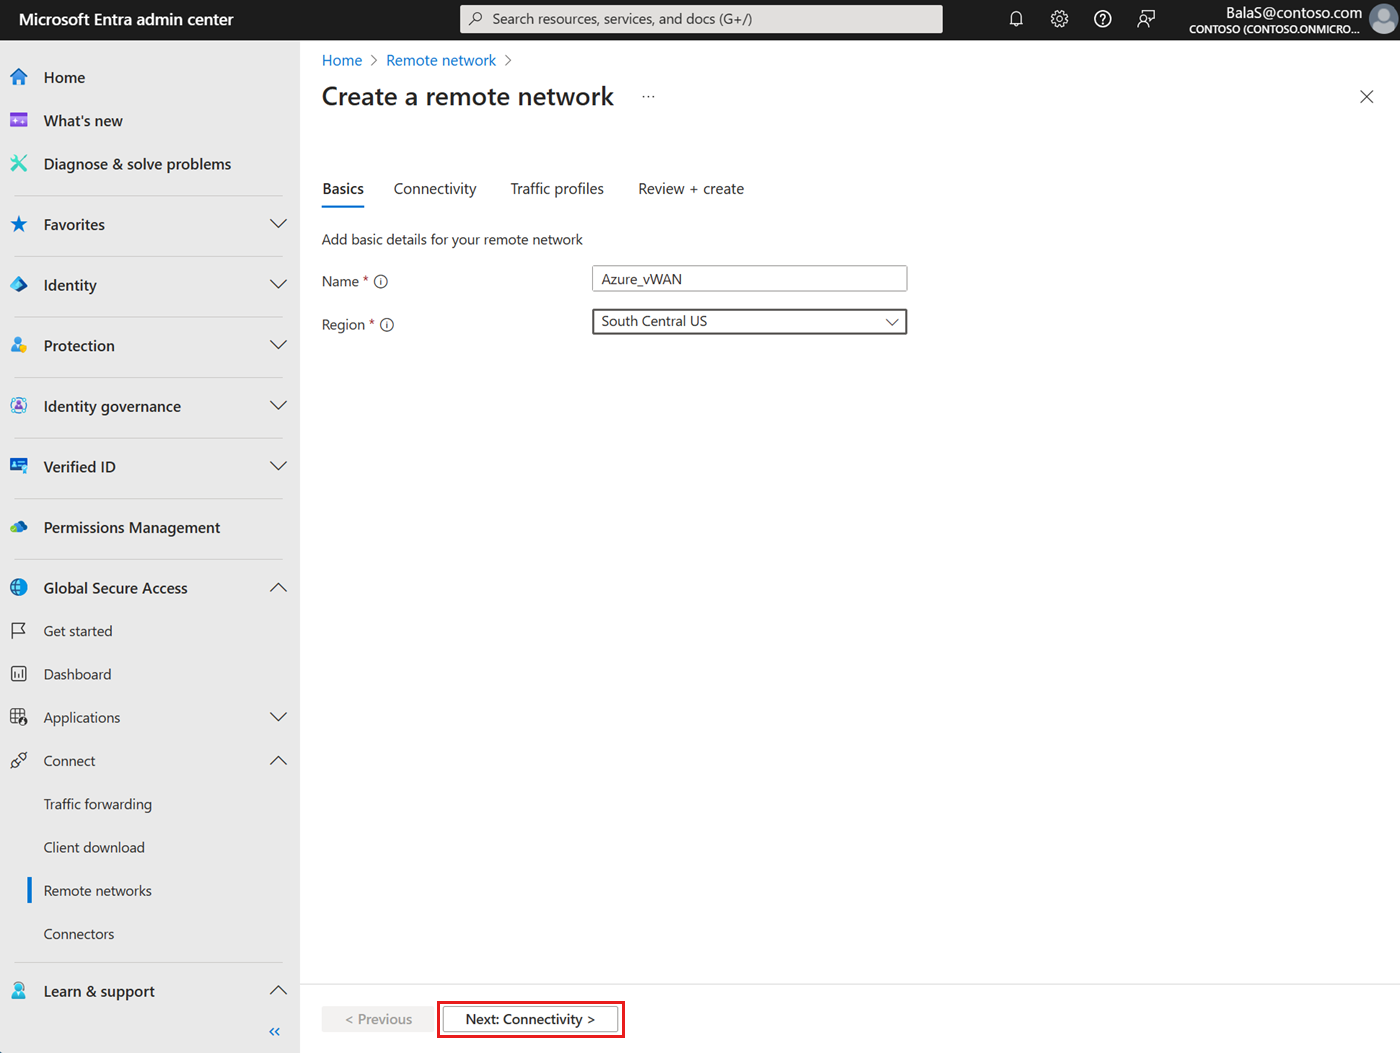
- Select the Create remote network button and provide the details.
- Name: For this example, use Azure_vWAN.
- Region: For this example, select South Central US.
- Select Next: Connectivity to proceed to the Connectivity tab.
- On the Connectivity tab, add device links for the remote network. Create one link for the VPN gateway's Instance0 and another link for the VPN gateway's Instance1:
- Select + Add a link.
- Complete the fields on the General tab in the Add a link form, using the VPN gateway's Instance0 configuration from the JSON view:
Link name: Name of your Customer Premises Equipment (CPE). For this example, Instance0.
Device type: Choose a device option from the dropdown list. Set to Other.
Device IP address: Public IP address of your device. For this example, use 203.0.113.250.
Device BGP address: Enter the Border Gateway Protocol (BGP) IP address of your CPE. For this example, use 10.101.0.4.
Device ASN: Provide the autonomous system number (ASN) of the CPE. For this example, the ASN is 65515.
Redundancy: Set to No redundancy.
Zone redundant local BGP address: This optional field shows up only when you select Zone redundancy.
- Enter a BGP IP address that isn't part of your on-premises network where your CPE resides and is different from the Local BGP address.
Bandwidth capacity (Mbps): Specify tunnel bandwidth. For this example, set to 250 Mbps.
Local BGP address: Use a BGP IP address that isn't part of your on-premises network where your CPE resides, such as 192.168.10.10.
- Refer to the valid BGP addresses list for reserved values that can't be used.
- Select the Next button to view the Details tab. Keep the default settings.
- Select the Next button to view the Security tab.
- Enter the Preshared key (PSK). The same secret key must be used on your CPE.
- Select the Save button.
For more information about links, see the article, How to manage remote network device links.
- Repeat the above steps to create a second device link using the VPN gateway's Instance1 configuration.
- Select + Add a link.
- Complete the fields on the General tab in the Add a link form, using the VPN gateway's Instance1 configuration from the JSON view:
- Link name: Instance1
- Device type: Other
- Device IP address: 203.0.113.251
- Device BGP address: 10.101.0.5
- Device ASN: 65515
- Redundancy: No redundancy
- Bandwidth capacity (Mbps): 250 Mbps
- Local BGP address: 192.168.10.11
- Select the Next button to view the Details tab. Keep the default settings.
- Select the Next button to view the Security tab.
- Enter the Preshared key (PSK). The same secret key must be used on your CPE.
- Select the Save button.
- Proceed to the Traffic profiles tab to select the traffic profile to link to the remote network.
- Select Microsoft 365 traffic profile.
- Select Review + create.
- Select Create remote network.
Navigate to the Remote network page to view the details of the new remote network. There should be one Region and two Links.
- Under Connectivity details, select the View configuration link.
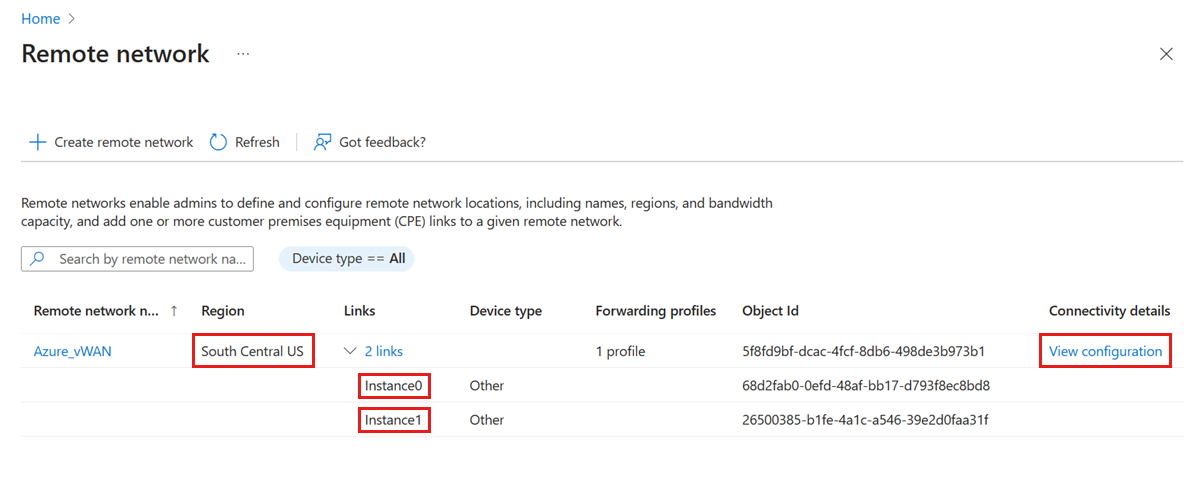
- Copy the Remote network configuration text into a file for reference in upcoming steps. Make note of the Endpoint, ASN, and BGP address for each of the links (Instance0 and Instance1).
   {
  "id": "68d2fab0-0efd-48af-bb17-d793f8ec8bd8",
  "displayName": "Instance0",
  "localConfigurations": [
    {
      "endpoint": "203.0.113.32",
      "asn": 65476,
      "bgpAddress": "192.168.10.10",
      "region": "southCentralUS"
    }
  ],
  "peerConfiguration": {
    "endpoint": "203.0.113.250",
    "asn": 65515,
    "bgpAddress": "10.101.0.4"
  }
},
{
  "id": "26500385-b1fe-4a1c-a546-39e2d0faa31f",
  "displayName": "Instance1",
  "localConfigurations": [
    {
      "endpoint": "203.0.113.34",
      "asn": 65476,
      "bgpAddress": "192.168.10.11",
      "region": "southCentralUS"
    }
  ],
  "peerConfiguration": {
    "endpoint": "203.0.113.251",
    "asn": 65515,
    "bgpAddress": "10.101.0.5"
  }
}
Create a VPN site using the Microsoft gateway
In this step, create a VPN site, associate the VPN site with the hub, and then validate the connection.
Create a VPN site
- In the Microsoft Azure portal, sign in the virtual hub created in the previous steps.
- Navigate to Connectivity > VPN (Site to site).
- Select + Create new VPN site.
- On the Create VPN site page, complete the fields on the Basics tab.
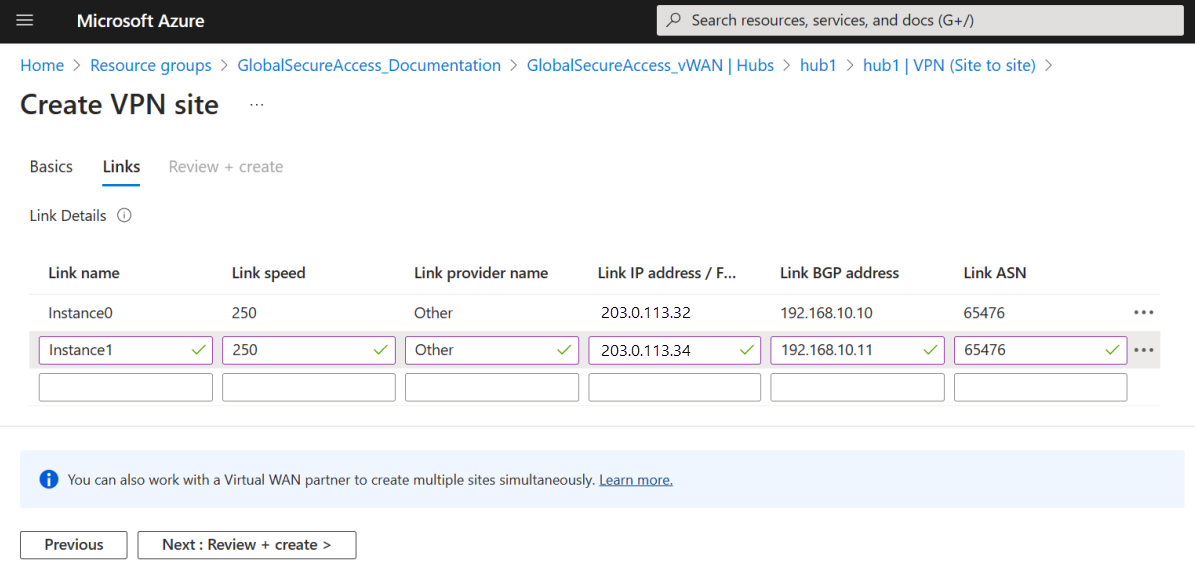
- Proceed to the Links tab. For each link, enter the Microsoft gateway configuration from the Remote network configuration noted in the "view details" step:
- Link name: For this example, Instance0; Instance1.
- Link speed: For this example, 250 for both links.
- Link provider name: Set to Other for both links.
- Link IP address / FQDN: Use the Endpoint address. For this example, 203.0.113.32; 203.0.113.34.
- Link BGP address: Use the BGP address, 192.168.10.10; 192.168.10.11.
- Link ASN: Use the ASN. For this example, 65476 for both links.
- Select Review + create.
- Select Create.
Create a site-to-site connection
In this step, associate the VPN site from the previous step with the hub. Next, remove the default hub association:
- Navigate to Connectivity > VPN (Site to site).
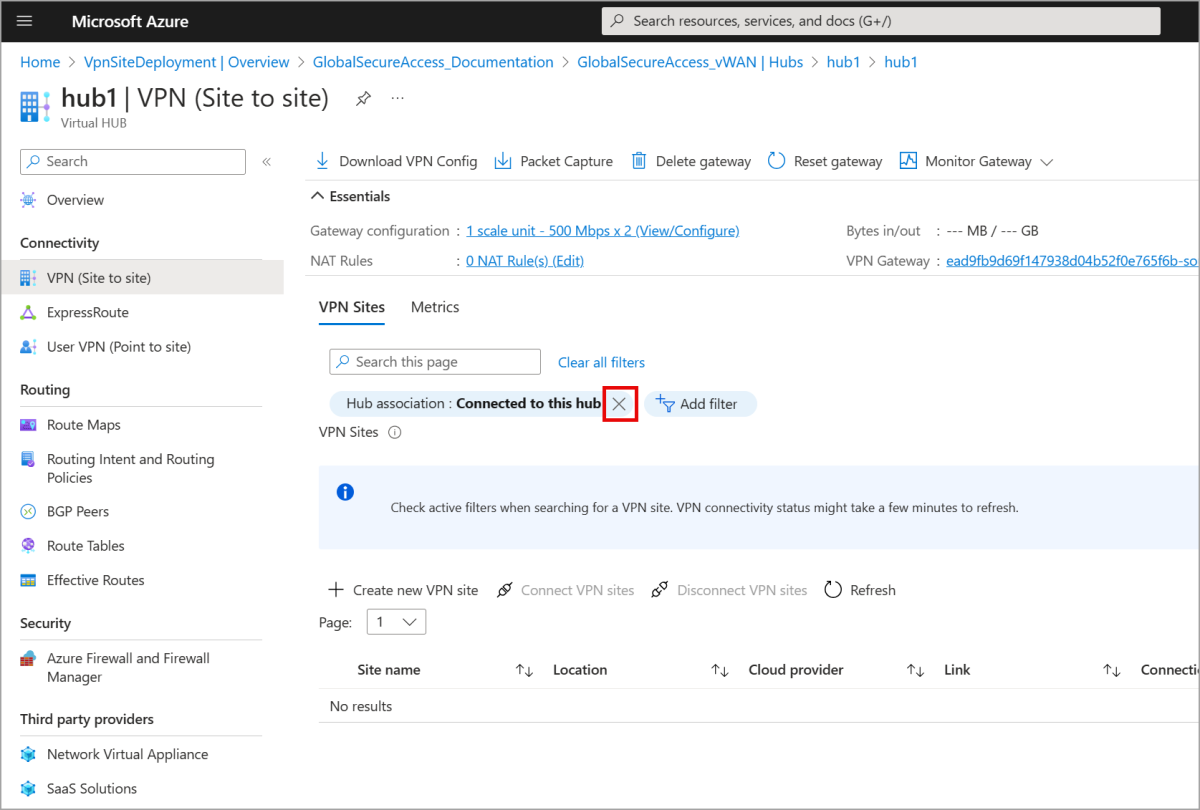
- Select the X to remove the default Hub association : Connected to this hub filter so the VPN site appears on the list of available VPN sites.
- Select the VPN site from the list and select Connect VPN sites.
- In the Connect sites form, type the same Pre-shared key (PSK) used for the Microsoft Entra admin center.
- Select Connect.
- After about 30 minutes, the VPN site updates to show success icons for both the Connection provisioning status and Connectivity status.

Check BGP connectivity and learned routes in Microsoft Azure portal
In this step, use the BGP Dashboard to check the list of learned routes that the site-to-site gateway is learning.
- Navigate to Connectivity > VPN (Site to site).
- Select the VPN site created the previous steps.
- Select BGP Dashboard.
The BGP dashboard lists the BGP Peers (VPN gateways and VPN site), which should have a Status of Connected.
- To view the list of learned routes, select Routes the site-to-site gateway is learning.
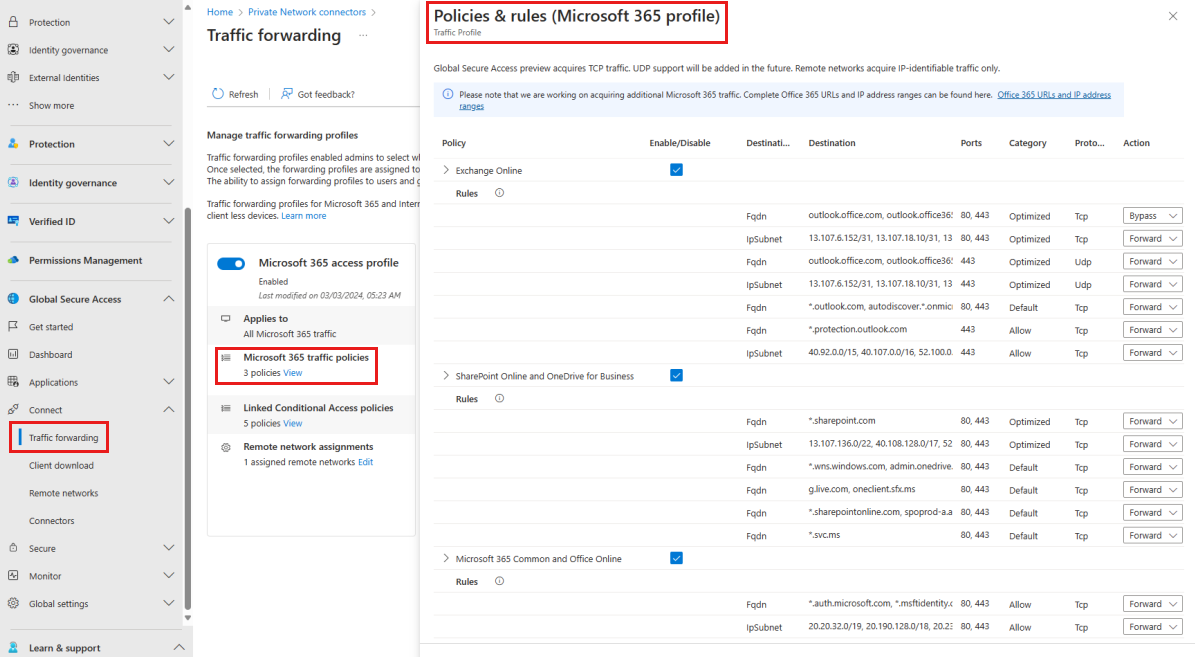
The list of Learned Routes shows that the site-to-site gateway is learning the Microsoft 365 routes listed in the Microsoft 365 traffic profile.
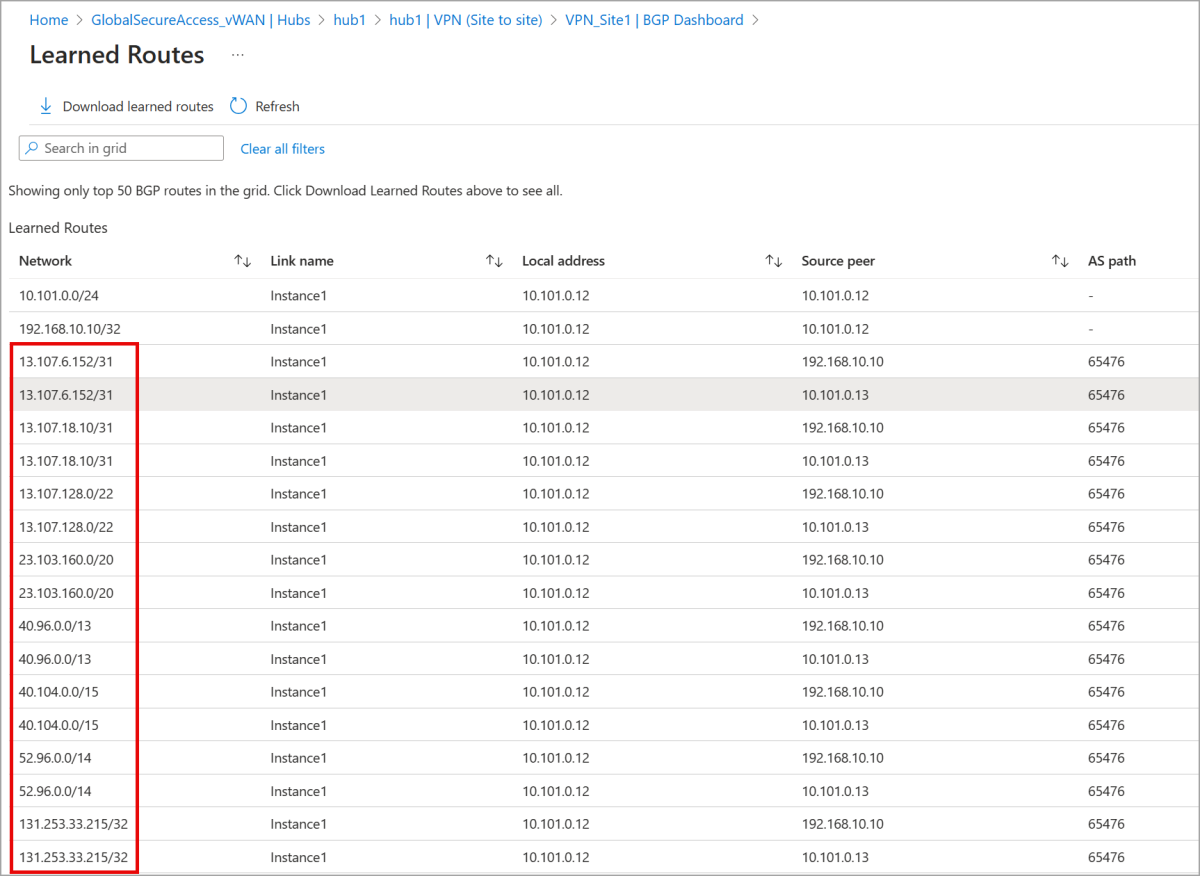
The following image shows the traffic profile Policies & rules for the Microsoft 365 profile, which should match the routes learned from the site-to-site gateway.
Check connectivity in Microsoft Entra admin center
View the Remote network health logs to validate connectivity in the Microsoft Entra admin center.
- In Microsoft Entra admin center, navigate to Global Secure Access > Monitor > Remote network health logs.
- Select Add Filter.
- Select Source IP and type the source IP address for the VPN gateway's Instance0 or Instance1 IP address. Select Apply.
- The connectivity should be "Remote network alive".
You can also validate by filtering by tunnelConnected or BGPConnected. For more information, see What are remote network health logs?.
Configure security features for testing
In this step, we prepare for testing by configuring a virtual network, adding a virtual network connection to the vWAN, and creating an Azure Virtual Desktop.
Create a virtual network
In this step, use the Azure portal to create a virtual network.
- In the Azure portal, search for and select Virtual networks.
- On the Virtual networks page, select + Create.
- Complete the Basics tab, including the Subscription, Resource group, Virtual network name, and the Region.
- Select Next to proceed to the Security tab.
- In the Azure Bastion section, select Enable Bastion.
- Type the Azure Bastion host name. For this example, use Virtual_network_01-bastion.
- Select the Azure Bastion public IP address. For this example, select (New) default.
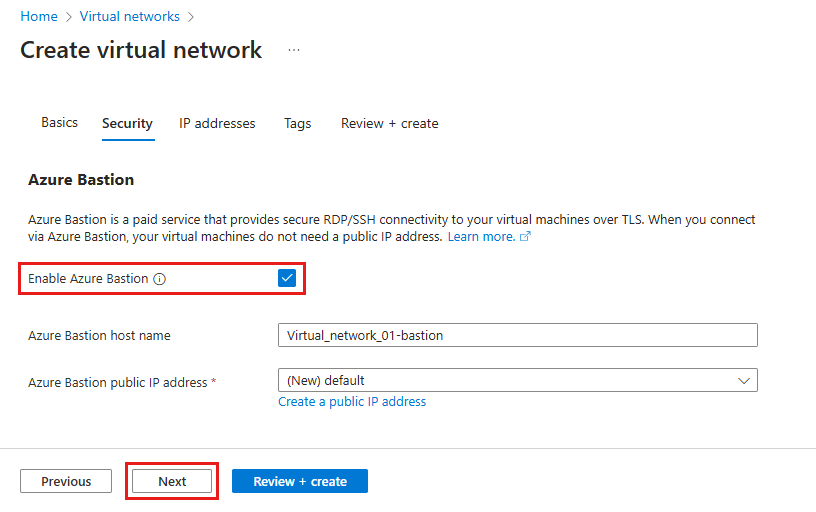
- Select Next to proceed to the IP addresses tab tab. Configure the address space of the virtual network with one or more IPv4 or IPv6 address ranges.
Tip
Don’t use an overlapping address space. For example, if the virtual hub created in the previous steps uses the address space 10.0.0.0/16, create this virtual network with the address space 10.2.0.0/16. 7. Select Review + create. When validation passes, select Create.
Add a virtual network connection to the vWAN
In this step, connect the virtual network to the vWAN.
- Open the vWAN created in the previous steps and navigate to Connectivity > Virtual network connections.
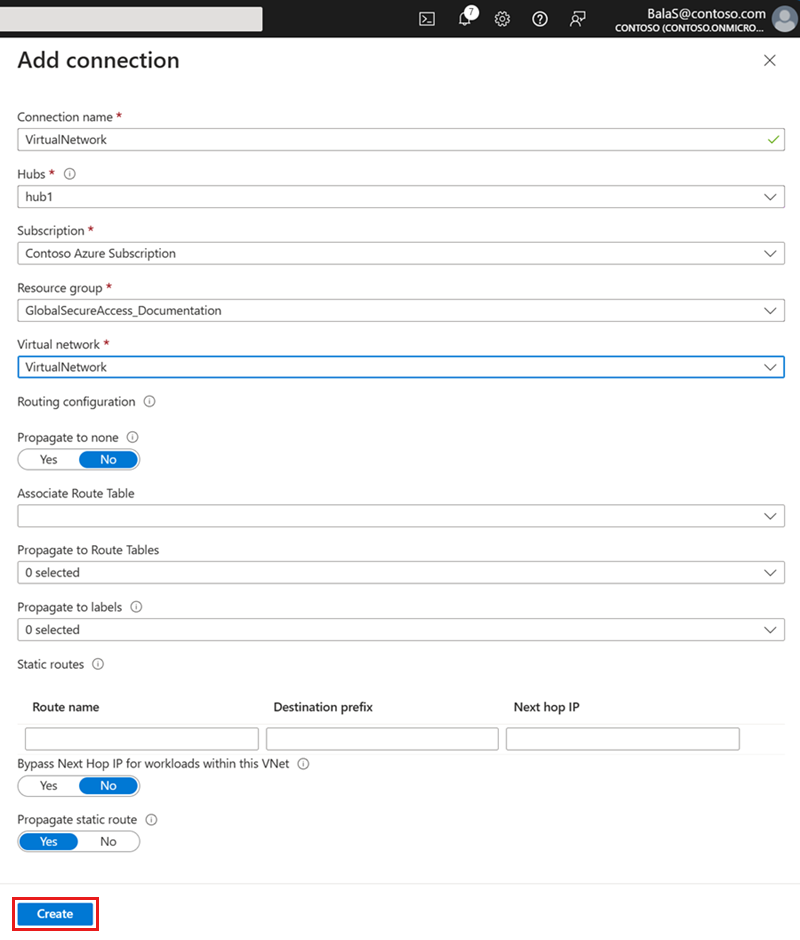
- Select + Add connection.
- Complete the Add connection form, selecting the values from the virtual hub and virtual network created in previous sections:
- Connection name: VirtualNetwork
- Hubs: hub1
- Subscription: Contoso Azure Subscription
- Resource group: GlobalSecureAccess_Documentation
- Virtual network: VirtualNetwork
- Leave the remaining fields set to their default values and select Create.
Create an Azure Virtual Desktop
In this step, create a virtual desktop and host it with Bastion.
- In the Azure portal, search for and select Azure Virtual Desktop.
- On the Azure Virtual Desktop page, select Create a host pool.
- Complete the Basics tab with the following:
- The Host pool name. For this example, VirtualDesktops.
- The Location of the Azure Virtual Desktop object. In this case, South Central US.
- Preferred app group type: select Desktop.
- Host pool type: select Pooled.
- Load balancing algorithm: select Breadth-first.
- Max session limit: select 2.
- Select Next: Virtual Machines.
- Complete the Next: Virtual Machines tab with the following:
- Add virtual machines: Yes
- The desired Resource group. For this example, GlobalSecureAccess_Documentation.
- Name prefix: avd
- Virtual machine type: select Azure virtual machine.
- Virtual machine location: South Central US.
- Availability options: select No infrastructure redundancy required.
- Security type: select Trusted launch virtual machine.
- Enable secure boot: Yes
- Enable vTPM: Yes
- Image: For this example, select Windows 11 Enterprise multi-session + Microsoft 365 apps version 22H2.
- Virtual machine size: select Standard D2s v3, 2 vCPU's, 8-GB memory.
- Number of VMs: 1
- Virtual network: select the virtual network created in previous step, VirtualNetwork.
- Domain to join: select Microsoft Entra ID.
- Enter the admin account credentials.
- Leave other options to default and select Review + create.
- When validation passes, select Create.
- After about 30 minutes, the host pool will update to show that the deployment is complete.
- Navigate to Microsoft Azure Home and select Virtual machines.
- Select the virtual machine created in the previous steps.
- Select Connect > Connect via Bastion.
- Select Deploy Bastion. The system takes about 30 minutes to deploy the Bastion host.
- After the Bastion is deployed, enter the same admin credentials used to create the Azure Virtual Desktop.
- Select Connect. The virtual desktop launches.
Test security features with Azure Virtual Desktop (AVD)
In this step, we use the AVD to test access restrictions to the virtual network.
Test the tenant restriction
Before testing, enable tenant restrictions on the virtual network.
- In Microsoft Entra admin center, navigate to Global Secure Access > Settings > Session management.
- Set the Enable tagging to enforce tenant restrictions on your network toggle to on.
- Select Save.
- You can modify the cross-tenant access policy by navigating to Identity > External identities > Cross-tenant access settings. For more information, see the article, Cross-tenant access overview.
- Keep the default settings, which prevent users from logging in with external accounts on managed devices.
To test:
- Sign in to the Azure Virtual Desktop virtual machine created in the previous steps.
- Go to www.office.com and sign in with an internal organization ID. This test should pass successfully.
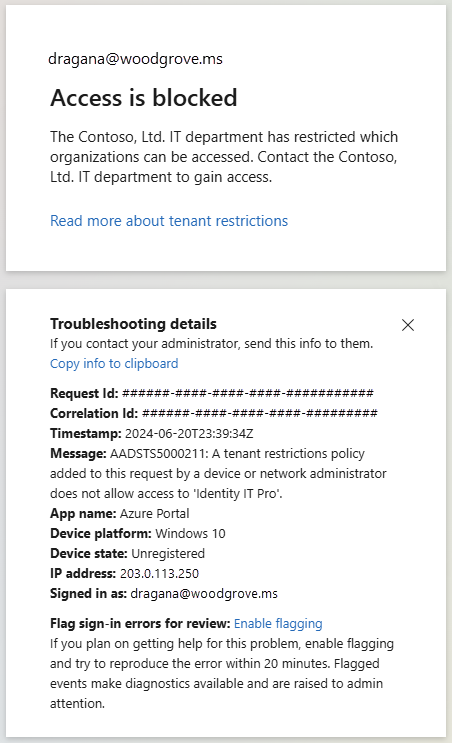
- Repeat the previous step, but with an external account. This test should fail due to blocked access.
Test source IP restoration
Before testing, enable conditional access.
- In Microsoft Entra admin center, navigate to Global Secure Access > Settings > Session management.
- Select the Adaptive Access tab.
- Set the Enable Global Secure Access signaling in Conditional Access toggle to on.
- Select Save. For more information, see the article, Source IP restoration.
To test (option 1): Repeat the tenant restriction test from the previous section:
- Sign in to the Azure Virtual Desktop virtual machine created in the previous steps.
- Go to www.office.com and sign in with an internal organization ID. This test should pass successfully.
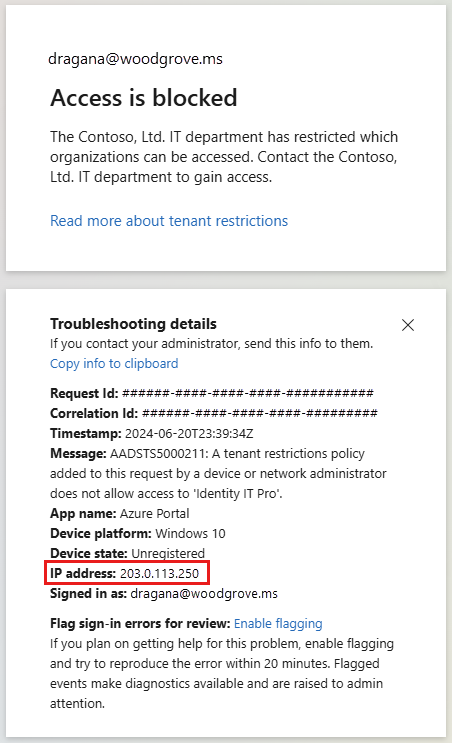
- Repeat the previous step, but with an external account. This test should fail because the source IP address in the error message is coming from the VPN gateway public IP address instead of the Microsoft SSE proxying the request to Microsoft Entra.
To test (option 2):
- In Microsoft Entra admin center, navigate to Global Secure Access > Monitor > Remote network health logs.
- Select Add Filter.
- Select Source IP and type the VPN gateway public IP address. Select Apply.
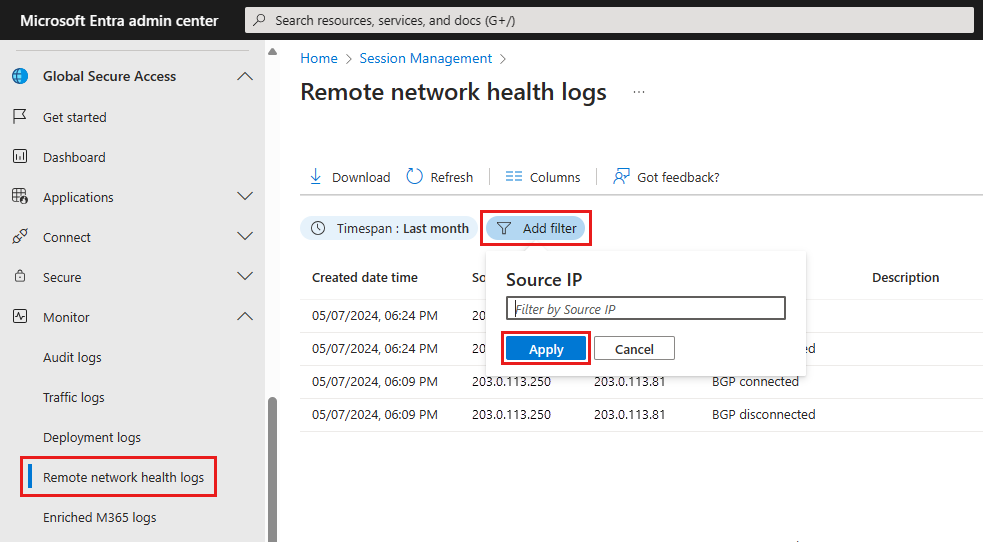
The system restores the branch office's customer premises equipment (CPE) IP address. Because the VPN gateway represents the CPE, the health logs show the public IP address of the VPN gateway, not the proxy's IP address.
Remove unneeded resources
When done testing, or at the end of a project, it's a good idea to remove the resources that you no longer need. Resources left running can cost you money. You can delete resources individually or delete the resource group to delete the entire set of resources.