Register items enabled for warehouse management processes using an item arrival journal
This article presents a scenario that shows how to register items using the item arrival journal when you are using warehouse management processes (WMS). This would usually be done by a receiving clerk.
Enable sample data
To work through this scenario using the sample records and values specified in this article, you must be using a system where the standard demo data is installed, and you must select the USMF legal entity before you begin.
You can instead work through this scenario by substituting values from your own data provided that you have the following data available:
- You must have a confirmed purchase order with an open purchase order line.
- The item on the line must be stocked. It must not use product variants, and must not have tracking dimensions.
- The item must be associated with a storage dimension group that has warehouse management process enabled.
- The warehouse that's used must be enabled for WMS and the location that you use for receiving must be license plate controlled.
Create an item arrival journal header that uses warehouse management
The following scenario shows how to create an item arrival journal header that uses warehouse management:
Make sure your system contains a confirmed purchase order that fulfils the requirements outlined in the previous section. This scenario uses a purchase order for company USMF, vendor account 1001, warehouse 51, with an order line for 10 PL (10 pallets) of item number M9200.
Make a note of the purchase order number that you will use.
Go to Inventory management > Journal entries > Item arrival > Item arrival.
Select New on the Action Pane.
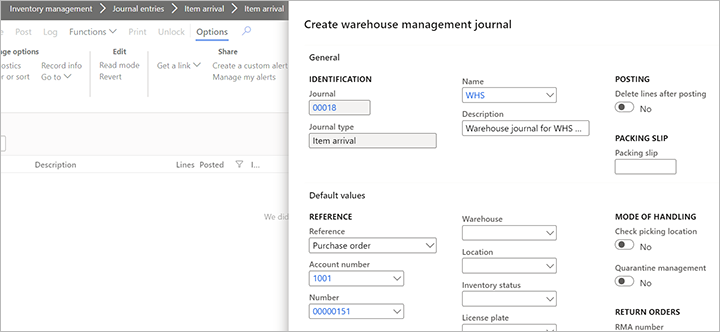
The Create warehouse management journal dialog box opens. Select a journal name in the Name field.
- If you are using USMF sample data, select WHS.
- If you're using your own data, the journal you choose must have Check picking location set to No and Quarantine management set to No.
Set Reference to Purchase order.
Set Account number to 1001.
Set Number to the number of the purchase order that you identified for this exercise.

Select the OK to create the journal header.
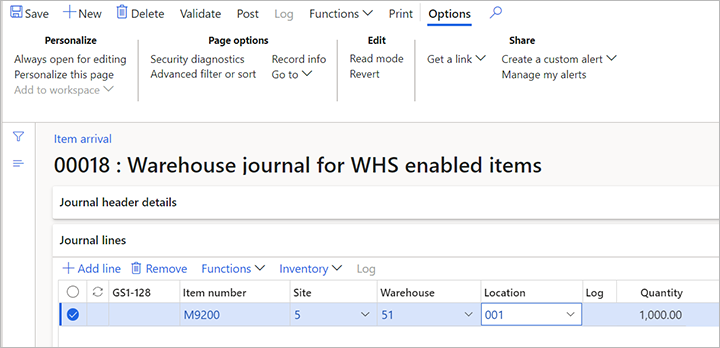
In the Journal lines section, select Add line and enter the following data:
- Item number – Set to M9200. The Site, Warehouse, and Quantity will get set based on the inventory transaction data for the 10 pallets (1000 ea.).
- Location – Set to 001. This specific location does not track license plates.

Note
The Date field determines the date on which the on-hand quantity of this item will be registered in the inventory.
The Lot ID will be populated by the system if it can be uniquely identified from the information provided. Otherwise you will have to enter this manually. This is a required field, which links this registration to a specific source document line.
Select Validate on the Action Pane. This checks that the journal is ready to be posted. If the validation fails you will need to fix the errors before you can post the journal.
The Check journal dialog box opens. Select OK.
Review the message bar. There should be a message denoting that the operation was completed.
Select Post on the Action Pane.
The Post journal dialog box opens. Select OK.
Review the message bar. There should be messages denoting that the operation completed.
Select Functions > Product receipt on the Action Pane to update the purchase order line and post a product receipt.