Use in-client page scripting tool for acceptance testing
Important
This content is archived and is not being updated. For the latest documentation, go to What's new or changed in Business Central. For the latest release plans, go to Dynamics 365, Power Platform, and Cloud for Industry release plans.
| Enabled for | Public preview | General availability |
|---|---|---|
| Users, automatically |  Apr 1, 2024
 |
- |
Business value
With the page scripting tool, customers and consultants can easily record and replay user acceptance tests directly in the Business Central web client, driving higher test coverage while reducing cost.
Feature details
The page scripting tool in the Business Central web client allows you to record your actions, such as opening pages or entering data, and replay them. You can save the recording and share it with others for future playback. An important use case for the tool is capturing and executing user acceptance tests, which is also the initial focus for this release wave.
Open the tool
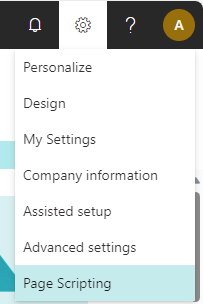
In the web client, the page scripting tool is accessed from the Settings menu (cog wheel icon). The Page Scripting action, however, only appears if you have record or playback permission to use the tool.
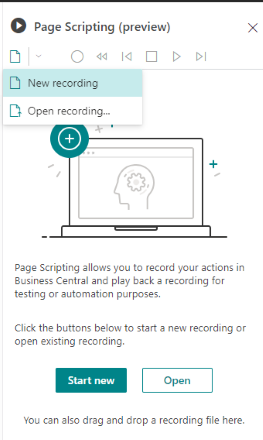
The Page Scripting pane opens on the right, where you’re asked whether to start a new recording or to open an existing one to inspect or replay it.
Record
To start recording your actions (in other words, start a user acceptance test), select Start new or select New > New recording in the toolbar at the top of the pane. Once recording starts, as indicated by a solid red circle in the toolbar, perform the actions you want to capture.
The page scripting tool will capture your on-screen interactions and the resulting actions, such as pages opening or closing, selections, data entry, and so on.
During recording, it’s possible to delete the last captured step.
To stop the recording, use the Stop button in the toolbar. To resume to record more steps, select the round Start recording button in the toolbar.
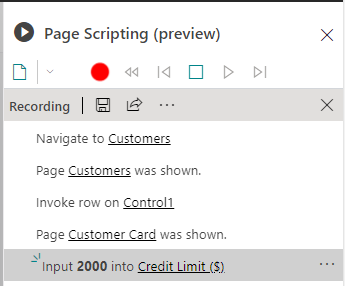
The following figure illustrates some captured steps and toolbar (while recording).
Options for capturing steps
During recording, you can manually insert special steps by right-clicking a page control, like a field, and selecting an appropriate option. These options are explained in the following sections.
Copy to and paste from clipboard
The page scripting tool comes with its own clipboard that lets you copy field values and then, for example, insert them in other fields, use them in expressions, or use them to validate results. To copy and paste during recording, right-click a page control and select Copy or Paste from the context menu.

Paste session info
When recording, you have access to session information, such as the user ID. This allows you to, for example, set filters based on the current user. To insert the user ID, right-click a control in the page and select Paste > Session Info > User ID. For an example, see the previous image.
Validate a given outcome
During the recording, you can insert validation steps to check the outcome when playing back the recording. To do this, right-click a control, such as a field or cue, and select Validate in the context menu. This inserts a validation step with the current value. If you want to change the value that’s validated, you can go to the validate step in the Page Scripting step list, select the context menu ..., and select Properties.

Make some steps conditional
Another option during the recording is to insert a conditional branch step. For example, suppose you only want some steps done during playback if there are no current rows in a list.
To insert a branch of conditional steps, right-click a page control, select Add conditional steps when, and then select an option.
After the conditional step has been inserted, you can add more steps that should be performed if the condition is met.
To end the condition branch, select End scope in the Page Scripting steps list.
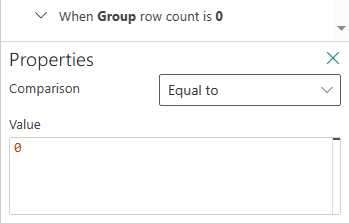
The actual condition can be changed by selecting the condition step in the Page Scripting step list, expand the properties, and set the comparison rule and value.
Edit captured steps
During recording, as well as playback, you can edit a captured step in the Page Scripting pane using the context menu ... on the step. The options in the context menu depend on whether you’re in the record or playback mode and the kind of step. Some of the options are explained in the following sections.
Properties
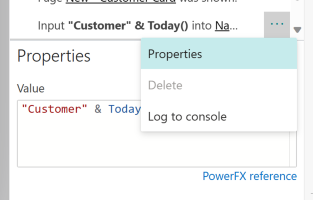
Some steps have properties, which include things like conditional steps or validation steps. You can see the properties for a step by selecting the Properties option from the context menu on a step.
Using expressions in properties
Values and conditions can use expressions for simple calculations. Power Fx is used as the expression language. There's a link to the Power Fx expression reference documentation in the UI.
Besides the Power Fx functions, three top-level objects are available:
Clipboardfor access to the current entries copied in the recording.Parametersfor access to the value of any parameters passed to this recording.SessionInfofor session information like current user ID.
Here are a couple of examples:
- To validate that a previously copied value is incremented in a validate step, use the expression
"Clipboard.'SO Processor Activities - ReadyToShip' + 1" - To generate a "random" name to use in an input step, use the expression
"Customer " & Today().
Handle optional pages
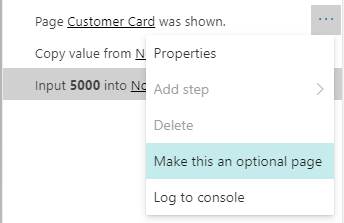
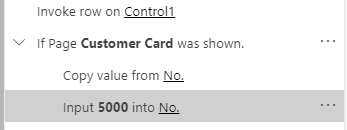
Sometimes a page doesn’t always show in a recorded flow because it depends on data or settings. An example is the confirm dialog shown when closing a sales order. To handle this, you can make the page an optional page, which means that the steps under the page will only be run if the page is shown. To make a page optional, go to the Page Scripting step list, select the recorded step named Page X was shown, select the context menu ..., and select Make this an optional page.
The steps that occur on the page are indented to indicate that they’re optional, depending on page being shown.
Playback
To play a recording, whether you just captured it or you opened it from a file, select the Play button in the toolbar.
During playback, you can do the following actions:
- Go forward or backward a single step by using Forward and Backward buttons in the toolbar. When stepping backward, changes aren’t undone, though. You have to undo changes manually.
- Go back to the beginning of the recording.
- Run the recording as far as a given step. To do this, select the context menu ... and then select Run to here.
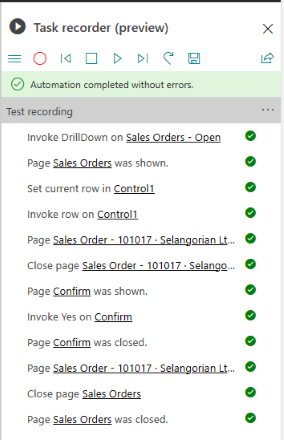
As the steps are played back, the tool records whether they completed successfully (green check mark) or failed (red exclamation mark) and provides the result of any steps that validate a result.
Save a recording
You can save the recording from the toolbar. This creates a YAML file that you can download, share, edit, and reopen for playback.
Share a recording
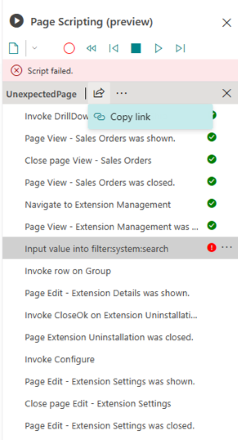
You can share a recording as a link by selecting Share in the toolbar. The link includes the full recording and its playback result. In the following example, the playback has failed halfway through the recording.
Supported capture actions
The page scripting tool is focused on capturing actions coming from executing AL code. The tool isn’t a generic HTML automation tool. Therefore, it can’t automate elements such as control add-ins (like charts), embedded Power BI or Power Apps, or anything outside of the Business Central web client experience.
Tell us what you think
Help us improve Dynamics 365 Business Central by discussing ideas, providing suggestions, and giving feedback. Use the forum at https://aka.ms/bcideas.