Create orchestration flows
This article explains orchestration flows and how to create them in Microsoft Dynamics 365 Intelligent Order Management.
Orchestration flows are a central concept in Intelligent Order Management. You can create orchestration flows that determine how data obtained from configured providers are being orchestrated.
Intelligent Order Management lets you define orchestration flows for different purposes. For example, you can define flows for ordering intake to fulfillment, and for collecting and distributing inventory visibility information.
Orchestration types
Orchestration types control which actions and elements can be used to define the orchestration flow. One orchestration type is currently supported out of the box. More orchestration types will be released over time.
| Type | Purpose |
|---|---|
| Order orchestration | Lets users define an end-to-end orchestration flow for orders, from order capture to fulfillment and billing. |
Orchestration fields
An orchestration flow record consists of three fields, as listed in the following table.
| Field | Description |
|---|---|
| Name | A unique name provided by the user. |
| Orchestration type | Specifies the orchestration type. |
| Created on | The date and time when the orchestration flow was created. |
| Status | An orchestration flow can be in two status states:
|
Actions and elements
Actions and elements can be used to define the orchestration flow in designer view. The following table lists actions and elements for the order orchestration type.
| Action or element | Description |
|---|---|
| Validate Order Header | Performs validation on the order header level. |
| Validate Order Line | Performs validation on the order line level. |
| Send to DOM | Sends orders and order lines to the distributed order management (DOM) provider for fulfillment determination. Fulfillment orders and fulfillment order lines are generated. |
| Assign Fulfillment Source | Enables fulfillment determination to be assigned by simple user-defined policy and rules. Fulfillment orders and fulfillment order lines are generated. |
| Send to Fulfillment | Sends fulfillment orders and fulfillment order lines to the fulfillment provider. |
| Send to Fulfillment – Dynamics 365 finance and operations apps | Sends orders and order lines to finance and operations apps. The fulfillment determination takes place in finance and operations apps. |
| Send to Invoice | Sends orders and order lines to the billing provider. |
| Custom | Enables user-defined actions to be added to the orchestration flow. For example, a user-defined action can be used to orchestrate orders to a custom provider. |
The following table lists other available actions and elements.
| Action or element | Description |
|---|---|
| Condition | Lets you split the orchestration flow into two paths, with no constraint that the paths will merge again.
|
| Splitter | Lets you split the orchestration flow into a user-defined number of paths, with no constraint that the paths will merge again. Note: A filter policy is added in the subsequent action to define the split in the path. |
| Condition-Merge | Lets you split the orchestration flow into two paths, with the constraint that the paths will merge again.
|
| Splitter-Merge | Lets you split the orchestration flow into a user-defined number of paths, with the constraint that the paths will merge again. Note: A filter policy is added in the subsequent action to define the split in the path. |
Create a new orchestration flow
To create an orchestration flow, follow these steps.
- Go to Orchestration > Flows.
- Select New to initiate the process for orchestration flow creation. The orchestration flow designer canvas is opened.
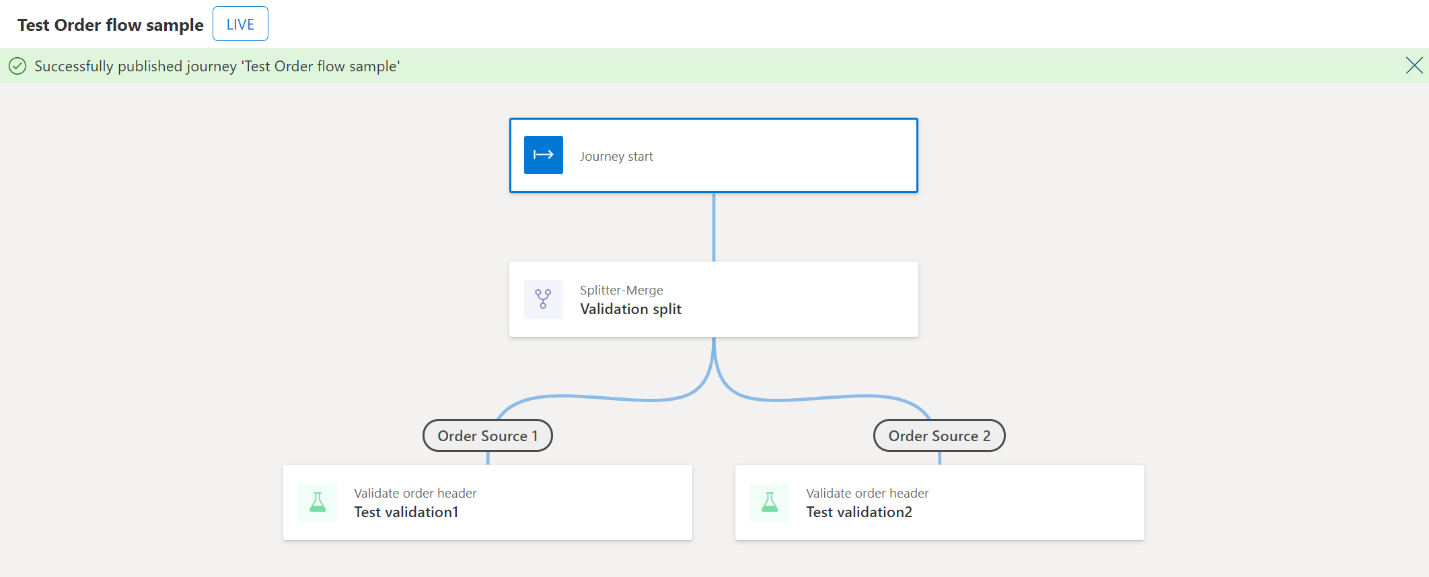
- In the upper-left corner, enter a unique name, such as Test Order flow sample.
- In the Orchestration Type field, select Order Orchestration.
- In the Description field, enter My first orchestration flow.
- In the designer canvas, select the plus sign (+) to add an action or an element.
- Select Splitter-Merge.
- In the Name field, enter Validation split.
- In Splitter Settings, delete Branch 1, and enter Order Source 1. Then delete Branch 2, and enter Order Source 2.
- In the designer canvas, under Order Source 1, select the plus sign (+) to add an action or an element.
- Select Validate order header.
- In the Name field, enter Test validation 1.
- In the Input Events field, select New order.
- Select Add.
- In the Filter Policies field, select Filter Policy – BigCommerce.
- In the Execution Policies field, select Order header Validation Policy.
- Select Add.
- In the designer canvas, under Order Source 2, select the plus sign (+) to add an action or an element.
- Select Validate order header.
- In the Name field, enter Test validation 2.
- In the Input Events field, select New order.
- Select Add.
- In the Filter Policies field, select Filter Policy – Orderful.
- In the Execution Policies field, select Order header Validation Policy.
- Select Add.
- Select Publish.
The following illustration shows an example orchestration flow that is named Test Order flow sample.
Note
- Several orchestration flows of the same type can be in the Published status at the same time. An order and its lines can be processed by multiple orchestration flows. If you create and publish several orchestration flows, it's important that you add and configure filter policies.
- An orchestration flow can't be edited after it's published.
- A published orchestration flow can be stopped. In this case, its status is updated to Unpublished to ensure that data no longer flows through it.
- You might receive a message that explains that a stopped orchestration flow can't be restarted. This message is incorrectly generated from the designer platform. It doesn't apply to the implementation of the designer in Intelligent Order Management.
- An unpublished orchestration flow can be edited and then republished. In this case, its status is updated to Published to ensure that data flows again through the new version.
Pause and resume an orchestration flow (preview)
A new feature lets Intelligent Order Management users pause an orchestration flow during business hours. In this way, they can manage unforeseen downtime that is caused by provider connection issues. They can also make changes to the orchestration flow midday and republish it as required.
To enable this feature, turn on the following settings in Power Apps:
- Go to Solution > Default solution > Settings > Enable orchestration pause and resume. Under Setting environment value, set the Add existing value field to yes.
- Go to Solution > Default solution > Settings > Enable plugin triggers for step execution in a journey, and change the default value to yes.