Use customer support swarming (preview)
Important
To use this feature, it must be turned on and the license terms must be accepted. What are Preview features and how do I enable them?
A preview feature is a feature that is not complete, but is made available before it’s officially in a release so customers can get early access and provide feedback. Preview features aren’t meant for production use and may have limited or restricted functionality.
We expect changes to this feature, so you shouldn’t use it in production. Use it only in test and development environments.
Microsoft doesn't provide support for this preview feature. Microsoft Dynamics 365 Technical Support won’t be able to help you with issues or questions. Preview features aren't meant for production use and are subject to a separate supplemental terms of use.
When you work on time-sensitive, complex customer issues, there are times when it's useful to apply the expertise of coworkers outside of your Dynamics 365 Customer Service team.
Customer support swarming can help when you need to take the following actions:
- Collaborate with experts across your organization to get help on complex cases.
- Use an expert finder to quickly locate experts with the right skills to help.
Use customer support swarming to find the right set of experts to work with on your customer issues and collaborate with peers directly from your desktop.
Prerequisites
To be able to create a swarm when working on a customer issue, you must have the following prerequisites in place.
If you're a customer service representative (service representative or representative), you must have both a Dynamics 365 Customer Service Enterprise license and Microsoft Teams license.
If you're an expert joining a swarm, you must have a Teams license.
Embedded Microsoft Teams chat must be enabled for the representative desktop or on the Teams web app.
Start a swarm
On the Customer Service command bar, select Create swarm. (You might need to select the ellipsis to see this option.)

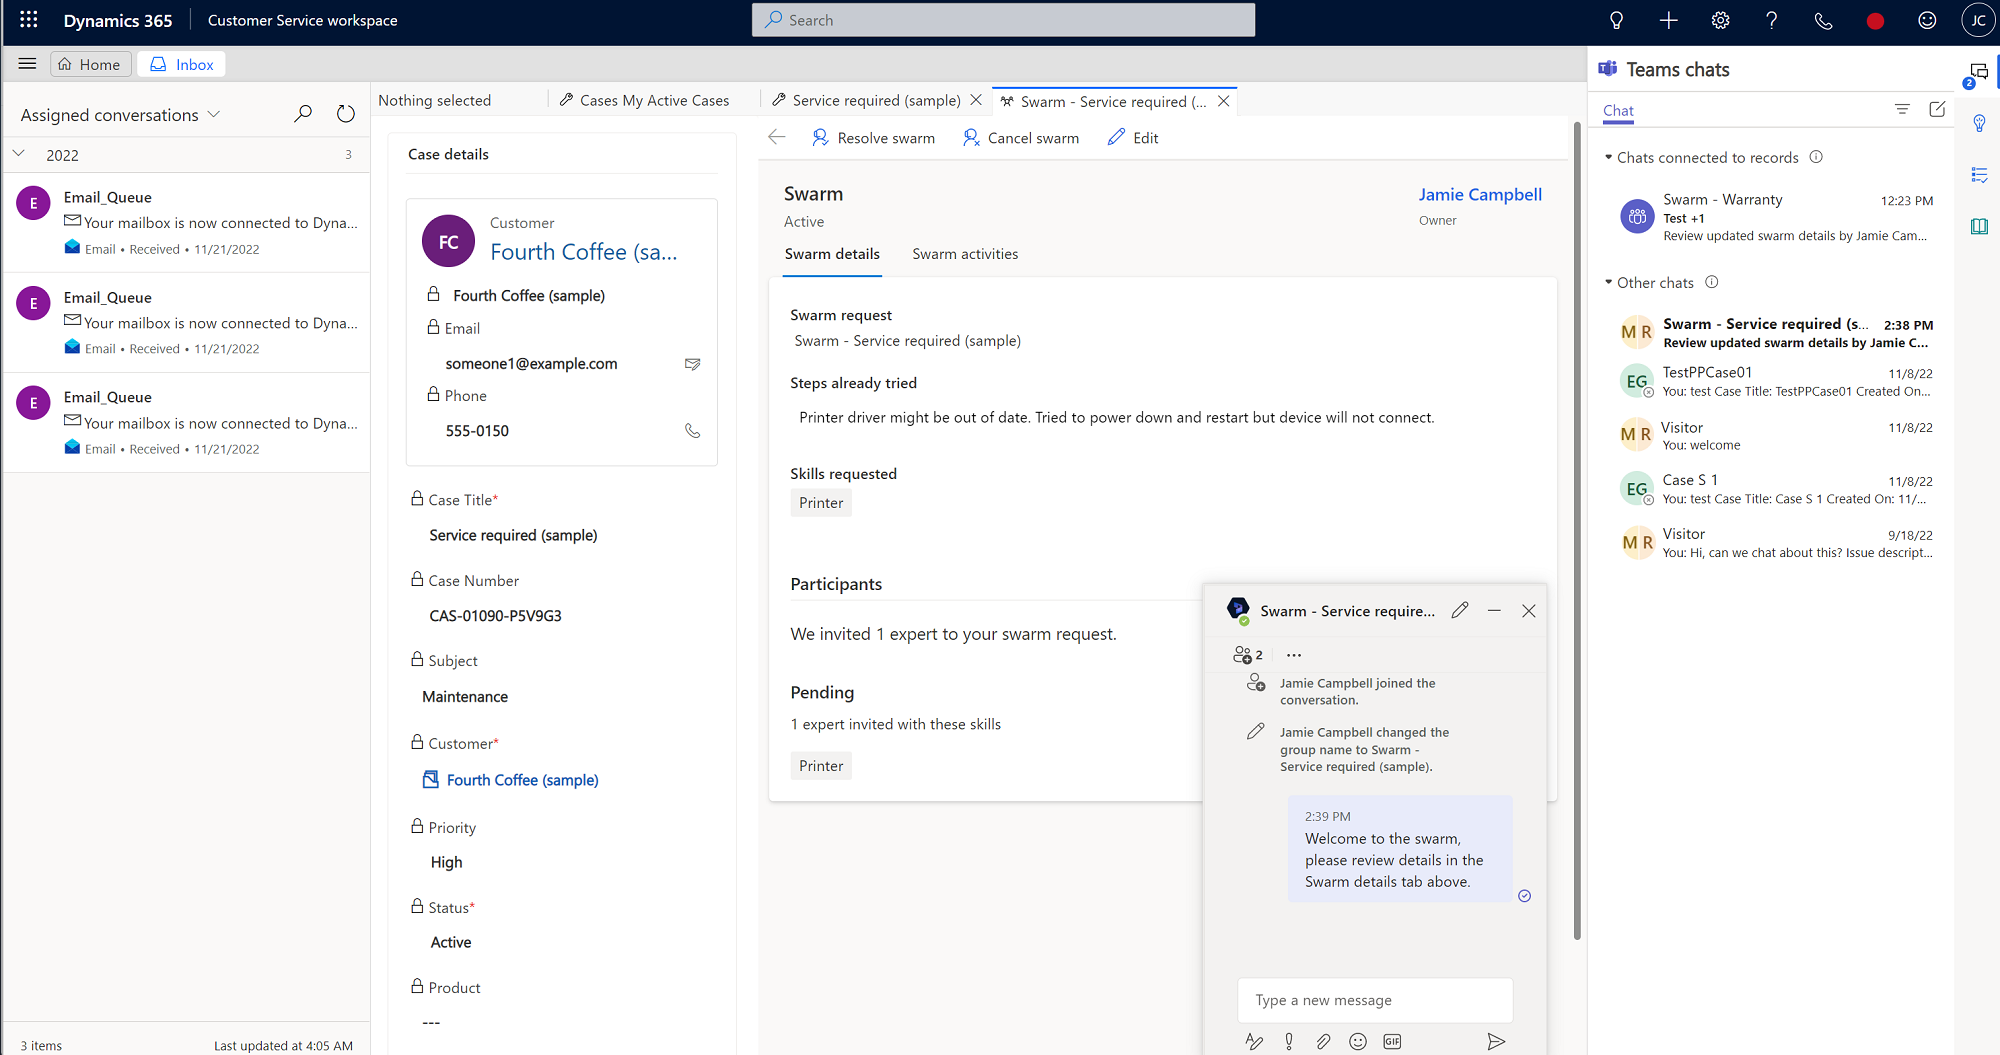
The Swarm page opens with the Case details displayed on the left side pane. The case and account fields are read-only, and are designed to give other swarm participants the associated details about the case.
Note
If you don't see the Create swarm option, ask your administrator to assign access privileges for you.
On the Swarm form, type information into the following fields:
- Swarm request: The title of the swarm is displayed by default, but you can edit it if needed.
- Steps already tried (optional, 2,000-character limit): Type the details about steps you took to try to resolve the issue, and any results. These details help confirm that any required processes were followed. They also provide immediate context for other swarm participants invited to collaborate on the issue.
- What skills do you need? (optional): As part of the swarm request, the system takes the following actions:
- Attempts to match skills based on your swarm question
- Suggests skills based on rules your administrator defined. These rules find the key words that are present in the swarm request and/or steps taken, and then populates the matched skills based on the configured rules.
Suggested skills have the light bulb icon. You can also select up to 10 skills (both system-suggested and manually selected) that you think are relevant to the case. (Manually selected skills don't have the light bulb icon next to them.)
Note
If neither the system nor you designate any skills, you can still create the swarm but no experts will be added. In this scenario, we recommend asking your supervisor for help with identifying the appropriate skills to get expert support.
Select Save and send invitation. A linked swarm chat is created, and the contacts configured by your administrator are automatically added to the chat. When the swarm invitation sends, you can still go back and edit the swarm details if needed.
Note
By default, your supervisor is automatically added to create the swarm. If you don't have a supervisor, your administrator who configured the swarm is automatically added.
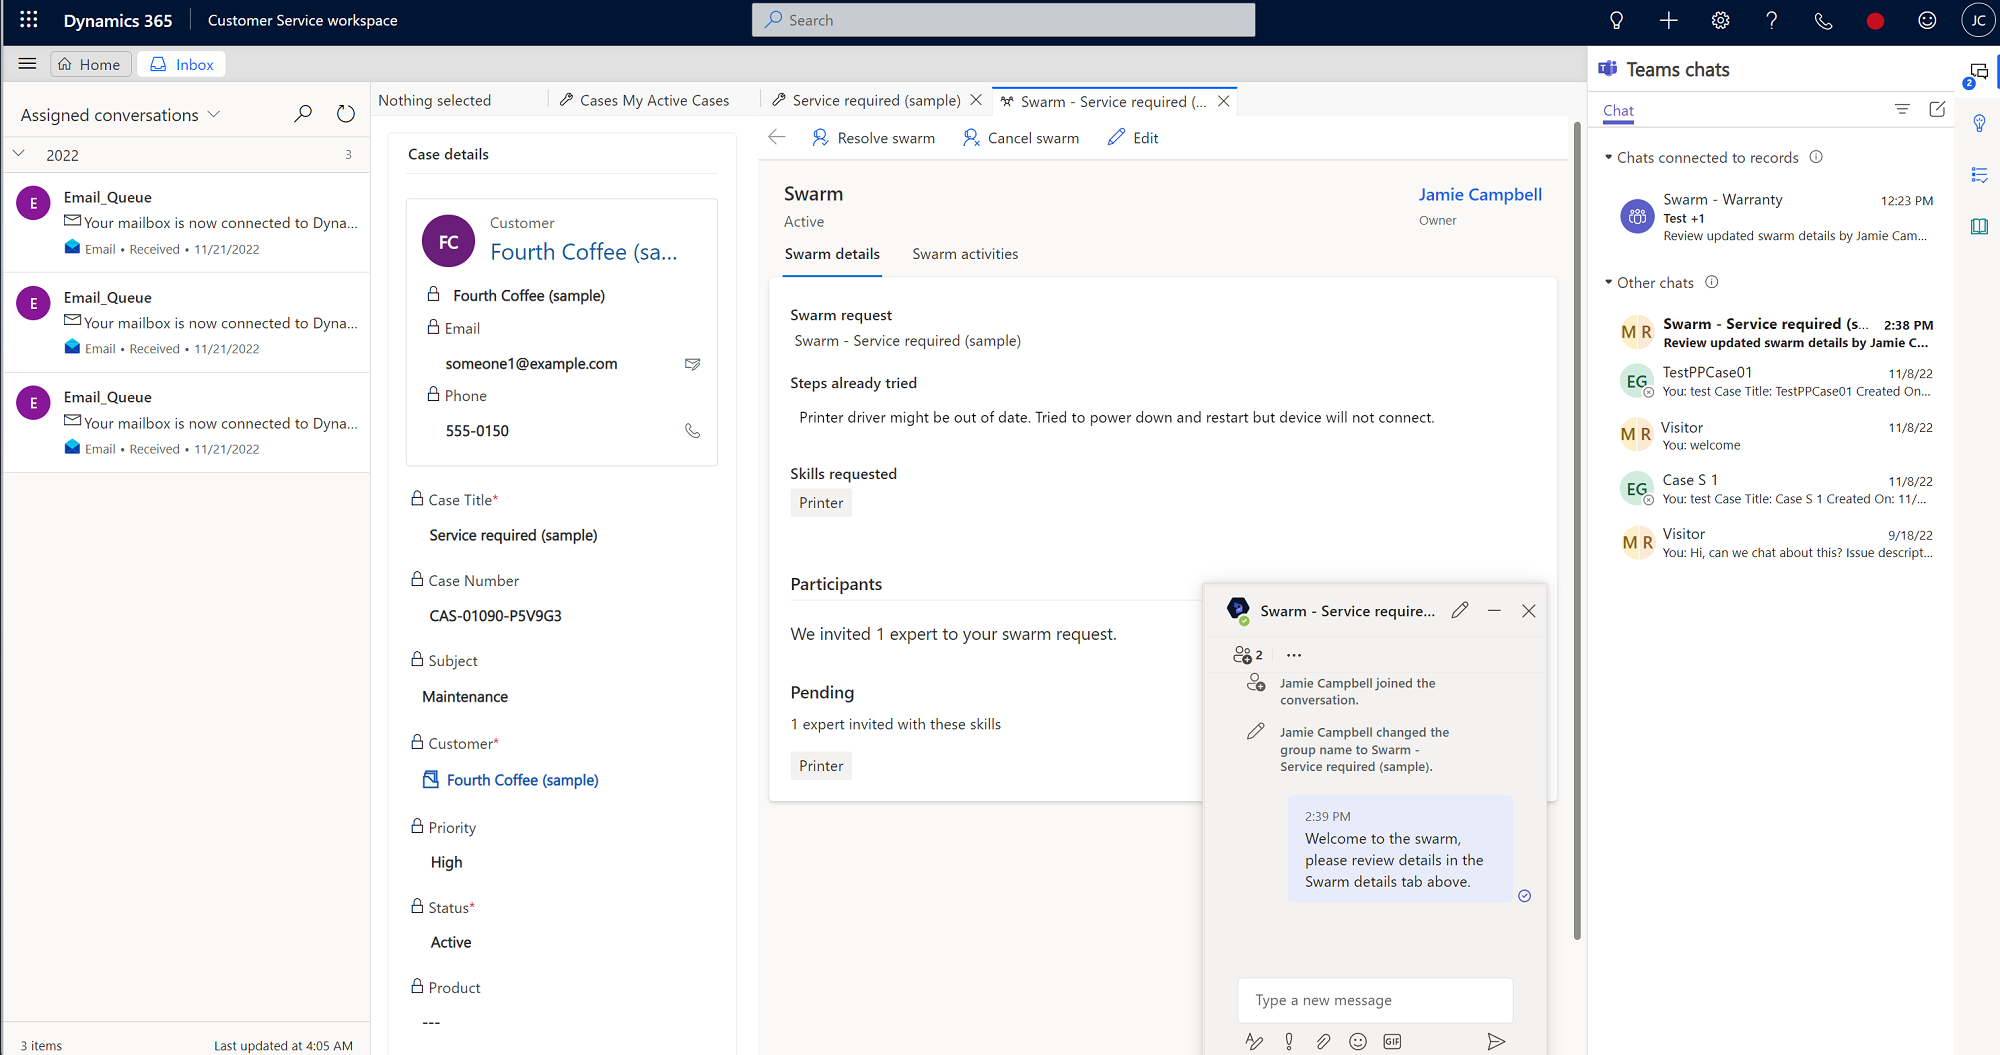
The following actions and views occur:
- The system finds the minimum set of experts needed to cover as many of the skills suggested or that you added as possible.
- A participants section opens, where you can see the number of experts invited to your swarm who match particular skills.
- You can view the names of skills not matched to an expert. If a skill is unmatched, you can work with your supervisor to find experts who match the skill.
- You can view names of automatically added participants in the chat window.
- When an invited expert accepts the swarm invitation, they're automatically added to the swarm chat.
- If you select Edit on the command bar, existing saved skills remain. If you edit the swarm request, then the following actions occur:
- The system searches for skills to account for the newest information, and appends skills found to the existing ones.
- Invited experts and experts who are already in the swarm remain.
- A group chat is created, where you can chat with people who are experts on the issue. You might be the only one who is in the chat at first but you can message others to ask them to join if needed.
How the invitation to experts works
When you select an expert for your swarm, they're sent an automated invitation in Teams via an adaptive card. When they accept your invitation, they're attached to the swarm, and their skills are indicated. If the expert declines the invitation, the system then looks for the next expert or experts who have one or more of the needed skills.
For the invited expert, the swarm invitation shows the following information:
- Inviting agent: The representative who initiated the swarm and invited the expert.
- Swarm request: The question the representative needs help with.
- Steps the agent already tried: A brief description of what the representative tried before creating the swarm.
- Expert skills: The required skills the expert has for the swarm.
- Accept and reject: Options for the expert to either join or decline the swarm. If an expert declines an invitation and then later decides they want to join, they can participate by asking you to add them manually. They aren't able to view the swarm form from the group chat.
When an expert joins a group chat, they see a read-only version of the Swarm details form added as a tab. The right-side pane displays the associated case details. The representative's swarm request and a summary of what they tried to do to resolve the issue are displayed.
Experts who join a swarm can see all participants in the swarm and the skills they have that resulted in their invitation to the swarm.
Experts aren't required have access to Dynamics 365 to participate in swarms, but if they're able to access a swarm in Customer Service, they can go to the Swarm activities tab on the Swarm page, where they can view a timeline of all the key events that are related to the swarm.
Experts without a Dynamics 365 license can be invited to swarms in Teams. When they accept the invitation to join the swarm, a swarm chat appears in the Chat pane in Teams. The expert must select the chat to enter the swarm conversation. Both the representative and the expert can add others to the chat if needed. The representative can interact with the expert and add notes of their interaction to the swarm timeline.
Create a task in the timeline
If there are details that you or your swarm experts want to document or update in the future, you can create a task with an optional due date that appears in the swarm timeline and also in the Teams chat.
To create a swarm-related task, complete the following steps:
- On the swarm page in Customer Service workspace, select the Swarm activities page.
- In Timeline, select the Add (+) icon, and then select Task on the dropdown menu. The Quick Create: Task pane opens on the right-hand side of the page.
- (Optional) In the Owner field, as the creator of the task, you're listed by default. You can add others if desired by typing their names.
- (Optional) Enter a Description of what you need to do.
- (Optional) Enter a Due date.
- Specify the Duration and Priority details.
- When finished, select Save and Close.
A Dynamics 365 bot autoposts a link to the task in the Teams chat.
Create a note in the timeline
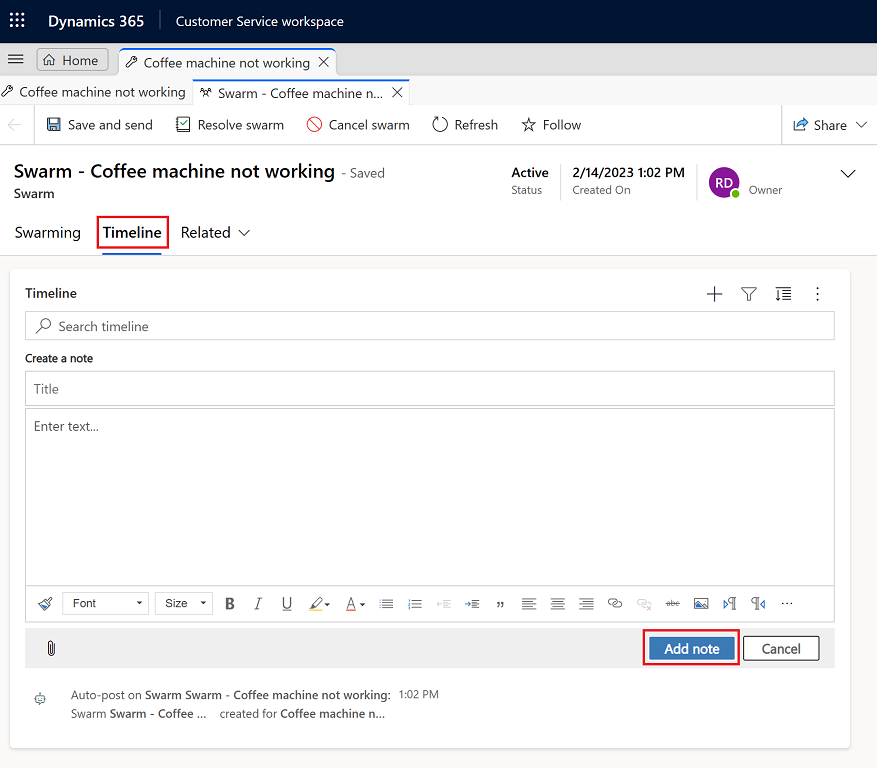
You can create notes that include specific details that appear in the swarm timeline and also in the Teams chat.
- In Timeline, select the Add (+) icon, and then select Note on the dropdown menu. The Quick Create: Note pane opens on the right-hand side of the page.
- Type a Title for the note.
- In the rich text editor, add details.
- When finished, select Save and Close.
Case closure and swarm resolution
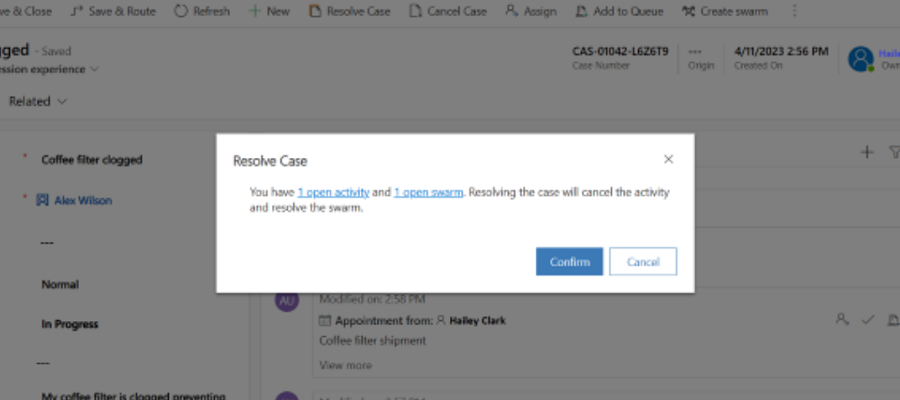
When you close a case, either by resolving or canceling it, links to any open swarms that are associated with the case are displayed. You can choose to close or cancel those swarms by selecting the links. If you confirm, the relevant swarms are resolved. If you select cancel, you're returned to the case form.
Resolve a swarm session
When a swarm has completed, you can close it by completing the following steps:
- On the Swarm page in Customer Service workspace, select Resolve swarm.
- (Optional): In the Resolve this swarm? dialog box, enter details that describe the solution.
- Select Resolve swarm.
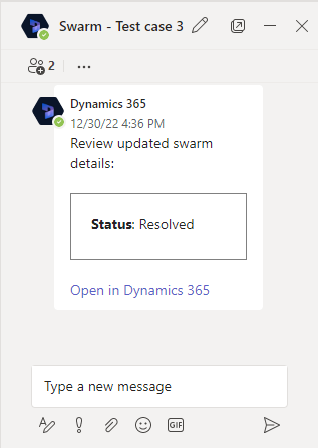
After the swarm is resolved, a Dynamics 365 bot posts to the Teams chat to indicate that the swarm is resolved with a link to the swarm details in Dynamics 365.
Reactivate a swarm
You can reactivate a swarm by completing the following steps:
- In Customer Service workspace, on the sitemap, select Swarms in Service.
- On the Swarm page, from the dropdown list, select All swarms, and then select the swarm you want to reactivate.
- On the Case details page, select Reactivate swarm.
After the swarm is reactivated, a Dynamics 365 bot posts to the Teams chat to indicate that the swarm is reactivated with a link to the swarm details in Dynamics 365.
Cancel a swarm
You can cancel a swarm that's in progress by completing the following steps:
- In Customer Service workspace, on the sitemap, select Swarms in Service.
- On the Swarm page, select Active swarms from the dropdown menu, and then select the swarm you want to cancel.
- On the Case details page, select Cancel swarm.
- On the Cancel this swarm? dialog, select the reason you want to cancel the swarm from the dropdown list, and then select Cancel swarm.
After the swarm is canceled, a Dynamics 365 bot posts to the Teams chat to indicate that the swarm is canceled with a link to the swarm details in Dynamics 365.
View associated swarms
You can see the swarms that are associated with a case from the record. To view the associated swarms, in Customer Service workspace, go to the Details tab, and then view the Associated swarms card.
Swarm views
To view a list of swarms, go to Swarms on the site map. The following views are available:
- All swarms
- Canceled swarms
- My active swarms
- Resolved swarms
- Swarms being followed
- Swarms I follow
Related information
Configure customer support swarming
Configure Teams chat
Use Teams chat