Manage phone numbers
Applies to: Dynamics 365 Contact Center—embedded, Dynamics 365 Contact Center—standalone, and Dynamics 365 Customer Service
You can enable and use voice and SMS services seamlessly within Dynamics 365. The voice channel comes with trial phone numbers with limited free calling time. More information: Use trial phone numbers
As an administrator, you can purchase phone numbers and calling plans, decide whether you want to avail calling and SMS services, and whether you want to set up inbound and outbound calling options for your business. You can also bring your own phone number via Azure direct routing. More information: Bring your own carrier
Prerequisites
- Check for the following criteria:
- Deploy the voice channel.
- Connect to Azure Communication Services using an existing or new Azure resource, and then deploy the resource through Dynamics 365.
- Verify that you have permissions on the secure columns. More information: Configure permissions to access secure columns
Important
You can purchase one phone number per tenant for Azure Communication Services via the Azure Portal. However, if you want to acquire numbers in bulk or request a specific phone number, follow the instructions to create a special number request order here.
View phone numbers
In the site map of Customer Service admin center or Contact Center admin center, select Channels in Customer support. The Channels page appears.
You see a list of all available phone numbers together with their carrier name, calling plan details, associated workstream, connection status, and other details.

If you don't have any phone numbers set up for your business, see Acquire new phone numbers to learn how you can purchase new numbers.
Note
If your direct routing phone number is in the inactive state, delete the number and add it again.
Acquire new phone numbers
You can purchase new phone numbers for your organization after you check for the prerequisites, install the voice channel, and successfully connect to an Azure Communication Services resource.
In the site map of Customer Service admin center or Contact Center admin center, select Channels in Customer support. The Channels page appears.
Select Manage for Phone numbers.
On the Phone numbers page, select New number. The Add phone number dialog opens.
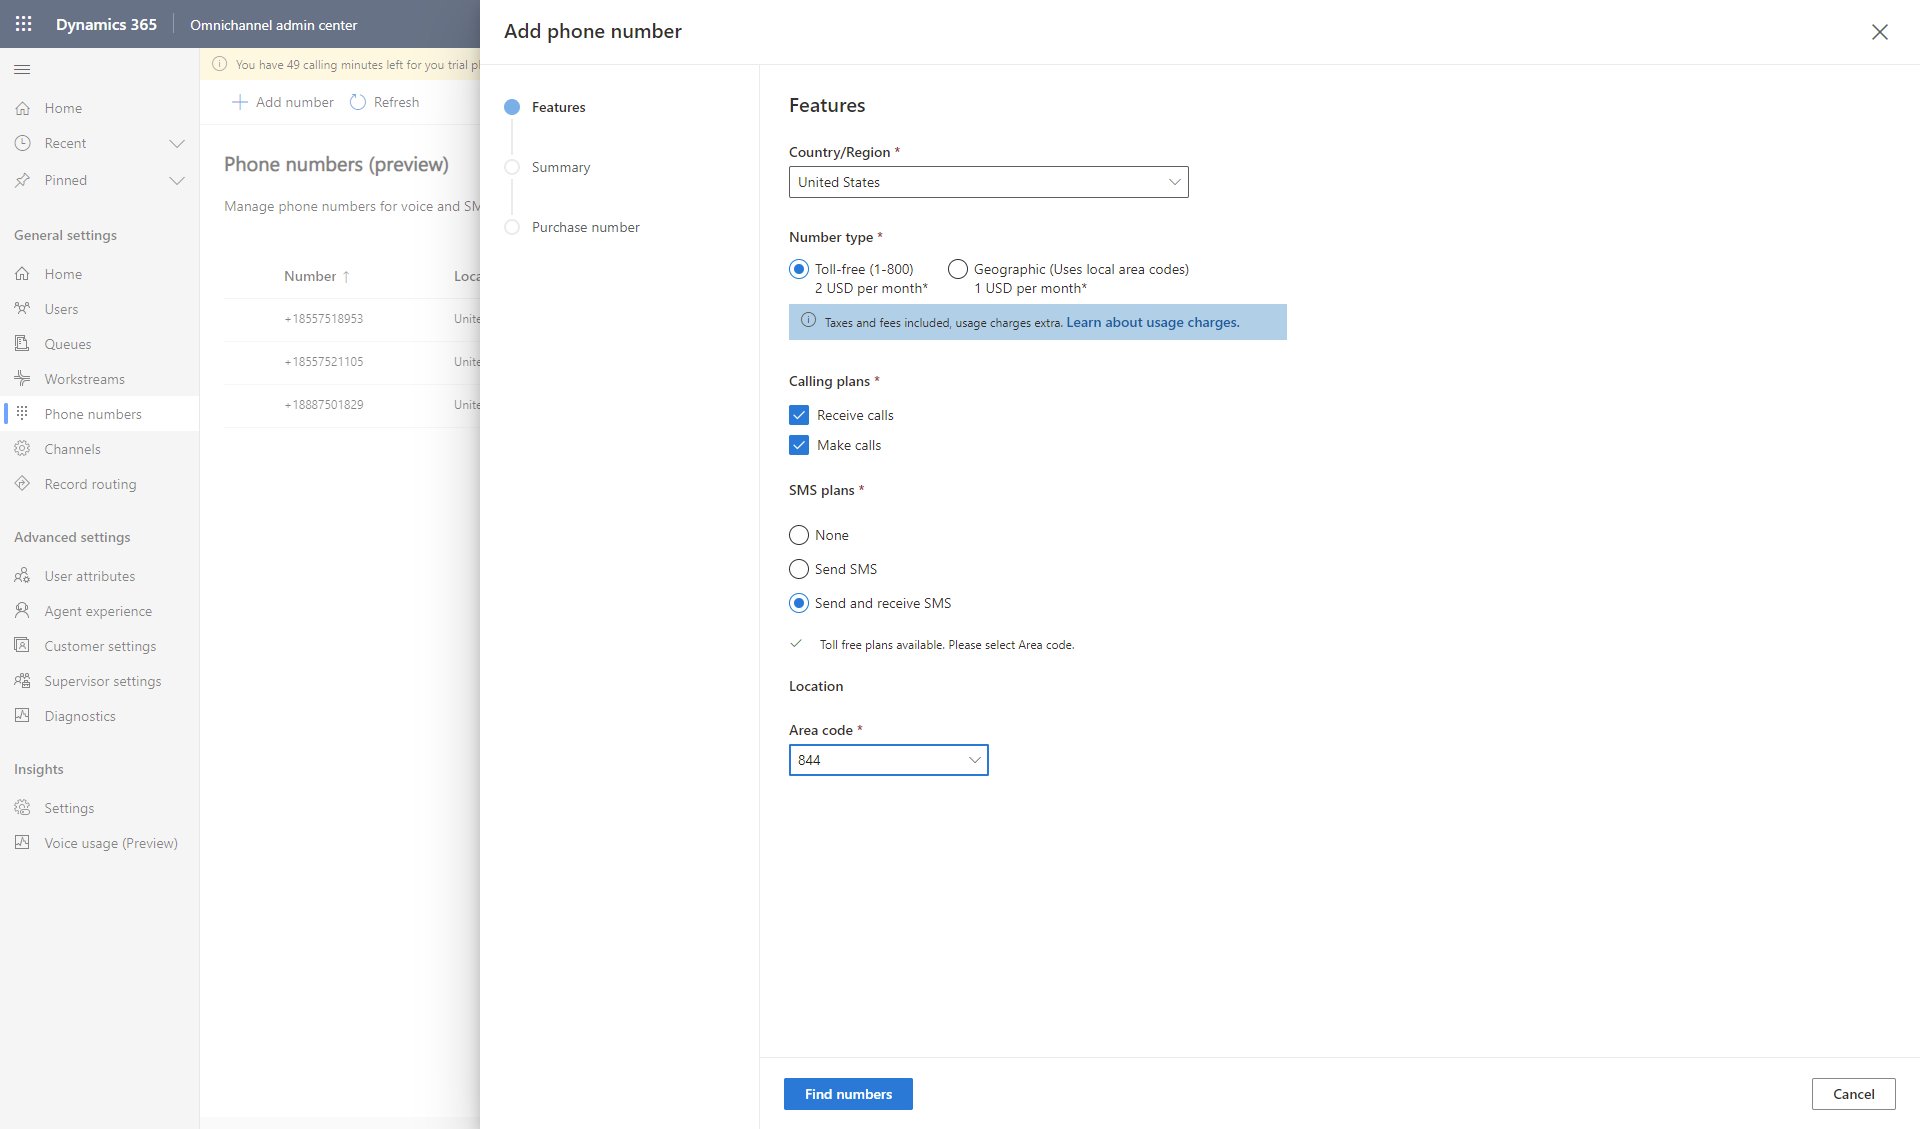
On the Features page, do the following:
a. Select Country/Region from the dropdown list. The list of available plans for the selected country or region appears.
Note
You can acquire United States-based phone numbers only in Customer Service. If you want to acquire phone numbers from a different region, you must first purchase them through Azure Communication Services. After you’ve acquired the phone numbers, you must sync them to Dynamics 365 Contact Center. For more information, see Quickstart: Get and manage phone numbers and Sync from Azure Communication Services
b. Select the Number type, whether Toll-free or Geographic. More information: Number types and features
c. Select the Calling plans—Receive calls, Make calls, or both.
d. Select any one of the SMS plans—None, Send SMS, or Send and receive SMS. SMS facility is currently available only on toll-free numbers.
e. In Location, select the area or state code from the dropdown lists.
f. Then, select Find numbers to search for available numbers in your area.

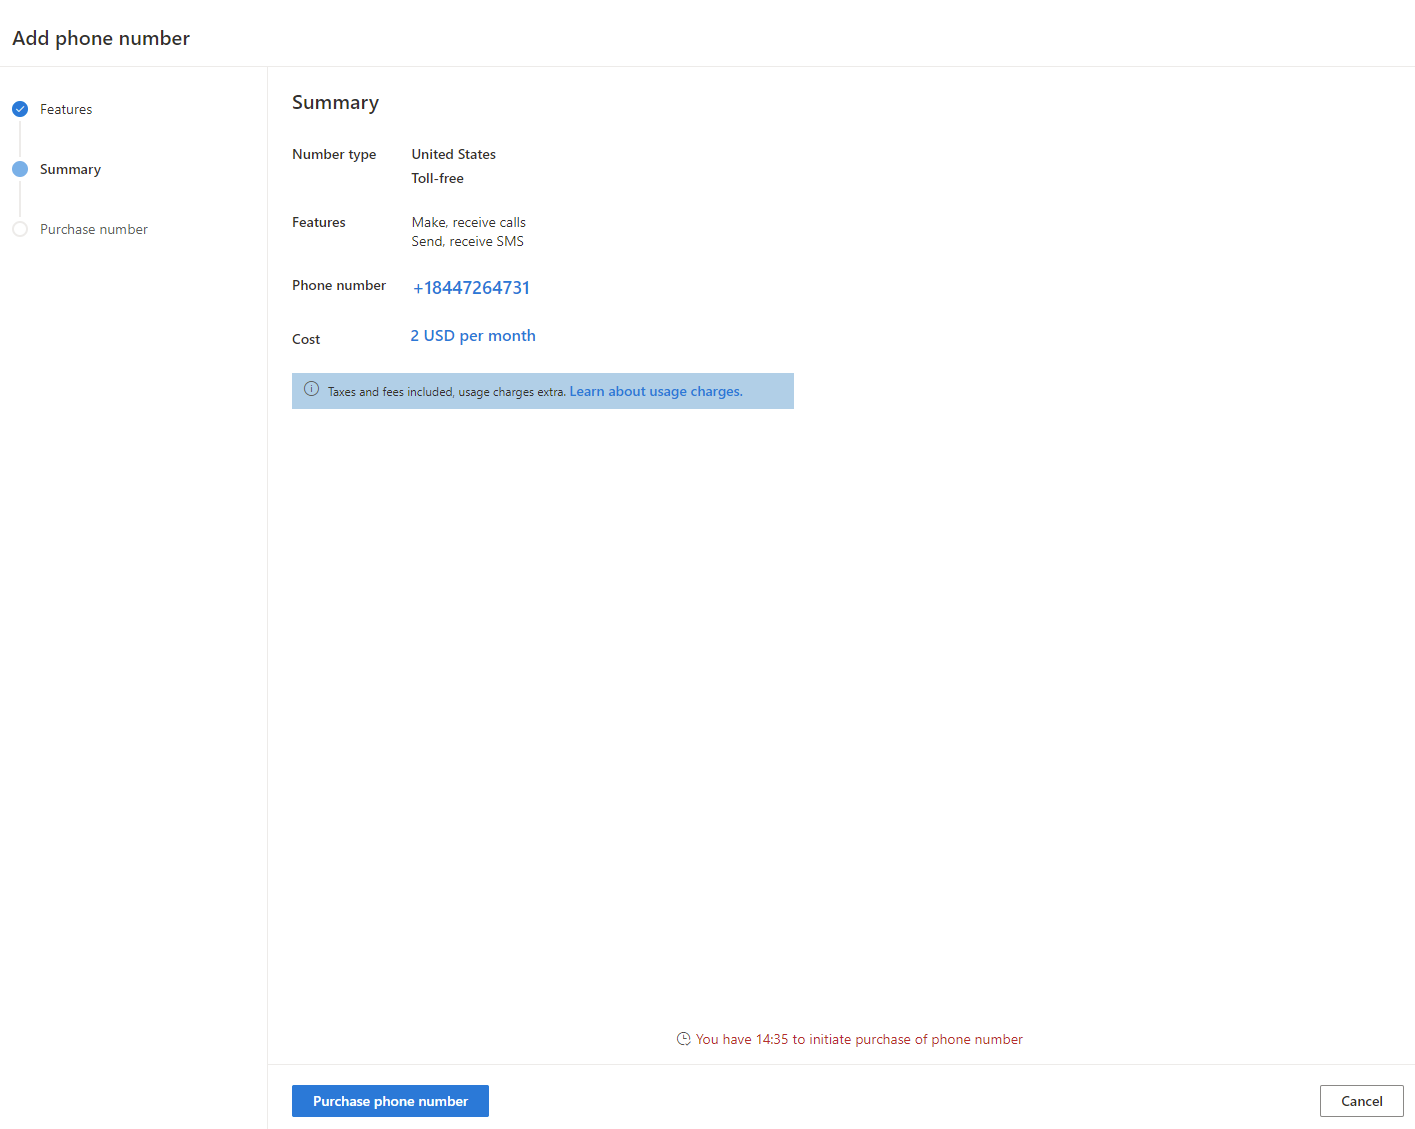
A Summary with the newly allotted phone number and its details is displayed.
On the Summary page, select Purchase phone number. Your new phone number is displayed after purchase and you can select Done to get back to the Phone numbers page.

The new phone number is displayed in the numbers list with the status Ready for setup.
Note
- After you're allotted a new phone number, you must purchase it within the next 15 minutes. If the time elapses, you have to try purchasing again.
- After you select Purchase phone number, you can select Close and return to the Phone numbers page. The purchase happens in the background and the new phone number appears in the phone numbers list with the Ready for setup status.
(Optional) Select Setup Workstream to add the phone number to a voice workstream.
Select Done to go back to the Phone numbers page where you can view details of the phone number that you just acquired.
Note
- To port your phone number into an Azure Communication Services resource, see Port a phone number.
- You can port your Teams number in regions where Azure Communication Services is available. Use the information in Create a Special Order for Telephone Numbers.
Add a phone number to a voice workstream
After you acquire a phone number, you must add it to a voice workstream to be able to use it. You can associate a phone number with only one voice workstream.
In the application, go to the Phone numbers page, and then select the phone number marked Ready for setup in the Status column.
Select Setup workstream. The Workstreams page with a list of all workstreams is displayed.
If you want to create a new workstream, select New workstream, and then follow the steps to set up a voice workstream.
Select an existing workstream from the list.
Follow the steps to configure a voice channel.
The phone number is added to the workstream, and you can view the Connected status for the phone number on the Phone numbers page.
Configure phone numbers for outbound calls
After you purchase phone numbers and associated them with voice workstreams, you can configure them for outbound calls so your customer service representatives can actually make calls to customers. More information: Configure the phone number for outbound calling
Configure voice channel for inbound calls
You can also enable your customer service representatives to receive customer calls, create queues for the voice channel, and set up routing rules. More information: Set up workstreams and queues for the voice channel
Assign phone numbers to customer service representatives
You can also assign personal phone numbers to customer service representatives, so they're able to make and/or receive calls exclusively on that number. Learn more in Assign personal phone numbers to customer service representatives.
Edit phone numbers
If you want to change the calling plan, or upgrade the calling or SMS plans on a particular number, you can do so by editing the phone number. For example, if you hadn't selected any SMS plans, you can upgrade to the Send SMS or Send and receive SMS plans; if you selected only the Send SMS option, you can now upgrade to the Send and receive SMS plans.
- In Customer Service admin center or Contact Center admin center, go to the Phone numbers page. The list of the available phone numbers for your business is displayed.
- Select a phone number and then select Edit. The Edit phone number dialog with the current plan type, calling plan, and SMS plan is displayed.
- Make any changes to your call or SMS plans, and select Save and Close.
Important
- You can't upgrade a phone number or change your call or SMS plans, after it's connected to a workstream.
- You can't remove features once granted to a phone number, but you can upgrade phone number features. For example, if you chose both Make calls and Receive calls options in your calling plans, you can't change it. However, if you selected None for SMS plans, you can upgrade to Send SMS or Send and receive SMS plan.
Release phone numbers
If you no longer need a phone number, you can release it from your organization's phone number list. However, before you plan to remove the phone number from your business, you must remove the number from any associated workstreams or outbound profiles. Also, if the number is assigned as a personal number to any customer service representative, you must disable the number, and then try releasing it again.
Important
When you release a phone number, you actually delete it from Dynamics 365, so release a number only if you're sure that you don't need it at all. To disconnect phone numbers from an Azure Communication Services resource, see Disconnect from Azure Communication Services resource.
- In Customer Service admin center or Contact Center admin center, go to the Phone numbers page. The list of the available phone numbers for your business is displayed.
- Select a phone number and select Release number. The Release number dialog requesting you to confirm the number deletion is displayed.
- Select OK if you're sure you don't need the number. The phone number is removed from your organization and is no longer displayed in the Phone numbers list.
Next steps
Set up outbound calling
Set up inbound calling
Related information
Overview of the voice channel
Connect to Azure Communication Services
Import phone numbers
Disconnect from Azure Communication Services
Block spam numbers
Bring your own carrier
Integrate a third-party IVR system with voice channel
Port a phone number
Use trial phone numbers