Configure the agent calendar view
Applies to: Dynamics 365 Contact Center—embedded, Dynamics 365 Contact Center—standalone, and Dynamics 365 Customer Service
As an administrator or a supervisor, you can help agents in your organization view their work schedules. The My Schedule view in the Customer Service workspace app lets agents quickly view their working hours, nonworking hours, breaks, and any scheduled time off.
The calendar view is a read-only visual that provides daily, weekly, and monthly views of an agent's schedule. It also has an agenda view that provides a list-type view of the agent's schedule.
Note
The agent calendar view isn't supported in the Government Community Cloud (GCC) or sovereign clouds.
Prerequisites
You must have Workforce Management for Customer Service enabled in your environment.
To enable the calendar view for agents, you must have at least one of the following roles:
- System Administrator
- CSR Manager
- Omnichannel administrator
- Omnichannel supervisor
You must have a third-party adapter configured to import agent bookings from an external system. Without an adapter in place, external bookings can't be surfaced in the agent calendar, and agents can't view their schedules.
Enable the agent calendar
In the Customer Service admin center site map, select Workforce management.
In the Agent calendar section, select Manage. The Agent calendar page is displayed.
Turn on the Enable agent calendar toggle.
Select Save and close.
Shift bookings view for supervisors
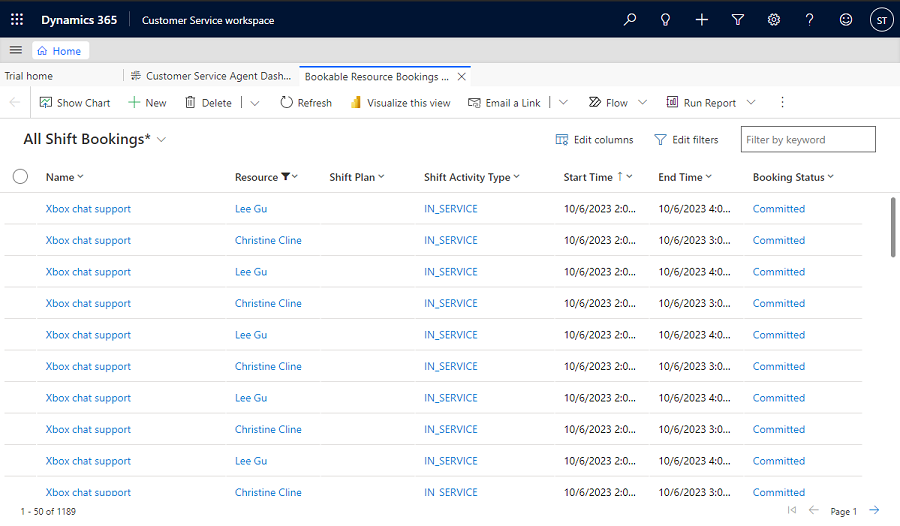
The shift booking list view lets supervisors view the bookings that are imported from their third-party workforce management system. Supervisors can use this view to access a consolidated list of bookings for all agents in their system. The shift bookings view offers a comprehensive breakdown of each agent’s individual activities, including work hours, time off, lunch breaks, trainings, and more.
Administrators can utilize this view to verify the proper functioning of the third-party adapter booking sync process.
In Customer Service workspace, expand the site map, and then select Shift Bookings.
Select the All Shift Bookings view.

Enable workforce management
To enable Workforce Management, complete the following steps:
Navigate to your environment in Power Platform admin center.
Note
You must have the System Administrator role to make changes to your environment.
On the command bar, select Resources > Dynamics 365 apps. The Dynamics 365 apps page is displayed.
Select Install app. The Install Dynamics 365 apps page is displayed.
Scroll down to locate and select Workforce Management for Customer Service, and then select Next.
You must agree to the terms of service, and then select Install.
Wait until the Workforce Management for Customer Service shows as installed on the Dynamics 365 apps page.
Next Steps
Get started with Customer Service workspace
Use the agent calendar view