Create multiple cases from an email sent to multiple mailboxes
When an email is sent to multiple mailboxes (To, Cc, or Bcc) that are queue-enabled in Customer Service, the email gets converted to only one case using automatic record creation rules. Sometimes, multiple cases do get created for an email sent to multiple mailboxes but the email gets associated only to one case and is displayed on one of the case timelines only.
As an administrator, you can enable this feature to ensure that multiple cases (one for each queue-enabled mailbox) are created when multiple mailboxes are added as recipients in the email. With the ability to create multiple cases from an email, customer service representatives (service representatives) can do the following:
With multiple cases being created, email appears in the timeline for all cases. So, service representatives can respond to customers’ issues using any case timeline.
Replies to the original email are linked to the appropriate cases.
Service representatives can see responses from the customer to outbound emails on the case timeline.
When a customer replies to the original email adding a new queue-enabled mailbox or forwards the original email to a new queue-enabled mailbox, a new case is created for that queue.
Enable creation of multiple cases from an email sent to multiple mailboxes
- Sign in to powerapps.com, and then select the environment that contains your solution.
- From Objects, select Settings > Settings definition.
- Select the Email Multi Related for ARC setting definition.
- On the Edit Email Multi Related for ARC setting dialog, in the Setting environment value section, select New environment value.
- Select Yes for the dropdown list. The Default Value is No.
- Select Save.
- Go back to Solutions and select Publish all customizations.
How automatic record creation rules work to create multiple cases from an email sent to multiple mailboxes
After the feature is enabled, any new emails sent to multiple mailboxes are converted to multiple cases, and a Related attribute (new attribute introduced on email activity to capture multiple records that an email can be associated with) is set for those cases. For more information on related attributes, see Enable users to associate activities to multiple records (preview). The existing Regarding attribute for such emails are blank. However, once the feature is turned on, for any existing email records, you see the following actions:
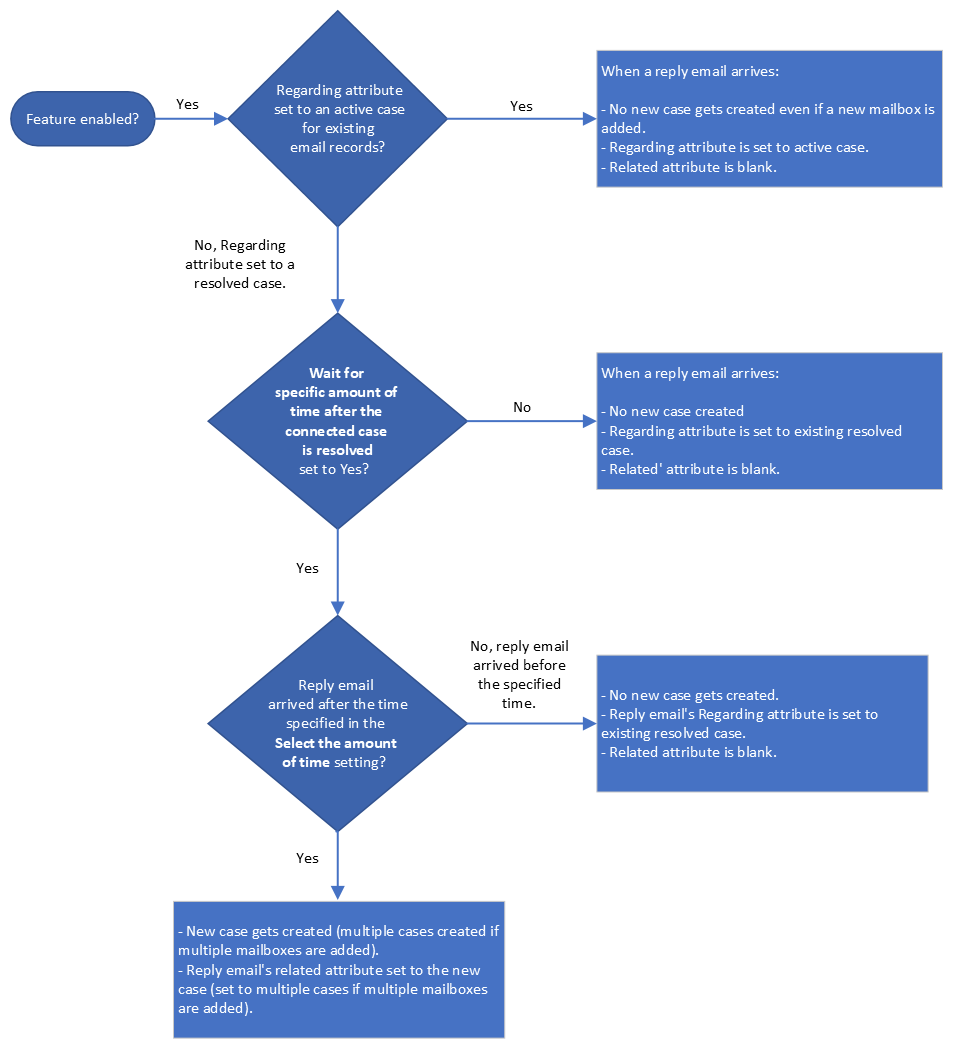
If older email records have an existing Active case set as Regarding, no new case gets created when a reply email arrives, even if a new mailbox is added. The replied email gets associated with an existing case, and Regarding is set to the existing active case. The Related field remains empty, as no case was created.
If older email records have an existing Resolved case set as Regarding, and the Wait for a specific amount of time after the connected case has been resolved option is set to YES, and a reply email arrives after the time mentioned in the Select the amount of time setting, a new case is created. The related attribute of the reply email is populated with the newly created case. If the reply email is sent to multiple mailboxes, multiple cases are created and the related field is populated with multiple cases. The Regarding field for the reply email isn't set. However, the Regarding field for the previous correlated email isn't impacted.
The following flowchart explains how automatic record creation rules work to create multiple cases from an email sent to multiple mailboxes.

Recommendations
We recommend that you add a related attribute to your email form from the Power Apps Maker portal, so that you can check which cases an email gets associated with after it gets converted to multiple cases. The related column isn't added to an email form by default. To enable users to use this new column, add the Related column to the email form. For information about how to add a column to a form, go to add columns to a form.
When email gets converted to multiple cases, every case has the same case title by default, as the email subject gets copied to the case title. If you want to see which case originated in which mailbox, it's advisable to add the originating queue entries on the case form, which helps you identify which case got created in which queue.
To achieve this, you can add a subgrid to list the originating queue entries to the case entity from the Power Apps Maker portal by customizing the case form.
Perform the following steps:
Create a new view on the msdyn_originatingqueue table. We recommend you show the msdyn_queueid and msdyn_emailid fields in the view.
Sign in to powerapps.com, and then select your environment.
Go to Tables > Originating Queue Mapping.
Select Views from the Data experiences tab.
Select New view.
On the New view dialog box, provide the Name and Description, and then select Create.
We recommend you show the Queue and Email fields in the view.
Add a new subgrid component to the case form for the originating queue entity.
Go to Tables > Case.
Select Forms from the Data experiences tab.
Select the case form available in your environment.
On the Case form, go to Component > Grid > Subgrid.
On the New Case form, Properties > Display options, fill in the following information:
Label: Provide a meaningful label.
Name: Provide a name.
Select the Show related records checkbox.
Select originatingqueue (Case) from the Table dropdown list.
Select the view you created in Step 1.
Select Save and Publish.
Related information
How the automatic record creation rule works in a customer scenario
How the automatic record creation rule works in a service representative scenario