Note
Access to this page requires authorization. You can try signing in or changing directories.
Access to this page requires authorization. You can try changing directories.
Add a timer control to a service-level agreement (SLA) enabled entity form to help users gauge the amount of time they have to complete a task as specified in the SLA. The timer control displays countdown timers that show the current status and time remaining for the configured SLA KPIs.
Add a SLA timer to a SLA-enabled entity
After you've configured the SLA KPIs, SLAs, and SLA items for an entity, you can add the SLA Timer control to display the SLA KPIs that are configured for the entity. You can customize the views to filter the KPIs and display only the relevant KPIs to customer service representatives (service representatives). Some of the KPIs that service representatives can see include the different stages that KPIs go through.
For information on how the SLA KPIs are displayed at runtime when service representatives view the case to work on in Customer Service Hub, see Timer for SLA-enabled entities.
Note
- The SLA Timer control displays SLA KPIs that are created in Unified Interface only.
- The SLA Timer control displays No Applicable SLA when there aren't any applicable SLAs.
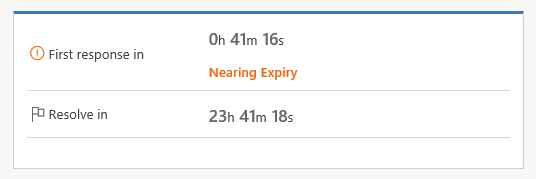
A sample runtime view of the SLA Timer is as follows.
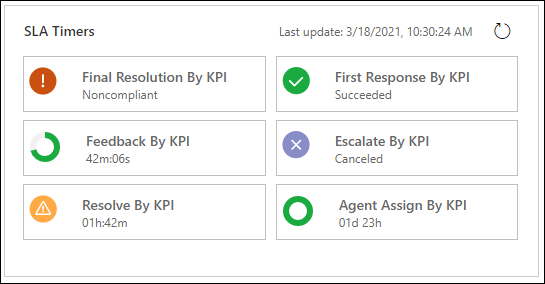
However, SLA KPI Instances won't reach a Nearing non-compliance or Non-complaint state, if the SLAWarningAndExpiryMonitoringFlow isn't enabled and the SLA KPI Instance timer continues to run. The following warning message is displayed on the SLA Timers: "The SLA instances may be incorrect because workflow <workflow ID> is turned off. Please contact your admin to turn the workflow on." The workflow ID varies from system to system as it corresponds to SLAWarningAndExpiryMonitoringFlow. For more information on how to enable SLAWarningAndExpiryMonitoringFlow, see Warning message appears on slakpiinstances.
For more information on why an SLA KPI Instance doesn't reach Nearing Non-compliance or Non-compliant state and how you can resolve it, see SLA KPI Instance doesn't reach Nearing Non-compliance or Non-compliant state, and the SLA KPI Instance timer continues to run.
Do the following steps to add the SLA timer control for the case entity.
Important
You can add the SLA timer control only in the classic Power Apps experience.
In your Power Platform environment, select Advanced Settings to go to Customizations.
Select Customize the System, and in the Solutions page, expand Entities under Components.
Select the entity for which you want to add the SLA Timer control, and in the Forms view, select the corresponding form. In this example, let us select the Case entity, and the Case for interactive experience form.
On the page that appears, on the Insert tab, insert a section, and then insert a subgrid.
Double-click the subgrid and in the Set Properties dialog, enter the necessary details. On the Display tab, Data Source section:
For Records, select Only Related Records.
Selecting All Record Types retrieves all the SLA KPI instances present in the organization and might lead to performance issues.
For Entity, select SLA KPI Instances (Regarding).
In Default View, add a view or edit an existing view to determine the SLA KPIs that need to be displayed for service representatives at runtime. For more information on views, see Create and edit views.
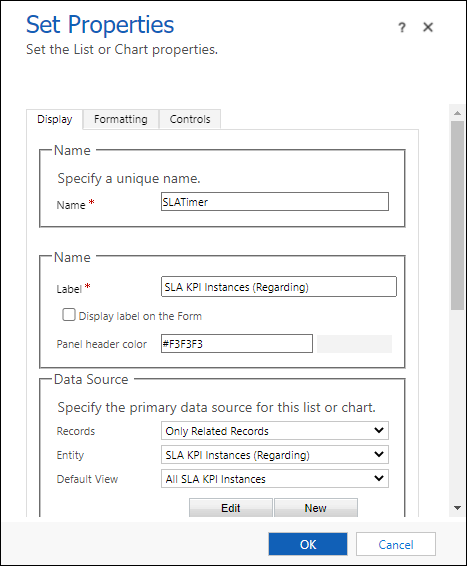
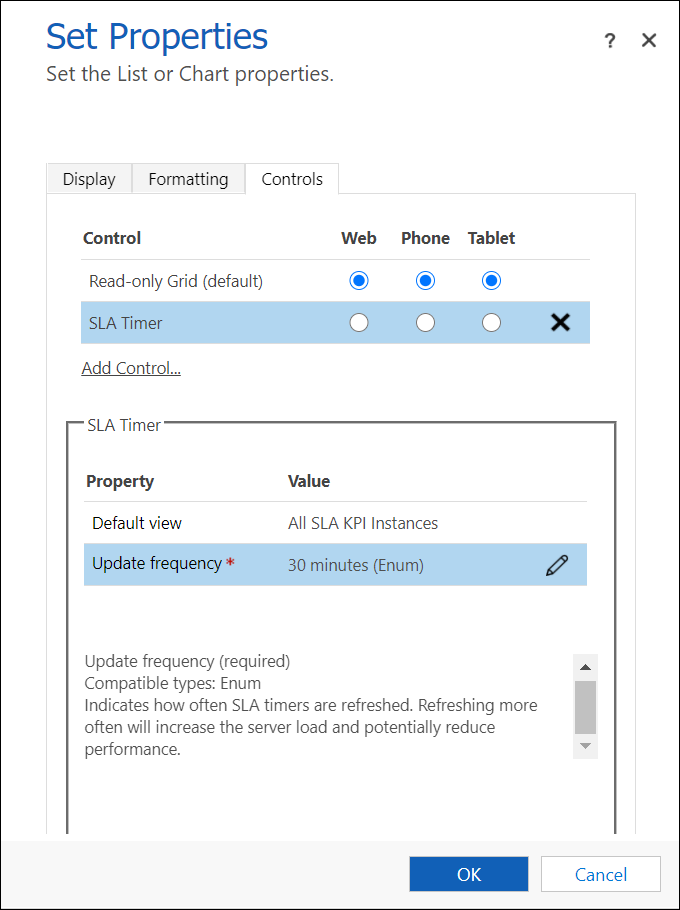
On the Controls tab, enter the following information:
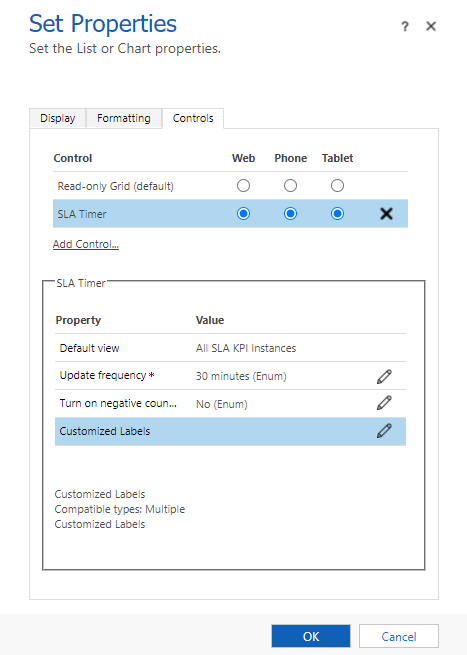
- Select Add Control, and then select SLA Timer.
- In the SLA Timer area, enter a value for Update_Frequency_key to set the timer refresh interval. For optimal performance, choose an interval that isn't too short. The default interval is 30 minutes.
Save and publish the solution.
Enable elapsed time for SLA Timers in expired status
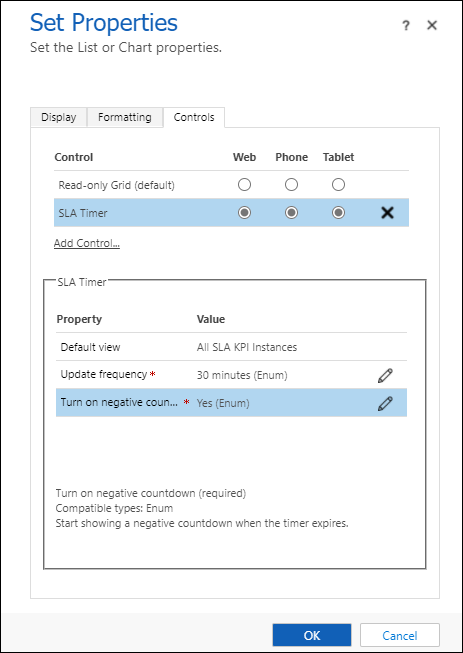
You can configure the negative countdown property for the SLA timer so that the timer continues to display the elapsed time after the SLA expires instead of showing the status. The setting needs to be configured for each SLA Timer instance.
After you add the SLA Timer control, set the Turn on negative countdown property as Yes.
Save and publish the solution.
Customize the SLA timer control display label
After you've added the SLA timer control for a SLA-enabled entity, you can customize the labels of the status to be displayed for the timer control.
In the SLA Timer area, select Edit for Customized Labels.
In the Configure Property "Customized Label" dialog, select the Bind to a static value option and enter the values for multiple language codes.
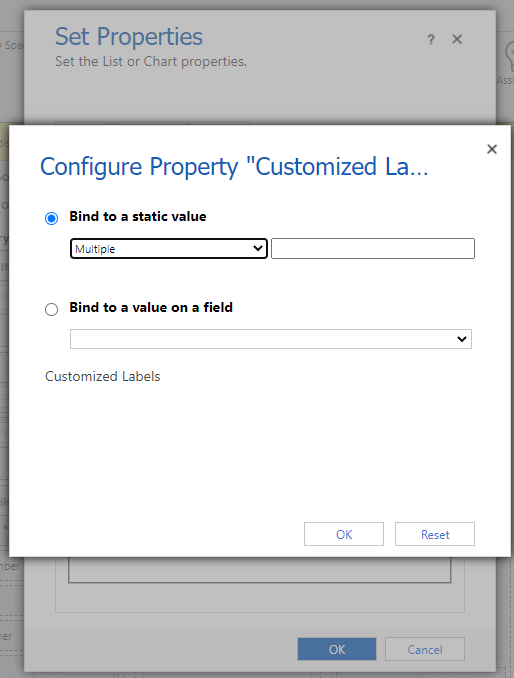
The language code value must be of the following format:
(language code1)=(KPI instance status value):(KPI instance custom label)
For example, 1033=1:Custom NoncompliantYou can also enter multiple language codes by separating them with a semicolon:
(language code1)=(KPI instance status value):(KPI instance custom label); (language code2)=(KPI instance status value):(KPI instance custom label)
For example, 1033=1:Custom Noncompliant; 3:PausedIf you need to create multiple language code sets, you must separate each set by selecting Enter. For example:
Enter
(language code1)=(KPI instance status value):(KPI instance custom label); (language code2)=(KPI instance status value):(KPI instance custom label)Select Enter.
Enter
(language code1)=(KPI instance status value):(KPI instance custom label); (language code2)=(KPI instance status value):(KPI instance custom label)
The customizable status codes are:
- 1: Noncompliant
- 3: Paused
- 4: Succeeded
- 5: Canceled
To look up the language code, or to enable or disable a language, go to Advanced Settings>Administration>Languages.
Select OK.
Save and publish the solution.
Add an out-of-the-box timer control to the Case form
On a case form, the timer control can show any of the following, depending on the actions of the customer service representative and what you specify when you set up the timer control:
If the customer service representative completes the task within the remaining time, the control shows the word Succeeded.
If the customer service representative doesn’t complete the task within the remaining time, the control shows the word Expired.
As the timer counts down, the color changes to yellow as the time remaining nears non-compliance. If the time remaining expires, the timer shows the word Expired. Then the timer color changes to red and the timer starts counting up to show the elapsed time since the task should have been completed. This behavior is optional.
If a condition causes the milestone to be canceled, the control shows the word Canceled. This behavior is optional.
If either of the required fields in the Timer Control dialog doesn't have a value in the record, the control shows the words Not Set.

Important
- The instructions in this article apply if you're adding a timer to track time for the date/time field of any entity, or for tracking time against standard SLAs on case records. If you are using enhanced SLAs and want to add a timer to your forms, go to Add a timer to forms to track time against enhanced SLAs.
- The timer control is designed to visually show the current state or show the remaining or elapsed time relative to the date and time as specified in the Failure Time field of the SLA KPI Instance. It doesn’t calculate or keep track of the time for which the Pause condition is true.
Note
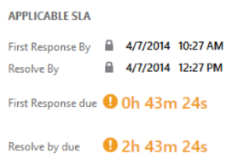
The screens showcase the timer control on a Unified Interface app. On a legacy web client app, the timer control is displayed as follows:
More information: Understand SLA details with Timer control
Add an out-of-the-box timer control
Make sure that you have the System Administrator or System Customizer security role or equivalent permissions.
Check your security role
- Follow the steps in View your user profile.
Go to Settings > Customizations.
Select Customize the System.
In the solution explorer on the left pane, expand Entities, expand the Case entity, and select Forms.
To add the timer to the form so the customer service representatives can use it in Customer Service Hub, open the case form of type Main.
Select on the form where you want to place the control. You can add it anywhere except the form header or footer.
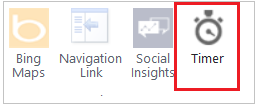
On the Insert tab, in the Control group, select Timer.
In the Timer Control dialog, do the following:
In the General section, type a name and label for the control.
Under Data Source, next to Failure Time Field, select the date-time field that represents the time when a milestone should be completed. For example, select the First Response By field.
Next to Success Condition, select a field to use to evaluate the success of the milestone, and then select the condition that indicates success. For example, select the First Response Sent field, and then select Yes to indicate the success criteria of the First Response metric. This setting is required.
Next to Failure Condition, select a field to use to evaluate the failure of the milestone, and then select the condition that indicates the failure. For example, in the first drop-down list, select IsEscalated. In the second drop-down list, select Yes.
Next to Warning Condition, enter the condition that will cause the timer control to display a warning when the time is about to expire. For example, in the first list next to Warning Condition, select First Response SLA Status. In the list to the right, select Nearing Noncompliance. This setting is optional.
Next to Cancel Condition, select a field to evaluate whether the achievement of the milestone should be canceled. Then choose the option that indicates the milestone is canceled. This setting is optional.
Next to Pause Condition, enter the condition that will cause the timer to pause the count down. For example, you want the timer to pause the count down every time the case status is set to “On-hold”. For this, in the first drop-down list, select Status. In the second drop-down list, select On-hold.
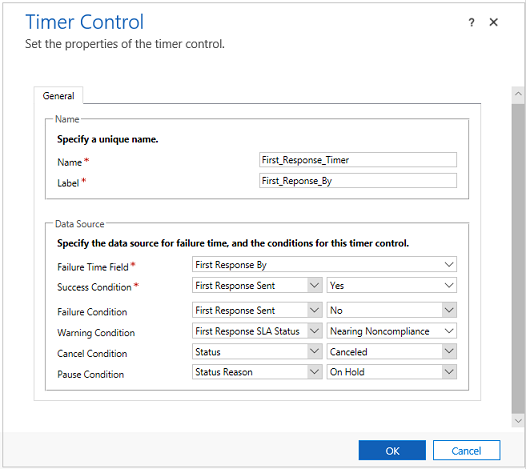
Select OK to add the control to the form.
Notes
The timer control refreshes on the OnChange form event, and also when the form is loaded.
You can add a timer control to a form based on any record type (entity), including custom record types.
You can add multiple timer controls for different key performance indicators (KPIs).
You can add a timer control to any Main or Main - Interactive experience form of other entities, but timer controls are not displayed in Dynamics 365 for tablets.
Related information
Configure service level agreements