Customer interactions timeline
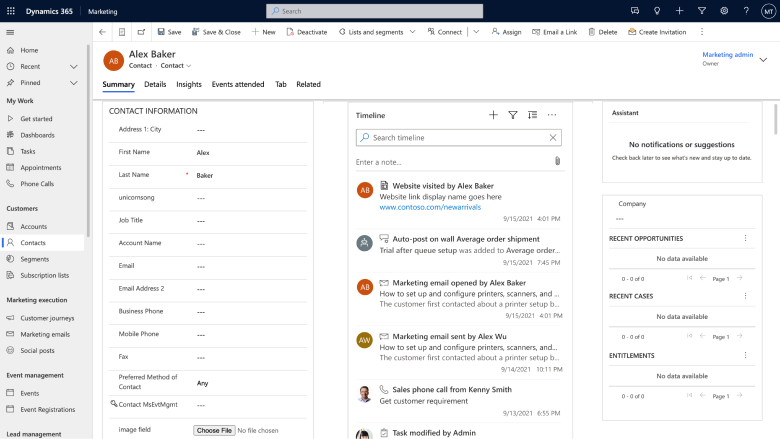
The interactions timeline for a contact or lead provides a unified view of historical interactions based on customer activities in Dynamics 365 Customer Insights - Journeys (both Customer Insights - Journeys and outbound), Sales, and Customer Service.
You can also view Customer Insights activities in the timeline. Learn more: Integrate Customer Insights activities with Dynamics 365 timelines.
Tip
To learn how to configure the timeline and view interactions across Dynamics 365 Sales and Customer Service, see the Use timeline article in the Power Apps documentation.
Having a single view of all the activities that a customer engages in lets you get a complete understanding of your customer. Business stakeholders (marketers, sales agents, customer service agents, account managers, etc.) can use the unified view of customers' historical interactions with the business to create personalized experiences through both digital and non-digital channels. For instance, a sales agent could learn about the newsletters that a contact has subscribed to due to previous marketing campaigns as well as the product pages and blogs recently explored by the contact to personalize communication with them in the next sales call. Similarly, a service agent could investigate the latest email communications received by a customer as part of a customer journey to help with an escalation scenario.
How to enable marketing interactions in your contact or lead timeline
If you use the out-of-the-box contact and lead forms provided with Customer Insights - Journeys, marketing interactions (based on Customer Insights - Journeys and outbound marketing activities) automatically show up in the timeline. The timeline only displays interactions associated with the respective profile type (either contact or lead). For example, the timeline for a contact includes interactions for that contact only.
But if you use custom forms for contacts and leads, you need to add a custom connector to the timeline component in your custom contact or lead form to see the marketing interactions.
The following steps show you how to add the custom connector to your timeline component through the Power Apps maker experience:
Within the Power Apps maker experience, select Tables. Open the table you want (for example, Contact), and then select the Forms area.
Open your custom contact or lead form and select the timeline component in the form.
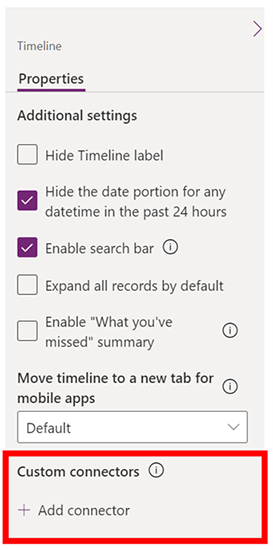
To add a new custom connector, in the Properties pane for the timeline component, go to Custom connectors and select Add connector.

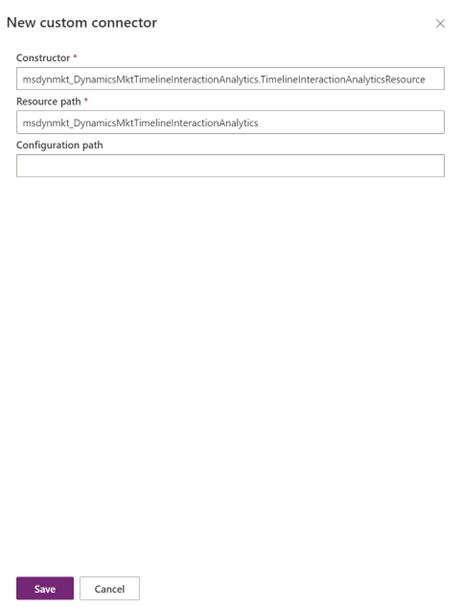
The New custom connector pane is displayed. Add the following details and select Save:
- Constructor:
msdynmkt_DynamicsMktTimelineInteractionAnalytics.TimelineInteractionAnalyticsResource - Resource path:
msdynmkt_DynamicsMktTimelineInteractionAnalytics

- Constructor:
The custom connector is now added to the timeline component. Save and Publish your custom contact or lead form. The timeline in your custom contact or lead form now shows the marketing interactions.
For more information, see Use custom connectors with the timeline control.
Key capabilities of the timeline

- Along with activities from Dynamics 365 Sales and Customer Service, you can view interactions based on activities from both Customer Insights - Journeys and outbound marketing, including interactions across the following marketing activities:
- Emails
- Text messages
- Push notifications
- Web activity
- Forms
- Events
- Use filtering to focus on specific types of marketing interactions like all emails that were opened by a contact
- Preview the communications (emails, text messages, and push notifications) that a contact received or interacted with as part of your marketing campaigns within the timeline
Important
To see marketing interactions on the timeline, enable the following read permissions:
- msdyncrm_marketingemail
- msevtmgt_event
- msdyncrm_marketingform
- msdynmkt_marketingform
- msdyncrm_website
- msdynmkt_email
- msdynmkt_pushnotification
- msdynmkt_sms
Note
Real-time marketing activities from the past 12 months are shown in the timeline for the selected contact or lead. Historical interactions from outbound marketing activities are shown only after the real-time marketing installation date or May 2022, whichever is later.