Preview: Build an event registration website using Power Pages
Important
A preview feature is a feature that isn't complete but is made available before it’s officially in a release so customers can get early access and provide feedback. Preview features aren’t meant for production use and may have limited or restricted functionality.
Microsoft doesn't provide support for this preview feature. Microsoft Dynamics 365 Technical Support won’t be able to help you with issues or questions. Preview features aren’t meant for production use, especially to process personal data or other data that are subject to legal or regulatory compliance requirements.
Microsoft Power Pages is a secure, enterprise-grade, low-code software as a service (SaaS) platform for creating, hosting, and administering modern external-facing business websites.
You can create an event registration website in Power Pages simply by using the Event Registration template. The template contains multiple pages to encompass the entire registration process:
- Home: Lists all events that are enabled for the website.
- Events: Details the event, including the list of speakers and sessions. This page is dynamic and the content is loaded based on the event selected in the home page.
- Register to an event: Provides the event registration form. The registration form is dynamic. Each event can have a different registration form.
Important
Using Power Pages requires an extra license. You can test Power Pages using a free trial. For more information, see licensing.
Power Pages combined with the event registration template unlocks powerful scenarios:
- Style and customize your website in the Power Pages studio editor.
- Set the custom domain name for event registration website.
- Create multiple event registration websites.
- Each event can have a different registration form without the need to change any code.
- Explore more Power Pages capabilities.
Step-by-step guide to build an event registration website
This guide shows all steps to create an event registration website using Power Pages studio and the event registration template for Customer Insights - Journeys. The guide has three parts:
- Create a website in Power Pages.
- Configure the website in Customer Insights - Journeys.
- Publish events to your Power Pages event portal.
If you encounter any issues while creating or editing your website, refer to the Power Pages documentation.
Create a website in Power Pages
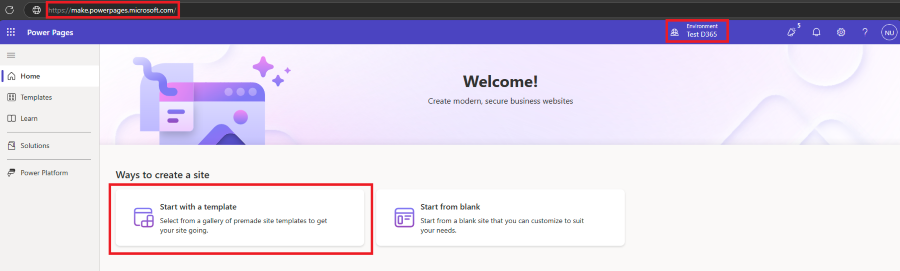
- Create a new website: To open Power Pages studio, go to Power Pages Get started in your browser. Select the correct environment in the top right corner, then select Start with a template.
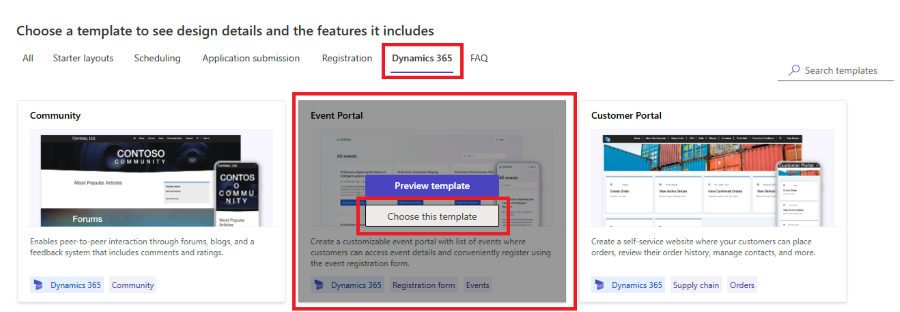
- Find an Event Portal template in Dynamics 365 and select Choose this template.
- Name your site and set the language. You can change the web address later to use your own domain name. Select Done in the bottom right corner. It takes a few minutes to get your site ready. You can check the status of your newly created website in the list of Active sites.
- Once your site is ready, select Edit to customize your website. Your new website is created as Private–not accessible for external audience.
- The Home page contains the list of events. You can customize what information about the event is displayed in the list of events by selecting the Card gallery control on the canvas. You can also easily change the hero image, logo in the page header, page footer, etc.
- Preview your website: Select Preview in the top right corner. You might need to enable pop-up windows to display the preview.
- Publish your website: Follow the Go-live checklist.


Configure your website in Customer Insights - Journeys
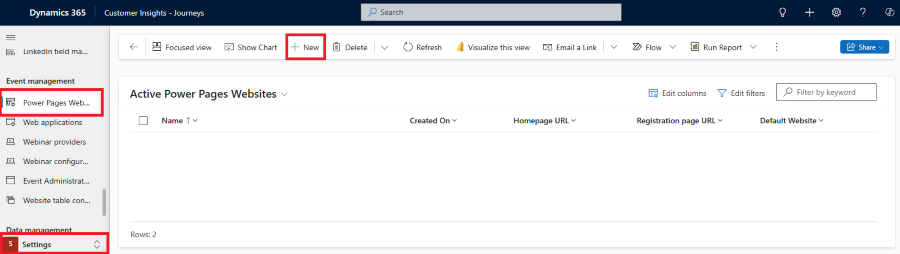
- Create a new Power Pages Website configuration to link your Power Pages website with Customer Insights - Journeys and simplify the event publishing for your event planners: Navigate to the Power Pages Websites section of Event Management in Settings. Select + New to create a new configuration.
 Set the Name of your website configuration, which is visible to event planners so they can select the website on which the event is hosted. Fill in the Homepage URL with the URL of your Power Pages website. To get your website URL, navigate to Power Pages studio, select Set up in the left pane, and find the URL under Site details. Select Save & Close.
 - Enable external form hosting and optionally prefill for your Power Pages domain. External form hosting and Prefill can be enabled in Settings > Domains.
Publish events to the Power Pages Event Portal
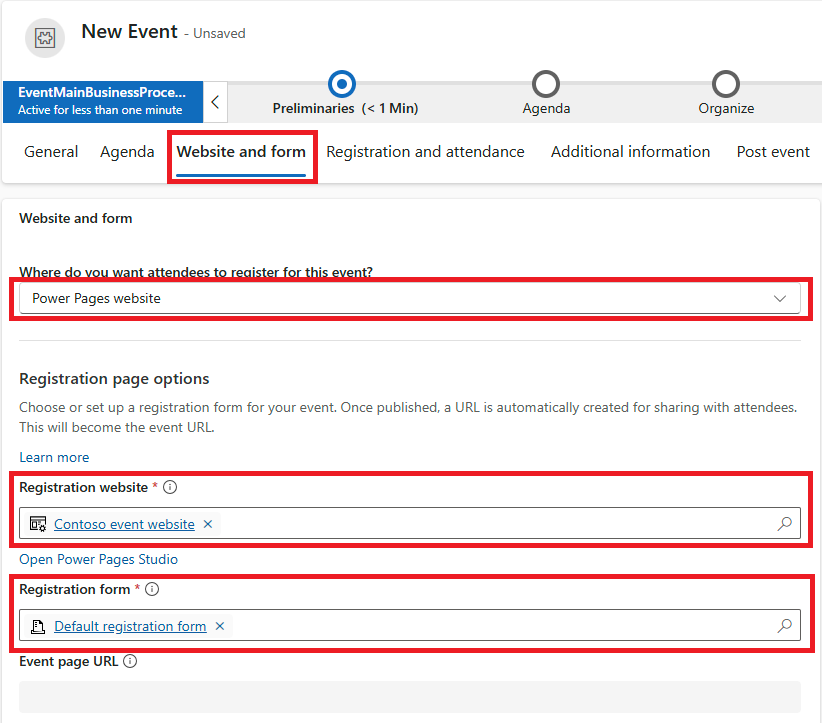
- Create a new event or edit an existing one: Navigate to the Website and form tab. Select Power Pages Website as the destination of Where do you want attendees to register for this event? Your default Registration website is automatically set. You can also change the form used for the event. Each event can use a different form, although these events are hosted on the same website.
- Save your event and select Go Live.
- View your event listed in the preview or live version of your Power Pages website.

Note
It can take several minutes to see the new event or a change published on your portal. Please clear your browser cache and refresh to see the changes.
Event registration website customization
The next sections cover customizing the event registration website.
Customize displayed information about the event in the card gallery control
The card gallery control renders the list of events. You can choose from various layouts.
You can change what information is displayed about the event in the Data section of the card gallery design. The Data source defines which event records are listed. Always select Event as the Data source. You can limit which events are displayed on this website by selecting a custom view as the View for the card gallery. By default, the view provided lists all events in Customer Insights - Journeys published to the Power Pages website. If you're using multiple portals or you want to create a new view that should be used for the card gallery component, refer to the steps in the next section.
You can customize the fields that are displayed on the card gallery component and map them to the respective fields in the event entity.

To make the call-to-action of the card gallery a click through to the detail page of the event, set the button settings to:
- Label Type: Content Snippet
- Label: Register to Event
- Link Type: Data Column
- Data Column: Event URL

To change the label of the call-to-action button, navigate to Power Pages Management. Under Content Snippets, search for "Register" content snippet for your portal. In the value field, provide copy that you want to appear as the call-to-action on the card gallery component.
Create multiple event registration websites
It's possible to create multiple event registration websites and set which event is displayed on each website. Some events can be public while other events can be private only for authenticated users.
- Build at least two websites in Power Pages using the Event Registration template.
- Create multiple Power Pages Website configurations in Customer Insights - Journeys settings and link each configuration to the correct Power Pages website. This allows the event planner to select the correct website while setting up the event in Event Management. A savedQuery with the filtering of events for that specific website is automatically created. This automatically generated view can't be customized but you can save it as a new view to customize it.
- Open the card gallery control in Power Pages studio and Customize the corresponding view as the View.
Custom components for event registration
The event registration template uses multiple custom components such as the Event Registration form, Event Speaker section, Event Session section, etc. To add one of these custom components, select the plus icon (+) on the canvas and review the list of custom components. You can build your own pages applying these custom components as the building blocks.
The custom components visualize data about your event, which is stored as Event entity attributes. To review or change the attributes used by the custom component, select the custom component on the canvas in Power Pages studio, select Edit custom component, and then select Open Power Pages Management. This opens the source code of the custom component where you can review which attributes are fetched and how the attributes are visualized by the component.

Set a custom domain name for the event registration website
A custom domain name can be set in Power Platform admin center. For more information, see Add a custom domain name.
Important
Once you assign a custom domain name to your Power Pages website, check the following:
- Your custom domain name must be enabled for external form hosting. If your custom domain name isn't enabled, the registration form can't be rendered on your website.
- The Power Pages website configuration in Customer Insights - Journeys must point to the home page URL. For more information, see Power Pages Website configuration in Customer Insights - Journeys.
Power Pages website configuration in Customer Insights - Journeys
This configuration links your Power Pages website with Customer Insights - Journeys and simplifies the event publishing process for your event planners. Navigate to the Power Pages Websites section of Event Management in Settings. Select + New to create a new configuration or select an existing configuration to edit it.

You can set the following parameters for your website:
- The Name of your website configuration is visible to event planners so they can select which website the event is hosted on.
- The Homepage URL is the URL of your Power Pages website. To get your website URL, navigate to Power Pages Studio, select Set up in the left pane and find the URL in the Site details.
- The Registration page URL is an optional parameter. If you want to use a custom registration page instead of the Events page provided in the template, enter the page URL here.
- Default website defines if this configuration is selected as default for your newly created events hosted on your Power Pages website.
Important
Updating the Homepage URL or Registration page URL of the existing configuration automatically updates the public URL of all the events using this website configuration.