Prerequisite software for installing Dynamics GP Web Components
Before you can install the Dynamics GP web components, you must install other software on the web server and the session host servers. The prerequisite software to install will depend on the components you will be installing on the server.
Server operating system
To install the Dynamics GP web components, the web server and the session host servers must be running one of the following operating systems from Microsoft Dynamics GP System Requirements.
You cannot install any of the Dynamics GP web client components on a server that is also being used as a domain controller.
Internet Information Services (IIS) and ASP.NET
Internet Information Services (IIS) and ASP.NET must be installed on the web server on which you will be installing the Dynamics GP web client.
Windows Server 2008 R2
To install these items, complete the following steps for Windows Server 2008 R2:
Open the Server Manager.
Click Roles.
Choose Add Roles. In the Add Roles Wizard, click Next.
Mark Web Server (IIS) and then click Next.
At the Introduction screen, click Next.
Select the role services to install. The following items must be marked:
In Common HTTP Features:
Static Content
Default Document
In Application Development:
- ASP.NET
In Security:
- Windows Authentication
Other role services will already be marked. Some are marked by default. Others are marked depending on how the web server is configured. Click Next.
Click Install. The roles and role services will be added.
After the installation is complete, click Close.
Windows Server 2012 and Windows Server 2012 R2, Windows Server 2016 and later.
To install these items, complete the following steps for Windows Server 2012 and 2016:
Open the Server Manager.
Click Manage >> Add Roles and Features.
In the Add Roles and Features Wizard, click Next.
Choose Role-based or feature-based installation, and then click Next.
Select your server from the server pool, and then click Next.
Mark Web Server (IIS) and then click Next.
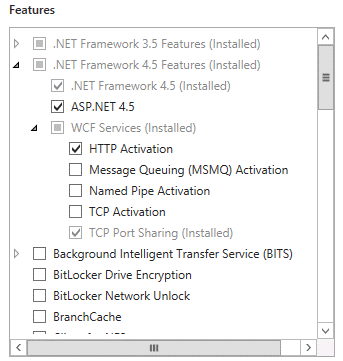
Select the features to install. Be sure that you mark ASP.NET 4.5. In the WCF Services group under .NET Framework 4.5 Features, be sure that you have marked HTTP Activation.

Click Next.
The screen for the Web Server Role (IIS) is displayed. Click Next.
Select the role services to install for the web server. The following items must be marked:
In Common HTTP Features:
Static Content
Default Document
In Security:
- Windows Authentication
In Application Development:
- ASP.NET 4.5
Other role services will already be marked. Some are marked by default. Others are marked depending on how the web server is configured. Click Next.
Click Install. The roles, features, and role services will be added.
After the installation is complete, click Close.