Foldable Layout
Important
This article describes functionality and guidance that is in public preview and may be substantially modified before it's generally available. Microsoft makes no warranties, express or implied, with respect to the information provided here.
Important
The content of this view will be available only after the Activity root view is attached to the window. This happens because the implementation is based on Window Manager library and the Window Manager is working only when view is attached to the window.
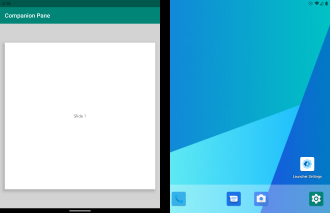
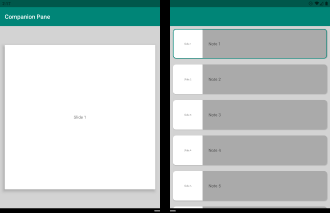
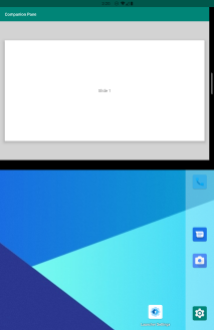
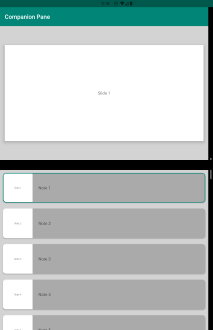
The FoldableLayout component is a custom layout that can position its children differently when the application runs on foldable devices. The component can split the screen in two areas depending on the position and orientation of the folding feature. When the screen is split, it can hold two child containers either side by side or one above the other.
| Single-screen layout | Dual-screen layout |
|---|---|
 |
 |
 |
 |
XML Attributes
single_screen_layout_id- Receives the layout id to be displayed in single screen mode.dual_screen_start_layout_id- Receives the layout id to be displayed in the start container of dual screen mode.dual_screen_end_layout_id- Receives the layout id to be displayed in the start container of dual screen mode.
The FoldableLayout also has the ability to create a single container when the application is running on a foldable device.
We added four new attributes that will help you create the UI you want:
dual_portrait_single_layout_id- Receives the layout id for the dual portrait single container.is_dual_portrait_single_container- Creates an empty dual portrait single container.dual_landscape_single_layout_id- Receives the layout id for the dual landscape single container.is_dual_landscape_single_container- Creates an empty dual landscape single container.
smallestScreenSize support
When an Activity transitions to a new screen mode but it is not recreated because flag smallestScreenSize is set in the Manifest file, the layout will detect the new configuration and automatically resize the containers or even add or remove the second container depending on the FoldableLayout configuration.
Android Studio preview
tools_hinge_color- Select hinge color in layout preview.tools_screen_mode- Select screen mode in layout preview.
If you add fragments inside xml files to FoldableLayout, you will need the following attributes to preview the fragment UI:
show_in_single_screenshow_in_dual_screen_startshow_in_dual_screen_endshow_in_dual_portrait_single_containershow_in_dual_landscape_single_container
Container IDs
The containers have the ids:
first_container_idsecond_container_id
No matter the screen orientation or special behaviour set to the layout, if the layout will show only one container, its id will be first_container_id. If it will show two container there will also be second_container_id.
For example:
- If the application is in single screen mode the container id will be
first_container_id. - If a transition to dual screen mode in dual portrait is done and we have
dual_portrait_single_layout_idoris_dual_portrait_single_containerset then there will be only one container in dual screen mode and its id will still befirst_container_id. - When a transition to dual landscape is done but we don't have the attributes
dual_landscape_single_layout_idandis_dual_landscape_single_containerset, then both containers with the idsfirst_container_idandsecond_container_idwill be present.
Create FoldableLayout in code
findViewById<FrameLayout>(R.id.parent).addView(
    FoldableLayout(this, FoldableLayout.Config().apply {
        singleScreenLayoutId = R.layout.single_screen
        dualScreenStartLayoutId = R.layout.dual_screen_start
        dualScreenEndLayoutId = R.layout.dual_screen_end
        dualLandscapeSingleLayoutId = R.layout.single_screen
    })
)
Replace FoldableLayout configuration
The code below will discard the old configuration, replace it with a new one and inflate the view with the new configuration.
findViewById<FoldableLayout>(R.id.surface_duo_layout)
    .newConfigCreator()
    .singleScreenLayoutId(R.layout.single_screen)
    .dualScreenStartLayoutId(R.layout.dual_screen_start)
    .dualScreenEndLayoutId(R.layout.dual_screen_end)
    .reInflate()
Update FoldableLayout configuration
The code below will update the current configuration with the selected attributes and inflate the view:
findViewById<FoldableLayout>(R.id.surface_duo_layout)
    .updateConfigCreator()
    .dualScreenStartLayoutId(R.layout.dual_screen_start)
    .reInflate()
How to use the layout components
To create an application, you can either use an Activity or an Activity with Fragments to handle the UI. The Fragments can also be declared in a layout resource file or can be directly created in an Activity. We'll talk about how the components handle these cases later.
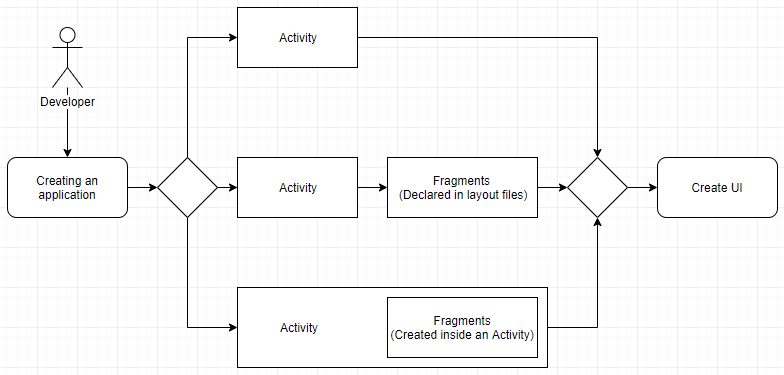
Using an Activity
Here, we look at how the components work by using just an Activity to handle the UI.
First, you have to add the
FoldableLayoutto the *.xml file of the Activity.<com.microsoft.device.dualscreen.layouts.FoldableLayout xmlns:android="http://schemas.android.com/apk/res/android" xmlns:app="http://schemas.android.com/apk/res-auto" android:id="@+id/enlightened_layout" android:layout_width="match_parent" android:layout_height="match_parent" android:animateLayoutChanges="true" app:single_screen_layout_id="@layout/single_screen_layout" app:dual_screen_start_layout_id="@layout/single_screen_layout" app:dual_screen_end_layout_id="@layout/dual_screen_end_layout"/>Then, create the three layouts for the different screen modes.
Link your layout to your activity.
Using Fragments declared in resource files
Here, we see how the components work with fragments that are declared in the *.xml files.
First, you have to add the
FoldableLayoutto the *.xml file of the Activity.<com.microsoft.device.dualscreen.layouts.FoldableLayout xmlns:android="http://schemas.android.com/apk/res/android" xmlns:app="http://schemas.android.com/apk/res-auto" android:id="@+id/activity_main" android:layout_width="match_parent" android:layout_height="match_parent" app:single_screen_layout_id="@layout/single_screen_layout" app:dual_screen_start_layout_id="@layout/dual_screen_start_layout" app:dual_screen_end_layout_id="@layout/dual_screen_end_layout" />Next, you declare your fragments into the singlescreenlayout.xml, dualscreenstartlayout.xml, and dualscreenendlayout.xml files.
<fragment
    xmlns:android="http://schemas.android.com/apk/res/android"
    android:id="@+id/single_list"
    android:layout_width="match_parent"
    android:layout_height="match_parent"
    android:name="com.microsoft.device.display.samples.contentcontext.MapPointListFragment" />
Link your layout to your activity.
Using Fragments created in an Activity
Finally, we will see how the components work with fragments that are added using getSupportFragmentManager().beginTransaction().
First, you have to add the
FoldableLayoutto the *.xml file of the Activity.<com.microsoft.device.dualscreen.layouts.FoldableLayout xmlns:android="http://schemas.android.com/apk/res/android" android:id="@+id/activity_main" android:layout_width="match_parent" android:layout_height="match_parent" />This creates the containers for the views but there will be nothing inflated into them.
You can have access to the containers of the
FoldableLayoutby using their ids:first_container_idsecond_container_id
Next please visit fragment manager state handler library as fragments need special care when dealing with screen mode transitions.
View Binding
Important
Please use findViewById as shown in the code snippets below. Do not attempt to use Google View Binding.
Because the FoldableLayout content is inflated when WindowManager has available information about the window layout,
you cannot retrieve the child instance and use it.
In order to bind the child view, firstly you need to be sure that the FoldableLayout content is ready to be used.
For this, you should use the following methods:
class MainActivity : AppCompatActivity() {
    private lateinit var binding: ActivityMainBinding

    private val contentChangedListener = object : FoldableLayout.ContentChangedListener {
        override fun contentChanged(screenMode: ScreenMode?) {
            // Here, you can retrieve the child instance
            val child = binding.foldableLayout.findViewById<View>(R.id.child_view)
        }
    }

    override fun onCreate(savedInstanceState: Bundle?) {
        super.onCreate(savedInstanceState)
        binding = ActivityMainBinding.inflate(layoutInflater)
        setContentView(binding.root)
    }

    override fun onResume() {
        super.onResume()
        binding.foldableLayout.addContentChangedListener(contentChangedListener)
    }

    override fun onPause() {
        super.onPause()
        binding.foldableLayout.removeContentChangedListener(contentChangedListener)
    }
}
where:
FoldableLayout.ContentChangedListeneris the callback that will be called after theFoldableLayoutcontent is inflated.FoldableLayout.addContentChangedListenerwill register the givenFoldableLayout.ContentChangedListenercallback.foldableLayout.removeContentChangedListenerwill unregister the givenFoldableLayout.ContentChangedListenercallback.
Important
You must add this code inside the onResume and onPause methods from your Activity or Fragment in order to avoid memory leaks.