Deploy and debug your .NET MAUI app on Windows
You can use your local Windows development computer to deploy and debug a .NET Multi-platform App UI (.NET MAUI) app. This article describes how to configure Windows to debug a .NET MAUI app.
When debugging and deploying a new .NET MAUI project to Windows, the default behavior is to deploy a packaged app. For information about packaged apps, see Windows apps: packaging, deployment, and process.
Configure Windows for packaged app deployment
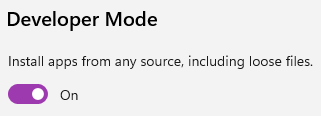
You'll need to enable Developer Mode in Windows to be able to deploy a packaged .NET MAUI Windows app. Both Windows 10 and Windows 11 are supported.

Windows 11
Developer Mode is enabled in Settings app, under Privacy & security > For developers. To enable Developer Mode in Windows 11:
- Open the Start Menu.
- Type Developer settings in the search box and select it.
- Turn on Developer Mode.
- If you receive a warning message about Developer Mode, read it, and select Yes if you understand the warning.
Windows 10
Developer Mode is enabled in Settings app, under Update & Security > For developers. To enable Developer Mode in Windows 10:
- Open the Start Menu.
- Search for Developer settings, select it.
- Turn on Developer Mode.
- If you receive a warning message about Developer Mode, read it, and select Yes if you understand the warning.
Target Windows
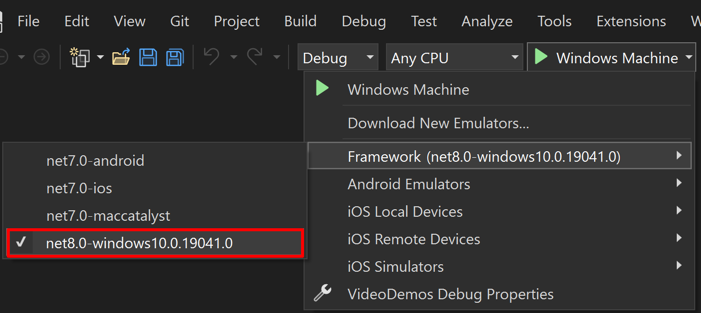
In Visual Studio, set the Debug Target to Framework (...) > net8.0-windows. There is a version number in the item entry, which may or may not match the following screenshot:

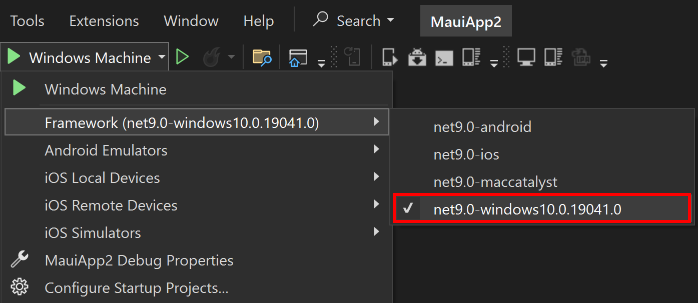
In Visual Studio, set the Debug Target to Framework (...) > net9.0-windows. There is a version number in the item entry, which may or may not match the following screenshot:

Convert a packaged .NET MAUI Windows app to unpackaged
To convert an existing .NET MAUI Windows packaged app to an unpackaged app in Visual Studio:
In Solution Explorer, right-click on your .NET MAUI app project and select Properties. Then, navigate to the Application > Windows Targets tab and ensure that Create a Windows MSIX package is unchecked:

Visual Studio will modify your app's project file (*.csproj) to set the $(WindowsPackageType) build property to None:
<PropertyGroup>
    <WindowsPackageType>None</WindowsPackageType>
</PropertyGroup>
In addition, your app's Properties/launchSettings.json file will have the commandName value changed from MsixPackage to Project:
{
  "profiles": {
    "Windows Machine": {
      "commandName": "Project",
      "nativeDebugging": false
    }
  }
}
Important
If your app defines multiple launch setting profiles you'll have to manually update the commandName value from MsixPackage to Project for each profile.
Convert an unpackaged .NET MAUI Windows app to packaged
If your app needs to use APIs that are only available with Windows packaged apps and you plan on distributing your app through the Microsoft Store, you'll need to convert your unpackaged app to a packaged app. This can be achieved in Visual Studio:
In Solution Explorer, right-click on your .NET MAUI app project and select Properties. Then, navigate to the Application > Windows Targets tab and ensure that Create a Windows MSIX package is checked:

Visual Studio will modify your app's project file (.csproj) to remove the <WindowsPackageType>None</WindowsPackageType> line. In addition, your app's Properties/launchSettings.json file will have the commandName value changed from Project to MsixPackage:
{
  "profiles": {
    "Windows Machine": {
      "commandName": "MsixPackage",
      "nativeDebugging": false
    }
  }
}
Important
If your app defines multiple launch setting profiles you'll have to manually update the commandName value from Project to MsixPackage for each profile.
When deploying a packaged .NET MAUI Windows app, you'll need to enable Developer Mode in Windows. For more information, see Configure Windows for packaged app deployment.
When debugging and deploying a new .NET MAUI project to Windows, the default behavior is to deploy an unpackaged app. For information about unpackaged apps, see Windows apps: packaging, deployment, and process.
Target Windows
In Visual Studio, set the Debug Target to Framework (...) > net8.0-windows. There is a version number in the item entry, which may or may not match the following screenshot:

In Visual Studio, set the Debug Target to Framework (...) > net9.0-windows. There is a version number in the item entry, which may or may not match the following screenshot:

Convert an unpackaged .NET MAUI Windows app to packaged
If your app needs to use APIs that are only available with Windows packaged apps and you plan on distributing your app through the Microsoft Store, you'll need to convert your unpackaged app to a packaged app. This can be achieved in Visual Studio:
In Solution Explorer, right-click on your .NET MAUI app project and select Properties. Then, navigate to the Application > Windows Targets tab and ensure that Create a Windows MSIX package is checked:

Visual Studio will modify your app's project file (.csproj) to remove the <WindowsPackageType>None</WindowsPackageType> line. In addition, your app's Properties/launchSettings.json file will have the commandName value changed from Project to MsixPackage:
{
  "profiles": {
    "Windows Machine": {
      "commandName": "MsixPackage",
      "nativeDebugging": false
    }
  }
}
Important
If your app defines multiple launch setting profiles you'll have to manually update the commandName value from Project to MsixPackage for each profile.
When deploying a packaged .NET MAUI Windows app, you'll need to enable Developer Mode in Windows. For more information, see Configure Windows for packaged app deployment.
Convert a packaged .NET MAUI Windows app to unpackaged
To convert an existing .NET MAUI Windows packaged app to an unpackaged app in Visual Studio:
In Solution Explorer, right-click on your .NET MAUI app project and select Properties. Then, navigate to the Application > Windows Targets tab and ensure that Create a Windows MSIX package is unchecked:

Visual Studio will modify your app's project file (*.csproj) to set the $(WindowsPackageType) build property to None:
<PropertyGroup>
    <WindowsPackageType>None</WindowsPackageType>
</PropertyGroup>
In addition, your app's Properties/launchSettings.json file will have the commandName value changed from MsixPackage to Project:
{
  "profiles": {
    "Windows Machine": {
      "commandName": "Project",
      "nativeDebugging": false
    }
  }
}
Important
If your app defines multiple launch setting profiles you'll have to manually update the commandName value from MsixPackage to Project for each profile.
Configure Windows for packaged app deployment
You'll need to enable Developer Mode in Windows to be able to deploy a packaged .NET MAUI Windows app. Both Windows 10 and Windows 11 are supported.

Windows 11
Developer Mode is enabled in Settings app, under Privacy & security > For developers. To enable Developer Mode in Windows 11:
- Open the Start Menu.
- Type Developer settings in the search box and select it.
- Turn on Developer Mode.
- If you receive a warning message about Developer Mode, read it, and select Yes if you understand the warning.
Windows 10
Developer Mode is enabled in Settings app, under Update & Security > For developers. To enable Developer Mode in Windows 10:
- Open the Start Menu.
- Search for Developer settings, select it.
- Turn on Developer Mode.
- If you receive a warning message about Developer Mode, read it, and select Yes if you understand the warning.
