Create a long-running workflow service
This article describes how to create a long-running workflow service, which can run for long periods of time. At some point the workflow might go idle waiting for additional information. When this occurs the workflow is persisted to a SQL database and is removed from memory. When the additional information becomes available, the workflow instance is loaded back into memory and continues executing.
In this scenario, you're implementing a simplified ordering system. The client sends an initial message to the workflow service to start the order. It returns an order ID to the client. At this point the workflow service is waiting for another message from the client and goes into the idle state and is persisted to a SQL Server database. When the client sends the next message to order an item, the workflow service is loaded back into memory and finishes processing the order.
In the code sample, it returns a string stating the item has been added to the order. The code sample is not meant to be a real world application of the technology, but rather a simple sample that illustrates long running workflow services.
Prerequisites
You must have the following software installed to use this walkthrough:
- Microsoft SQL Server 2008
- Visual Studio 2012
- Microsoft .NET Framework 4.6.1
You must also be familiar with WCF and Visual Studio 2012 and know how to create projects/solutions.
Set up the SQL Database
In order for workflow service instances to be persisted you must have Microsoft SQL Server installed and you must configure a database to store the persisted workflow instances. Run Microsoft SQL Management Studio by clicking the Start button, selecting All Programs, Microsoft SQL Server 2008, and Microsoft SQL Management Studio.
Click the Connect button to log on to the SQL Server instance
Right click Databases in the tree view and select New Database to create a new database called
SQLPersistenceStore.Run the SqlWorkflowInstanceStoreSchema.sql script file located in the C:\Windows\Microsoft.NET\Framework\v4.0\SQL\en directory on the SQLPersistenceStore database to set up the needed database schemas.
Run the SqlWorkflowInstanceStoreLogic.sql script file located in the C:\Windows\Microsoft.NET\Framework\v4.0\SQL\en directory on the SQLPersistenceStore database to set up the needed database logic.
Create the Web Hosted Workflow Service
Create an empty Visual Studio 2012 solution, name it
OrderProcessing.Add a new WCF Workflow Service Application project called
OrderServiceto the solution.In the project properties dialog, select the Web tab.
Under Start Action select Specific Page and specify
Service1.xamlx.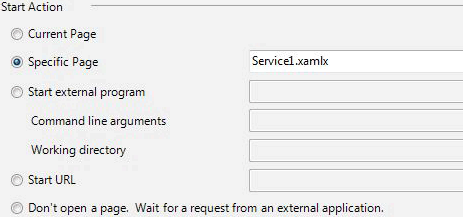
Under Servers select Use Local IIS Web server.

Warning
You must run Visual Studio 2012 in administrator mode to make this setting.
These two steps configure the workflow service project to be hosted by IIS.
Open
Service1.xamlxif it is not open already and delete the existing ReceiveRequest and SendResponse activities.Select the Sequential Service activity and click the Variables link and add the variables shown in the following illustration. Doing this adds some variables that will be used later on in the workflow service.
Note
If CorrelationHandle is not in the Variable Type drop-down, select Browse for types from the drop-down. Type CorrelationHandle in the Type name box, select CorrelationHandle from the listbox and click OK.

Drag and drop a ReceiveAndSendReply activity template into the Sequential Service activity. This set of activities will receive a message from a client and send a reply back.
Select the Receive activity and set the properties highlighted in the following illustration.
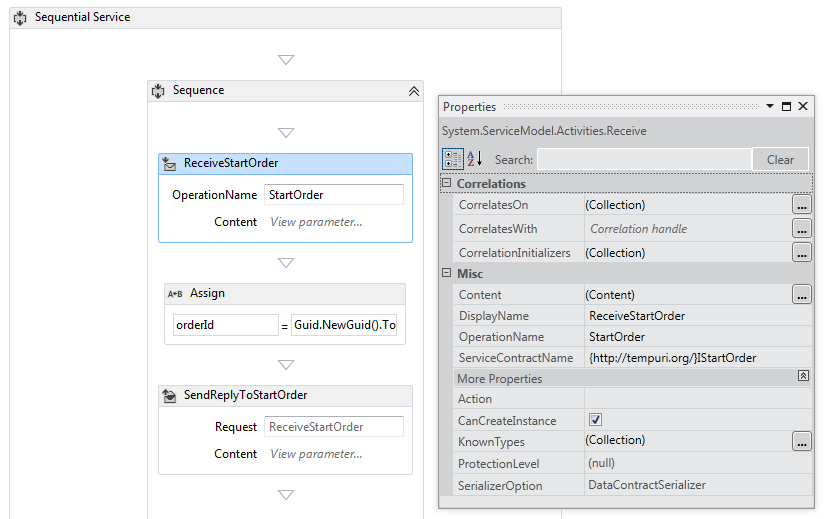
The DisplayName property sets the name displayed for the Receive activity in the designer. The ServiceContractName and OperationName properties specify the name of the service contract and operation that are implemented by the Receive activity. For more information about how contracts are used in Workflow services see Using Contracts in Workflow.
Click the Define link in the ReceiveStartOrder activity and set the properties shown in the following illustration. Notice that the Parameters radio button is selected, a parameter named
p_customerNameis bound to thecustomerNamevariable. This configures the Receive activity to receive some data and bind that data to local variables.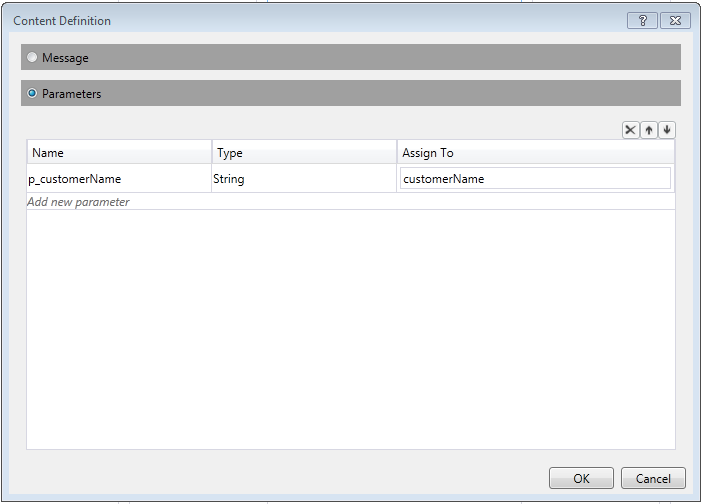
Select The SendReplyToReceive activity and set the highlighted property shown in the following illustration.
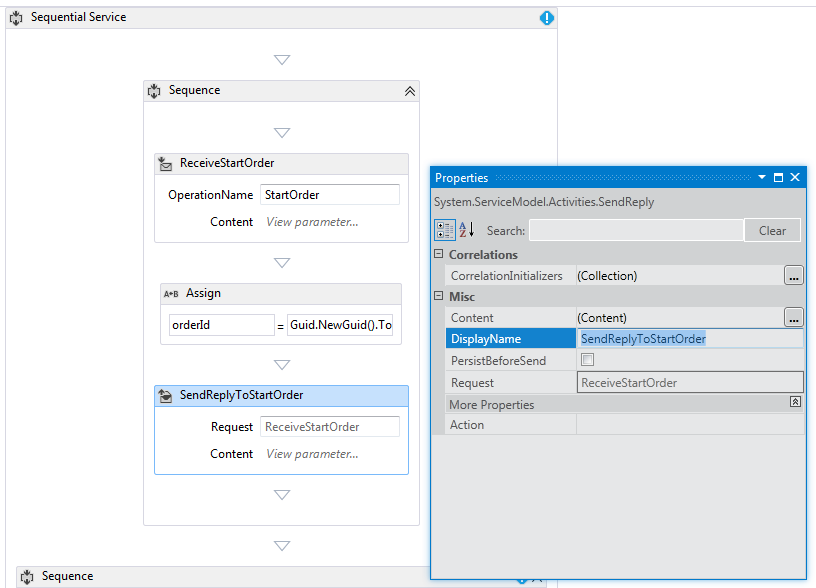
Click the Define link in the SendReplyToStartOrder activity and set the properties shown in the following illustration. Notice that the Parameters radio button is selected; a parameter named
p_orderIdis bound to theorderIdvariable. This setting specifies that the SendReplyToStartOrder activity will return a value of type string to the caller.
Drag and drop an Assign activity in between the Receive and SendReply activities and set the properties as shown in the following illustration:
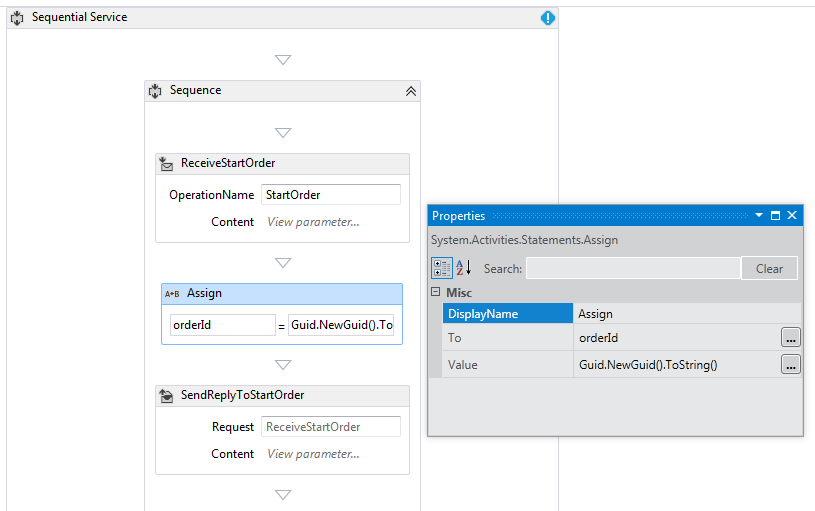
This creates a new order ID and places the value in the orderId variable.
Select the ReplyToStartOrder activity. In the properties window click the ellipsis button for CorrelationInitializers. Select the Add initializer link, enter
orderIdHandlein the Initializer text box, select Query correlation initializer for the Correlation type, and select p_orderId under the XPATH Queries dropdown box. These settings are shown in the following illustration. Click OK. This initializes a correlation between the client and this instance of the workflow service. When a message containing this order ID is received it is routed to this instance of the workflow service.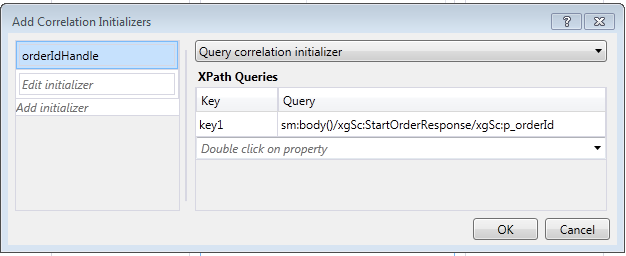
Drag and drop another ReceiveAndSendReply activity to the end of the workflow (outside the Sequence containing the first Receive and SendReply activities). This will receive the second message sent by the client and respond to it.
Select the Sequence that contains the newly added Receive and SendReply activities and click the Variables button. Add the variable highlighted in the following illustration:
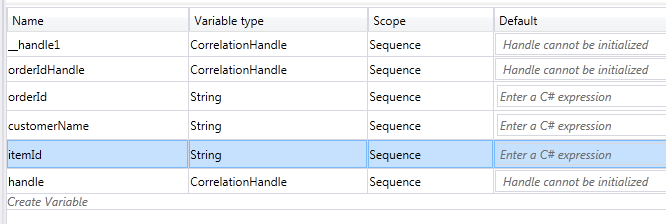
Also add
orderResultas String in theSequencescope.Select the Receive activity and set the properties shown in the following illustration:
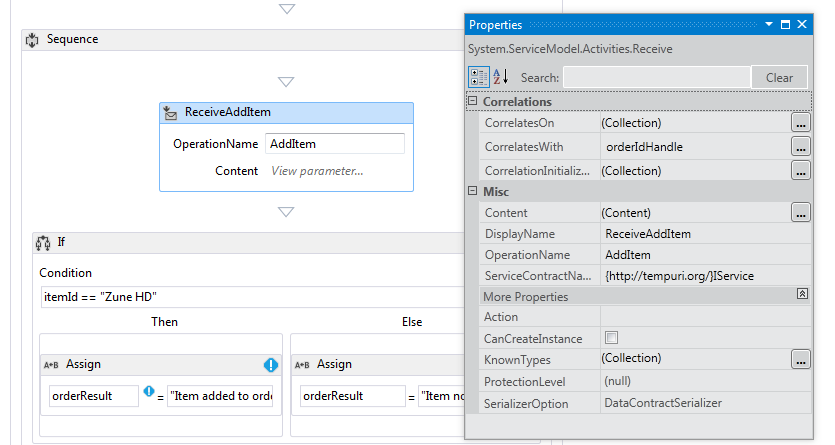
Note
Don't forget to change ServiceContractName field with
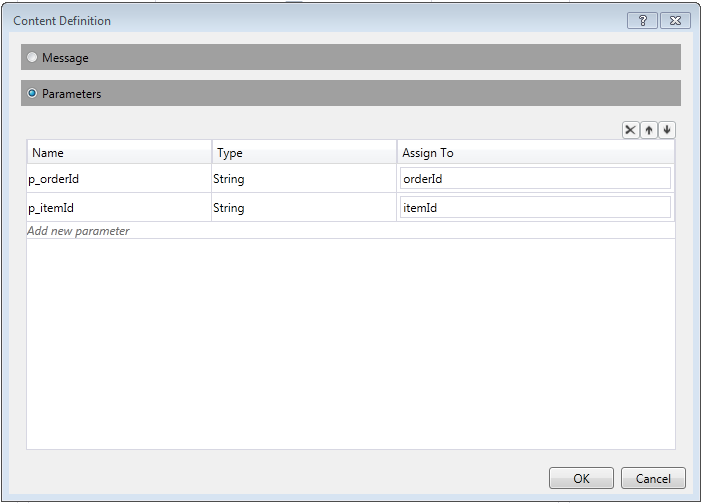
../IAddItem.Click the Define link in the ReceiveAddItem activity and add the parameters shown in the following illustration:This configures the receive activity to accept two parameters, the order ID and the ID of the item being ordered.
Click the CorrelateOn ellipsis button and enter
orderIdHandle. Under XPath Queries, click the drop down arrow and selectp_orderId. This configures the correlation on the second receive activity. For more information about correlation see Correlation.
Drag and drop an If activity immediately after the ReceiveAddItem activity. This activity acts just like an if statement.
Set the Condition property to
itemId=="Zune HD" (itemId="Zune HD" for Visual Basic)Drag and drop an Assign activity in to the Then section and another into the Else section set the properties of the Assign activities as shown in the following illustration.
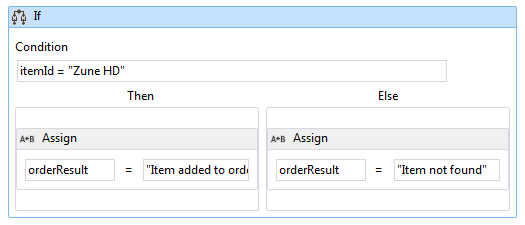
If the condition is
truethe Then section will be executed. If the condition isfalsethe Else section is executed.Select the SendReplyToReceive activity and set the DisplayName property shown in the following illustration.
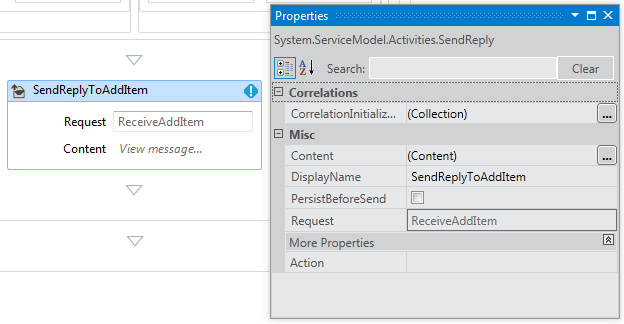
Click the Define link in the SetReplyToAddItem activity and configure it as shown in the following illustration. This configures the SendReplyToAddItem activity to return the value in the
orderResultvariable.
Open the web.config file and add the following elements in the <behavior> section to enable workflow persistence. (Make sure to complete the connection string.)
<sqlWorkflowInstanceStore connectionString="...;Asynchronous Processing=True" instanceEncodingOption="None" instanceCompletionAction="DeleteAll" instanceLockedExceptionAction="BasicRetry" hostLockRenewalPeriod="00:00:30" runnableInstancesDetectionPeriod="00:00:02" />
          <workflowIdle timeToUnload="0"/>
Build the solution.
Create a Client Application to Call the Workflow Service
Add a new Console application project called
OrderClientto the solution.Add references to the following assemblies to the
OrderClientprojectSystem.ServiceModel.dll
System.ServiceModel.Activities.dll
Add a service reference to the workflow service and specify
OrderServiceas the namespace.In the
Main()method of the client project add the following code:static void Main(string[] args) { // Send initial message to start the workflow service Console.WriteLine("Sending start message"); StartOrderClient startProxy = new StartOrderClient(); string orderId = startProxy.StartOrder("Kim Abercrombie"); // The workflow service is now waiting for the second message to be sent Console.WriteLine("Workflow service is idle..."); Console.WriteLine("Press [ENTER] to send an add item message to reactivate the workflow service..."); Console.ReadLine(); // Send the second message Console.WriteLine("Sending add item message"); AddItemClient addProxy = new AddItemClient(); AddItem item = new AddItem(); item.p_itemId = "Zune HD"; item.p_orderId = orderId; string orderResult = addProxy.AddItem(item); Console.WriteLine("Service returned: " + orderResult); }Build the solution and run the
OrderClientapplication. The client will display the following text:Sending start messageWorkflow service is idle...Press [ENTER] to send an add item message to reactivate the workflow service...To verify that the workflow service has been persisted, start the SQL Server Management Studio by going to the Start menu, Selecting All Programs, Microsoft SQL Server 2008, SQL Server Management Studio.
- In the left hand pane expand, Databases, SQLPersistenceStore, Views and right click System.Activities.DurableInstancing.Instances and select Select Top 1000 Rows. In the Results pane verify you see at least one instance listed. There may be other instances from prior runs if an exception occurred while running. You can delete existing rows by right clicking System.Activities.DurableInstancing.Instances and selecting Edit Top 200 rows, pressing the Execute button, selecting all rows in the results pane and selecting delete. To verify the instance displayed in the database is the instance your application created, verify the instances view is empty prior to running the client. Once the client is running re-run the query (Select Top 1000 Rows) and verify a new instance has been added.
Press enter to send the add item message to the workflow service. The client will display the following text:
Sending add item messageService returned: Item added to orderPress any key to continue . . .