Create a simple custom control (Windows Forms .NET)
This article teaches how to create custom Windows Forms control. The simple control developed in this article prints the control's Text to the left, center, or right of the control. The alignment of the text can be changed. This control doesn't raise or handle events.
In this article you learn how to:
- Add a property and field to handle the horizontal alignment setting of the text.
- Use
OnTextChangedto invalidate the control. - Provide code in the
OnPaintmethod to draw text on the control's surface.
Add a custom control
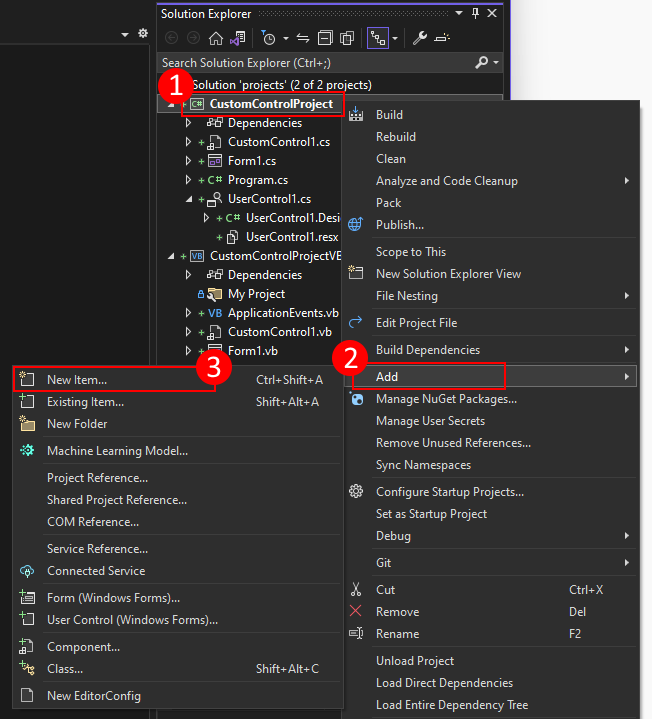
The first step is to add a custom control to your project.
In Visual Studio, find the Solution Explorer window. Right-click on the project and choose Add > New Item.
Search for Custom Control and select it.
Set the file name to FirstControl and select Add.
If the Design mode of the control is visible, switch to the code view. Press F7 or select the switch to code view link.
Tip
You can also right-click the file in the Solution Explorer window and select View Code.
You should now be looking at the source code for the custom control, which looks similar to the following snippet:
public partial class FirstControl : Control
{
    public FirstControl()
    {
        InitializeComponent();
    }

    protected override void OnPaint(PaintEventArgs pe)
    {
        base.OnPaint(pe);
    }
}
Public Class FirstControl

    Protected Overrides Sub OnPaint(ByVal e As System.Windows.Forms.PaintEventArgs)
        MyBase.OnPaint(e)

        'Add your custom paint code here
    End Sub

End Class
Add a property
Create a new property on the control named TextAlignment. This property will adjust where the text is painted on the control. With the FirstControl class, perform the following steps:
Add a field named
_textAlignmentof the typeHorizontalAlignment.private HorizontalAlignment _textAlignment = HorizontalAlignment.Left;Private _textAlignment As HorizontalAlignment = HorizontalAlignment.LeftWrap the field in a property named
TextAlignment. When setting the property, call theInvalidatemethod to force the control to repaint itself.public HorizontalAlignment TextAlignment { get => _textAlignment; set { _textAlignment = value; Invalidate(); } }Public Property TextAlignment As HorizontalAlignment Get Return _textAlignment End Get Set(value As HorizontalAlignment) _textAlignment = value Invalidate() End Set End PropertyAdd the following attributes to the property to integrate it with the Properties window in Visual Studio.
Category—The category applied to the property.Description—The description of the property.DefaultValue—A default value for the property.The default value enables the property to be reset by the designer. It also helps determine when the property should be serialized to the code-behind, as default values aren't serialized.
[System.ComponentModel.Category("Alignment"), System.ComponentModel.Description("Specifies the alignment of text."), System.ComponentModel.DefaultValue(HorizontalAlignment.Left)] public HorizontalAlignment TextAlignment<System.ComponentModel.Category("Alignment"), System.ComponentModel.Description("Specifies the alignment of text."), System.ComponentModel.DefaultValue(HorizontalAlignment.Left)> Public Property TextAlignment As HorizontalAlignment
Handle text changed
The TextAlignment property calls Invalidate so that the control repaints itself. This ensures that the correct alignment is instantly used with rendering the Text of the control. However, if the Text property changes, nothing is updated because Text doesn't call Invalidate. The property does call the OnTextChanged method, though, which you can override to call Invalidate and force the control to repaint itself.
With the FirstControl class, perform the following steps:
- Override the
OnTextChangedmethod. - Call
base.OnTextChangedso that theTextChangedevent is raised, as expected by consumers of the control. - Call the
Invalidatemethod to force repainting.
Your code should look like the following snippet:
protected override void OnTextChanged(EventArgs e)
{
base.OnTextChanged(e);
Invalidate();
}
Protected Overrides Sub OnTextChanged(e As EventArgs)
MyBase.OnTextChanged(e)
Invalidate()
End Sub
Paint the control
The last part of the custom control is painting. With the FirstControl class, perform the following steps:
Locate the
OnPaintmethod generated by the template. If it's missing, override it from the base class.Create a new
StringFormatvariable namedstyle.StringFormat style = new();Dim style As New StringFormatThe System.Drawing.StringFormat type encapsulates text layout information and provides access to alignment.
Based on
TextAlignment, set thestyle.Alignmentproperty to the appropriate value.style.Alignment = TextAlignment switch { // Map the HorizontalAlignment enum to the StringAlignment enum HorizontalAlignment.Left => StringAlignment.Near, HorizontalAlignment.Right => StringAlignment.Far, HorizontalAlignment.Center => StringAlignment.Center, // Default to Near alignment _ => StringAlignment.Near };'Map the HorizontalAlignment enum to the StringAlignment enum Select Case TextAlignment Case HorizontalAlignment.Left style.Alignment = StringAlignment.Near Case HorizontalAlignment.Right style.Alignment = StringAlignment.Far Case HorizontalAlignment.Center style.Alignment = StringAlignment.Center End SelectDraw the
Textproperty withGraphics.DrawString.// Create the brush and automatically dispose it. using SolidBrush foreBrush = new(ForeColor); // Call the DrawString method to write text. // Text, Font, and ClientRectangle are inherited properties. pe.Graphics.DrawString(Text, Font, foreBrush, ClientRectangle, style);'Create the brush and automatically dispose it. Using foreBrush As New SolidBrush(ForeColor) 'Call the DrawString method to write text. 'Text, Font, and ClientRectangle are inherited properties. e.Graphics.DrawString(Text, Font, foreBrush, ClientRectangle, style) End UsingImportant
The
Graphics.DrawStringmethod uses aBrushfor the color of the text.Brushesmust be disposed of after use.The Graphics.DrawString method uses text, a font, color, and formatting options to draw a string.
Call
base.OnPaintto ensure that thePaintevent is raised.base.OnPaint(pe);MyBase.OnPaint(e)Save the code file and compile the project. After the project compiles, Visual Studio adds the custom control to the Toolbox window when you open the Visual Designer.
Your code should look like the following snippet:
public partial class FirstControl : Control
{
private HorizontalAlignment _textAlignment = HorizontalAlignment.Left;
[System.ComponentModel.Category("Alignment"),
System.ComponentModel.Description("Specifies the alignment of text."),
System.ComponentModel.DefaultValue(HorizontalAlignment.Left)]
public HorizontalAlignment TextAlignment
{
    get => _textAlignment;
    set
    {
        _textAlignment = value;
        Invalidate();
    }
}
public FirstControl()
{
InitializeComponent();
}
protected override void OnTextChanged(EventArgs e)
{
base.OnTextChanged(e);
Invalidate();
}
protected override void OnPaint(PaintEventArgs pe)
{
StringFormat style = new();
style.Alignment = TextAlignment switch
{
// Map the HorizontalAlignment enum to the StringAlignment enum
HorizontalAlignment.Left => StringAlignment.Near,
HorizontalAlignment.Right => StringAlignment.Far,
HorizontalAlignment.Center => StringAlignment.Center,
// Default to Near alignment
_ => StringAlignment.Near
};
// Create the brush and automatically dispose it.
using SolidBrush foreBrush = new(ForeColor);
// Call the DrawString method to write text.
// Text, Font, and ClientRectangle are inherited properties.
pe.Graphics.DrawString(Text, Font, foreBrush, ClientRectangle, style);
base.OnPaint(pe);
}
}
Public Class FirstControl
Private _textAlignment As HorizontalAlignment = HorizontalAlignment.Left
<System.ComponentModel.Category("Alignment"),
System.ComponentModel.Description("Specifies the alignment of text."),
System.ComponentModel.DefaultValue(HorizontalAlignment.Left)>
Public Property TextAlignment As HorizontalAlignment
    Get
        Return _textAlignment
    End Get

    Set(value As HorizontalAlignment)
        _textAlignment = value
        Invalidate()
    End Set
End Property
Protected Overrides Sub OnTextChanged(e As EventArgs)
    MyBase.OnTextChanged(e)
    Invalidate()
End Sub
Protected Overrides Sub OnPaint(ByVal e As System.Windows.Forms.PaintEventArgs)
Dim style As New StringFormat
'Map the HorizontalAlignment enum to the StringAlignment enum
Select Case TextAlignment
    Case HorizontalAlignment.Left
        style.Alignment = StringAlignment.Near
    Case HorizontalAlignment.Right
        style.Alignment = StringAlignment.Far
    Case HorizontalAlignment.Center
        style.Alignment = StringAlignment.Center
End Select
'Create the brush and automatically dispose it.
Using foreBrush As New SolidBrush(ForeColor)
    'Call the DrawString method to write text.
    'Text, Font, and ClientRectangle are inherited properties.
    e.Graphics.DrawString(Text, Font, foreBrush, ClientRectangle, style)
End Using
MyBase.OnPaint(e)
End Sub
End Class
Related content
.NET Desktop feedback