Create and consume custom frameworks for iOS-like platforms
Starting from .NET 9, Native AOT supports publishing .NET class libraries that don't depend on iOS workloads for iOS-like platforms. This support enables you to create self-contained native libraries that can be consumed from iOS, Mac Catalyst, and tvOS applications.
Important
This approach does not come with the built-in Objective-C interoperability support and additional code adaptations might be required (such as marshalling reference type arguments) to achieve interoperability.
Build shared libraries
This section describes steps to create a simple .NET Class Library project with NativeAOT support and produce a native library for iOS-like platforms from it.
Download .NET 9 SDK
Create a class library project
dotnet new classlib -n "MyNativeAOTLibrary"Add the following properties into the project file
MyNativeAOTLibrary.csproj<PublishAot>true</PublishAot> <PublishAotUsingRuntimePack>true</PublishAotUsingRuntimePack>Edit the
MyNativeAOTLibrary/Class1.cssource code to expose a managed method so that it can be referenced from the native code asaotsample_add. For example:using System.Runtime.InteropServices; namespace NaotLib; public class Class1 { [UnmanagedCallersOnly(EntryPoint = "aotsample_add")] public static int Add(int a, int b) { return a + b; } }Publish the class library and target the desired iOS-like platform by specifying the appropriate runtime identifier (referenced below as
<rid>):dotnet publish -r <rid> MyNativeAOTLibrary/MyNativeAOTLibrary.csproj
Successful completion of the previous step produces a pair of files: a shared library MyNativeAOTLibrary.dylib and its debug symbols MyNativeAOTLibrary.dylib.dSYM, which are located at: MyNativeAOTLibrary/bin/Release/net9.0/<rid>/publish/.
Note
For creating universal frameworks, it is required to publish the class library for both Arm64 and x64 architectures for a given platform.
This means that you need to repeat step 5 with a different runtime identifier.
For example, you'd publish the class library with both maccatalyst-arm64 and maccatalyst-x64 runtime identifiers as a prerequisite for Packaging the shared library into a custom MacCatalyst universal framework.
Create and consume a custom framework
Apple imposes a requirement that shared libraries (.dylibs) need to be packaged into frameworks in order to be consumed from applications.
This section describes all required steps to achieve this and a simple scenario of a iOS/MacCatalyst application consuming a shared NativeAOT library/framework.
Note
The described steps are just for demonstration purposes. The actual requirements might differ depending on the exact use case.
Package the shared library into custom iOS framework
Create a framework folder:
mkdir MyNativeAOTLibrary.frameworkAdjust load commands:
LC_RPATHload commandinstall_name_tool -rpath @executable_path @executable_path/Frameworks MyNativeAOTLibrary/bin/Release/net9.0/ios-arm64/publish/MyNativeAOTLibrary.dylibLC_ID_DYLIBload commandinstall_name_tool -id @rpath/MyNativeAOTLibrary.framework/MyNativeAOTLibrary MyNativeAOTLibrary/bin/Release/net9.0/ios-arm64/publish/MyNativeAOTLibrary.dylib
Manually package the binary into a universal file:
lipo -create MyNativeAOTLibrary/bin/Release/net9.0/ios-arm64/publish/MyNativeAOTLibrary.dylib -output MyNativeAOTLibrary.framework/MyNativeAOTLibraryAdd a property list file to your framework:
- Create a
Info.plistfile
touch MyNativeAOTLibrary.framework/Info.plist- Add the contents from the appendix into the created
Info.plistfile
- Create a
After the final step, the framework structure should look like this:
MyNativeAOTLibrary.framework
    |_ MyNativeAOTLibrary
    |_ Info.plist
Package the shared library into a custom MacCatalyst universal framework
Universal frameworks require binaries for both Arm64 and x64 architecture.
For this reason, you must publish native libraries targeting both of the following RIDs beforehand: maccatalyst-arm64 and maccatalyst-x64.
Create a framework folder structure:
mkdir -p MyNativeAOTLibrary.framework/Versions/A/Resources
ln -sfh Versions/Current/MyNativeAOTLibrary MyNativeAOTLibrary.framework/MyNativeAOTLibrary
ln -sfh Versions/Current/Resources MyNativeAOTLibrary.framework/Resources
ln -sfh A MyNativeAOTLibrary.framework/Versions/Current
Adjust load commands:
LC_RPATHload commandinstall_name_tool -rpath @executable_path @executable_path/../Frameworks MyNativeAOTLibrary/bin/Release/net9.0/maccatalyst-arm64/publish/MyNativeAOTLibrary.dylib install_name_tool -rpath @executable_path @executable_path/../Frameworks MyNativeAOTLibrary/bin/Release/net9.0/maccatalyst-x64/publish/MyNativeAOTLibrary.dylibLC_ID_DYLIBload commandinstall_name_tool -id @rpath/MyNativeAOTLibrary.framework/Versions/A/MyNativeAOTLibrary MyNativeAOTLibrary/bin/Release/net9.0/maccatalyst-arm64/publish/MyNativeAOTLibrary.dylib install_name_tool -id @rpath/MyNativeAOTLibrary.framework/Versions/A/MyNativeAOTLibrary MyNativeAOTLibrary/bin/Release/net9.0/maccatalyst-x64/publish/MyNativeAOTLibrary.dylib
Manually package the binary into a universal file:
lipo -create MyNativeAOTLibrary/bin/Release/net9.0/maccatalyst-arm64/publish/MyNativeAOTLibrary.dylib MyNativeAOTLibrary/bin/Release/net9.0/maccatalyst-x64/publish/MyNativeAOTLibrary.dylib -output MyNativeAOTLibrary.framework/Versions/A/MyNativeAOTLibraryAdd a property list file to your framework:
- Create a
Info.plistfile
touch MyNativeAOTLibrary.framework/Versions/A/Resources/Info.plist- Add the contents from the appendix into the created
Info.plistfile
- Create a
After the final step, the framework structure should look like this:
MyNativeAOTLibrary.framework
    |_ MyNativeAOTLibrary -> Versions/Current/MyNativeAOTLibrary
    |_ Resources -> Versions/Current/Resources
    |_ Versions
        |_ A
        |   |_ Resources
        |   |   |_ Info.plist
        |   |_ MyNativeAOTLibrary
        |_ Current -> A
Consume custom frameworks
Open
Xcode(in this exampleXcode 16.0is used)Create a new
AppprojectChoose the name for your app (for example,
MyiOSApp) and choose Objective-C as the source languageAdd a reference to the
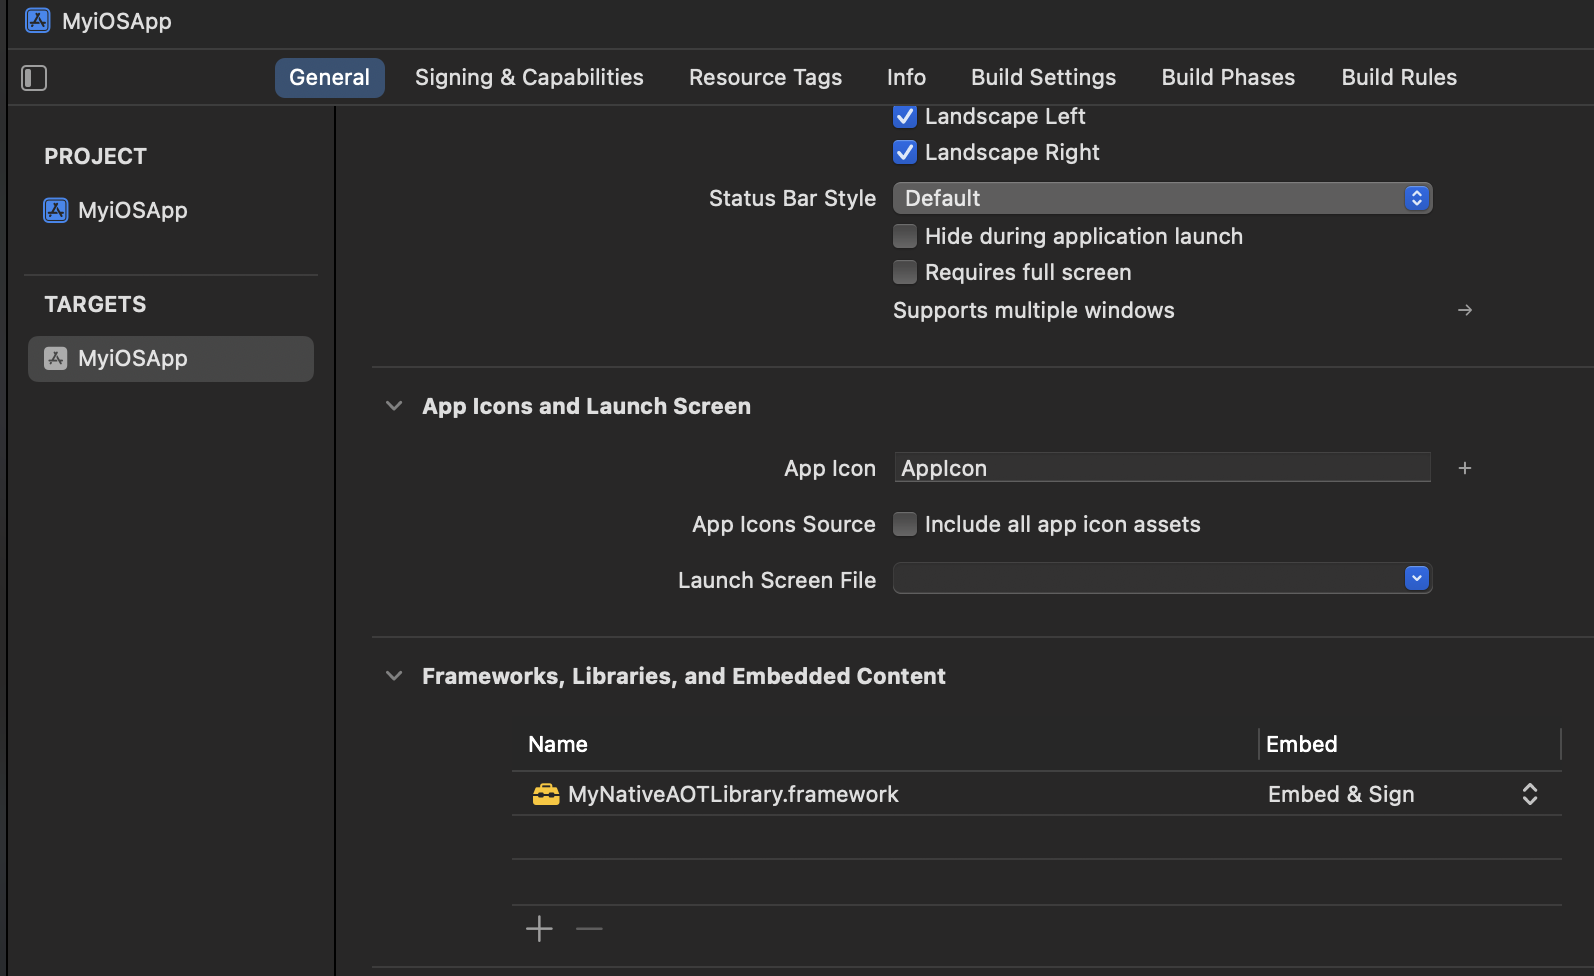
MyNativeAOTLibraryframework- In the
MyiOSApptargets General tab, under Frameworks, Libraries and Embedded Content, select + to addMyNativeAOTLibraryas the referenced framework - In the dialog, choose Add Other -> Add Files and then browse to the location of
MyNativeAOTLibrary.frameworkand select it - Once selected, set
Embed and Signoption forMyNativeAOTLibraryframework

- In the
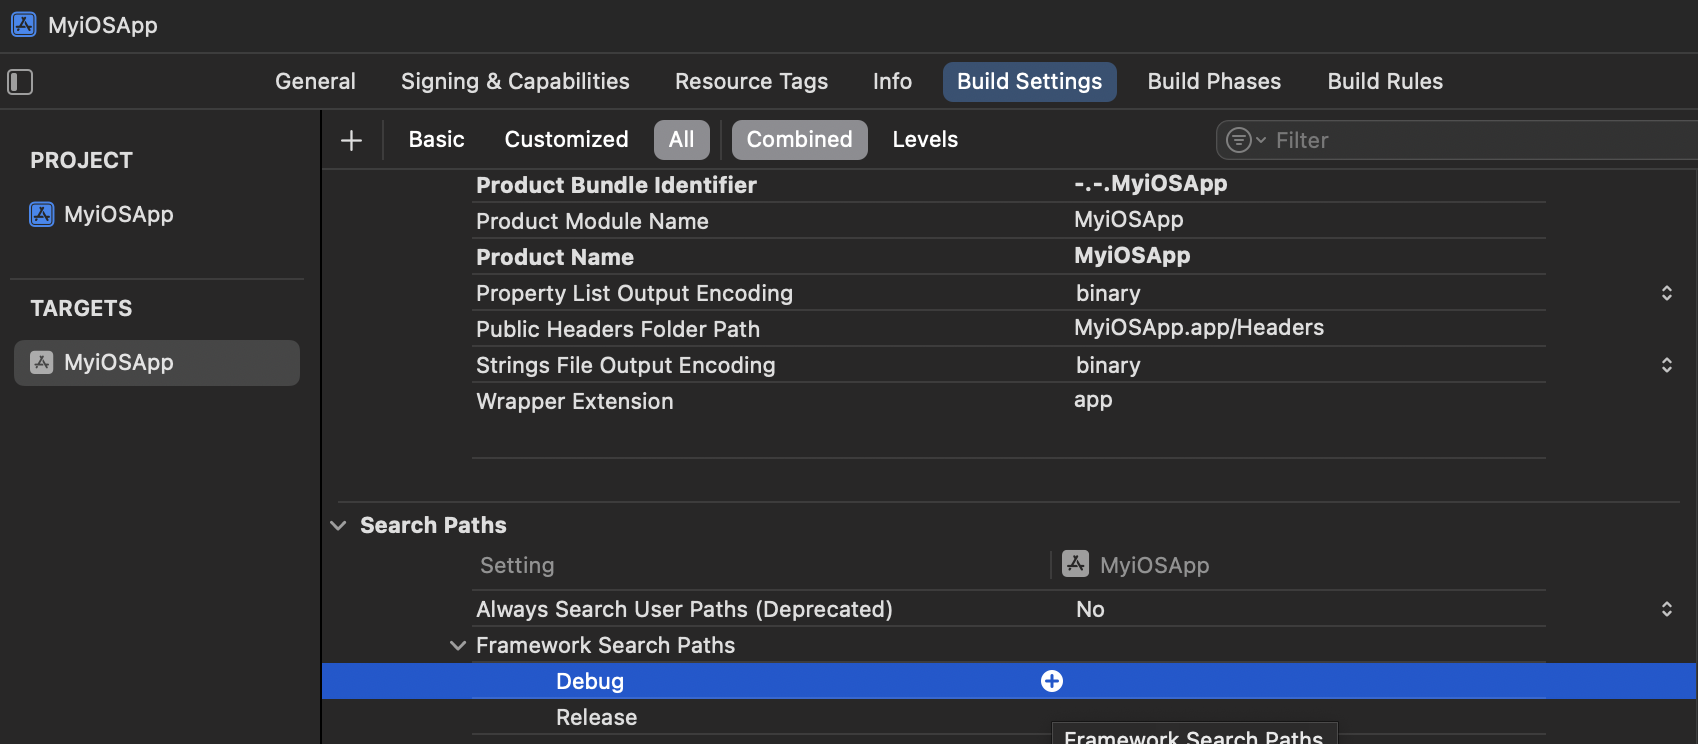
Add
MyNativeAOTLibrary.frameworklocation to the list of Framework Search Paths in the Build Settings tab
Edit
main.mby calling the exposed managed methodaotsample_addand printing the resultextern int aotsample_add(int a, int b); int main(int argc, char * argv[]) { ... NSLog(@"2 + 5 = %d", aotsample_add(2, 5)); ... }Select your physical iOS device and build/run the app
Inspect the logs after the app has successfully launched. The app should print out:
2 + 5 = 7
Note
For MacCatalyst, use the same steps except for step 7, where the Run Destination needs to be set as: Mac (Mac Catalyst).
Build static libraries with NativeAOT for iOS-like platforms
As described in building native libraries overview, it's better to build shared libraries over static ones due to several limitations.
However, if desired, you can build a static library by following the steps for building a shared one and including an additional property in the project file:
<NativeLib>Static</NativeLib>
After the project has been published, the static library MyNativeAOTLibrary.a can be found at: MyNativeAOTLibrary/bin/Release/net9.0/<rid>/publish.
This article doesn't cover how to consume the static library and configure the consumer project.
Appendix Info.plist contents
<?xml version="1.0" encoding="UTF-8"?>
<!DOCTYPE plist PUBLIC "-//Apple//DTD PLIST 1.0//EN" "http://www.apple.com/DTDs/PropertyList-1.0.dtd">
<plist version="1.0">
<dict>
    <key>CFBundleName</key>
    <string>MyNativeAOTLibrary</string>
    <key>CFBundleIdentifier</key>
    <string>com.companyname.MyNativeAOTLibrary</string>
    <key>CFBundleVersion</key>
    <string>1.0</string>
    <key>CFBundleExecutable</key>
    <string>MyNativeAOTLibrary</string>
    <key>CFBundlePackageType</key>
    <string>FMWK</string>
</dict>
</plist>
