Authenticate .NET apps to Azure services during local development using service principals
Developers need to debug and test cloud apps on their local workstation. When an app runs on a developer's workstation during local development, it must still authenticate to any Azure services used by the app. This article covers how to set up dedicated application service principal objects to be used during local development.
Dedicated application service principals for local development allow you to follow the principle of least privilege during app development. Since permissions are scoped to exactly what's needed for the app during development, app code is prevented from accidentally accessing an Azure resource intended for use by a different app. This also prevents bugs from occurring when the app is moved to production because the app was over-privileged in the dev environment.
An application service principal is set up for the app when the app is registered in Azure. When registering an app for local development, it's recommended to:
- Create a separate app registration for each developer working on the app. This will create separate application service principals for each developer to use during local development and avoid the need for developers to share credentials for a single application service principal.
- Create a separate app registration per app. This scopes the app's permissions to only what is needed by the app.
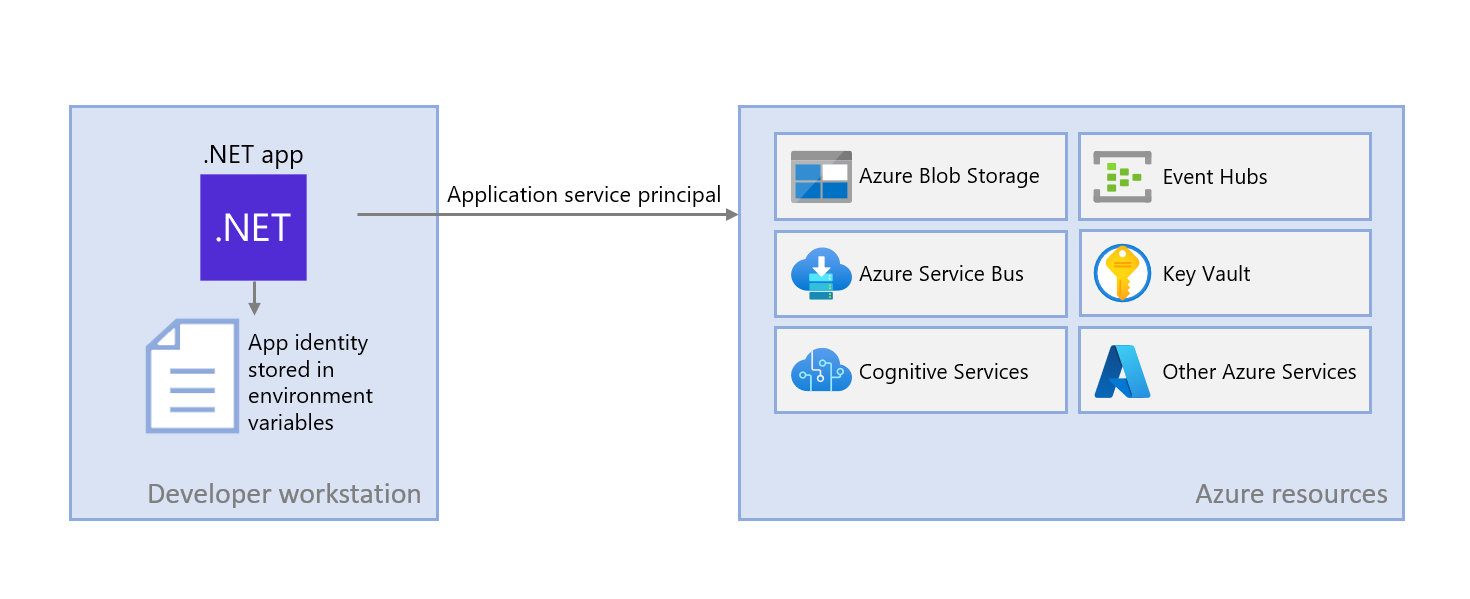
During local development, environment variables are set with the application service principal's identity. The Azure Identity library reads these environment variables and uses this information to authenticate the app to the Azure resources it needs.
1 - Register the application in Azure
Application service principal objects are created with an app registration in Azure. This can be done using either the Azure portal or Azure CLI.
Sign in to the Azure portal and follow these steps.
| Instructions | Screenshot |
|---|---|
In the Azure portal:
|

|
| On the App registrations page, select + New registration. |

|
On the Register an application page, fill out the form as follows.
|

|
On the App registration page for your app:
|

|
| On the Certificates & secrets page, select + New client secret. |

|
The Add a client secret dialog will pop out from the right-hand side of the page. In this dialog:
|

|
| On the Certificates & secrets page, you'll be shown the value of the client secret. Copy this value to a temporary location in a text editor, as you'll need it in a future step. IMPORTANT: This is the only time you will see this value. Once you leave or refresh this page, you won't be able to see this value again. You may add an additional client secret without invalidating this client secret, but you won't see this value again. |

|
2 - Create Microsoft Entra group for local development
Since there are typically multiple developers who work on an app, it's recommended to create a Microsoft Entra group to encapsulate the roles (permissions) the app needs in local development rather than assigning the roles to individual service principal objects. This approach offers the following advantages:
- Every developer is assured to have the same roles assigned since roles are assigned at the group level.
- If a new role is needed for the app, it only needs to be added to the group for the app.
- If a new developer joins the team, a new application service principal is created for the developer and added to the group, assuring the developer has the right permissions to work on the app.
| Instructions | Screenshot |
|---|---|
| Navigate to the Microsoft Entra ID page in the Azure portal by typing Microsoft Entra ID into the search box at the top of the page. Select Microsoft Entra ID under the Services section. |

|
| On the Microsoft Entra ID page, select Groups from the left-hand menu. |

|
| On the All groups page, select New group. |

|
On the New Group page:
|

|
On the Add members dialog box:
|

|
| Back on the New group page, select Create to create the group. The group will be created and you'll be taken back to the All groups page. It may take up to 30 seconds for the group to appear. You may need to refresh the page due to caching in the Azure portal. |

|
3 - Assign roles to the application
Next, determine what roles (permissions) your app needs on what resources and assign those roles to your app. In this example, the roles will be assigned to the Microsoft Entra group created in step 2. Groups can be assigned a role at a resource, resource group, or subscription scope. This example shows how to assign roles at the resource group scope, since most apps group all their Azure resources into a single resource group.
| Instructions | Screenshot |
|---|---|
| Locate the resource group for your app by searching for the resource group name using the search box at the top of the Azure portal. Navigate to your resource group by selecting the resource group name under the Resource Groups heading in the dialog box. |

|
| On the page for the resource group, select Access control (IAM) from the left-hand menu. |

|
On the Access control (IAM) page:
|

|
The Add role assignment page lists all of the roles that can be assigned for the resource group.
|

|
The next Add role assignment page allows you to specify what user to assign the role to.
|

|
In the Select members dialog:
|

|
| The Microsoft Entra group shows as selected on the Add role assignment screen. Select Review + assign to go to the final page and then Review + assign again to complete the process. |

|
4 - Set application environment variables
At runtime, DefaultAzureCredential looks for the service principal information in a collection of environment variables. There are multiple ways to configure environment variables when working with .NET, depending on your tooling and environment.
Regardless of the approach you choose, configure the following environment variables when working with a service principal:
AZURE_CLIENT_ID→ The app ID value.AZURE_TENANT_ID→ The tenant ID value.AZURE_CLIENT_SECRET→ The password/credential generated for the app.
When working locally with Visual Studio, environment variables can be set in the launchsettings.json file in the Properties folder of your project. When the app starts up, these values are pulled in automatically. Keep in mind, these configurations don't travel with your app when it's deployed, so you need to set up environment variables on your target hosting environment.
"profiles": {
    "SampleProject": {
      "commandName": "Project",
      "dotnetRunMessages": true,
      "launchBrowser": true,
      "applicationUrl": "https://localhost:7177;http://localhost:5177",
      "environmentVariables": {
        "ASPNETCORE_ENVIRONMENT": "Development",
        "AZURE_CLIENT_ID": "00000000-0000-0000-0000-000000000000",
        "AZURE_TENANT_ID":"11111111-1111-1111-1111-111111111111",
        "AZURE_CLIENT_SECRET": "=abcdefghijklmnopqrstuvwxyz"
      }
    },
    "IIS Express": {
      "commandName": "IISExpress",
      "launchBrowser": true,
      "environmentVariables": {
        "ASPNETCORE_ENVIRONMENT": "Development",
        "AZURE_CLIENT_ID": "00000000-0000-0000-0000-000000000000",
        "AZURE_TENANT_ID": "11111111-1111-1111-1111-111111111111",
        "AZURE_CLIENT_SECRET": "=abcdefghijklmnopqrstuvwxyz"
      }
    }
  }
5 - Implement DefaultAzureCredential in your application
DefaultAzureCredential is an opinionated, ordered sequence of mechanisms for authenticating to Microsoft Entra ID. Each authentication mechanism is a class derived from the TokenCredential class and is known as a credential. At runtime, DefaultAzureCredential attempts to authenticate using the first credential. If that credential fails to acquire an access token, the next credential in the sequence is attempted, and so on, until an access token is successfully obtained. In this way, your app can use different credentials in different environments without writing environment-specific code.
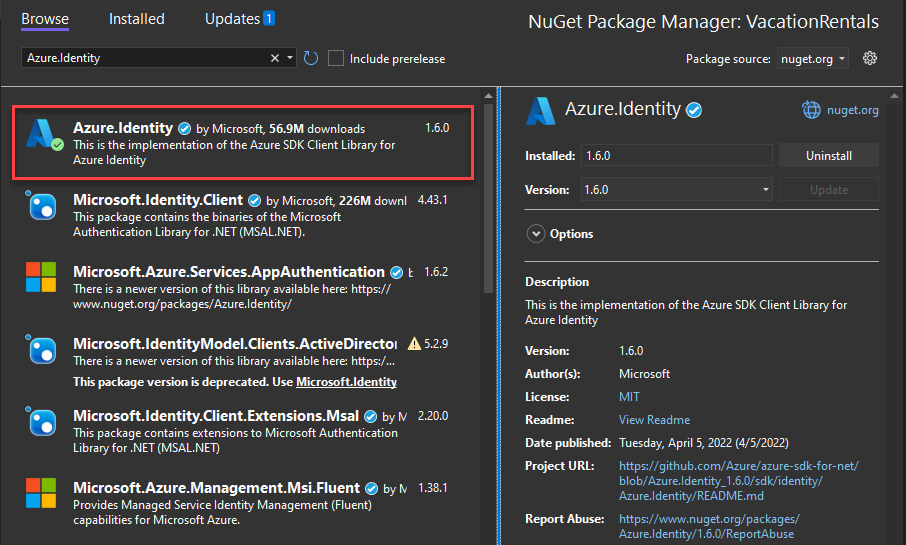
To use DefaultAzureCredential, add the Azure.Identity and optionally the Microsoft.Extensions.Azure packages to your application:
In a terminal of your choice, navigate to the application project directory and run the following commands:
dotnet add package Azure.Identity
dotnet add package Microsoft.Extensions.Azure
Azure services are accessed using specialized client classes from the various Azure SDK client libraries. These classes and your own custom services should be registered so they can be accessed via dependency injection throughout your app. In Program.cs, complete the following steps to register a client class and DefaultAzureCredential:
- Include the
Azure.IdentityandMicrosoft.Extensions.Azurenamespaces viausingdirectives. - Register the Azure service client using the corresponding
Add-prefixed extension method. - Pass an instance of
DefaultAzureCredentialto theUseCredentialmethod.
For example:
using Microsoft.Extensions.Azure;
using Azure.Identity;

builder.Services.AddAzureClients(clientBuilder =>
{
    clientBuilder.AddBlobServiceClient(
        new Uri("https://<account-name>.blob.core.windows.net"));
    clientBuilder.UseCredential(new DefaultAzureCredential());
});
An alternative to UseCredential is to instantiate DefaultAzureCredential directly:
using Azure.Identity;

builder.Services.AddSingleton<BlobServiceClient>(_ =>
    new BlobServiceClient(
        new Uri("https://<account-name>.blob.core.windows.net"),
        new DefaultAzureCredential()));
When the preceding code runs on your local development workstation, it looks in the environment variables for an application service principal or at locally installed developer tools, such as Visual Studio, for a set of developer credentials. Either approach can be used to authenticate the app to Azure resources during local development.
When deployed to Azure, this same code can also authenticate your app to other Azure resources. DefaultAzureCredential can retrieve environment settings and managed identity configurations to authenticate to other services automatically.