Configure Web Content Filtering on Edge
This article describes how to configure Web Content Filtering (WCF) for Microsoft Edge.
Introduction
Microsoft Edge is already one of the most secure browsers with features like phishing protection, typosquatting, and more to protect users when they're browsing online. Adding to these security features, Microsoft Edge is introducing Web Content Filtering (WCF) for Educational Institutions to help them keep students safe online. Using this feature, you can choose categories of websites that students aren't allowed to access while using Microsoft Edge.
To use this feature, set it up via the Microsoft Edge management service using the following the steps.
Note
The feature is in private preview and if you are not seeing the Web Content Filtering option on the Edge Management Service portal, fill in the Web Content Filtering on Edge Sign Up form to apply for access.
Prerequisites
Before you can set up WCF you must meet or exceed the following prerequisites.
- On managed Windows devices where WCF policy needs to be applied:
- Be signed in with school account on a device running Windows 10 or later.
- Have Microsoft Edge Version 118 or higher installed.
- You must be a Microsoft Edge Administrator or a Global Administrator to access this experience in Microsoft 365 Admin Center.
- Your organisation should have a M365 A1/A3/A5 license.
Note
Make sure you update Microsoft Edge to latest version on all the managed devices where you want to run Web Content Filtering (WCF).
Setup steps
This section describes and illustrates the six basic steps for setting up WCF:
- Create a security group to enable WCF
- Enable WCF for a Security group
- Manage exceptions via Allowlist and Blocklist
- Enable Diagnostic data (Optional)
- Assign the WCF policy to a group
- Verify that the WCF policy got applied
Create a security group to enable WCF
Tip
If you have pre-existing groups on Intune, they will automatically get imported to Edge management service. You can reuse them here without any additional work.
To create a group on Edge management service, open the Microsoft 365 admin center.
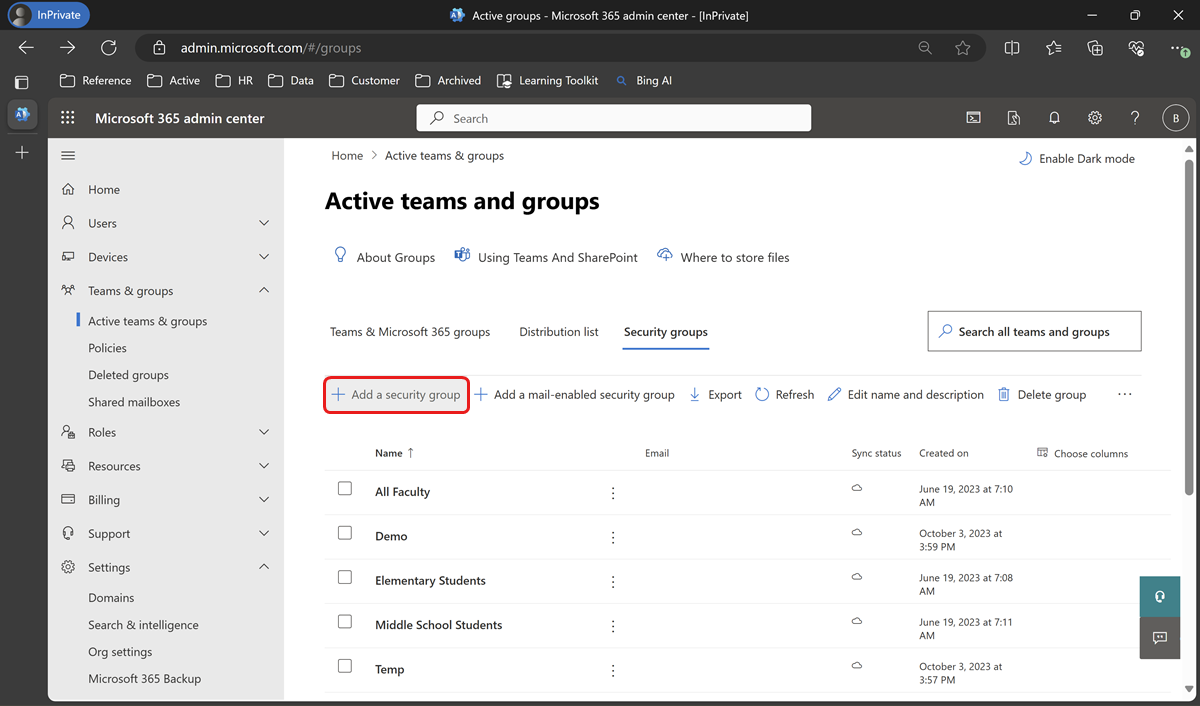
- Go to Active teams & groups > Security groups, and then select Add a security group.
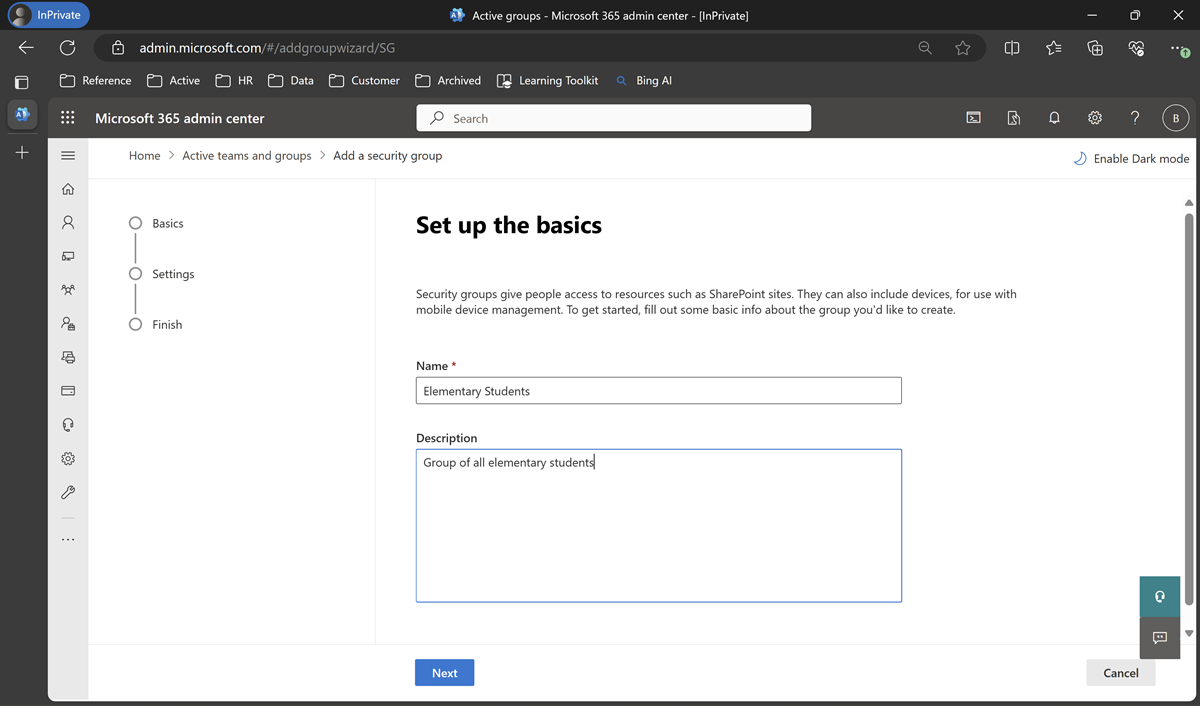
- Under Set up the basics, enter a Name and Description for the group and then select Next to create the group.
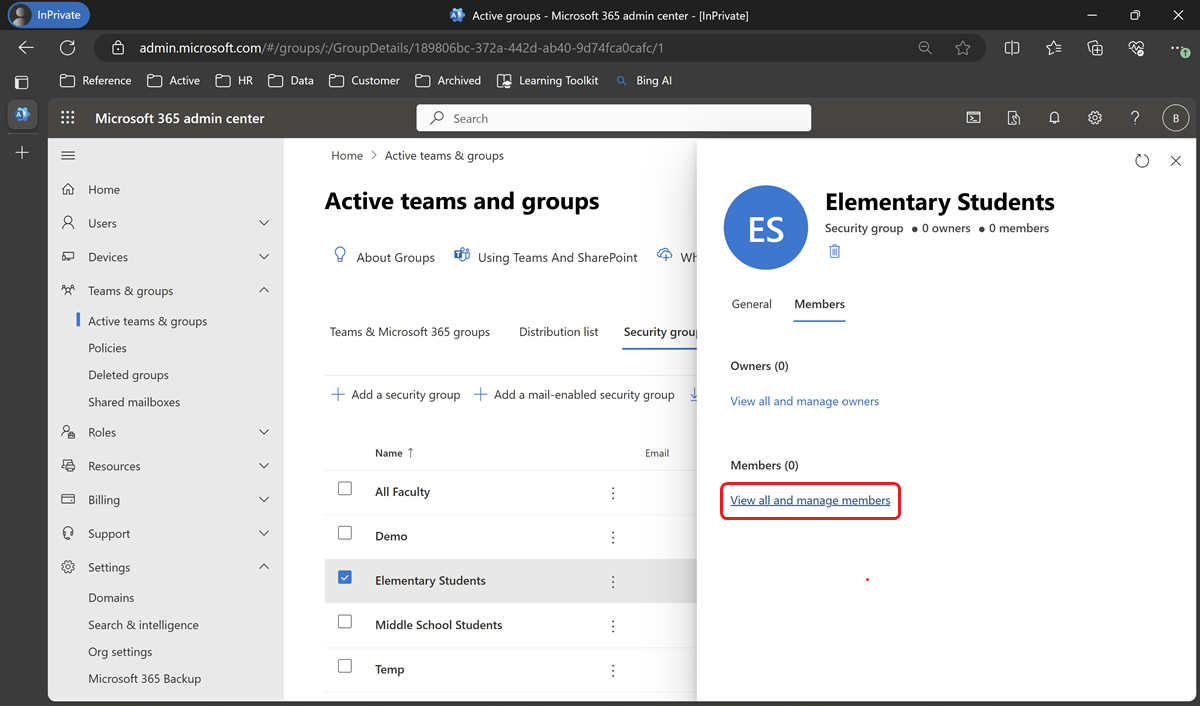
- Under Active teams and groups, select the group you created and then go the Members section. Select View all and manage members to add Owners and Members to the group.
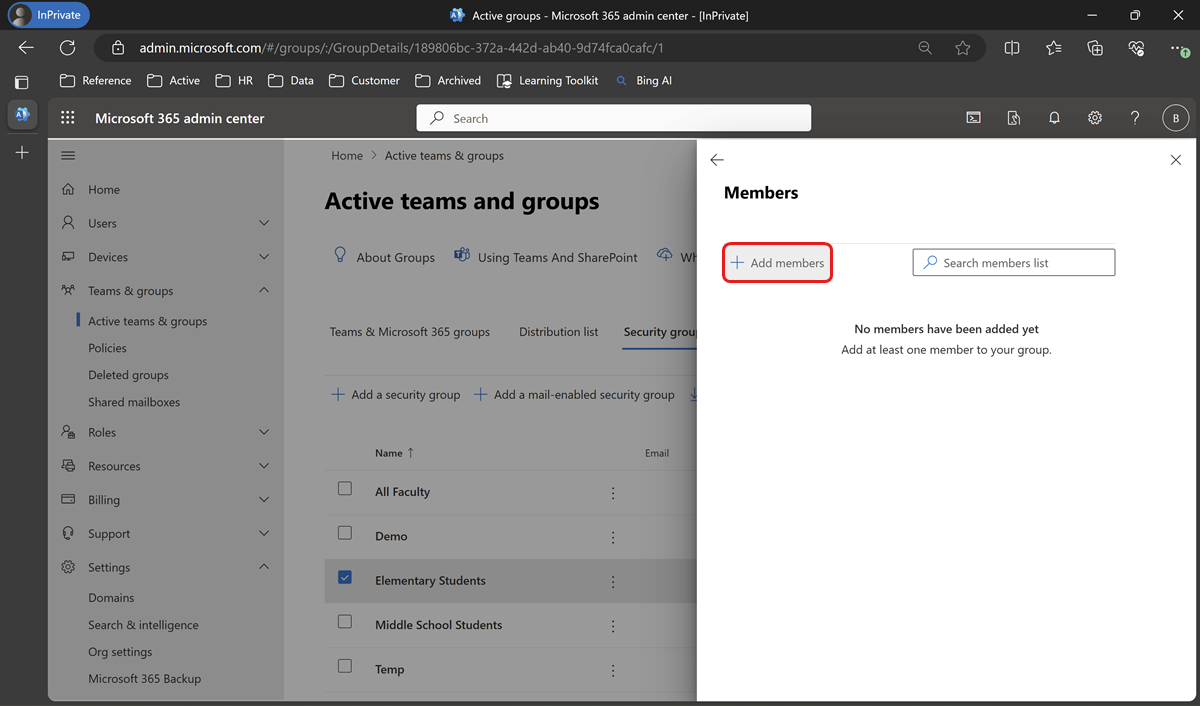
- On the Members panel, select Add members.
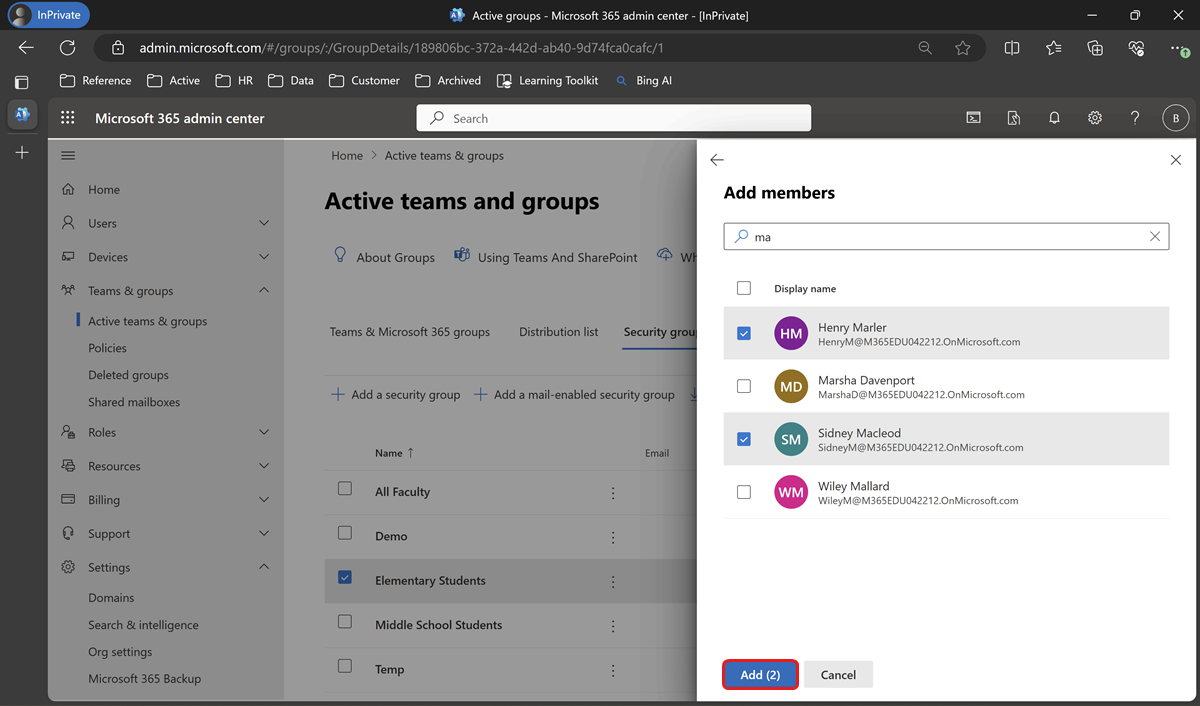
- On the Add members panel, under Display name, check the members you want to add. Select the Add button, which displays the number of members you picked.
Tip
We recommend that you test the policy on a small set of user groups (the IT team and/or teachers) before rolling the WCF policy out to students.
Note
Microsoft Edge management service currently only supports assignment of policies to user groups and not device groups.
Enable WCF for a Security group
To enable WCF for a security group:
- Go to Settings > Microsoft Edge > Configuration policies and then select Create policy.
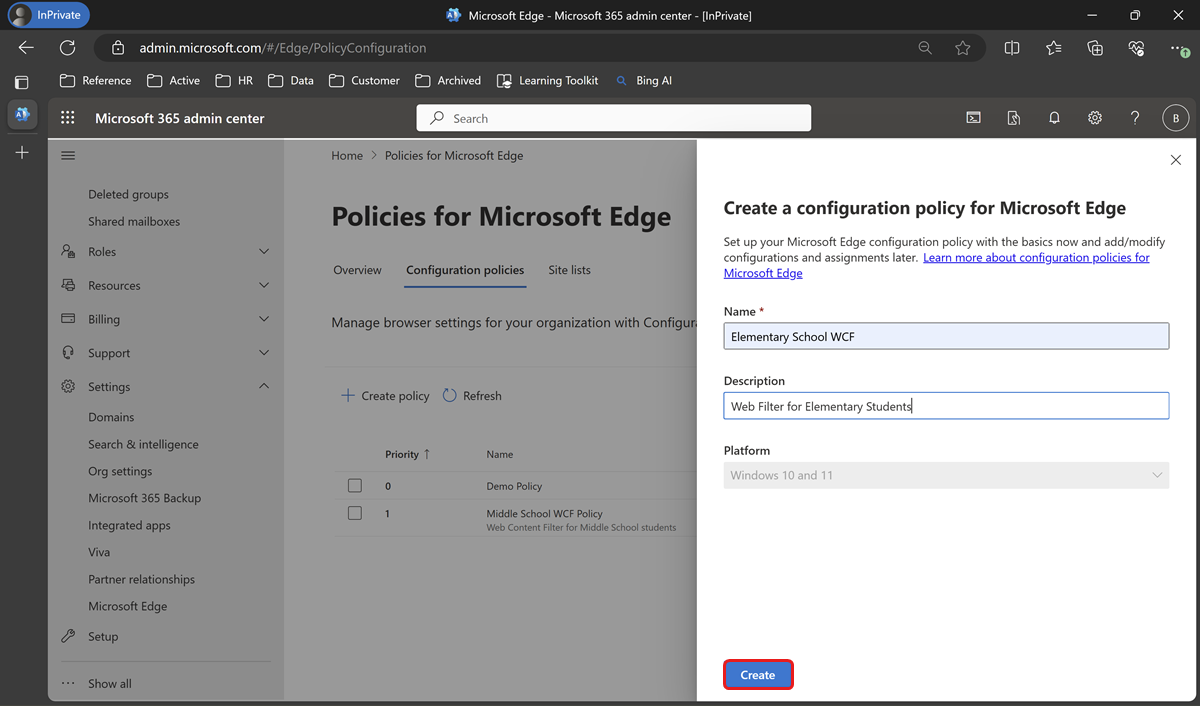
- Provide a Name and Description, and then select Create.
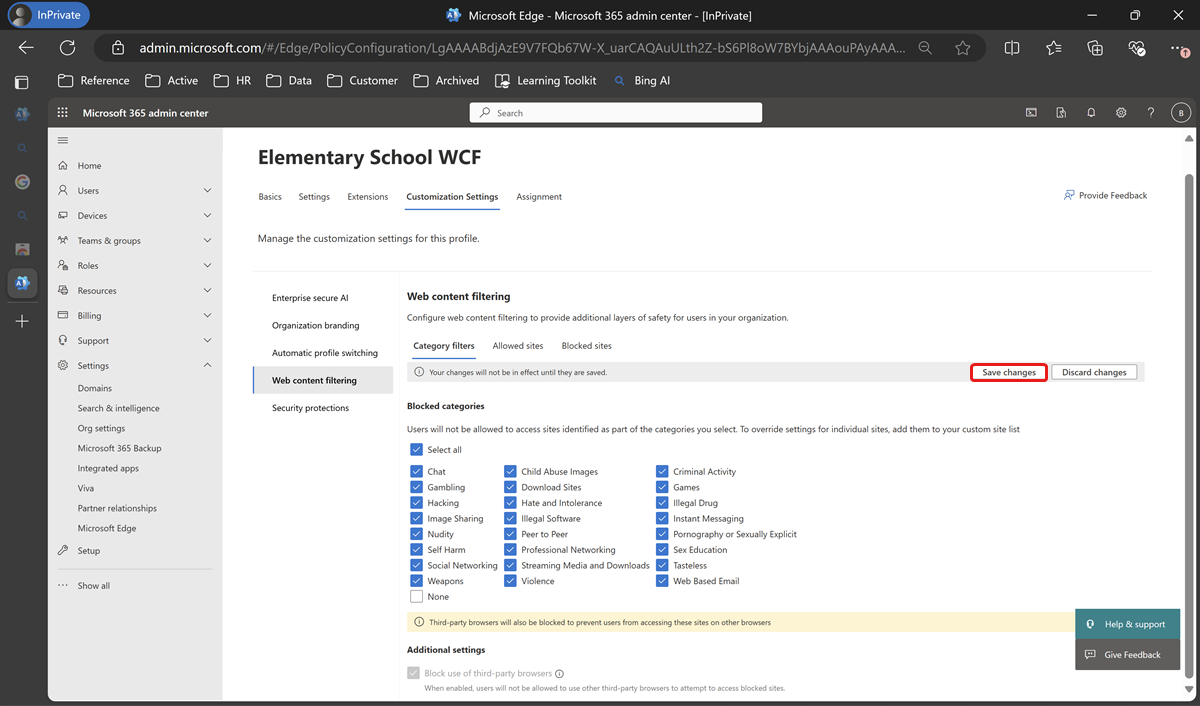
- In policy settings, go to Customization Settings > Web content filtering.
- Under Web content filtering there's a list of categories that you can block. Under Blocked categories, check all the categories that you want to block and then select Save Changes.
Important
To ensure full safety for students, enabling this policy will block all third-party browsers because they do not have a web content filtering feature.
Manage exceptions via Allowlist and Blocklist
With the necessary categories blocked, you can check the behavior for the top used URLs in your institution and use the Allowlist and Blocklist capabilities to manage any exceptions.
If you want to allow a particular URL that is part of a blocked category, then you can add the URL to the list of Allowed Sites by the following steps.
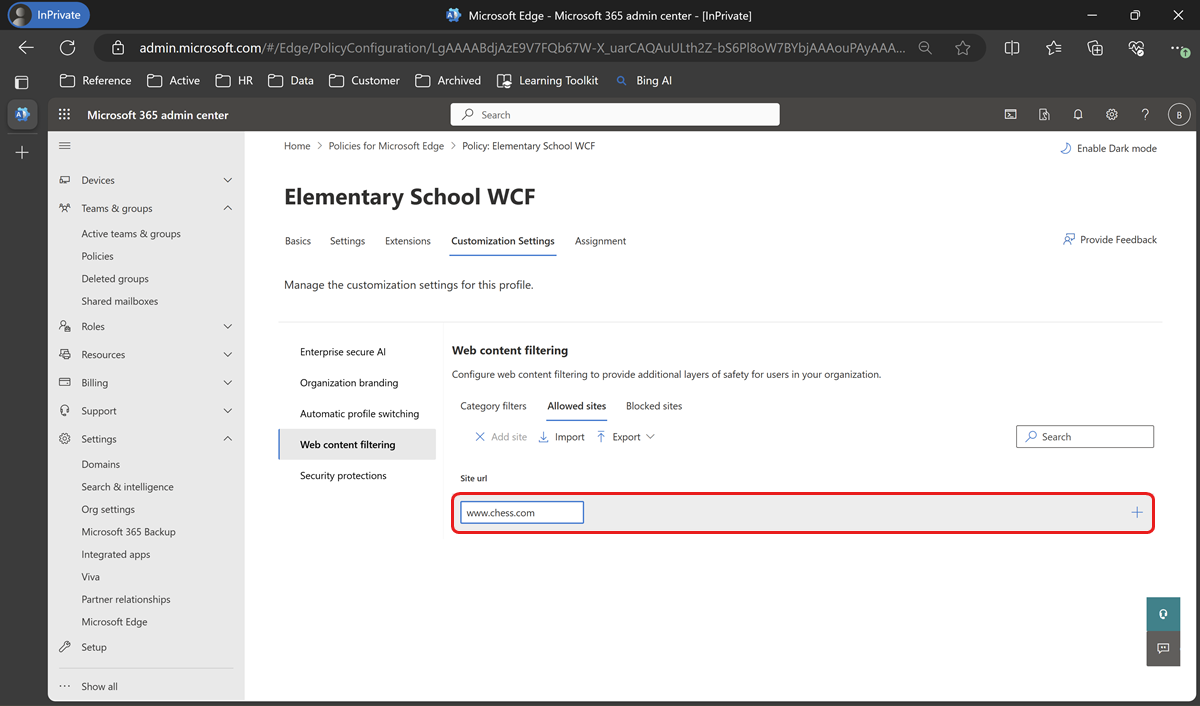
- Under Web content filtering, select Allowed Sites.
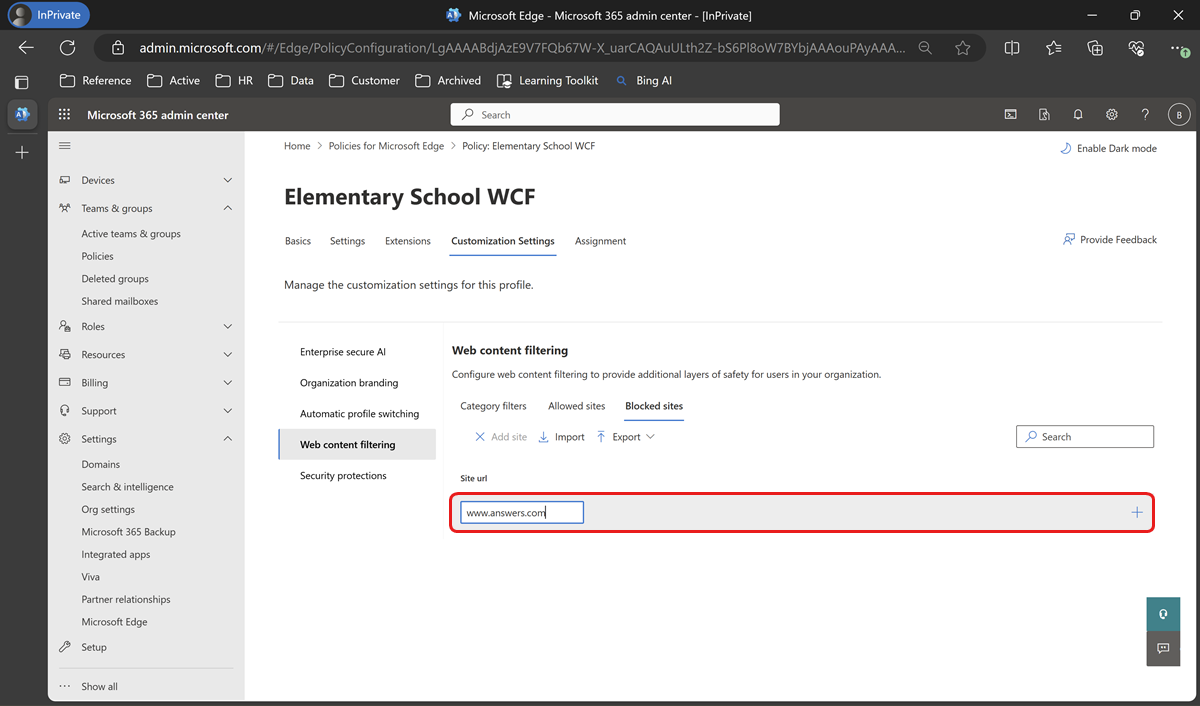
- Type in the URL of the site you want to allow and then select "+" to add the site.
- Select Save Changes after you finish adding sites.
Tip
Instead of adding the URLs manually, you can import them in bulk using a .csv or .json file with the Import option.
Similarly, if you want to block a particular URL or list of URLs, you can repeat the previous steps in the Blocked sites section.
Note
In addition to URLs you can use URL patterns with wildcard characters, which are supported. For more information, see Filter format for URL list-based policies
Important
Allowlist takes precedence over Blocklist and Blocked categories. You can read more about this here URLAllowlist.
Enable Diagnostic data (Optional)
Web Content Filtering (WCF) on Microsoft Edge is in preview and our aim is to make it as safe and seamless as possible. For us to be able to watch the behavior of this feature and diagnose any issues that might arise during the preview, we recommend that you enable Optional data on the devices that you're enabling WCF on. Microsoft values your privacy, and we won't collect or use personal data.
- To enable Diagnostic data open the policy configuration page and go to Settings.
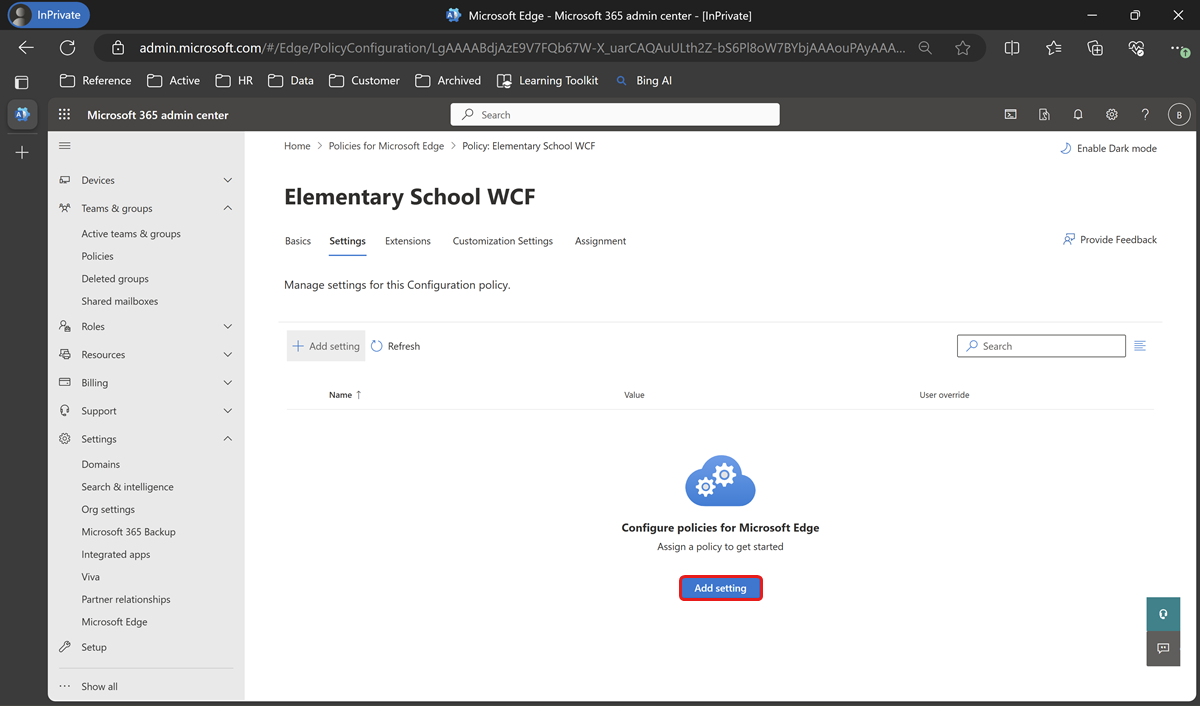
- Select Add setting.
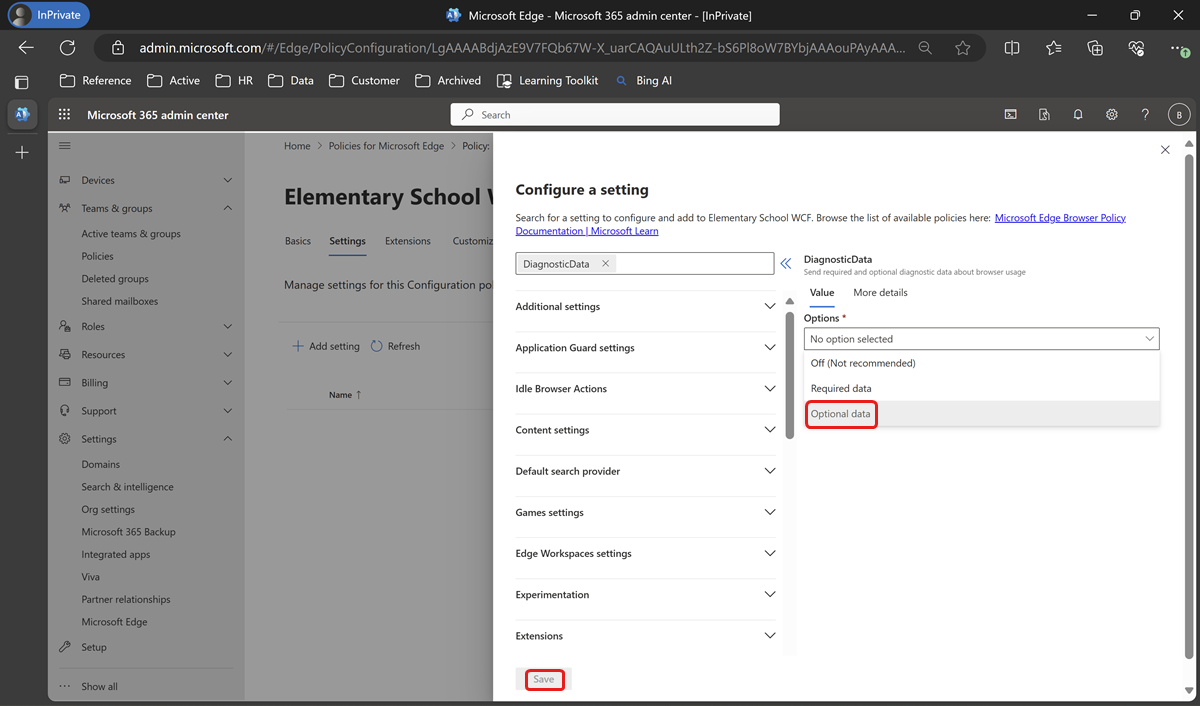
- Search for "DiagnosticData" and on the Configure a setting panel, under Required data, set the value to Optional data.
- Select Save.
Assign the WCF policy to a group
Now that the policy has WCF, Allowlist & Blocklist, and Diagnostic data settings configured you can assign this policy to a group.
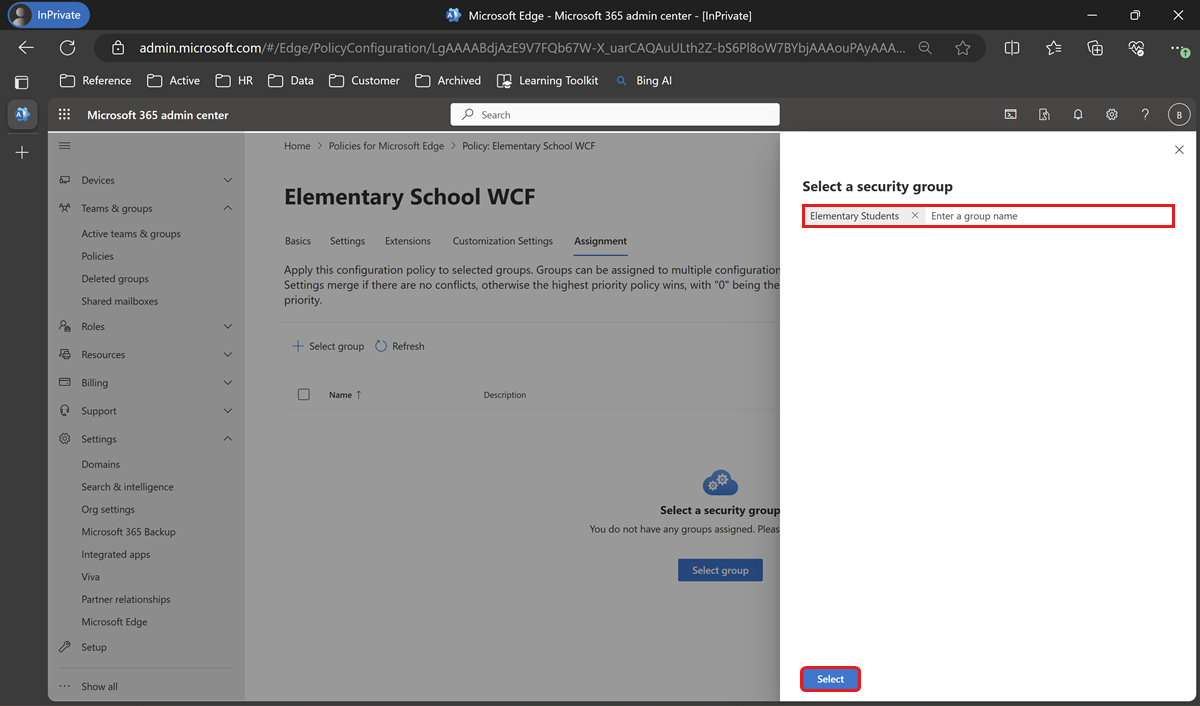
- On the policy page, select Assignment.
- Click + Select Group and then click Select group to add the groups.
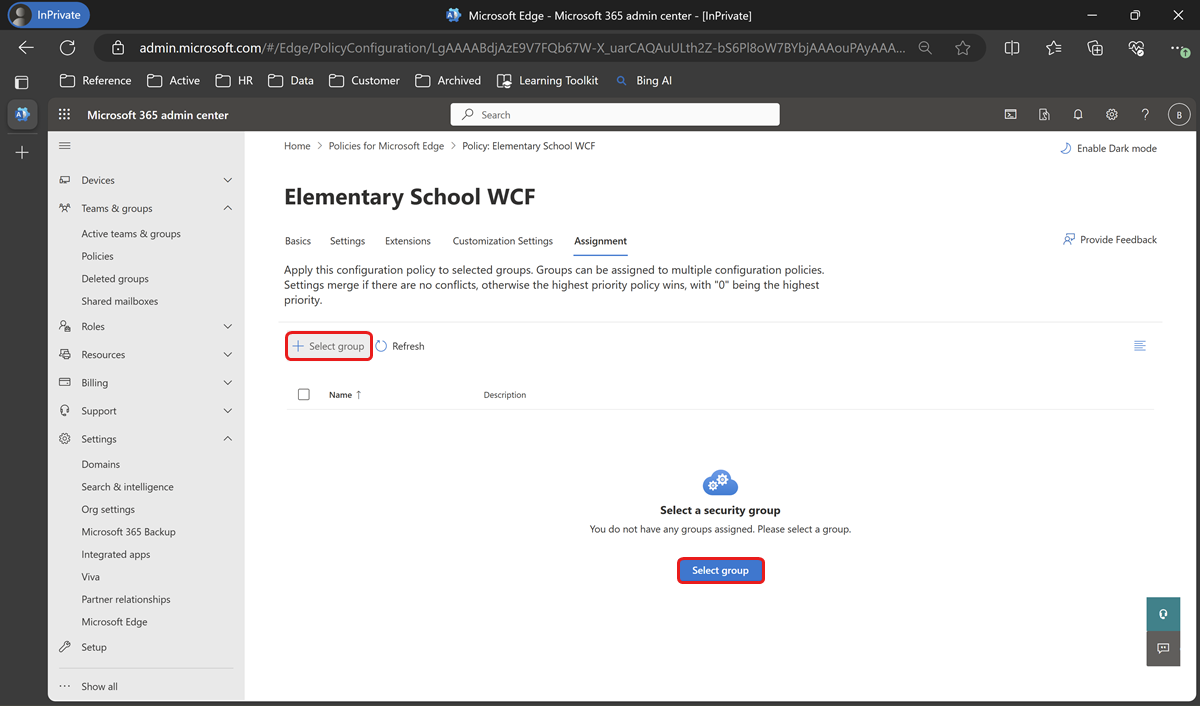
- On the Select a security group panel, add the groups you want to assign the policy to and then click Select.
Verify that the WCF policy got applied
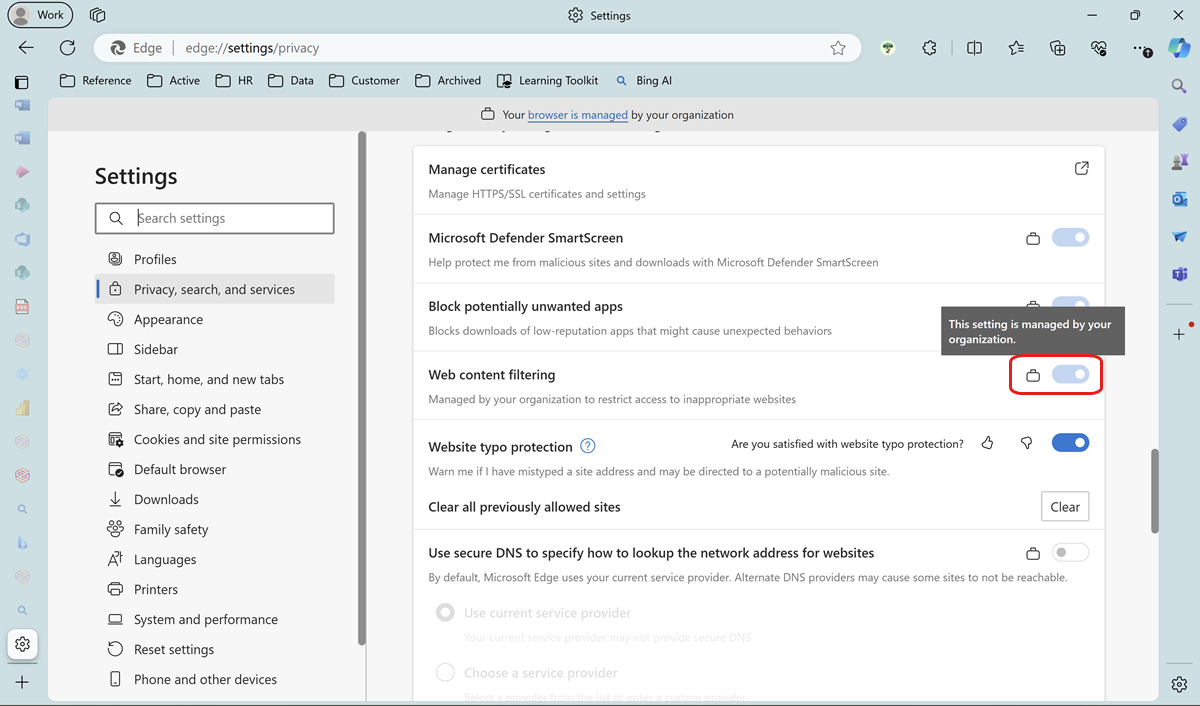
You can check whether the policy got applied on the respective user's Edge browser by opening Microsoft Edge Settings. Under Privacy, search, and services and see that Web content filtering is enabled as shown in the next screenshot.
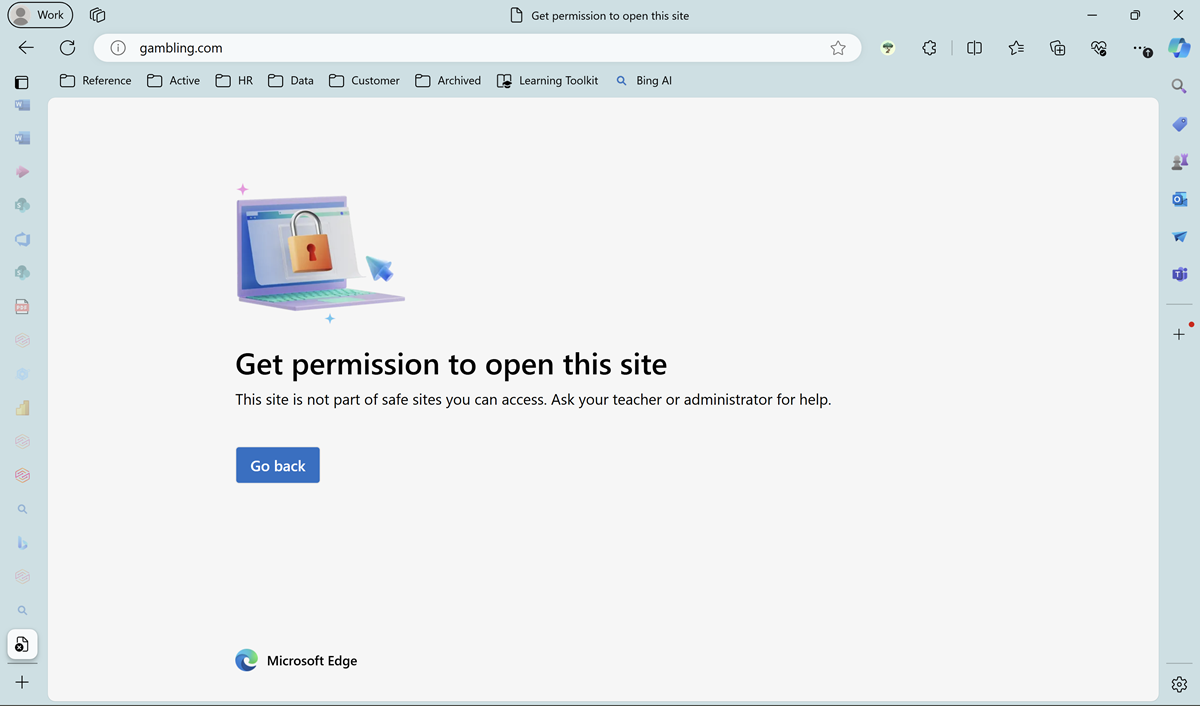
When you try to access a site that WCF blocks, you should see a screen like the one in the next screenshot.
Note
It can take up to 90 minutes for the policy set on Edge management service to get applied on a device.
Tip
If you have the same policy setup via Intune and EMX, Intune policy takes precedence by default. You can override this default behavior using the EdgeManagementPolicyOverridesPlatformPolicy and the EdgeManagementUserPolicyOverridesCloudMachinePolicy settings in the browser policy documentation.