Microsoft Defender for Endpoint on Linux for ARM64-based devices (preview)
- Microsoft Defender for Endpoint Server
- Microsoft Defender for Servers
Overview of Defender for Endpoint on Linux for ARM64-based devices
As you might already know, Microsoft Defender for Endpoint on Linux is a unified endpoint security solution that helps you protect your server devices from advanced threats. Defender for Endpoint on Linux is now extending support for ARM64-based Linux servers in preview. Similar to x64-based Linux servers (including Intel and AMD 64-bit platform), the following capabilities are included:
- Microsoft Defender Antivirus
- Endpoint detection and response (EDR)
- Live response
- Device isolation
- Advanced hunting
- Vulnerability management
- Centralized policy configuration using security settings management
Initially, the following Linux distributions are supported in preview:
Ubuntu 20.04 ARM64
Ubuntu 22.04 ARM64
Ubuntu 24.04 ARM64
Amazon Linux 2 ARM64
Amazon Linux 2023 ARM64
RHEL 8.x ARM64
RHEL 9.x ARM64
Oracle Linux 8.x ARM64
Oracle Linux 9.x ARM64
SUSE Linux Enterprise Server 15 (SP5, SP6) ARM64
Note
Support for more Linux distributions is planned as part of this preview program.
Deploy Defender for Endpoint on Linux for ARM64-based devices
The deployment procedures in this article installs the agent version 101.24102.0003 from the insiders-slow channel on the ARM64-based device. (See What's new in Microsoft Defender for Endpoint on Linux.)
You can choose from several methods to deploy Defender for Endpoint on Linux to your ARM64-based device:
Before you begin
Make sure the prerequisites are met for Defender for Endpoint on Linux
To onboard servers to Defender for Endpoint, server licenses are required. You can choose from these options:
- Microsoft Defender for Servers Plan 1 or Plan 2 (as part of the Defender for Cloud) offering; or
- Microsoft Defender for Endpoint Server
Deploy using the installer script
In the Microsoft Defender portal, go to Settings > Endpoints > Device management > Onboarding.
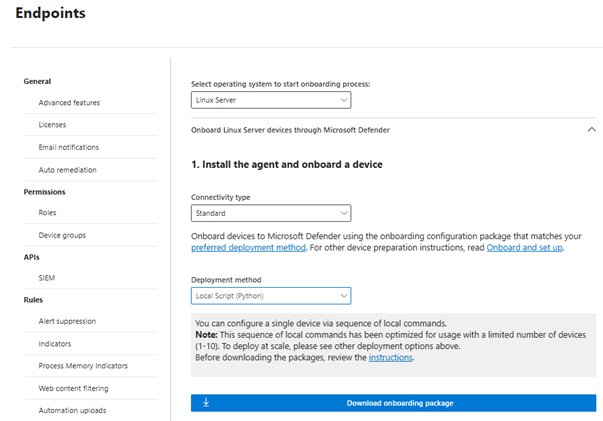
In the onboarding screen, select the following options:

In the Select operating system to start onboarding process list, select Linux Server.
In the Connectivity type list, select Streamlined. Or, if necessary, you can select Standard. (For more information, see Onboarding devices using streamlined connectivity for Microsoft Defender for Endpoint.)
In the Deployment method list, select Local Script (Python).
Select Download onboarding package.
In a new browser window, download the Defender for Endpoint installer bash script.
Use the following command to grant the necessary permissions for the script:
$chmod +x /mde_installer.shRun the following command to execute the installer script:
$sudo ~/mde_installer.sh --install --channel insiders-slow --onboard ~/MicrosoftDefenderATPOnboardingLinuxServer.pyValidate the deployment by following these steps:
On the device, run the following command to check the health status. A return value of
truedenotes that the product is functioning as expected:$ mdatp health --field healthyIn the Microsoft Defender portal, under Assets > Devices, look for the Linux device you just onboarded. It can take approximately 20 minutes for the device to show up in the portal.
If you run into an issue, see Troubleshoot deployment issues (in this article).
Deploy using the installer script with Ansible
In the Microsoft Defender portal, go to Settings > Endpoints > Device management > Onboarding.
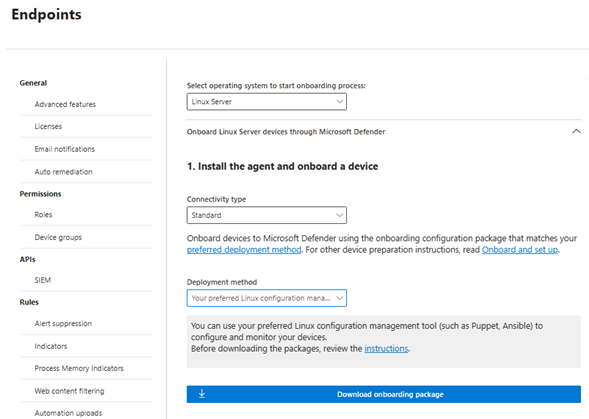
In the onboarding screen, select the following options:

In the Select operating system to start onboarding process list, select Linux Server.
In the Connectivity type list, select Streamlined. Or, if necessary, you can select Standard. (For more information, see Onboarding devices using streamlined connectivity for Microsoft Defender for Endpoint.)
In the Deployment method list, select Your preferred Linux configuration management tool.
Select Download onboarding package.
In a new browser window, download the Defender for Endpoint installer bash script.
Create an installation YAML file on your Ansible server. For example,
/etc/ansible/playbooks/install_mdatp.yml, using themde_installer.shyou downloaded in step 3.name: Install and Onboard MDE hosts: servers tasks: - name: Create a directory if it does not exist ansible.builtin.file: path: /tmp/mde_install state: directory mode: '0755' - name: Copy Onboarding script ansible.builtin.copy: src: "{{ onboarding_script }}" dest: /tmp/mde_install/mdatp_onboard.json - name: Install MDE on host ansible.builtin.script: "{{ mde_installer_script }} --install --channel {{ channel | default('insiders-slow') }} --onboard /tmp/mde_install/mdatp_onboard.json" register: script_output args: executable: sudo - name: Display the installation output debug: msg: "Return code [{{ script_output.rc }}] {{ script_output.stdout }}" - name: Display any installation errors debug: msg: "{{ script_output.stderr }}"Deploy Defender for Endpoint on Linux by using the following command. Edit the corresponding paths and channel, as appropriate.
ansible-playbook -i /etc/ansible/hosts /etc/ansible/playbooks/install_mdatp.yml --extra-vars "onboarding_script=<path to mdatp_onboard.json > mde_installer_script=<path to mde_installer.sh> channel=<channel to deploy for: insiders-slow > "Validate your deployment by following these steps:
On the device, run the following commands to check for device health, connectivity, antivirus, and EDR detections:
- name: Run post-installation basic MDE test
  hosts: myhosts
  tasks:

   - name: Check health
     ansible.builtin.command: mdatp health --field healthy
     register: health_status

   - name: MDE health test failed
     fail: msg="MDE is not healthy. health status => \n{{ health_status.stdout       }}\nMDE deployment not complete"
     when: health_status.stdout != "true"

   - name: Run connectivity test
     ansible.builtin.command: mdatp connectivity test
     register: connectivity_status

   - name: Connectivity failed
     fail: msg="Connectivity failed. Connectivity result => \n{{ connectivity_status.stdout }}\n MDE deployment not complete"
     when: connectivity_status.rc != 0

   - name: Check RTP status
     ansible.builtin.command: mdatp health --field real_time_protection_enabled
     register: rtp_status

   - name: Enable RTP
     ansible.builtin.command: mdatp config real-time-protection --value enabled
     become: yes
     become_user: root
     when: rtp_status.stdout != "true"

   - name: Pause for 5 second to enable RTP
     ansible.builtin.pause:
     seconds: 5

   - name: Download EICAR
     ansible.builtin.get_url:
     url: https://secure.eicar.org/eicar.com.txt
     dest: /tmp/eicar.com.txt

   - name: Pause for 5 second to detect eicar
     ansible.builtin.pause:
     seconds: 5

   - name: Check for EICAR file
     stat: path=/tmp/eicar.com.txt
     register: eicar_test

   - name: EICAR test failed
     fail: msg="EICAR file not deleted. MDE deployment not complete"
     when: eicar_test.stat.exists

   - name: MDE Deployed
     debug:
     msg: "MDE succesfully deployed"
In the Microsoft Defender portal, under Assets > Devices, look for the Linux device you just onboarded. It can take approximately 20 minutes for the device to show up in the portal.
If you run into an issue, see Troubleshoot deployment issues (in this article).
Deploy using the installer script with Puppet
In the Microsoft Defender portal, go to Settings > Endpoints > Device management > Onboarding.
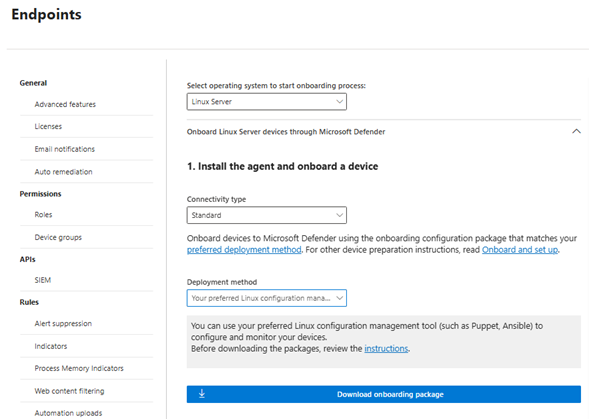
In the onboarding screen, select the following options:

In the Select operating system to start onboarding process list, select Linux Server.
In the Connectivity type list, select Streamlined. Or, if necessary, you can select Standard. (For more information, see Onboarding devices using streamlined connectivity for Microsoft Defender for Endpoint.)
In the Deployment method list, select Your preferred Linux configuration management tool.
Select Download onboarding package. Save the file as
WindowsDefenderATPOnboardingPackage.zip.
Extract the contents of the onboarding package by using the following command:
unzip WindowsDefenderATPOnboardingPackage.zipYou should see the following output:
Archive:  WindowsDefenderATPOnboardingPackage.zip
inflating: mdatp_onboard.json
In a new browser window, download the Defender for Endpoint installer bash script (this script is called
mde_installer.sh).Create a Puppet manifest by using the following procedure, which uses the
mde_installer.shscript from step 4.In the modules folder of your Puppet installation, create the following folders:
install_mdatp/filesinstall_mdatp/manifests
The modules folder is typically located at
/etc/puppetlabs/code/environments/production/moduleson your Puppet server.Copy the
mdatp_onboard.jsonfile created earlier to theinstall_mdatp/filesfolder.Copy
mde_installer.shtoinstall_mdatp/files folder.Create an
init.ppfile insideinstall_mdatp/manifeststhat contains the following deployment instructions:tree install_mdatp Output: install_mdatp ├── files │ ├── mdatp_onboard.sh │ └── mde_installer.sh └── manifests └── init.pp
Use the Puppet manifest to install Defender for Endpoint on Linux on your device.
# Puppet manifest to install Microsoft Defender for Endpoint on Linux.
# @param channel The release channel based on your environment, insider-fast or prod.

class install_mdatp (
  $channel = 'insiders-slow',
) {
  # Ensure that the directory /tmp/mde_install exists
  file { '/tmp/mde_install':
    ensure => directory,
    mode   => '0755',
  }

# Copy the installation script to the destination
file { '/tmp/mde_install/mde_installer.sh':
  ensure => file,
  source => 'puppet:///modules/install_mdatp/mde_installer.sh',
  mode   => '0777',
  }

# Copy the onboarding script to the destination
file { '/tmp/mde_install/mdatp_onboard.json':
 ensure => file,
 source => 'puppet:///modules/install_mdatp/mdatp_onboard.json',
 mode   => '0777',
 }

#Install MDE on the host using an external script
exec { 'install_mde':
 command     => "/tmp/mde_install/mde_installer.sh --install --channel ${channel} --onboard /tmp/mde_install/mdatp_onboard.json",
 path        => '/bin:/usr/bin',
 user        => 'root',
 logoutput   => true,
 require     => File['/tmp/mde_install/mde_installer.sh', '/tmp/mde_install/mdatp_onboard.json'], # Ensure the script is copied before running the installer
}
}
Validate your deployment. In the Microsoft Defender portal, under Assets > Devices, look for the Linux device you just onboarded. It can take approximately 20 minutes for the device to show up in the portal.
Deploy Defender for Endpoint on Linux using Microsoft Defender for Cloud
If your organization is using Defender for Cloud, you can use it to deploy Defender for Endpoint on Linux.
We recommend enabling automatic deployment on your ARM64-based Linux devices. After VM provisioning, define a variable under the file
/etc/mde.arm.d/mde.confon your device as follows:OPT_FOR_MDE_ARM_PREVIEW=1Wait for 1-6 hours for onboarding to complete.
In the Microsoft Defender portal, under Assets > Devices, look for the Linux devices you just onboarded.
Need help with Defender for Cloud?
See these articles:
- Enable the Defender for Endpoint integration: Linux
- Connect your non-Azure machines to Microsoft Defender for Cloud: Onboard your Linux server
Troubleshoot deployment issues
If you run into any issues deploying Defender for Endpoint on Linux to your ARM64-based devices, help is available. First, review our list of common issues and how to resolve them. If the problem persists, contact us.
Common issues and how to resolve them
The following table summarizes common issues and how to resolve them.
| Error message or issue | What to do |
|---|---|
mdatp not found |
The repository might not be configured correctly. Check to see if the channel is set to insiders-slow in the installer script |
mdatp health indicates a missing license |
Make sure you're passing the correct onboarding script or json file to your automation script or tool |
| Exclusions aren't working as expected | If you had exclusions working on other devices, but they're not working on your ARM64-based Linux servers, contact us at mdearmsupport@microsoft.com. You need your client analyzer logs. |
| You want help with tuning mdatp. | Contact us at mdearmsupport@microsoft.com. |
Contact us if you need help
When you contact us at mdearmsupport@microsoft.com, make sure to describe the issue in detail. Include screenshots if possible, and your client analyzer logs.
XMDE Client Analyzer ARM Preview
Using Bash, download the XMDE Client Analyzer ARM Preview.
wget --quiet -O XMDEClientAnalyzerARMPreview.zip https://go.microsoft.com/fwlink/?linkid=2299668Run the support tool.
sudo ./MDESupportTool -d --mdatp-log debugFollow the on-screen instructions and then follow up with at the end of the log collection. The logs are located in the
/tmpdirectory.The log set is owned by the root user, so you might need root privileges to remove the log set.