Create or modify a custom audience app ID for P2S VPN Microsoft Entra ID authentication
The steps in this article help you create a Microsoft Entra ID custom App ID (custom audience) for the new Microsoft-registered Azure VPN Client for point-to-site (P2S) connections. You can also update your existing tenant to change the new Microsoft-registered Azure VPN Client app from the previous Azure VPN Client app.
When you configure a custom audience app ID, you can use any of the supported values associated with the Azure VPN Client app. We recommend that you associate the Microsoft-registered App ID Azure Public audience value c632b3df-fb67-4d84-bdcf-b95ad541b5c8 to your custom app when possible. For the full list of supported values, see P2S VPN - Microsoft Entra ID.
This article provides high-level steps. The screenshots to register an application might be slightly different, depending on the way you access the user interface, but the settings are the same. For more information, see Quickstart: Register an application. For more information about Microsoft Entra ID authentication for P2S, see Microsoft Entra ID authentication for P2S.
If you're configuring a custom audience app ID in order to configure or restrict access based on users and groups, see Scenario: Configure P2S access based on users and groups - Microsoft Entra ID authentication. The scenario article outlines the workflow and steps to assign permissions.
Prerequisites
This article assumes that you already have a Microsoft Entra tenant and the permissions to create an Enterprise Application, typically the Cloud Application Administrator role or higher. For more information, see Create a new tenant in Microsoft Entra ID and Assign user roles with Microsoft Entra ID.
This article assumes that you're using the Microsoft-registered App ID Azure Public audience value
c632b3df-fb67-4d84-bdcf-b95ad541b5c8to configure your custom app. This value has global consent, which means you don't need to manually register it to provide consent for your organization. We recommend that you use this value.At this time, there's only one supported audience value for the Microsoft-registered app. See the supported audience value table for additional supported values.
If the Microsoft-registered audience value isn't compatible with your configuration, you can still use the older manually registered ID values.
If you need to use a manually registered app ID value instead, you must give consent to allow the app to sign in and read user profiles before proceeding with this configuration. You must sign in with an account that's assigned the Cloud Application Administrator role.
To grant admin consent for your organization, modify the following command to contain the desired
client_idvalue. In the example, the client_id value is for Azure Public. See the table for additional supported values.https://login.microsoftonline.com/common/oauth2/authorize?client_id=41b23e61-6c1e-4545-b367-cd054e0ed4b4&response_type=code&redirect_uri=https://portal.azure.com&nonce=1234&prompt=admin_consentCopy and paste the URL that pertains to your deployment location in the address bar of your browser.
Select the account that has the Cloud Application Administrator role if prompted.
On the Permissions requested page, select Accept.
Register an application
There are a couple of different ways to get to the App registrations page. One way is through the Microsoft Entra admin center. You can also use the Azure portal and Microsoft Entra ID. Sign in with an account that has the Cloud Application Administrator role or higher.
If you have access to multiple tenants, use the Settings icon in the top menu to switch to the tenant in which you want to register the application from the Directories + subscriptions menu.
Go to App registrations and select New registration.

On the Register an application page, enter a display Name for your application. Users of your application might see the display name when they use the app, for example during sign-in. You can change the display name at any time. Multiple app registrations can share the same name. The app registration's automatically generated Application (client) ID uniquely identifies your app within the identity platform.

Specify who can use the application, sometimes called its sign-in audience. Select Accounts in this organizational directory only (nameofyourdirectory only - Single tenant).
Leave Redirect URI (optional) alone for now as you configure a redirect URI in the next section.
Select Register to complete the initial app registration.


When registration finishes, the Microsoft Entra admin center displays the app registration's Overview pane. You see the Application (client) ID. Also called the client ID, this value uniquely identifies your application in the Microsoft identity platform. This is the custom audience value that you use when you configure your P2S gateway. Even though this value is present, you still need to complete the next sections to associate the Microsoft-registered application to your application ID.
Expose an API and add a scope
In this section, you create a scope to assign granular permissions.
In the left pane for the registered app, select Expose an API.

Select Add a scope. On the Add a scope pane, view the Application ID URI. This field is generated automatically. This defaults to
api://<application-client-id>. The App ID URI acts as the prefix for the scopes that you reference in your API's code, and it must be globally unique.
Select Save and continue to proceed to the next Add a scope pane.
In this Add a scope pane, specify the scope's attributes. For this walk-through, you can use the example values or specify your own.
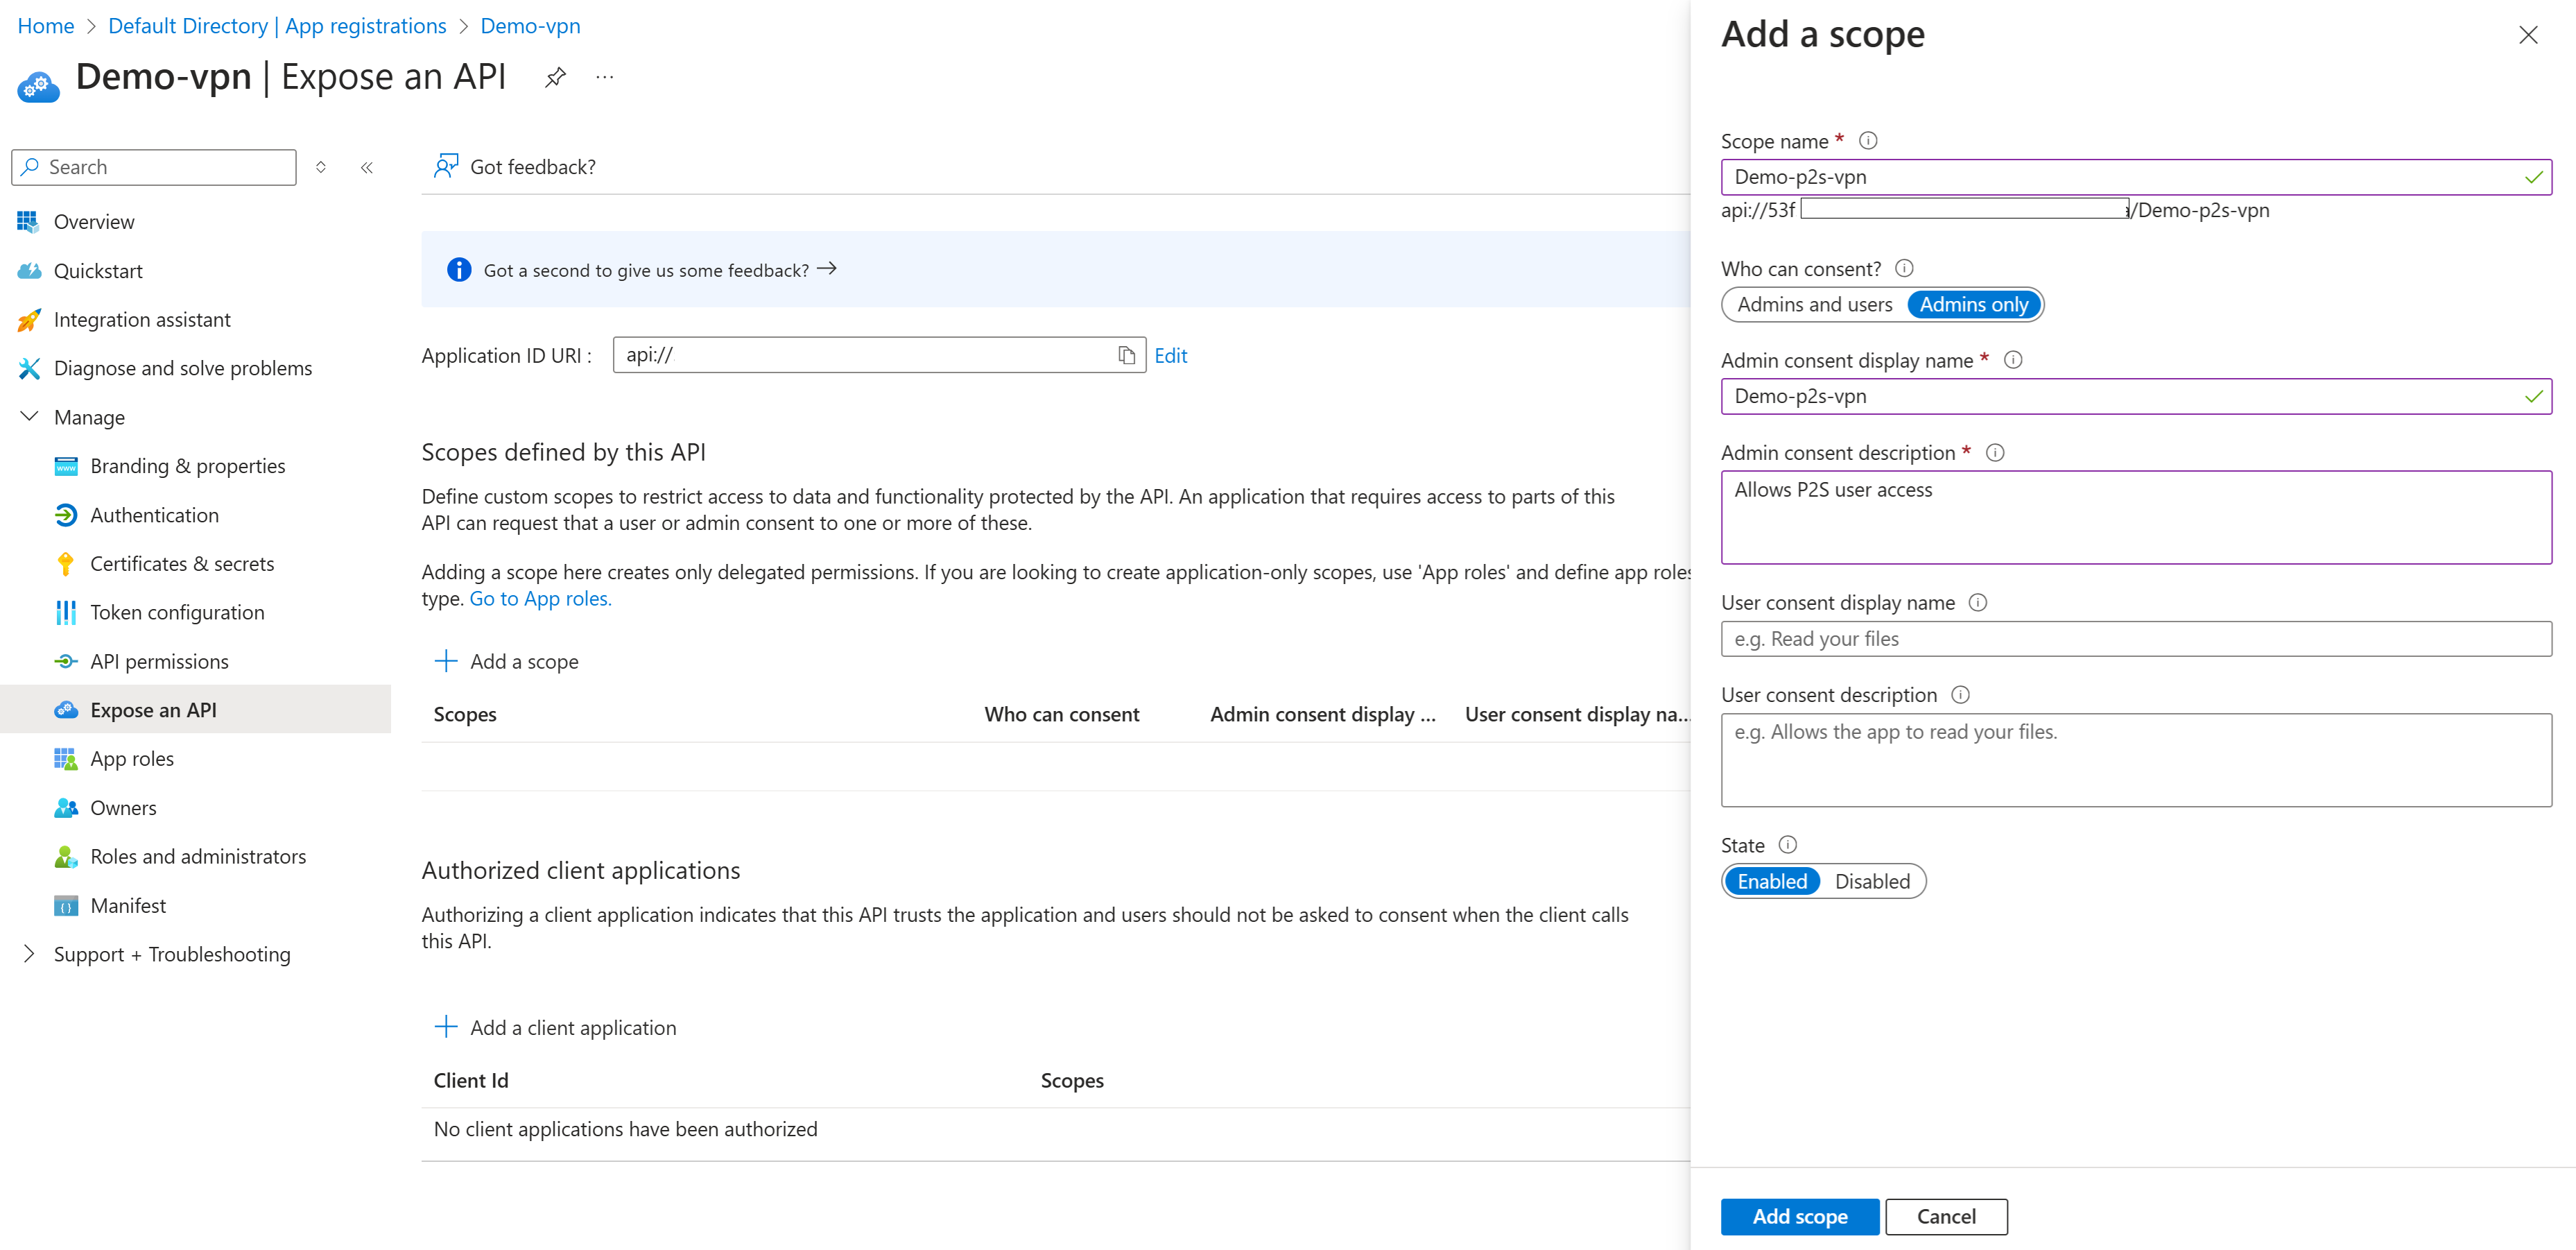
Field Value Scope name Example: p2s-vpn1 Who can consent Admins only Admin consent display name Example: p2s-vpn1-users Admin consent description Example: Access to the P2S VPN State Enabled Select Add scope to add the scope.


Add the Azure VPN Client application
In this section, you associate the Microsoft-registered Azure VPN Client application ID.
On the Expose an API page, select + Add a client application.

On the Add a client application pane, for Client ID, use the Azure Public Application ID for the Microsoft-registered Azure VPN Client app,
c632b3df-fb67-4d84-bdcf-b95ad541b5c8unless you know you need a different value.
Make sure Authorized scopes is selected.
Select Add application.


Gather values
On the Overview page for your application, make a note of the following values that you need when you configure your point-to-site VPN gateway for Microsoft Entra ID authentication.
- Application (client) ID: This is the custom Audience ID that you use for the Audience field when you configure your P2S VPN gateway.
- Directory (tenant) ID: This value is part of the value required for the Tenant and Issuer field for the P2S VPN gateway.
Configure the P2S VPN gateway
After you've completed the steps in the previous sections, continue to Configure P2S VPN Gateway for Microsoft Entra ID authentication – Microsoft-registered app.
Update to Microsoft-registered VPN app Client ID
Note
These steps can be used for any of the supported values associated with the Azure VPN Client app. We recommend that you associate the Microsoft-registered App ID Azure Public audience value c632b3df-fb67-4d84-bdcf-b95ad541b5c8 to your custom app when possible.
If you've already configured your P2S VPN gateway to use a custom value for the Audience ID field and you want to change to the new Microsoft-registered Azure VPN Client, you can authorize the new application by adding the client application to your API. Using this method, you don't need to change the settings on the Azure VPN gateway or your Azure VPN Clients if they're using the latest version of the client.
In the following steps, you add another authorized client application using the Microsoft-registered Azure VPN client App ID audience value. You don't change the value of the existing authorized client application. You can always delete the existing authorized client application if you're no longer using it.
There are a couple of different ways to get to the App registrations page. One way is through the Microsoft Entra admin center. You can also use the Azure portal and Microsoft Entra ID. Sign in with an account that has the Cloud Application Administrator role or higher.
If you have access to multiple tenants, use the Settings icon in the top menu to switch to the tenant you want to use from the Directories + subscriptions menu.
Go to App registrations and locate display name for the registered app. Click to open the page.
Click Expose an API. On the Expose an API page, notice the previous Azure VPN Client audience value
Client Idis present.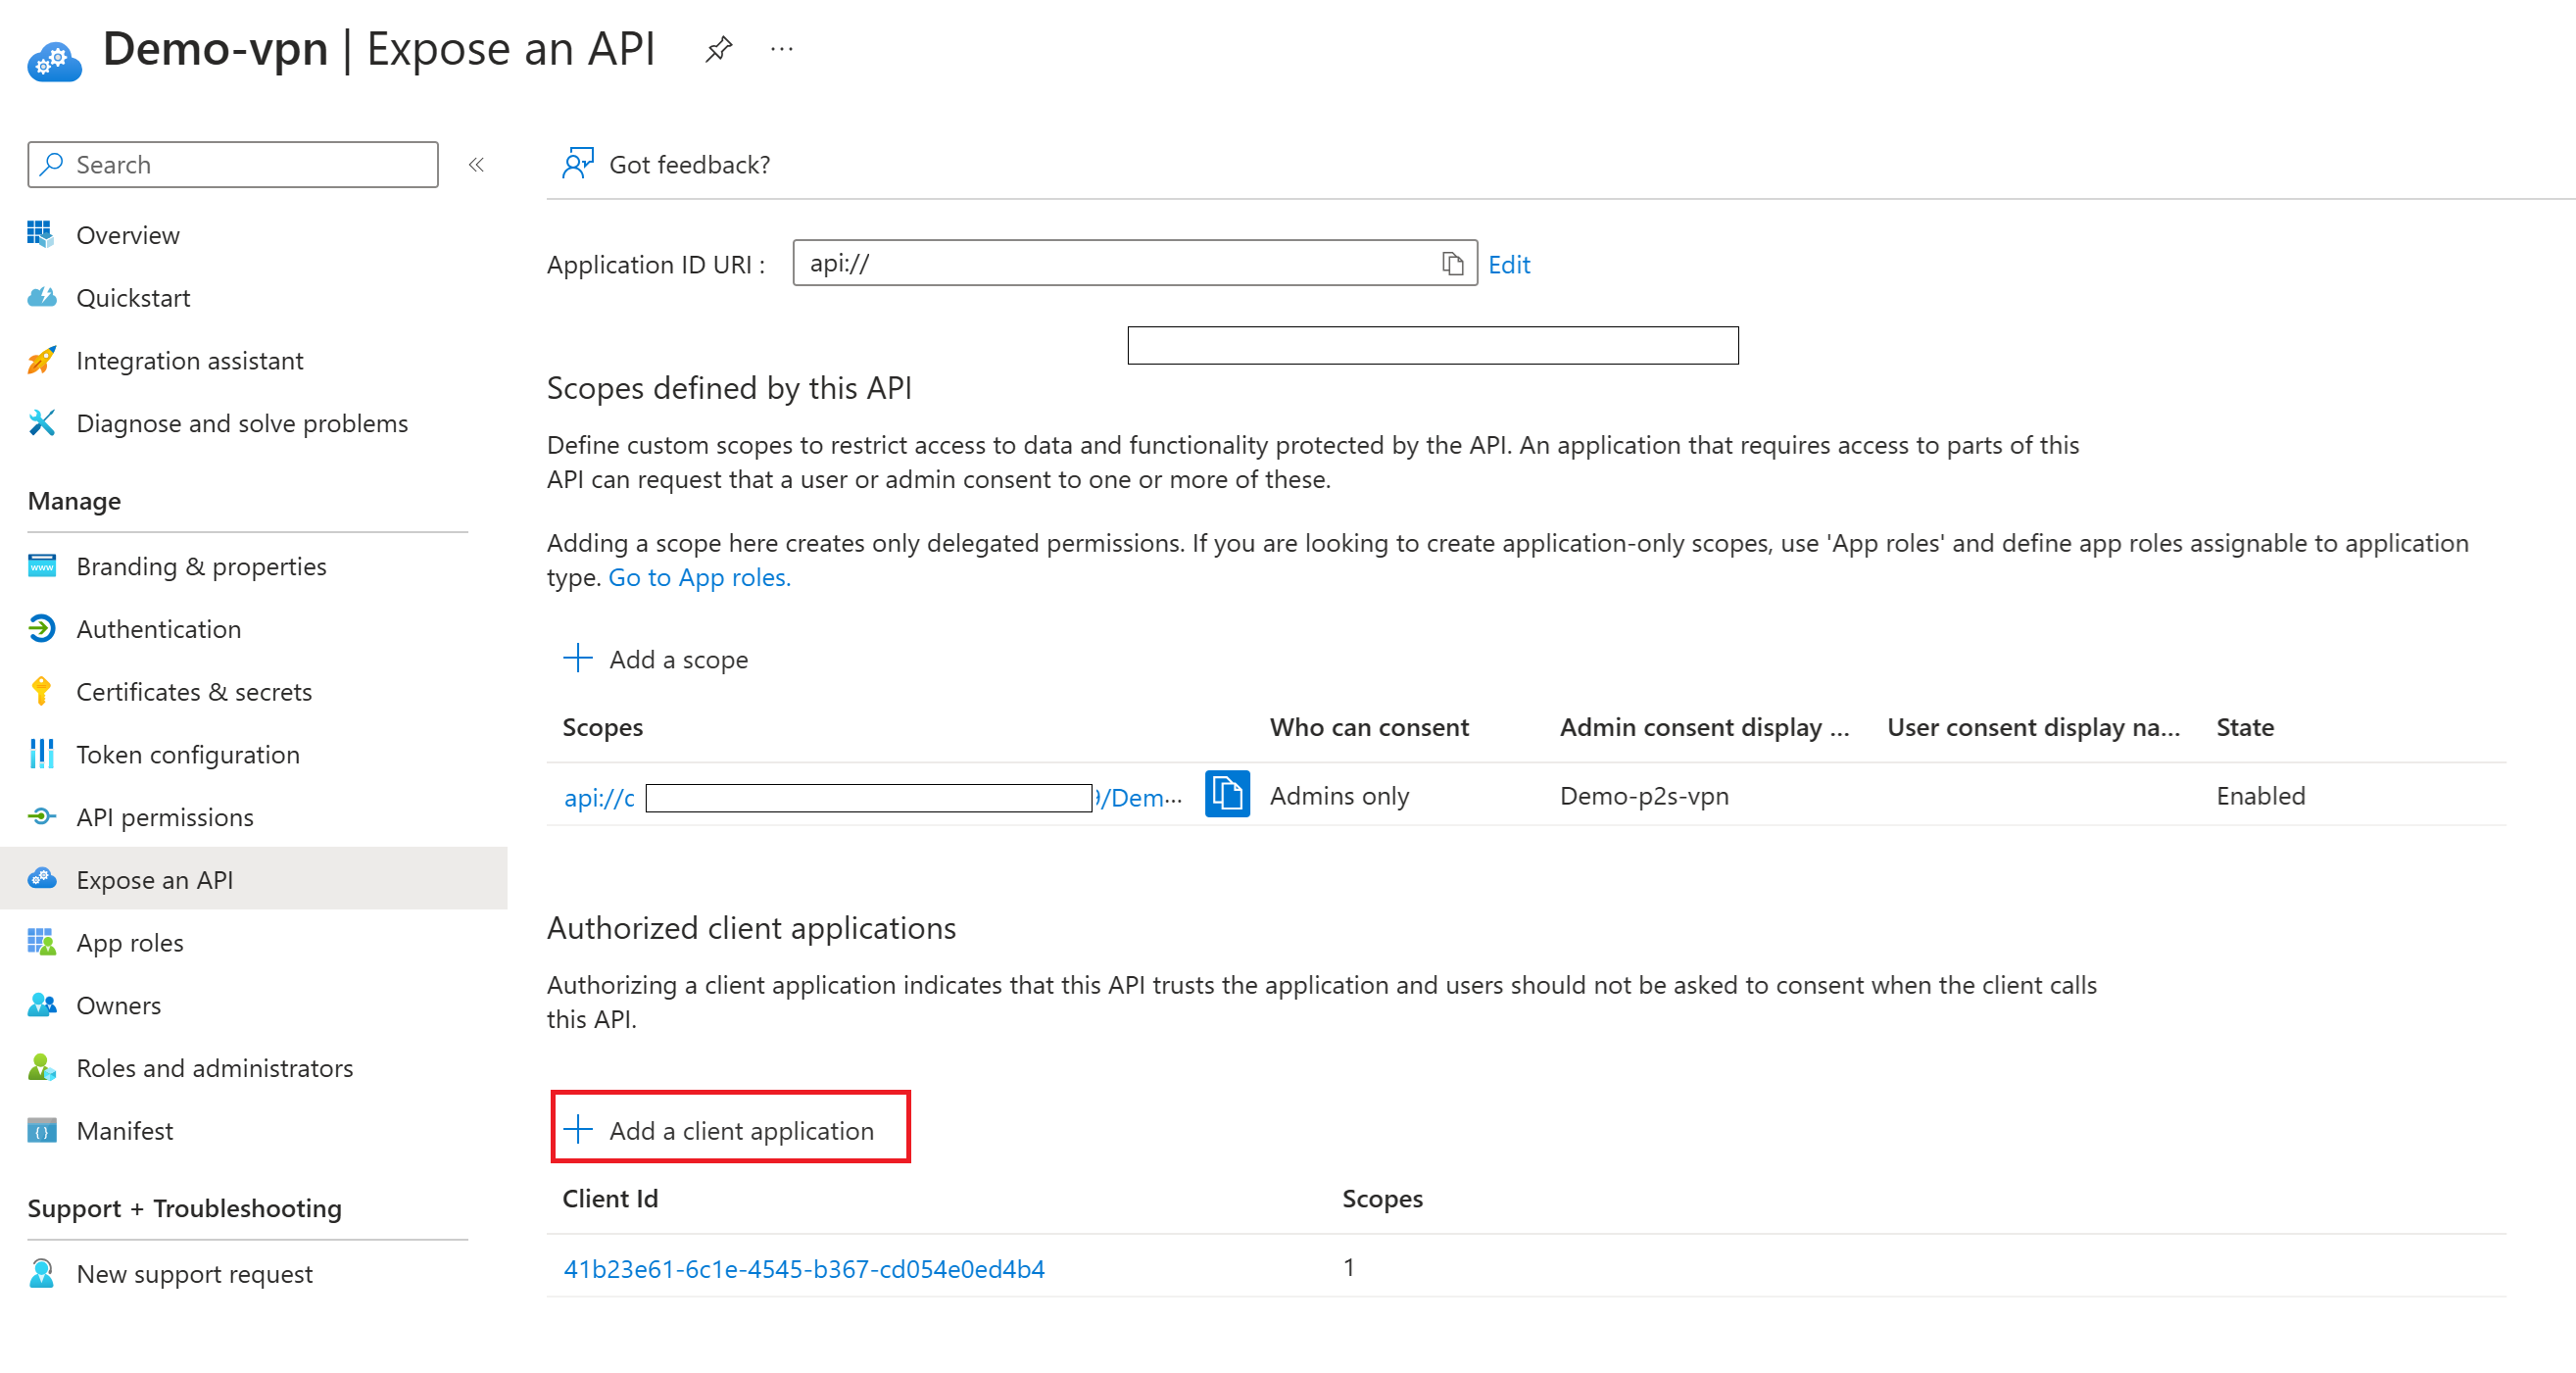
Select + Add a client application.
On the Add a client application pane, for Client ID, use the Azure Public Application ID for the Microsoft-registered Azure VPN Client app,
c632b3df-fb67-4d84-bdcf-b95ad541b5c8.Make sure Authorized scopes is selected. Then, click Add application.
On the Expose an API page, you'll now see both Client ID values listed. If you want to delete the previous version, click the value to open the Edit a client application page, and click Delete.
On the Overview page, notice that the values haven't changed. If you've already configured your gateway and clients using the custom Application (client) ID shown for the gateway Audience ID field and your clients are already configured to use this custom value, you don't need to make any additional changes.

Next steps
- Configure P2S VPN Gateway for Microsoft Entra ID authentication – Microsoft-registered app.
- To connect to your virtual network, you must configure the Azure VPN client on your client computers. See Configure a VPN client for P2S VPN connections.
- For frequently asked questions, see the Point-to-site section of the VPN Gateway FAQ.