NVMe Overview
NVM Express (NVMe) is a communication protocol that facilitates faster and more efficient data transfer between servers and storage systems by using nonvolatile memory (NVM). With NVMe, data can be transferred at the highest throughput and with the fastest response times. In this overview, learn about NVMe support on virtual machines (VM) created in Azure.
NVMe offers higher input/output operations per second (IOPS) and higher throughput in megabytes per second (MBps). This capability can significantly improve the performance of both temporary (local) and remote NVMe disk storage with Azure managed disks. Higher performance is especially beneficial for I/O-intensive workloads that require fast data transfer to the Azure managed disks.
Benefits
Azure storage performance with NVMe disks
The performance gains that your applications can achieve depend on several factors, including VM type, VM size, and I/O block size. To identify the ideal block size and to achieve peak transfer rates, test on the individual VM sizes. It's important to optimize the I/O size based on the specific requirements of your application. For more information on the performance capabilities of individual VM types, see the documentation about VM sizes in Azure.
Workloads
The VM families that use NVMe disks demonstrate performance benefits compared to Small Computer System Interface (SCSI) across various workloads that require higher I/O and improved storage performance. These workloads include application servers, web servers, databases, data warehousing, and analytics. You can achieve these benefits across VMs that use temporary and/or remote NVMe disks.
Azure Boost & NVMe VM benefits
Azure Boost is a Microsoft-designed system that offloads server virtualization processes traditionally performed by the hypervisor and host OS onto purpose-built software and hardware. Offloading these processes enables faster storage and networking performance for Azure VM customers.
One of the primary advantages of Azure Boost is its ability to enhance the throughput of Azure managed disks and local storage. This enhancement is enabled by offloading the storage processing tasks to hardware dedicated for Azure Boost.
Azure Boost also optimizes performance by using the industry-standard NVMe interface, which capitalizes on the low latency and internal parallelism of solid-state storage drives. For details on the performance that Azure Boost offers, refer to the Microsoft blog post about general availability of Azure Boost.
SCSI to NVMe
For v6, Ebsv5, and greater VMs; you need to transition from SCSI to NVMe. For more information, read about SCSI to NVMe using Linux.
Supportability
VM sizes
Typically, the older generations of general purpose, memory optimized, and compute optimized VMs (D/Ev5 or Fv2 and older) support SCSI. The newer generations (Ebsv5, Da/Ea/Fav6 and newer) typically support only the NVMe storage interface (or some offering supports SCSI and NVMe, both interfaces, Ebsv5 is an example of such offering). Also, starting from Da/Ea/Fav6 and some of the future offering, we have introduced the NVMe interface for the local SSD disks.
For specifics about which VM generations support which storage types, check the documentation about VM sizes in Azure.
VM image generation
If you think your workload benefits from NVMe performance, you must switch to the Generation 2 VMs. To create a Generation 2 VM, follow the documented steps.
Note
We currently do not support NVMe disks on Generation 1 VMs.
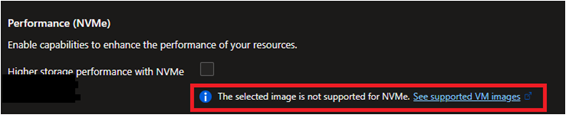
If you attempt to use a Generation 1 VM image, you won't be able to select an NVMe-capable VM or you receive an error message stating that the selected image is not supported for NVMe.
Availability of Support
NVMe support is available in more than 50 of the most popular OS images. We're not adding NVMe support to older OS images. However, we continuously improve the OS image coverage. For updates on the latest OS image support for both Linux and Windows, we recommend this documentation on OS image that supports NVMe.
If the OS you want to use doesn't support NVMe, use a VM series that still has SCSI support. Many of the latest Azure VM generations are NVMe-only and require an OS image that supports NVMe.
How to create a VM with the NVMe interface
You can enable NVMe during VM creation by using methods such as:
- Azure portal
- Azure CLI
- Azure PowerShell
- Azure Resource Manager templates
To create an NVMe-enabled VM, you must first enable the NVMe option on a VM and select the NVMe disk controller type for the VM. You can also update a VM to NVMe when stopped and deallocated, if the VM size supports NVMe.
Mark as NVMe capable
You can create NVMe interface enabled VM only by using an image (available in Marketplace, or shared in Azure Compute Gallery within your company) marked as NVMe.
Warning
If you use an unmarked image, a SCSI-based VM is created, and the VM might not perform as you intended.
To create VMs with an NVMe interface, it's essential to choose one of the supported OS images marked as NVMe. If your current OS image isn't supported for NVMe, you get this error message: "The selected image is not supported for NVMe. See supported VM images."
Using Azure portal to enable the NVMe interface during VM creation
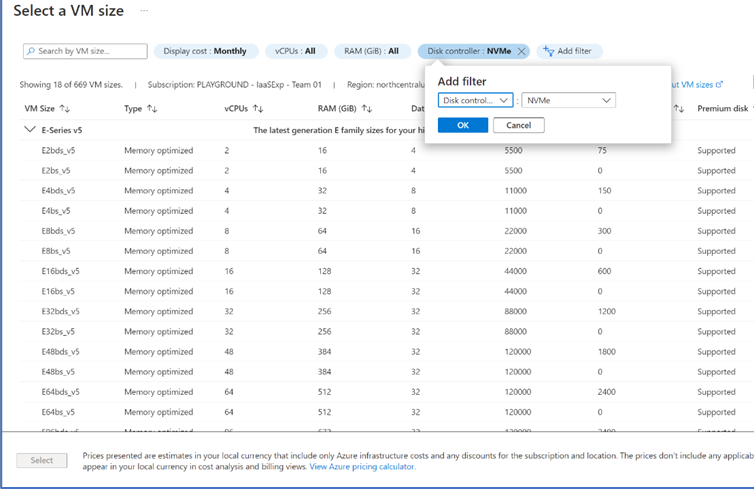
Add a disk controller filter. To find the NVMe-eligible sizes, select See All Sizes, select the Disk controller filter, and then select NVMe.
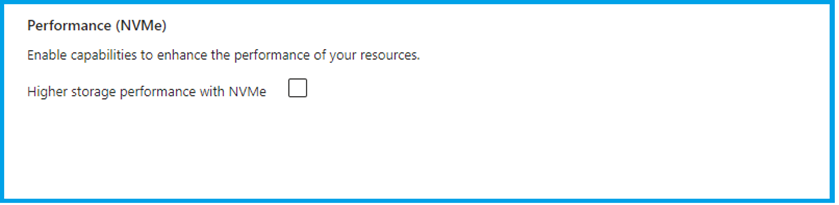
Enable the NVMe feature by going to the Advanced tab and selecting the checkbox under Performance (NVMe).
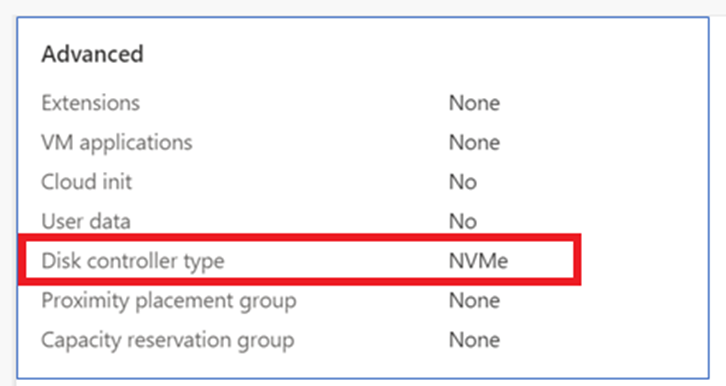
Verify that the feature is enabled by going to the Review and Create tab and confirming that the Disk controller type value is NVMe.