Install the Elastic Stack (ELK) on an Azure VM
Applies to: ✔️ Linux VMs ✔️ Flexible scale sets
This article walks you through how to deploy Elasticsearch, Logstash, and Kibana, on an Ubuntu VM in Azure. To see the Elastic Stack in action, you can optionally connect to Kibana and work with some sample logging data.
Additionally, you can follow the Deploy Elastic on Azure Virtual Machines module for a more guided tutorial on deploying Elastic on Azure Virtual Machines.
In this tutorial you learn how to:
- Create an Ubuntu VM in an Azure resource group
- Install Elasticsearch, Logstash, and Kibana on the VM
- Send sample data to Elasticsearch with Logstash
- Open ports and work with data in the Kibana console
This deployment is suitable for basic development with the Elastic Stack. For more on the Elastic Stack, including recommendations for a production environment, see the Elastic documentation and the Azure Architecture Center.
Prerequisites
Use the Bash environment in Azure Cloud Shell. For more information, see Quickstart for Bash in Azure Cloud Shell.

If you prefer to run CLI reference commands locally, install the Azure CLI. If you're running on Windows or macOS, consider running Azure CLI in a Docker container. For more information, see How to run the Azure CLI in a Docker container.
If you're using a local installation, sign in to the Azure CLI by using the az login command. To finish the authentication process, follow the steps displayed in your terminal. For other sign-in options, see Sign in with the Azure CLI.
When you're prompted, install the Azure CLI extension on first use. For more information about extensions, see Use extensions with the Azure CLI.
Run az version to find the version and dependent libraries that are installed. To upgrade to the latest version, run az upgrade.
- This article requires version 2.0.4 or later of the Azure CLI. If using Azure Cloud Shell, the latest version is already installed.
Create a resource group
Create a resource group with the az group create command. An Azure resource group is a logical container into which Azure resources are deployed and managed.
The following example creates a resource group named myResourceGroup in the eastus location.
az group create --name myResourceGroup --location eastus
Create a virtual machine
Create a VM with the az vm create command.
The following example creates a VM named myVM and creates SSH keys if they do not already exist in a default key location. To use a specific set of keys, use the --ssh-key-value option.
az vm create \
    --resource-group myResourceGroup \
    --name myVM \
    --image Ubuntu2204 \
    --admin-username azureuser \
    --generate-ssh-keys
When the VM has been created, the Azure CLI shows information similar to the following example. Take note of the publicIpAddress. This address is used to access the VM.
{
  "fqdns": "",
  "id": "/subscriptions/<subscription ID>/resourceGroups/myResourceGroup/providers/Microsoft.Compute/virtualMachines/myVM",
  "location": "eastus",
  "macAddress": "00-0D-3A-23-9A-49",
  "powerState": "VM running",
  "privateIpAddress": "10.0.0.4",
  "publicIpAddress": "40.68.254.142",
  "resourceGroup": "myResourceGroup"
}
SSH into your VM
If you don't already know the public IP address of your VM, run the az network public-ip list command:
az network public-ip list --resource-group myResourceGroup --query [].ipAddress
Use the following command to create an SSH session with the virtual machine. Substitute the correct public IP address of your virtual machine. In this example, the IP address is 40.68.254.142.
ssh azureuser@40.68.254.142
Install the Elastic Stack
Import the Elasticsearch signing key and update your APT sources list to include the Elastic package repository:
wget -qO - https://artifacts.elastic.co/GPG-KEY-elasticsearch | sudo apt-key add -
echo "deb https://artifacts.elastic.co/packages/5.x/apt stable main" | sudo tee -a /etc/apt/sources.list.d/elastic-5.x.list
Install the Java Virtual on the VM and configure the JAVA_HOME variable-this is necessary for the Elastic Stack components to run.
sudo apt update && sudo apt install openjdk-8-jre-headless
export JAVA_HOME=/usr/lib/jvm/java-8-openjdk-amd64
Run the following commands to update Ubuntu package sources and install Elasticsearch, Kibana, and Logstash.
sudo apt update && sudo apt install elasticsearch kibana logstash
Note
Detailed installation instructions, including directory layouts and initial configuration, are maintained in Elastic's documentation
Start Elasticsearch
Start Elasticsearch on your VM with the following command:
sudo systemctl start elasticsearch.service
This command produces no output, so verify that Elasticsearch is running on the VM with this curl command:
sudo curl -XGET 'localhost:9200/'
If Elasticsearch is running, you see output like the following:
{
  "name" : "w6Z4NwR",
  "cluster_name" : "elasticsearch",
  "cluster_uuid" : "SDzCajBoSK2EkXmHvJVaDQ",
  "version" : {
    "number" : "5.6.3",
    "build_hash" : "1a2f265",
    "build_date" : "2017-10-06T20:33:39.012Z",
    "build_snapshot" : false,
    "lucene_version" : "6.6.1"
  },
  "tagline" : "You Know, for Search"
}
Start Logstash and add data to Elasticsearch
Start Logstash with the following command:
sudo systemctl start logstash.service
Test Logstash in interactive mode to make sure it's working correctly:
sudo /usr/share/logstash/bin/logstash -e 'input { stdin { } } output { stdout {} }'
This is a basic Logstash pipeline that echoes standard input to standard output.
The stdin plugin is now waiting for input:
hello azure
2017-10-11T20:01:08.904Z myVM hello azure
Set up Logstash to forward the kernel messages from this VM to Elasticsearch. Create a new file in an empty directory called vm-syslog-logstash.conf and paste in the following Logstash configuration:
input {
    stdin {
        type => "stdin-type"
    }

    file {
        type => "syslog"
        path => [ "/var/log/*.log", "/var/log/*/*.log", "/var/log/messages", "/var/log/syslog" ]
        start_position => "beginning"
    }
}

output {

    stdout {
        codec => rubydebug
    }
    elasticsearch {
        hosts  => "localhost:9200"
    }
}
Test this configuration and send the syslog data to Elasticsearch:
sudo /usr/share/logstash/bin/logstash -f vm-syslog-logstash.conf
You see the syslog entries in your terminal echoed as they are sent to Elasticsearch. Use CTRL+C to exit out of Logstash once you've sent some data.
Start Kibana and visualize the data in Elasticsearch
Edit /etc/kibana/kibana.yml and change the IP address Kibana listens on so you can access it from your web browser.
server.host: "0.0.0.0"
Start Kibana with the following command:
sudo systemctl start kibana.service
Open port 5601 from the Azure CLI to allow remote access to the Kibana console:
az vm open-port --port 5601 --resource-group myResourceGroup --name myVM
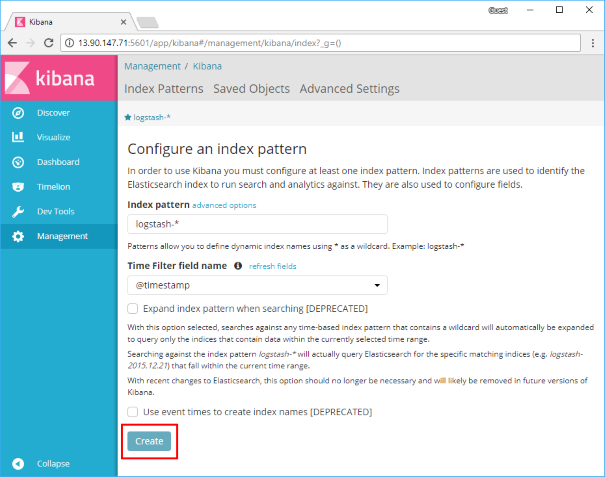
Open up the Kibana console and select Create to generate a default index based on the syslog data you sent to Elasticsearch earlier.
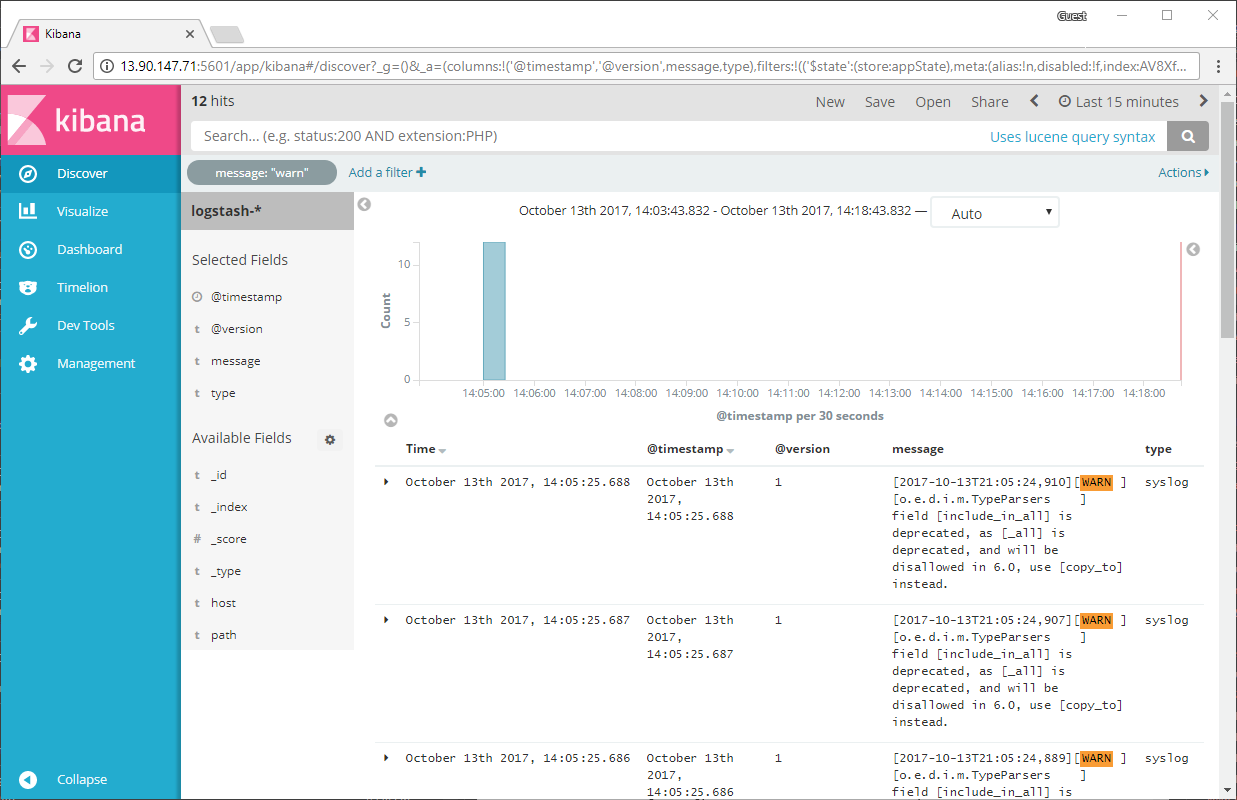
Select Discover on the Kibana console to search, browse, and filter through the syslog events.
Next steps
In this tutorial, you deployed the Elastic Stack into a development VM in Azure. You learned how to:
- Create an Ubuntu VM in an Azure resource group
- Install Elasticsearch, Logstash, and Kibana on the VM
- Send sample data to Elasticsearch from Logstash
- Open ports and work with data in the Kibana console