Set up single sign-on using Microsoft Entra ID for Spring Cloud Gateway and API Portal
Note
The Basic, Standard, and Enterprise plans entered a retirement period on March 17, 2025. For more information, see the Azure Spring Apps retirement announcement.
The Standard consumption and dedicated plan entered a retirement period on September 30, 2024, with a complete shutdown by the end of March 2025. For more information, see Migrate Azure Spring Apps Standard consumption and dedicated plan to Azure Container Apps.
This article applies to: ❎ Basic/Standard ✅ Enterprise
This article shows you how to configure single sign-on (SSO) for Spring Cloud Gateway or API Portal using the Microsoft Entra ID as an OpenID identify provider.
Prerequisites
- An Enterprise plan instance with Spring Cloud Gateway or API portal enabled. For more information, see Quickstart: Build and deploy apps to Azure Spring Apps using the Enterprise plan.
- Sufficient permissions to manage Microsoft Entra applications.
To enable SSO for Spring Cloud Gateway or API Portal, you need the following four properties configured:
| SSO Property | Microsoft Entra Configuration |
|---|---|
| clientId | See Register App |
| clientSecret | See Create Client Secret |
| scope | See Configure Scope |
| issuerUri | See Generate Issuer URI |
You'll configure the properties in Microsoft Entra ID in the following steps.
Assign an endpoint for Spring Cloud Gateway or API Portal
First, you must get the assigned public endpoint for Spring Cloud Gateway and API portal by following these steps:
- Open your Enterprise plan service instance in the Azure portal.
- Select Spring Cloud Gateway or API portal under VMware Tanzu components in the left menu.
- Select Yes next to Assign endpoint.
- Copy the URL for use in the next section of this article.
Create a Microsoft Entra application registration
Register your application to establish a trust relationship between your app and the Microsoft identity platform using the following steps:
- From the Home screen, select Microsoft Entra ID from the left menu.
- Select App Registrations under Manage, then select New registration.
- Enter a display name for your application under Name, then select an account type to register under Supported account types.
- In Redirect URI (optional) select Web, then enter the URL from the above section in the text box. The redirect URI is the location where Microsoft Entra ID redirects your client and sends security tokens after authentication.
- Select Register to finish registering the application.
When registration finishes, you'll see the Application (client) ID on the Overview screen of the App registrations* page.
Add a redirect URI after app registration
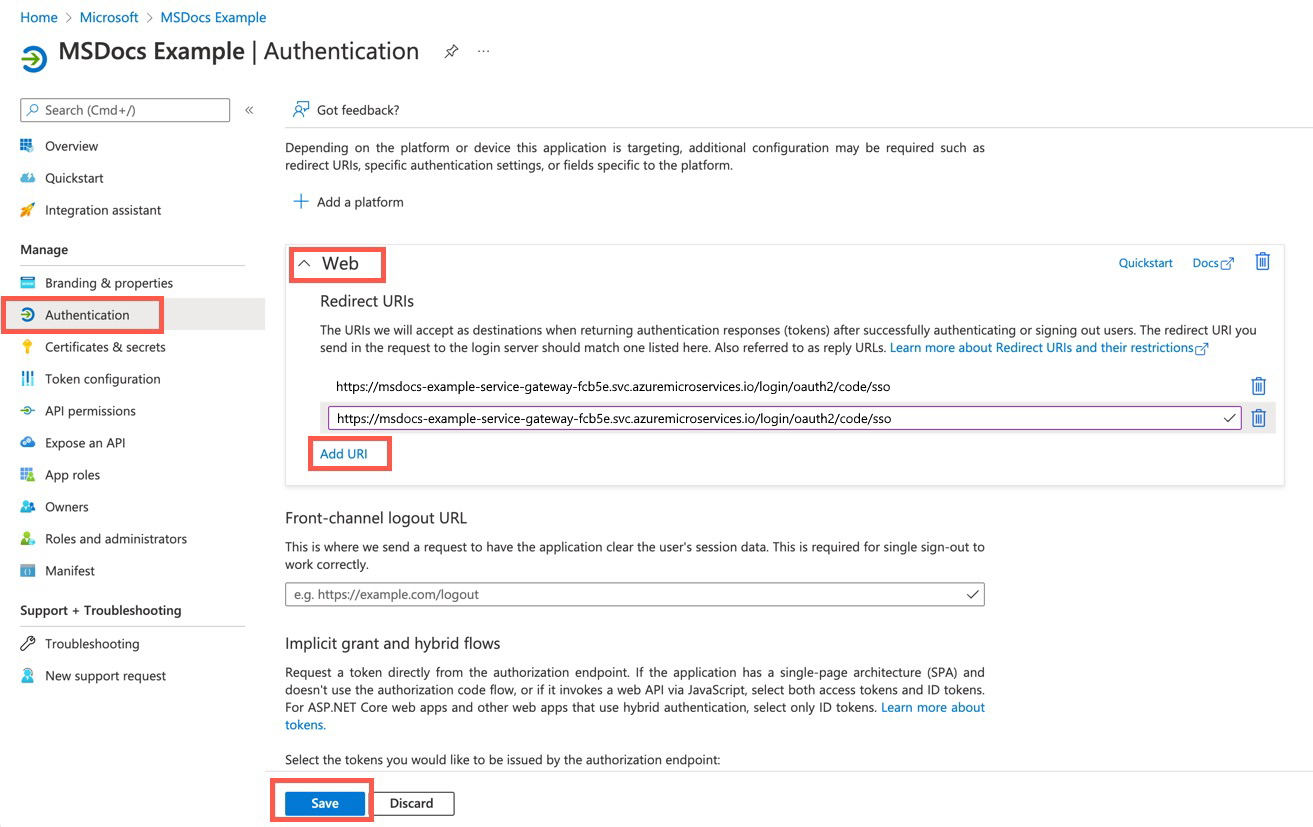
You can also add redirect URIs after app registration by following these steps:
- From your application overview, under Manage in the left menu, select Authentication.
- Select Web, then select Add URI under Redirect URIs.
- Add a new redirect URI, then select Save.
For more information on Application Registration, see Quickstart: Register an application with the Microsoft identity platform.
Add a client secret
The application uses a client secret to authenticate itself in SSO workflow. You can add a client secret using the following steps:
- From your application overview, under Manage in the left menu, select Certificates & secrets.
- Select Client secrets, then select New client secret.
- Enter a description for the client secret, then set an expiration date.
- Select Add.
Warning
Remember to save the client secret in a secure place. You can't retrieve it after you leave this page. The client secret should be provided with the client ID when you sign in as the application.
Configure scope
The scope property of SSO is a list of scopes to be included in JWT identity tokens. They're often referred to as permissions. Identity platform supports several OpenID Connect scopes, such as openid, email, and profile. For more information, see the OpenID Connect scopes section of Scopes and permissions in the Microsoft identity platform.
Configure issuer URI
The issuer URI is the URI that is asserted as its Issuer Identifier. For example, if the issuer-uri provided is https://example.com, then an OpenID Provider Configuration Request will be made to https://example.com/.well-known/openid-configuration.
The issuer URI of Microsoft Entra ID is like <authentication-endpoint>/<Your-TenantID>/v2.0. Replace <authentication-endpoint> with the authentication endpoint for your cloud environment (for example, https://login.microsoftonline.com for global Azure), and replace <Your-TenantID> with the Directory (tenant) ID where the application was registered.
Configure SSO
After configuring your Microsoft Entra application, you can set up the SSO properties of Spring Cloud Gateway or API Portal following these steps:
- Select Spring Cloud Gateway or API portal under VMware Tanzu components in the left menu, then select Configuration.
- Enter the
Scope,Client Id,Client Secret, andIssuer URIin the appropriate fields. Separate multiple scopes with a comma. - Select Save to enable the SSO configuration.
Note
After configuring SSO properties, remember to enable SSO for the Spring Cloud Gateway routes by setting ssoEnabled=true. For more information, see route configuration.
