Use Application Configuration Service for Tanzu
Note
The Basic, Standard, and Enterprise plans entered a retirement period on March 17, 2025. For more information, see the Azure Spring Apps retirement announcement.
The Standard consumption and dedicated plan entered a retirement period on September 30, 2024, with a complete shutdown by the end of March 2025. For more information, see Migrate Azure Spring Apps Standard consumption and dedicated plan to Azure Container Apps.
Note
Application Configuration Service for VMware Tanzu reaches the end of support on August 31, 2025. We recommend migrating it to managed Spring Cloud Config Server. For more information on how to perform the migration, see Migrate Application Configuration Service to managed Spring Cloud Config Server.
This article applies to: ❎ Basic/Standard ✅ Enterprise
This article shows you how to use Application Configuration Service for VMware Tanzu with the Azure Spring Apps Enterprise plan.
Application Configuration Service for VMware Tanzu is one of the commercial VMware Tanzu components. It enables the management of Kubernetes-native ConfigMap resources that are populated from properties defined in one or more Git repositories.
With Application Configuration Service, you have a central place to manage external properties for applications across all environments. To understand the differences from Spring Cloud Config Server in the Basic and Standard plans, see the Use Application Configuration Service for external configuration section of Migrate an Azure Spring Apps Basic or Standard plan instance to the Enterprise plan.
Application Configuration Service is offered in two versions: Gen1 and Gen2. The Gen1 version mainly serves existing customers for backward compatibility purposes, and is supported only until April 30, 2024. New service instances should use Gen2. The Gen2 version uses flux as the backend to communicate with Git repositories, and provides better performance compared to Gen1.
The following table shows the subcomponent relationships:
| Application Configuration Service generation | Subcomponents |
|---|---|
| Gen1 | application-configuration-service |
| Gen2 | application-configuration-service flux-source-controller |
The following table shows some benchmark data for your reference. However, the Git repository size is a key factor with significant impact on the performance data. We recommend that you store only the necessary configuration files in the Git repository in order to keep it small.
| Application Configuration Service generation | Duration to refresh under 100 patterns | Duration to refresh under 250 patterns | Duration to refresh under 500 patterns |
|---|---|---|---|
| Gen1 | 330 s | 840 s | 1500 s |
| Gen2 | 13 s | 100 s | 378 s |
Gen2 also provides more security verifications when you connect to a remote Git repository. Gen2 requires a secure connection if you're using HTTPS, and verifies the correct host key and host algorithm when using an SSH connection.
You can choose the version of Application Configuration Service when you create an Azure Spring Apps Enterprise service instance. The default version is Gen1. You can also upgrade to Gen2 after the instance is created, but downgrade isn't supported. The upgrade is zero downtime, but we still recommend that you to test in a staging environment before moving to a production environment.
Prerequisites
- An already provisioned Azure Spring Apps Enterprise plan instance with Application Configuration Service enabled. For more information, see Quickstart: Build and deploy apps to Azure Spring Apps using the Enterprise plan.
Manage Application Configuration Service settings
Application Configuration Service supports Azure DevOps, GitHub, GitLab, and Bitbucket for storing your configuration files.
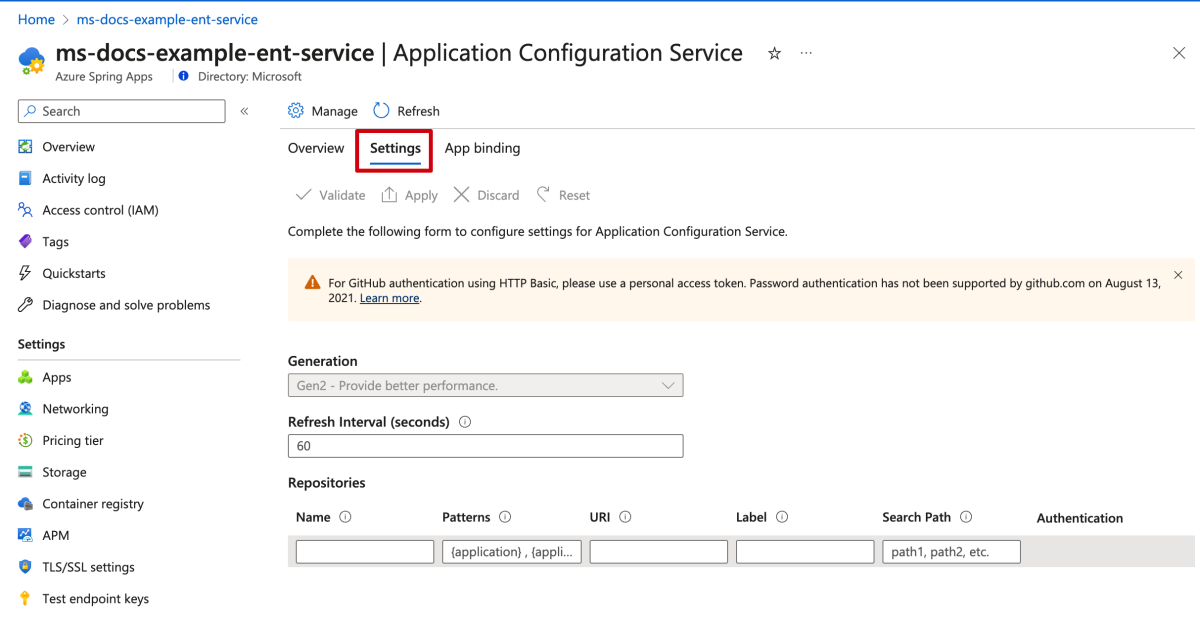
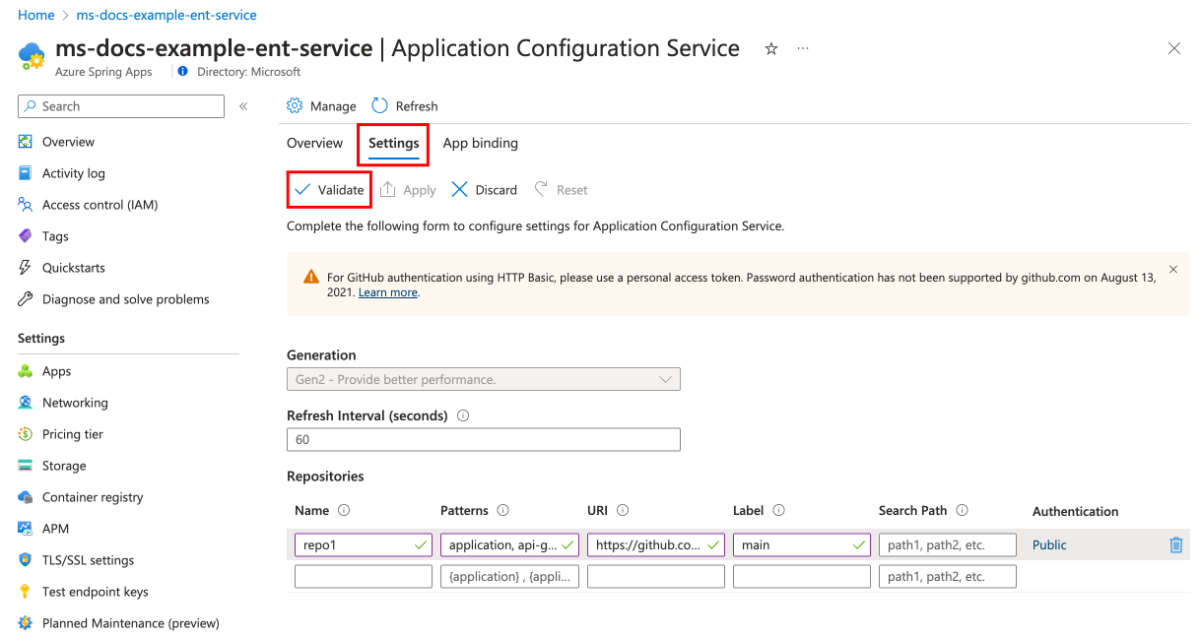
To manage the service settings, open the Settings section. In this section, you can configure the following key aspects:
- Generation: Upgrade the service generation.
- Refresh Interval: Adjust the frequency at which the service checks for updates from Git repositories.
- Repositories: Add new entries, or modify existing ones. This function enables you to control which repositories the service monitors use to pull data.
If your current service generation is Gen1, you can upgrade to Gen2 for better performance. For more information, see the Upgrade from Gen1 to Gen2 section.
The Refresh Interval specifies the frequency in seconds for checking updates in the repository. The minimum value is 0, which disables automatic refresh. For optimal performance, set this interval to a minimum value of 60 seconds.
The following table describes the properties for each repository entry:
| Property | Required? | Description |
|---|---|---|
Name |
Yes | A unique name to label each Git repository. |
Patterns |
Yes | The patterns to search for in Git repositories. For each pattern, use a format such as {application} or {application}/{profile} rather than {application}-{profile}.yml. Separate the patterns with commas. For more information, see the Pattern section of this article. |
URI |
Yes | A Git URI - for example, https://github.com/Azure-Samples/piggymetrics-config or git@github.com:Azure-Samples/piggymetrics-config. |
Label |
Yes | The branch name to search for in the Git repository. |
Search path |
No | Optional search paths, separated by commas, for searching subdirectories of the Git repository. |
Pattern
Configuration is pulled from Git backends using what you define in a pattern. A pattern is a combination of {application}/{profile} as described in the following guidelines:
- {application} - The name of an application whose configuration you're retrieving. The value
applicationis considered the default application and includes configuration information shared across multiple applications. Any other value refers to a specific application and includes properties for both the specific application and shared properties for the default application. - {profile} - Optional. The name of a profile whose properties you can retrieve. An empty value, or the value
default, includes properties that are shared across profiles. Non-default values include properties for the specified profile and properties for the default profile.
Authentication
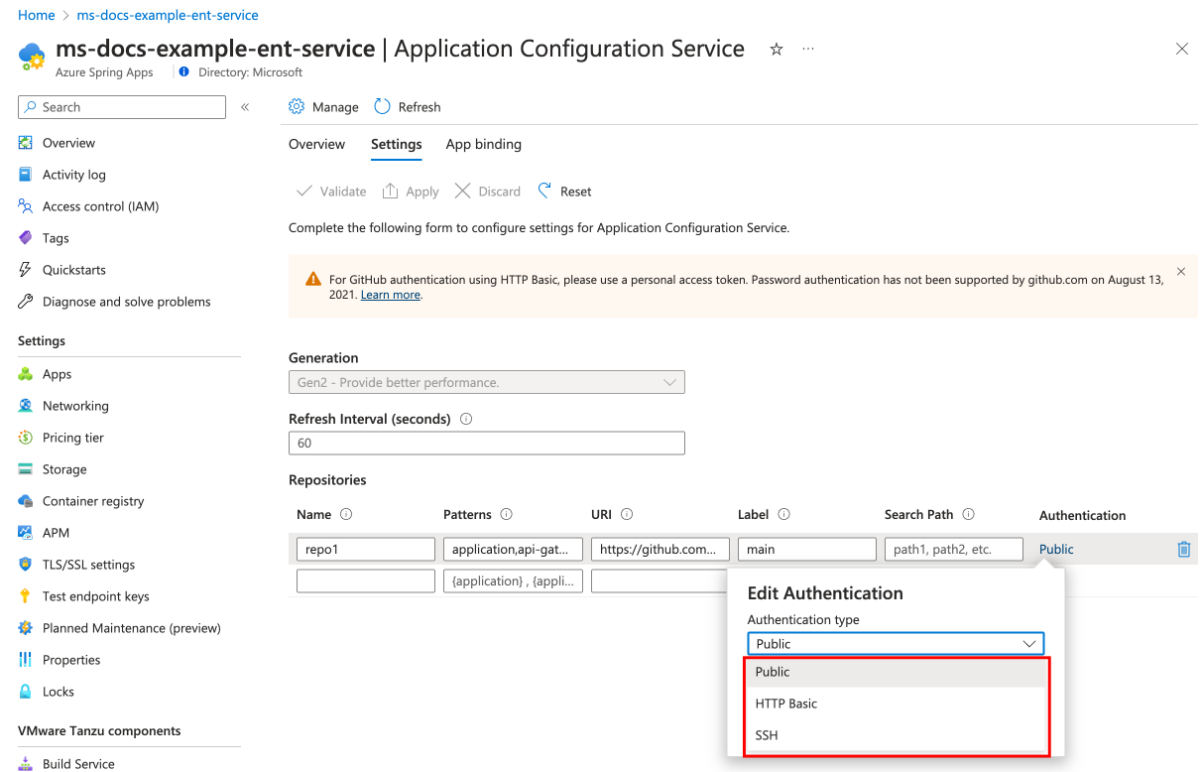
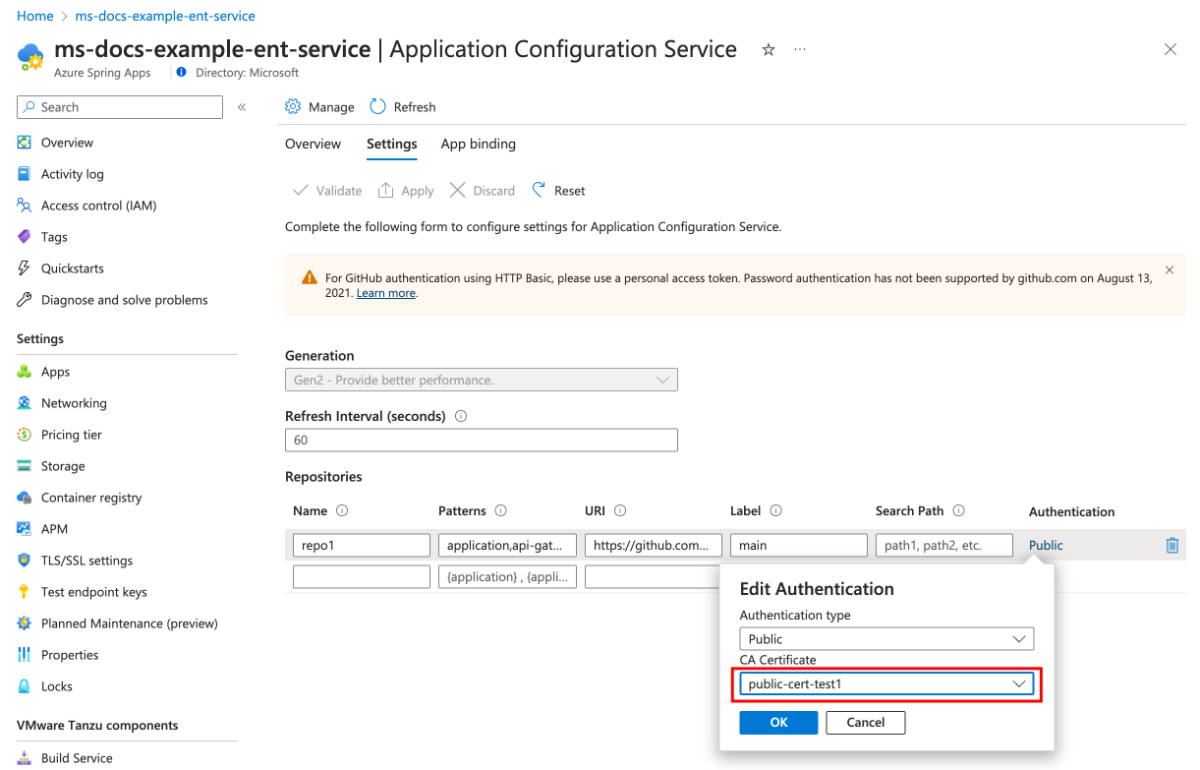
The following screenshot shows the three types of repository authentication supported by Application Configuration Service:
The following list describes the three authentication types:
Public repository.
You don't need any extra authentication configuration when you use a public repository. Select Public in the Authentication form.
The following table shows the configurable property you can use to set up a public Git repository:
Property Required? Description CA certificateNo Required only when a self-signed cert is used for the Git repo URL. Private repository with basic authentication.
The following table shows the configurable properties you can use to set up a private Git repository with basic authentication:
Property Required? Description usernameYes The username used to access the repository. passwordYes The password used to access the repository. CA certificateNo Required only when a self-signed cert is used for the Git repo URL. Private repository with SSH authentication.
The following table shows the configurable properties you can use to set up a private Git repository with SSH:
Property Required? Description Private keyYes The private key that identifies the Git user. Passphrase-encrypted private keys aren't supported. Host keyNo for Gen1
Yes for Gen2The host key of the Git server. If you connect to the server via Git on the command line, the host key is in your .ssh/known_hosts file. Don't include the algorithm prefix, because it's specified in Host key algorithm.Host key algorithmNo for Gen1
Yes for Gen2The algorithm for hostKey: one ofssh-dss,ssh-rsa,ecdsa-sha2-nistp256,ecdsa-sha2-nistp384, andecdsa-sha2-nistp521. Required if you supplyHost key.Strict host key checkingNo Optional value that indicates whether the backend should be ignored if it encounters an error when using the provided Host key. Valid values aretrueandfalse. The default value istrue.
To validate access to the target URI, select Validate. After validation completes successfully, select Apply to update the configuration settings.
Upgrade from Gen1 to Gen2
Application Configuration Service Gen2 provides better performance compared to Gen1, especially when you have a large number of configuration files. We recommend using Gen2, especially because Gen1 is being retired soon. The upgrade from Gen1 to Gen2 is zero downtime, but we still recommend that you test in a staging environment before moving to a production environment.
Gen2 requires more configuration properties than Gen1 when using SSH authentication. You need to update the configuration properties in your application to make it work with Gen2. The following table shows the required properties for Gen2 when using SSH authentication:
| Property | Description |
|---|---|
Host key |
The host key of the Git server. If you connect to the server via Git on the command line, the host key is in your .ssh/known_hosts file. Don't include the algorithm prefix, because it's specified in Host key algorithm. |
Host key algorithm |
The algorithm for hostKey: one of ssh-dss, ssh-rsa, ecdsa-sha2-nistp256, ecdsa-sha2-nistp384, or ecdsa-sha2-nistp521. |
Use the following steps to upgrade from Gen1 to Gen2:
In the Azure portal, navigate to the Application Configuration Service page for your Azure Spring Apps service instance.
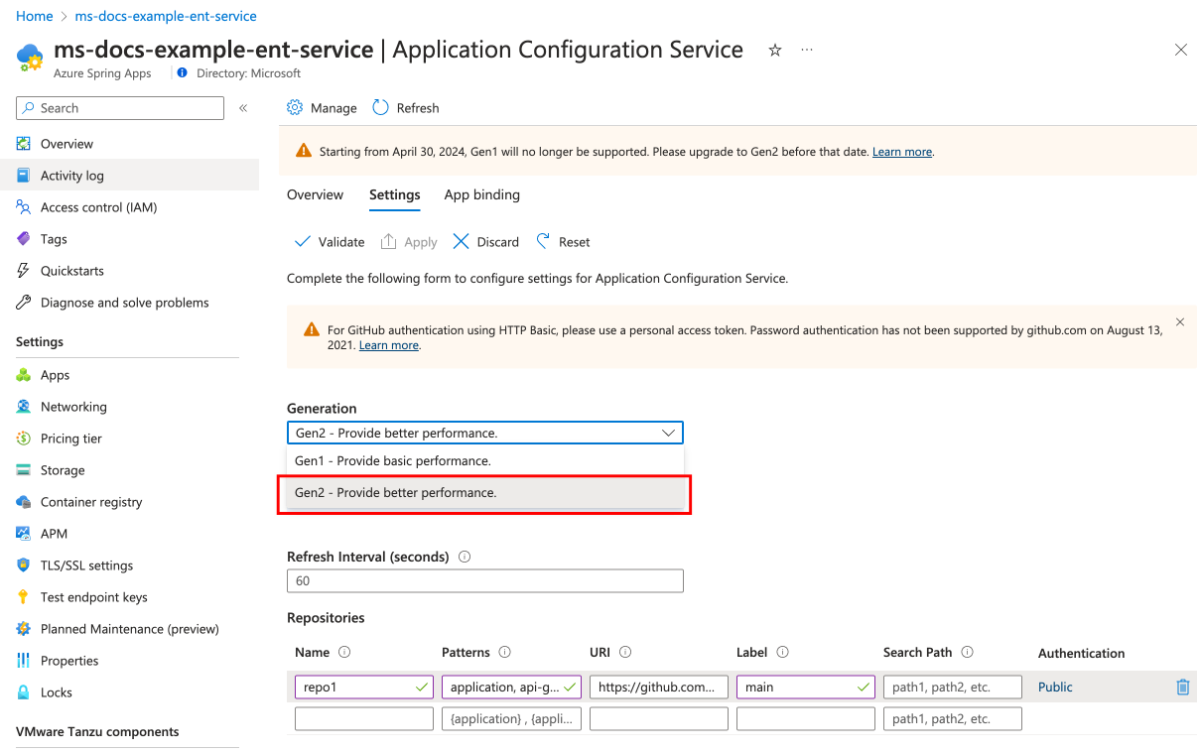
Select the Settings section and then select Gen2 in the Generation dropdown menu.
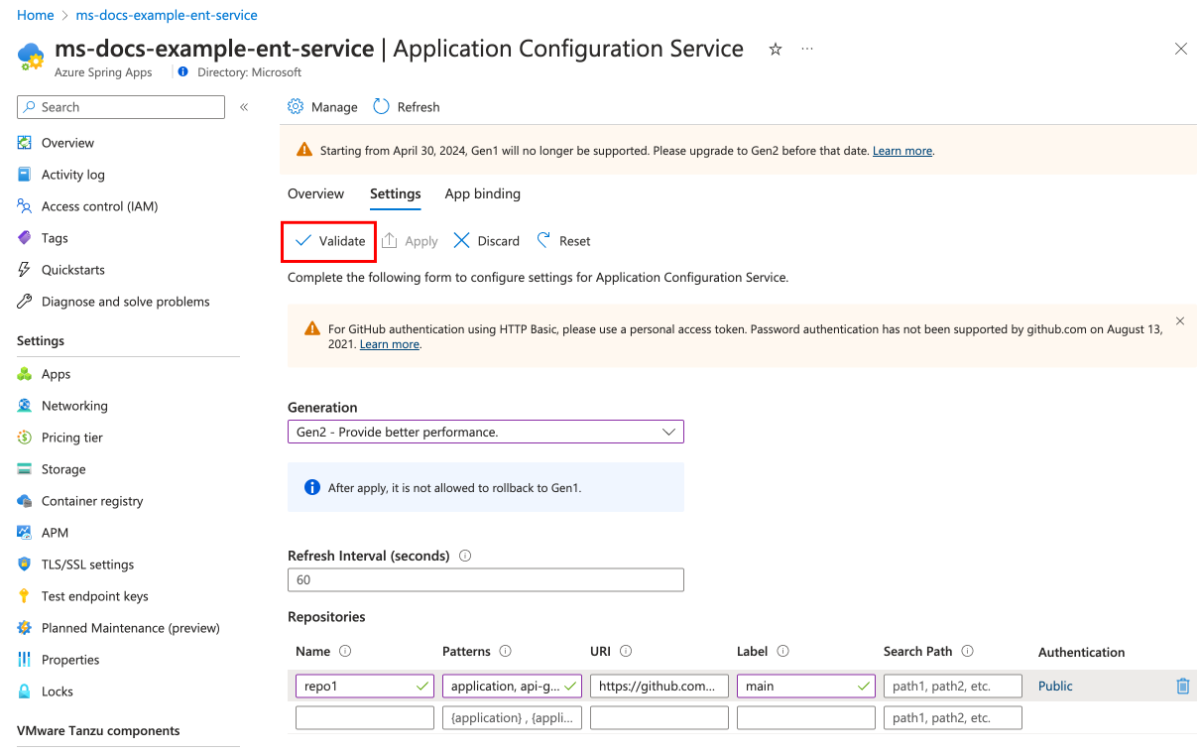
Select Validate to validate access to the target URI. After validation completes successfully, select Apply to update the configuration settings.
Polyglot support
The Application Configuration Service works seamlessly with Spring Boot applications. The properties generated by the service are imported as external configurations by Spring Boot and injected into the beans. You don't need to write extra code. You can consume the values by using the @Value annotation, accessed through Spring's Environment abstraction, or you can bind them to structured objects by using the @ConfigurationProperties annotation.
The Application Configuration Service also supports polyglot apps like dotNET, Go, Python, and so on. To access config files that you specify to load during polyglot app deployment in the apps, try to access a file path that you can retrieve through an environment variable with a name such as AZURE_SPRING_APPS_CONFIG_FILE_PATH. You can access all your intended config files under that path. To access the property values in the config files, use the existing read/write file libraries for your app.
Refresh strategies
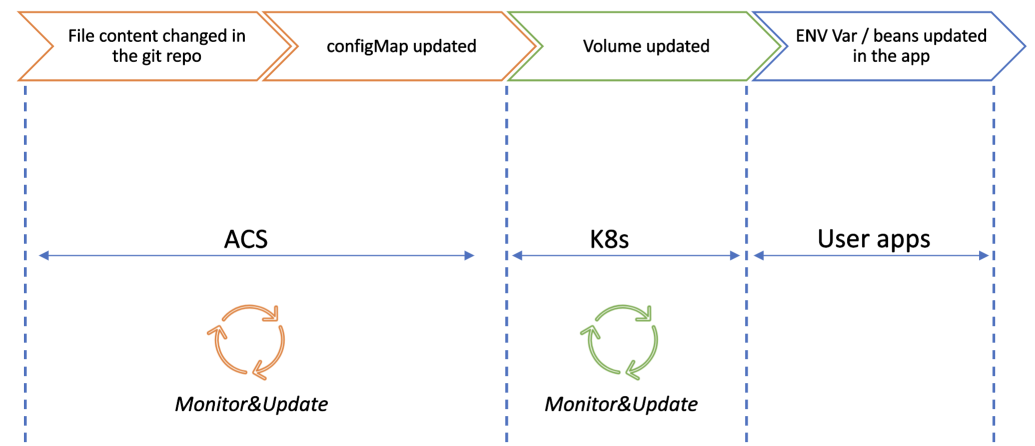
When you modify and commit your configurations in a Git repository, several steps are involved before these changes are reflected in your applications. This process, though automated, involves the following distinct stages and components, each with its own timing and behavior:
- Polling by Application Configuration Service: The Application Configuration Service regularly polls the backend Git repositories to detect any changes. This polling occurs at a set frequency, defined by the refresh interval. When a change is detected, Application Configuration Service updates the Kubernetes
ConfigMap. ConfigMapupdate and interaction with kubelet cache: In Azure Spring Apps, thisConfigMapis mounted as a data volume to the relevant application. However, there's a natural delay in this process due to the frequency at which the kubelet refreshes its cache to recognize changes inConfigMap.- Application reads updated configuration: Your application running in the Azure Spring Apps environment can access the updated configuration values. The existing beans in the Spring Context aren't automatically refreshed to use the updated configurations.
These stages are summarized in the following diagram:
You can adjust the polling refresh interval of the Application Configuration Service to align with your specific needs. To apply the updated configurations in your application, a restart or refresh action is necessary.
In Spring applications, properties are held or referenced as beans within the Spring Context. To load new configurations, consider using the following methods:
Restart the application. Restarting the application always loads the new configuration.
Call the
/actuator/refreshendpoint exposed on the config client via the Spring Actuator.To use this method, add the following dependency to your configuration client's pom.xml file:
<dependency>
   <groupId>org.springframework.boot</groupId>
   <artifactId>spring-boot-starter-actuator</artifactId>
</dependency>
You can also enable the actuator endpoint by adding the following configuration:
management.endpoints.web.exposure.include=refresh, bus-refresh, beans, envAfter you reload the property sources by calling the
/actuator/refreshendpoint, the attributes bound with@Valuein the beans having the annotation@RefreshScopeare refreshed.@Service @Getter @Setter @RefreshScope public class MyService { @Value private Boolean activated; }Use curl with the application endpoint to refresh the new configuration, as shown in the following example:
curl -X POST http://{app-endpoint}/actuator/refreshUse
FileSystemWatcherto watch the file change and refresh the context on demand.FileSystemWatcheris a class shipped withspring-boot-devtoolsthat watches specific directories for file changes, or you can use another utility with similar function. The previous option requires users to initiate the refresh actively, while the latter can monitor for file changes and automatically invoke the refresh upon detecting updates. You can retrieve the file path by using the environment variableAZURE_SPRING_APPS_CONFIG_FILE_PATH, as mentioned in the Polyglot support section.
Configure Application Configuration Service settings
Use the following steps to configure Application Configuration Service:
Select Application Configuration Service.
Select Overview to view the running state and resources allocated to Application Configuration Service.
Select Settings and add a new entry in the Repositories section with the Git backend information.
Select Validate to validate access to the target URI. After validation completes successfully, select Apply to update the configuration settings.
Configure the TLS certificate to access the Git backend with a self-signed certificate for Gen2
This step is optional. If you use a self-signed certificate for the Git backend, you must configure the TLS certificate to access the Git backend.
You need to upload the certificate to Azure Spring Apps first. For more information, see the Import a certificate section of Use TLS/SSL certificates in your application in Azure Spring Apps.
Use the following steps to configure the TLS certificate:
Use Application Configuration Service with applications
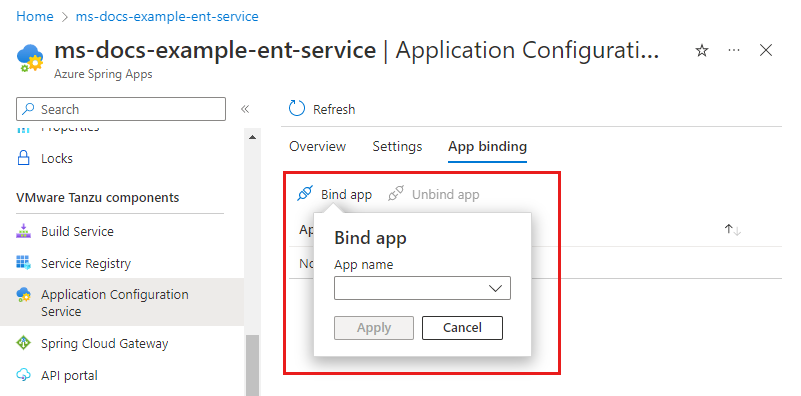
When you use Application Configuration Service with a Git back end and use the centralized configurations, you must bind the app to Application Configuration Service.
Use the following steps to use Application Configuration Service with applications:
Open the App binding tab.
Select Bind app and choose one app from the dropdown. Select Apply to bind.
Note
When you change the bind/unbind status, you must restart or redeploy the app to for the binding to take effect.
In the navigation menu, select Apps to view the list of all the apps.
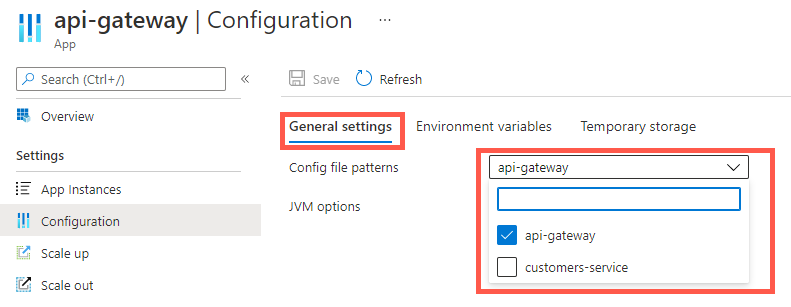
Select the target app to configure patterns for the
namecolumn.In the navigation pane, select Configuration and then select General settings.
In the Config file patterns dropdown, choose one or more patterns from the list. For more information, see the Pattern section.
Select Save.
Bind an app to the Application Configuration Service
You can now choose to bind your application to the Application Configuration Service when creating a new app.
Use the following steps to create a new app and bind it to the Application Configuration Service:
In the navigation pane, select Apps to see all your apps.
Select Create App to create a new app.
Enter a name for your new app.
Select the Bind tab and then select Application Configuration Service from the dropdown.
Select Create to finish creating your app and binding it to the Application Configuration Service.
Enable/disable Application Configuration Service after service creation
You can enable and disable Application Configuration Service after service creation using the Azure portal or the Azure CLI. Before disabling Application Configuration Service, you're required to unbind all of your apps from it.
Use the following steps to enable or disable Application Configuration Service:
- Navigate to your service resource and then select Application Configuration Service.
- Select Manage.
- Select or unselect Enable Application Configuration Service and then select Save.
- You can now view the state of Application Configuration Service on the Application Configuration Service page.
Examine configuration file in ConfigMap
The following section shows you how to examine the content of the configuration file pulled by Application Configuration Service from upstream Git repositories in the related Kubernetes ConfigMap. For more information, see the Refresh strategies section of this article.
Assign an Azure role
First, you must have the Azure role Azure Spring Apps Application Configuration Service Config File Pattern Reader Role assigned to you.
Use the following steps to assign an Azure role:
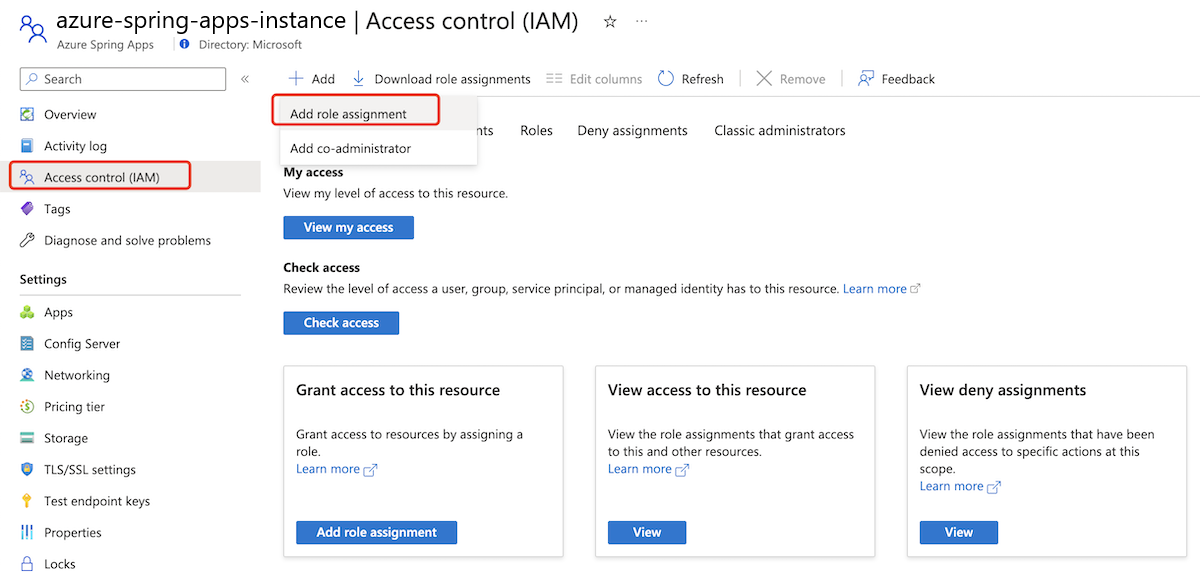
Open the Azure portal and go to your Azure Spring Apps service instance.
In the navigation pane, select Access Control (IAM).
On the Access Control (IAM) page, select Add, and then select Add role assignment.
On the Add role assignment page, in the Name list, search for and select the target role, and then select Next.
Select Members and then search for and select your username.
Select Review + assign.
Examine configuration file with the Azure CLI
Use the following command to view the content of the configuration file by Pattern:
az spring application-configuration-service config show \
    --resource-group <resource-group-name> \
    --service <Azure-Spring-Apps-instance-name> \
    --config-file-pattern <pattern>
This command produces JSON output similar to the following example:
{
  "configurationFiles": {
    "application.properties": [
      "example.property.application.name: example-service",
      "example.property.cloud: Azure"
    ]
  },
  "metadata": {
    "gitRevisions": "[{\"url\":\"{gitRepoUrl}\",\"revision\":\"{revisionInfo}\"}]"
  }
}
Note
The metadata and gitRevisions properties aren't available for the Gen1 version of Application Configuration Service.
You can also use this command with the --export-path <path-to-target-folder> parameter to export the configuration file to the specified folder. It supports both relative paths and absolute paths. If you don't specify the path, the command uses the path of the current directory by default.
Examine configuration file in the app
After you bind the app to the Application Configuration Service and set the Pattern for the app deployment, as described in the Use Application Configuration Service with applications section of this article, the ConfigMap containing the configuration file for the pattern should be mounted to the application container. Use the following steps to check the configuration files in each instance of the app deployment:
Connect to one of the application instances. For more information, see Connect to an app instance for troubleshooting.
Use the
echo $AZURE_SPRING_APPS_CONFIG_FILE_PATHcommand to find the folders containing the configuration files. A list of locations shows up separated by commas, as shown in the following example:$ echo $AZURE_SPRING_APPS_CONFIG_FILE_PATH /etc/azure-spring-cloud/configmap/acs-default-payment-default-e9d46,/etc/azure-spring-cloud/configmap/acs-default-catalog-default-616f4Check the content of the configuration file using commands such as
cat.
Note
The Git revision information isn't available in the app.
Check logs
The following sections show you how to view application logs by using either the Azure CLI or the Azure portal.
Use real-time log streaming
You can stream logs in real time with the Azure CLI. For more information, see Stream Azure Spring Apps managed component logs in real time. The following examples show how you can use Azure CLI commands to continuously stream new logs for application-configuration-service and flux-source-controller subcomponents.
Use the following command to stream logs for application-configuration-service:
az spring component logs \
    --resource-group <resource-group-name> \
    --service <Azure-Spring-Apps-instance-name> \
    --name application-configuration-service \
    --all-instances \
    --follow
Use the following command to stream logs for flux-source-controller:
az spring component logs \
    --resource-group <resource-group-name> \
    --service <Azure-Spring-Apps-instance-name> \
    --name flux-source-controller \
    --all-instances \
    --follow
Use Log Analytics
The following sections show you how to turn on and view System Logs using Log Analytics.
Diagnostic settings for Log Analytics
You must turn on System Logs and send the logs to your Log Analytics instance before you query the logs for Application Configuration Service. To enable System Logs in the Azure portal, use the following steps:
- Open your Azure Spring Apps instance.
- In the navigation pane, select Diagnostics settings.
- Select Add diagnostic setting or select Edit setting for an existing setting.
- In the Logs section, select the System Logs category.
- In the Destination details section, select Send to Log Analytics workspace and then select your workspace.
- Select Save to update the setting.
Check logs in Log Analytics
To check the logs of application-configuration-service and flux-source-controller using the Azure portal, use the following steps:
Make sure you turned on System Logs. For more information, see the Diagnostic settings for Log Analytics section.
Open your Azure Spring Apps instance.
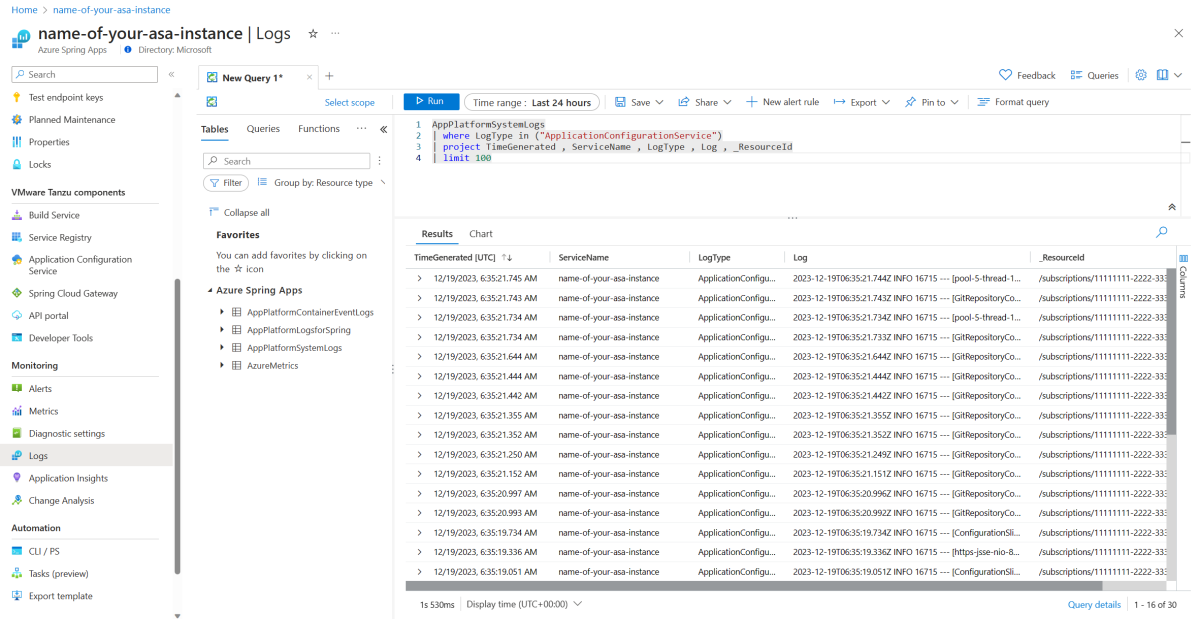
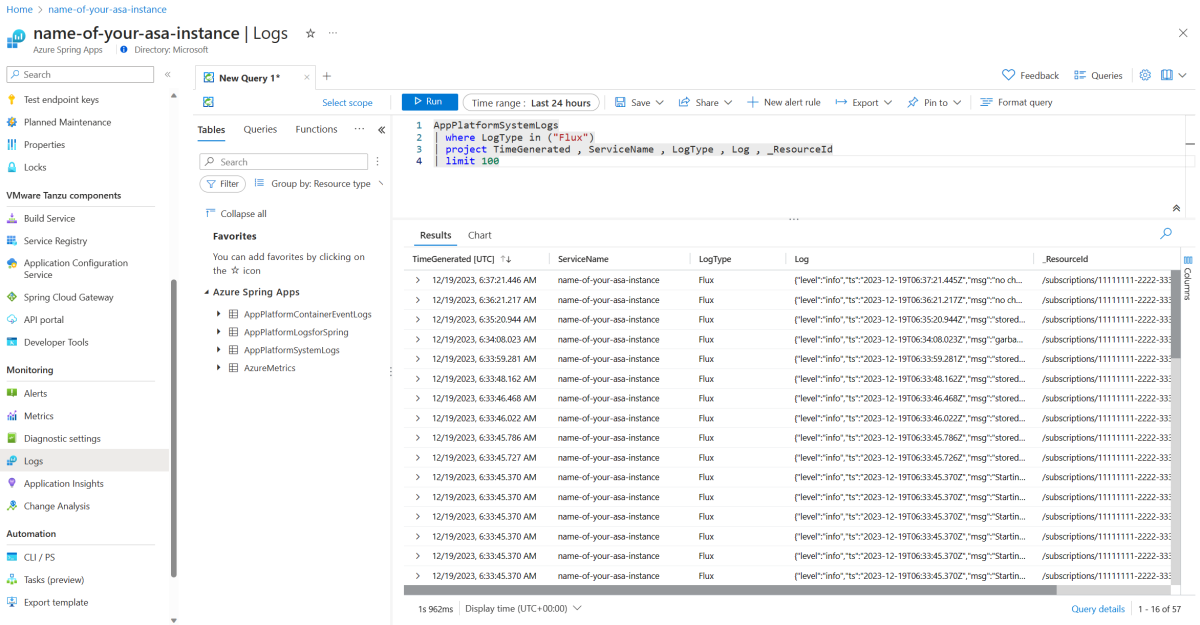
In the navigation menu, select Logs and then select Overview.
Use the following sample queries in the query edit pane. Adjust the time range then select Run to search for logs.
To view the logs for
application-configuration-service, use the following query:AppPlatformSystemLogs | where LogType in ("ApplicationConfigurationService") | project TimeGenerated , ServiceName , LogType, Log , _ResourceId | limit 100To view the logs for
flux-source-controller, use the following query:AppPlatformSystemLogs | where LogType in ("Flux") | project TimeGenerated , ServiceName , LogType, Log , _ResourceId | limit 100
Note
There might be a few minutes delay before the logs are available in Log Analytics.
Examine Git revisions of the configuration files
You can find the Git revision of the configuration file of the Pattern in the logs of Application Configuration Service. The following example log indicates that the configuration file for the payment/default pattern is pulled with example-commit-id from the main branch of the https://github.com/Azure-Samples/acme-fitness-store-config repository. You can learn how to query logs in the Check logs section.
Applied ConfigMap ({config-map-name}) for content (payment/default) from Git repositories https://github.com/Azure-Samples/acme-fitness-store-config@main@sha1:{example-commit-id}
You can also find the Git revision by using the Azure CLI. For more information, see the Examine configuration file with the Azure CLI section.
Note
Git revision isn't available for the Gen1 version of Application Configuration Service.
Troubleshoot known issues
If the latest changes aren't reflected in the applications, check the following items based on the Refresh strategies section:
- Confirm that the Git repo is updated correctly by checking the following items:
- Confirm that the branch of the desired config file changes is updated.
- Confirm that the pattern configured in the Application Configuration Service matches the updated config files.
- Confirm that the application is bound to the Application Configuration Service.
- Confirm that the Application Configuration Service is using the correct Git revisions as described in the Examine Git revisions of the configuration files section.
- Confirm that the
ConfigMapcontaining the configuration file for the Pattern used by the application is updated, as described in the Examine configuration file in ConfigMap section of this article. If it isn't updated, raise a ticket. - Confirm that the
ConfigMapis mounted to the application as a file, as described in the Examine configuration file in the app section of this article. If the file isn't updated, wait for the Kubernetes refresh interval - one minute - or force a refresh by restarting the application.
After checking these items, the applications should be able to read the updated configurations. If the applications still aren't updated, raise a ticket.
