Use Azure Spring Apps CI/CD with GitHub Actions
Note
The Basic, Standard, and Enterprise plans will be deprecated starting from mid-March, 2025, with a 3 year retirement period. We recommend transitioning to Azure Container Apps. For more information, see the Azure Spring Apps retirement announcement.
The Standard consumption and dedicated plan will be deprecated starting September 30, 2024, with a complete shutdown after six months. We recommend transitioning to Azure Container Apps. For more information, see Migrate Azure Spring Apps Standard consumption and dedicated plan to Azure Container Apps.
This article applies to: ✅ Basic/Standard ✅ Enterprise
This article shows you how to build up a CI/CD workflow for Azure Spring Apps with GitHub Actions.
GitHub Actions support an automated software development lifecycle workflow. With GitHub Actions for Azure Spring Apps you can create workflows in your repository to build, test, package, release, and deploy to Azure.
Prerequisites
This example requires the Azure CLI.
Set up GitHub repository and authenticate
You need an Azure service principal credential to authorize Azure login action. To get an Azure credential, execute the following commands on your local machine:
az login
az ad sp create-for-rbac \
    --role contributor \
    --scopes /subscriptions/<SUBSCRIPTION_ID> \
    --json-auth
To access to a specific resource group, you can reduce the scope:
az ad sp create-for-rbac \
    --role contributor \
    --scopes /subscriptions/<SUBSCRIPTION_ID>/resourceGroups/<RESOURCE_GROUP> \
    --json-auth
The command should output a JSON object:
{
    "clientId": "<GUID>",
    "clientSecret": "<GUID>",
    "subscriptionId": "<GUID>",
    "tenantId": "<GUID>",
    ...
}
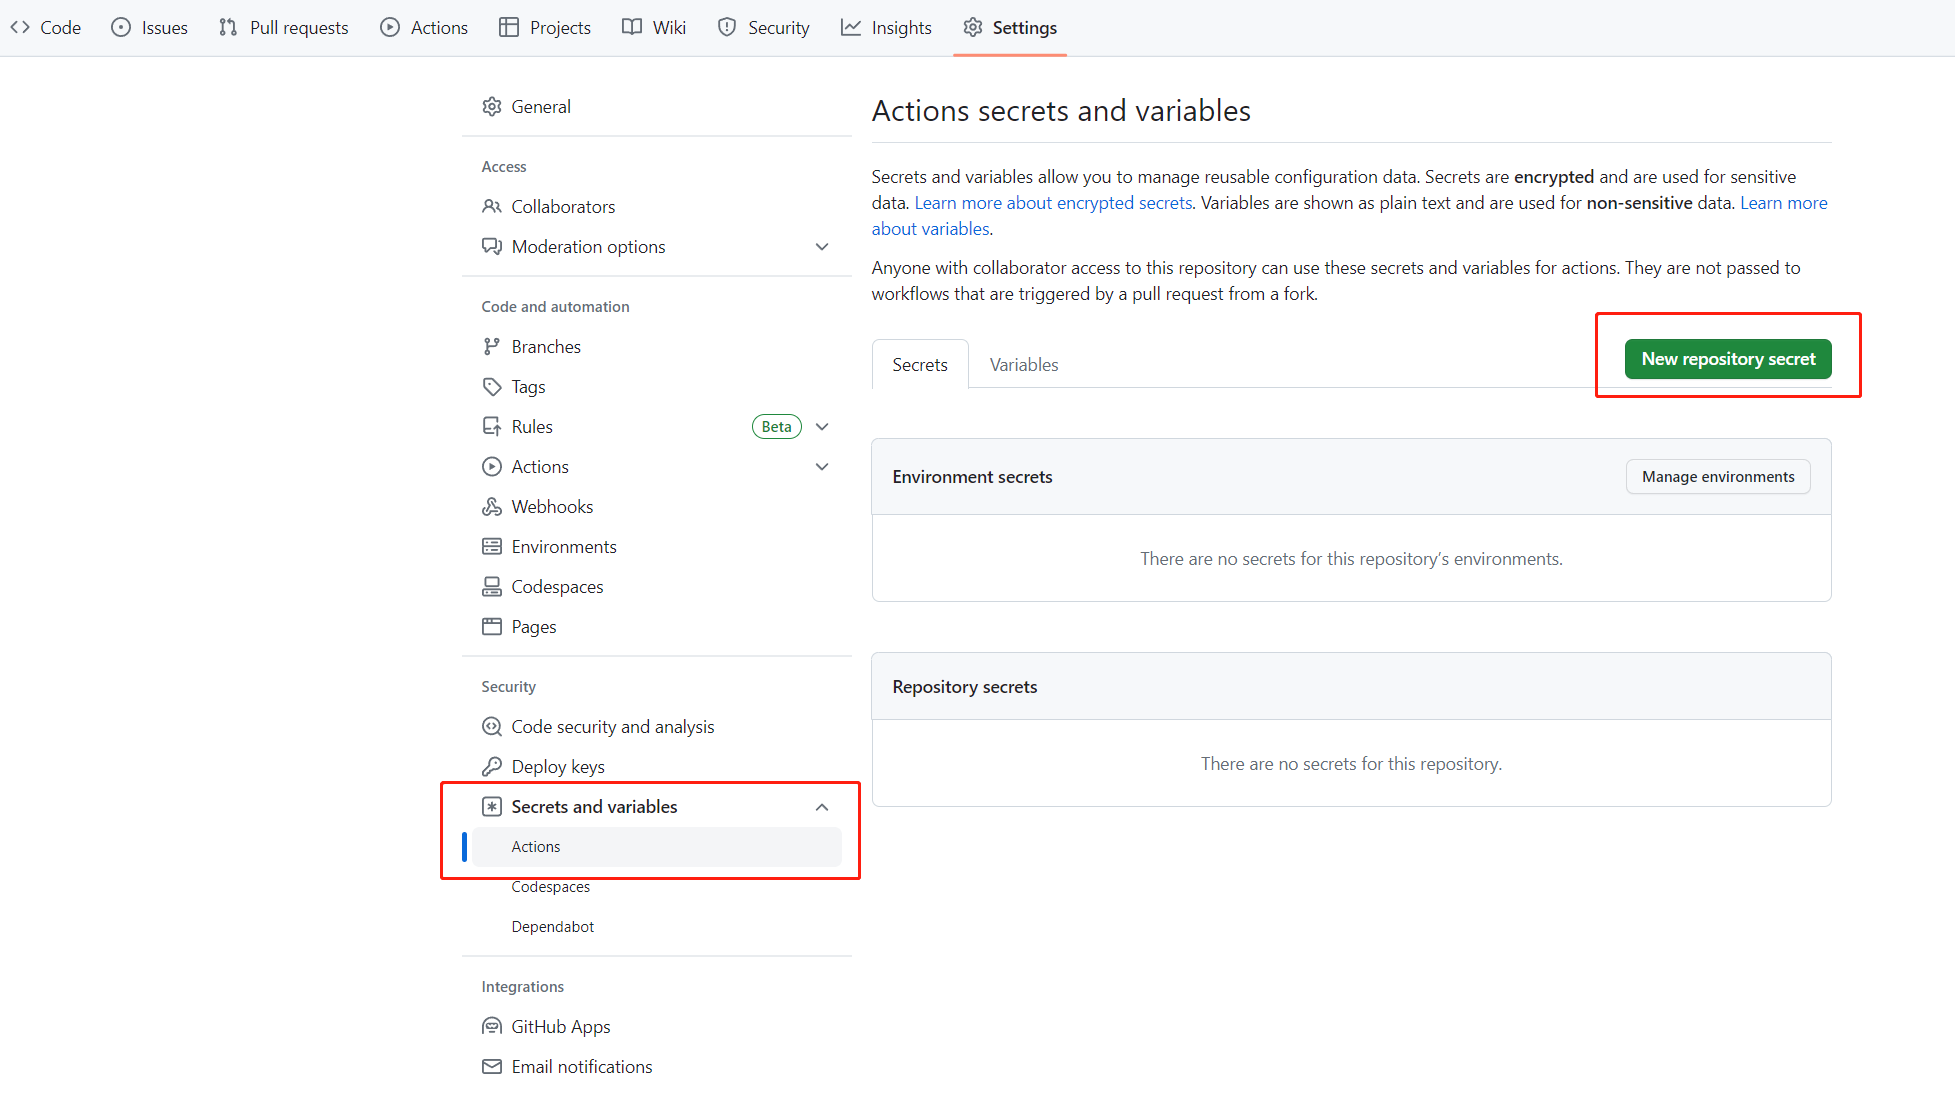
This example uses the steeltoe sample on GitHub. Fork the repository, open the GitHub repository page for the fork, and select the Settings tab. Open the Secrets menu, and select New secret:
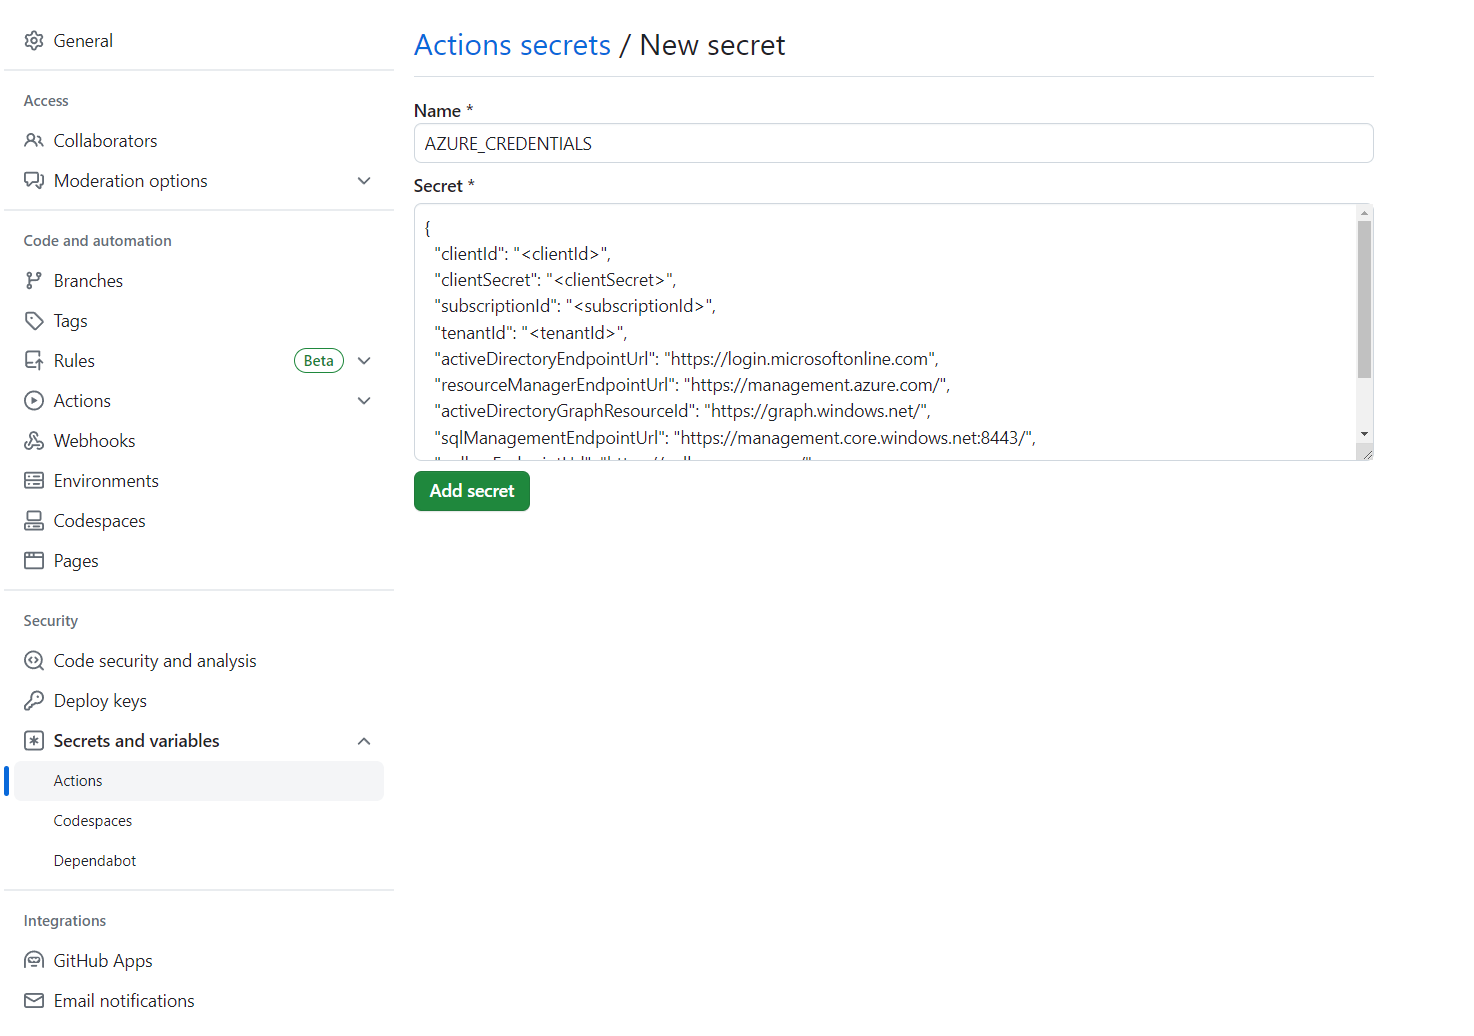
Set the secret name to AZURE_CREDENTIALS and its value to the JSON string that you found under the heading Set up your GitHub repository and authenticate.
You can also get the Azure login credential from Key Vault in GitHub Actions as explained in Authenticate Azure Spring with Key Vault in GitHub Actions.
Provision service instance
To provision your Azure Spring Apps service instance, run the following commands using the Azure CLI.
az extension add --name spring
az group create \
    --name <resource-group-name> \
    --location eastus
az spring create \
    --resource-group <resource-group-name> \
    --name <service-instance-name>
az spring config-server git set \
    --name <service-instance-name> \
    --uri https://github.com/Azure-Samples/azure-spring-apps-samples \
    --label main \
    --search-paths steeltoe-sample/config
Build the workflow
The workflow is defined using the following options.
Prepare for deployment with Azure CLI
The command az spring app create is currently not idempotent. After you run it once, you get an error if you run the same command again. We recommend this workflow on existing Azure Spring Apps apps and instances.
Use the following Azure CLI commands for preparation:
az config set defaults.group=<service-group-name>
az config set defaults.spring=<service-instance-name>
az spring app create --name planet-weather-provider
az spring app create --name solar-system-weather
Deploy with Azure CLI directly
Create the .github/workflows/main.yml file in the repository with the following content. Replace <your resource group name> and <your service name> with the correct values.
name: Steeltoe-CD

# Controls when the action runs. Triggers the workflow on push or pull request
# events but only for the main branch
on:
  push:
    branches: [ main]

# A workflow run is made up of one or more jobs that can run sequentially or in parallel
jobs:
  # This workflow contains a single job called "build"
  build:
    # The type of runner that the job runs on
    runs-on: ubuntu-latest
    env:
      working-directory: ./steeltoe-sample
      resource-group-name: <your resource group name>
      service-name: <your service name>

    # Supported .NET Core version matrix.
    strategy:
      matrix:
        dotnet: [ '3.1.x' ]

    # Steps represent a sequence of tasks that is executed as part of the job
    steps:
      # Checks-out your repository under $GITHUB_WORKSPACE, so your job can access it
      - uses: actions/checkout@v2

      # Set up .NET Core 3.1 SDK
      - uses: actions/setup-dotnet@v1
        with:
          dotnet-version: ${{ matrix.dotnet }}

      # Set credential for az login
      - uses: azure/login@v1.1
        with:
          creds: ${{ secrets.AZURE_CREDENTIALS }}

      - name: install Azure CLI extension
        run: |
          az extension add --name spring --yes

      - name: Build and package planet-weather-provider app
        working-directory: ${{env.working-directory}}/src/planet-weather-provider
        run: |
          dotnet publish
          az spring app deploy -n planet-weather-provider --runtime-version NetCore_31 --main-entry Microsoft.Azure.SpringCloud.Sample.PlanetWeatherProvider.dll --artifact-path ./publish-deploy-planet.zip -s ${{ env.service-name }} -g ${{ env.resource-group-name }}
      - name: Build solar-system-weather app
        working-directory: ${{env.working-directory}}/src/solar-system-weather
        run: |
          dotnet publish
          az spring app deploy -n solar-system-weather --runtime-version NetCore_31 --main-entry Microsoft.Azure.SpringCloud.Sample.SolarSystemWeather.dll --artifact-path ./publish-deploy-solar.zip -s ${{ env.service-name }} -g ${{ env.resource-group-name }}
Set up GitHub repository and authenticate
You need an Azure service principal credential to authorize Azure login action. To get an Azure credential, execute the following commands on your local machine:
az login
az ad sp create-for-rbac \
    --role contributor \
    --scopes /subscriptions/<SUBSCRIPTION_ID> \
    --json-auth
To access to a specific resource group, you can reduce the scope:
az ad sp create-for-rbac \
    --role contributor \
    --scopes /subscriptions/<SUBSCRIPTION_ID>/resourceGroups/<RESOURCE_GROUP> \
    --json-auth
The command should output a JSON object:
{
    "clientId": "<GUID>",
    "clientSecret": "<GUID>",
    "subscriptionId": "<GUID>",
    "tenantId": "<GUID>",
    ...
}
This example uses the PiggyMetrics sample on GitHub. Fork the sample, uncheck Copy the Azure branch only, open the GitHub repository page, and select the Settings tab. Open Secrets menu, and select Add a new secret:
Set the secret name to AZURE_CREDENTIALS and its value to the JSON string that you found under the heading Set up your GitHub repository and authenticate.
You can also get the Azure login credential from Key Vault in GitHub Actions as explained in Authenticate Azure Spring with Key Vault in GitHub Actions.
Provision service instance
To provision your Azure Spring Apps service instance, run the following commands using the Azure CLI.
az extension add --name spring
az group create --location eastus --name <resource group name>
az spring create -n <service instance name> -g <resource group name>
az spring config-server git set -n <service instance name> --uri https://github.com/xxx/piggymetrics --label config
End-to-end sample workflows
The following examples demonstrate common usage scenarios.
Deploying
The following sections show you various options for deploying your app.
To production
Azure Spring Apps supports deploying to deployments with built artifacts (for example, JAR or .NET Core ZIP) or source code archive.
The following example deploys to the default production deployment in Azure Spring Apps using JAR file built by Maven. This example is the only possible deployment scenario when using the Basic SKU:
Note
The package search pattern should only return exactly one package. If the build task produces multiple JAR packages such as sources.jar and javadoc.jar, you need to refine the search pattern so that it only matches the application binary artifact.
name: AzureSpringApps
on: push
env:
  ASC_PACKAGE_PATH: ${{ github.workspace }}
  AZURE_SUBSCRIPTION: <azure subscription name>

jobs:
  deploy_to_production:
    runs-on: ubuntu-latest
    name: deploy to production with artifact
    steps:
      - name: Checkout GitHub Action
        uses: actions/checkout@v2

      - name: Set up Java 11
        uses: actions/setup-java@v3
        with:
          distribution: 'temurin'
          java-version: '11'

      - name: maven build, clean
        run: |
          mvn clean package

      - name: Login via Azure CLI
        uses: azure/login@v1
        with:
          creds: ${{ secrets.AZURE_CREDENTIALS }}

      - name: deploy to production with artifact
        uses: azure/spring-apps-deploy@v1
        with:
          azure-subscription: ${{ env.AZURE_SUBSCRIPTION }}
          action: Deploy
          service-name: <service instance name>
          app-name: <app name>
          use-staging-deployment: false
          package: ${{ env.ASC_PACKAGE_PATH }}/**/*.jar
The following example deploys to the default production deployment in Azure Spring Apps using source code.
name: AzureSpringApps
on: push
env:
  ASC_PACKAGE_PATH: ${{ github.workspace }}
  AZURE_SUBSCRIPTION: <azure subscription name>

jobs:
  deploy_to_production:
    runs-on: ubuntu-latest
    name: deploy to production with source code
    steps:
      - name: Checkout GitHub Action
        uses: actions/checkout@v2

      - name: Login via Azure CLI
        uses: azure/login@v1
        with:
          creds: ${{ secrets.AZURE_CREDENTIALS }}

      - name: deploy to production step with source code
        uses: azure/spring-apps-deploy@v1
        with:
          azure-subscription: ${{ env.AZURE_SUBSCRIPTION }}
          action: deploy
          service-name: <service instance name>
          app-name: <app name>
          use-staging-deployment: false
          package: ${{ env.ASC_PACKAGE_PATH }}
The following example deploys to the default production deployment in Azure Spring Apps using source code in the Enterprise plan. You can specify which builder to use for deploy actions using the builder option.
name: AzureSpringApps
on: push
env:
  ASC_PACKAGE_PATH: ${{ github.workspace }}
  AZURE_SUBSCRIPTION: <azure subscription name>

jobs:
  deploy_to_production:
    runs-on: ubuntu-latest
    name: deploy to production with source code
    steps:
      - name: Checkout GitHub Action
        uses: actions/checkout@v2

      - name: Login via Azure CLI
        uses: azure/login@v1
        with:
          creds: ${{ secrets.AZURE_CREDENTIALS }}

      - name: deploy to production step with source code in the Enterprise plan
        uses: azure/spring-apps-deploy@v1
        with:
          azure-subscription: ${{ env.AZURE_SUBSCRIPTION }}
          action: deploy
          service-name: <service instance name>
          app-name: <app name>
          use-staging-deployment: false
          package: ${{ env.ASC_PACKAGE_PATH }}
          builder: <builder>
The following example deploys to the default production deployment in Azure Spring Apps with an existing container image.
name: AzureSpringApps
on: push
env:
  ASC_PACKAGE_PATH: ${{ github.workspace }}
  AZURE_SUBSCRIPTION: <azure subscription name>

jobs:
  deploy_to_production:
    runs-on: ubuntu-latest
    name: deploy to production with source code
    steps:
      - name: Checkout GitHub Action
        uses: actions/checkout@v2

      - name: Login via Azure CLI
        uses: azure/login@v1
        with:
          creds: ${{ secrets.AZURE_CREDENTIALS }}

      - name: Deploy Custom Image
        uses: Azure/spring-apps-deploy@v1
        with:
          azure-subscription: ${{ env.AZURE_SUBSCRIPTION }}
          action: deploy
          service-name: <service instance name>
          app-name: <app name>
          deployment-name: <deployment name>
          container-registry: <your container image registry>
          registry-username: ${{ env.REGISTRY_USERNAME }}
          registry-password: ${{ secrets.REGISTRY_PASSWORD }}
          container-image: <your image tag>
During deployment, you can achieve more functionality by using more arguments. For more information, see the Arguments section of GitHub Action for deploying to Azure Spring Apps.
Blue-green
The following examples deploy to an existing staging deployment. This deployment doesn't receive production traffic until it's set as a production deployment. You can set use-staging-deployment true to find the staging deployment automatically or just allocate specific deployment-name. We only focus on the spring-apps-deploy action and leave out the preparatory jobs in the rest of the article.
# environment preparation configurations omitted
    steps:
      - name: blue green deploy step use-staging-deployment
        uses: azure/spring-apps-deploy@v1
        with:
          azure-subscription: ${{ env.AZURE_SUBSCRIPTION }}
          action: deploy
          service-name: <service instance name>
          app-name: <app name>
          use-staging-deployment: true
          package: ${{ env.ASC_PACKAGE_PATH }}/**/*.jar
# environment preparation configurations omitted
    steps:
      - name: blue green deploy step with deployment-name
        uses: azure/spring-apps-deploy@v1
        with:
          azure-subscription: ${{ env.AZURE_SUBSCRIPTION }}
          action: deploy
          service-name: <service instance name>
          app-name: <app name>
          deployment-name: staging
          package: ${{ env.ASC_PACKAGE_PATH }}/**/*.jar
For more information on blue-green deployments, including an alternative approach, see Blue-green deployment strategies.
Setting production deployment
The following example sets the current staging deployment as production, effectively swapping which deployment receives production traffic.
# environment preparation configurations omitted
    steps:
      - name: set production deployment step
        uses: azure/spring-apps-deploy@v1
        with:
          azure-subscription: ${{ env.AZURE_SUBSCRIPTION }}
          action: set-production
          service-name: <service instance name>
          app-name: <app name>
          use-staging-deployment: true
Deleting a staging deployment
The Delete Staging Deployment action allows you to delete the deployment not receiving production traffic. This deletion frees up resources used by that deployment and makes room for a new staging deployment:
# environment preparation configurations omitted
    steps:
      - name: Delete staging deployment step
        uses: azure/spring-apps-deploy@v1
        with:
          azure-subscription: ${{ env.AZURE_SUBSCRIPTION }}
          action: delete-staging-deployment
          service-name: <service instance name>
          app-name: <app name>
Create or update build (Enterprise plan only)
The following example creates or updates a build resource in the Enterprise plan:
# environment preparation configurations omitted
    steps:
      - name: Create or update build
        uses: azure/spring-apps-deploy@v1
        with:
          azure-subscription: ${{ env.AZURE_SUBSCRIPTION }}
          action: build
          service-name: <service instance name>
          build-name: <build name>
          package: ${{ env.ASC_PACKAGE_PATH }}
          builder: <builder>
Delete build (Enterprise plan only)
The following example deletes a build resource in the Enterprise plan:
# environment preparation configurations omitted
    steps:
      - name: Delete build
        uses: azure/spring-apps-deploy@v1
        with:
          azure-subscription: ${{ env.AZURE_SUBSCRIPTION }}
          action: delete-build
          service-name: <service instance name>
          build-name: <build name>
Deploy with Maven Plugin
Another option is to use the Maven Plugin for deploying the Jar and updating App settings. The command mvn azure-spring-apps:deploy is idempotent and automatically creates Apps if needed. You don't need to create corresponding apps in advance.
name: AzureSpringApps
on: push

jobs:
  build-and-deploy:
    runs-on: ubuntu-latest
    steps:

    - uses: actions/checkout@main

    - name: Set up Java 11
      uses: actions/setup-java@v3
      with:
        distribution: 'temurin'
        java-version: '11'

    - name: maven build, clean
      run: |
        mvn clean package -DskipTests

    # Maven plugin can cosume this authentication method automatically
    - name: Azure Login
      uses: azure/login@v1
      with:
        creds: ${{ secrets.AZURE_CREDENTIALS }}

    # Maven deploy, make sure you have correct configurations in your pom.xml
    - name: deploy to Azure Spring Apps using Maven
      run: |
        mvn azure-spring-apps:deploy
Run the workflow
GitHub Actions should be enabled automatically after you push .github/workflow/main.yml to GitHub. The action is triggered when you push a new commit. If you create this file in the browser, your action should have already run.
To verify that the action has been enabled, select the Actions tab on the GitHub repository page:
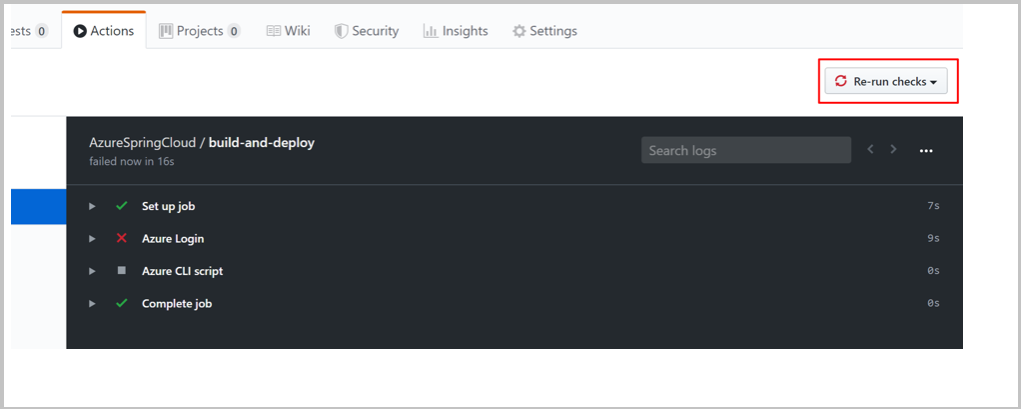
If your action runs in error, for example, if you haven't set the Azure credential, you can rerun checks after fixing the error. On the GitHub repository page, select Actions, select the specific workflow task, and then select the Rerun checks button to rerun checks:


