Tutorial: Deploy a container application with CI/CD to a Service Fabric cluster
This tutorial is part two of a series and describes how to set up continuous integration and deployment for an Azure Service Fabric container application using Visual Studio and Azure DevOps. An existing Service Fabric application is needed, the application created in Deploy a .NET application in a Windows container to Azure Service Fabric is used as an example.
In part two of the series, you learn how to:
- Add source control to your project
- Create a build definition in Visual Studio Team Explorer
- Create a release definition in Visual Studio Team Explorer
- Automatically deploy and upgrade an application
Prerequisites
Before you begin this tutorial:
- Have a cluster on Azure, or create one with this tutorial
- Deploy a containerized application to it
Prepare a publish profile
Now that you've deployed a container application, you're ready to set up continuous integration. First, prepare a publish profile within your application for use by the deployment process that executes within Azure DevOps. The publish profile should be configured to target the cluster that you've previously created. Start Visual Studio and open an existing Service Fabric application project. In Solution Explorer, right-click the application and select Publish....
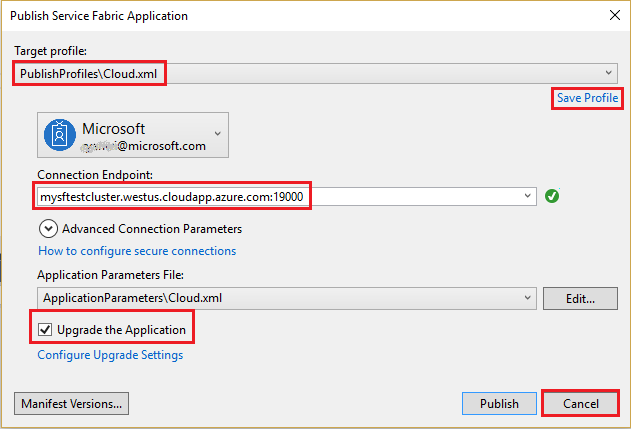
Choose a target profile within your application project to use for your continuous integration workflow, for example Cloud. Specify the cluster connection endpoint. Check the Upgrade the Application checkbox so that your application upgrades for each deployment in Azure DevOps. Click the Save hyperlink to save the settings to the publish profile and then click Cancel to close the dialog box.
Share your Visual Studio solution to a new Azure DevOps Git repo
Share your application source files to a team project in Azure DevOps so you can generate builds.
Create a new local Git repo for your project by selecting Add to Source Control -> Git on the status bar in the lower right-hand corner of Visual Studio.
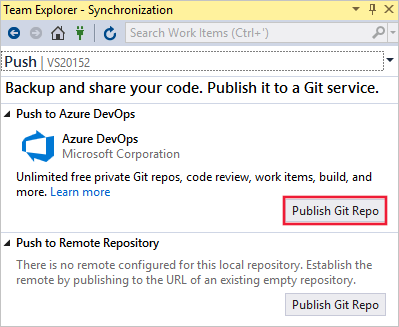
In the Push view in Team Explorer, select the Publish Git Repo button under Push to Azure DevOps.
Verify your email and select your organization in the Account drop-down. You may have to set up an organization if you don't already have one. Enter your repository name and select Publish repository.
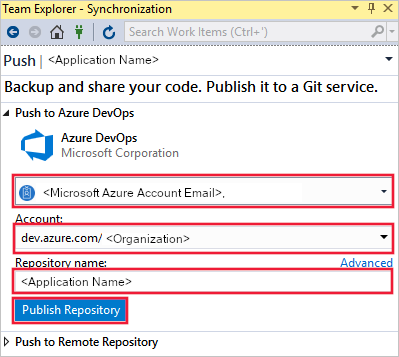
Publishing the repository creates a new team project in your account with the same name as the local repo. To create the repository in an existing team project, click Advanced next to Repository name and select a team project. You can view your code on the web by selecting See it on the web.
Configure Continuous Delivery with Azure Pipelines
An Azure DevOps build definition describes a workflow that is composed of a set of build steps that are executed sequentially. Create a build definition that produces a Service Fabric application package, and other artifacts, to deploy to a Service Fabric cluster. Learn more about Azure DevOps build definitions.
An Azure DevOps release definition describes a workflow that deploys an application package to a cluster. When used together, the build definition and release definition execute the entire workflow starting with source files to ending with a running application in your cluster. Learn more about Azure DevOps release definitions.
Create a build definition
Open your new team project by navigating to https://dev.azure.com in a web browser and selecting your organization, followed by the new project.
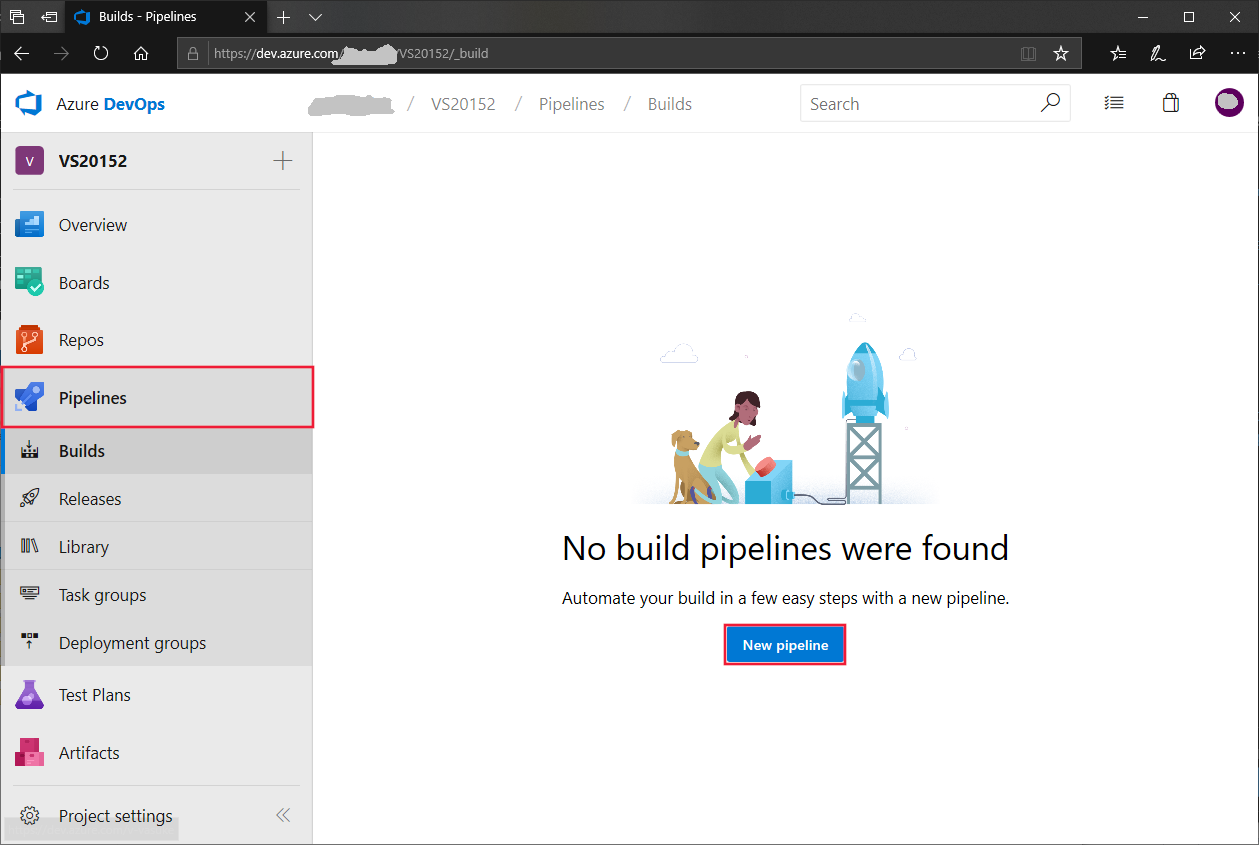
Select the Pipelines option on the left panel, then click New Pipeline.
Note
If you do not see the build definition template, make sure the New YAML pipeline creation experience feature is turned off. This feature is configured within the Preview Features section of your DevOps account.
Select Azure Repos Git as source, your Team project name, your project Repository, and master Default branch or manual and scheduled builds. Then click Continue.
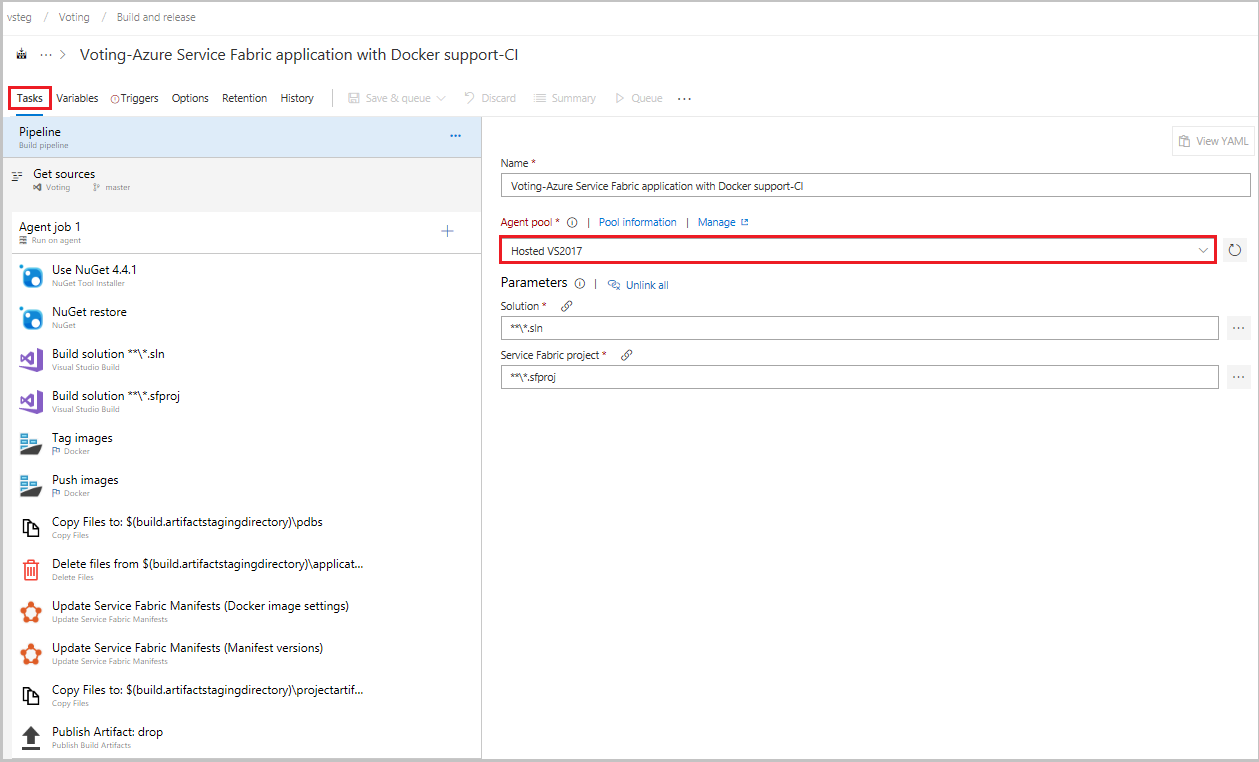
In Select a template, select the Azure Service Fabric application with Docker support template and click Apply.

In Tasks, select Hosted VS2017 as the Agent pool.
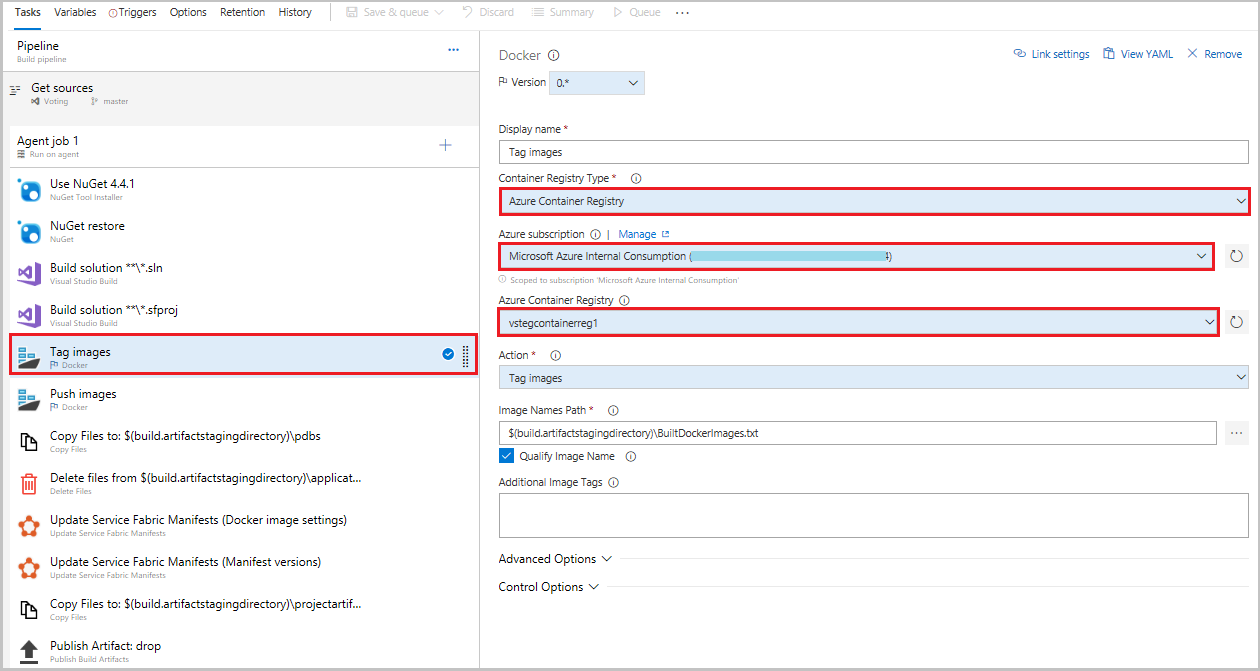
Click Tag images.
In Container Registry Type, select Azure Container Registry. Select an Azure Subscription, then click Authorize. Select an Azure Container Registry.
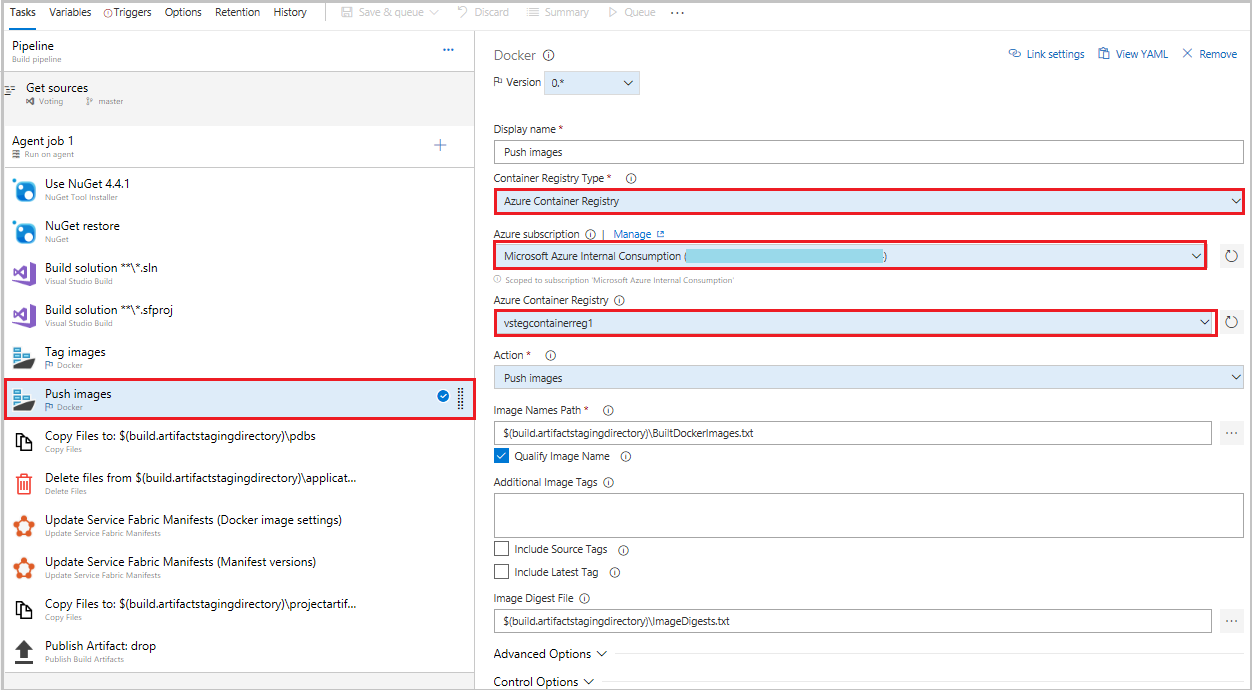
Click Push images.
In Container Registry Type, select Azure Container Registry. Select an Azure Subscription, then click Authorize. Select an Azure Container Registry.
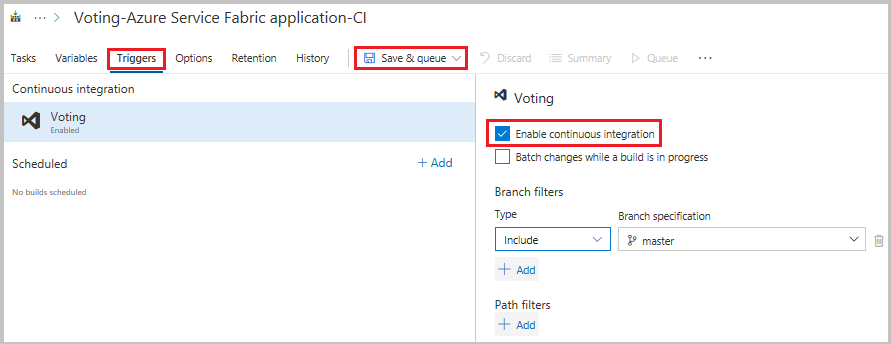
Under the Triggers tab, enable continuous integration by checking Enable continuous integration. Within Branch filters, click + Add, and the Branch specification will default to master.
In the Save build pipeline and queue dialog, click Save & queue to manually start a build.
Builds also trigger upon push or check-in. To check your build progress, switch to the Builds tab. Once you verify that the build executes successfully, define a release definition that deploys your application to a cluster.
Create a release definition
Select the Pipelines option on the left panel, then Releases, then + New pipeline. In Select a template, select the Azure Service Fabric Deployment template from the list and then Apply.

Select Tasks, then Environment 1, and then +New to add a new cluster connection.

In the Add new Service Fabric Connection view select Certificate Based or Microsoft Entra ID authentication. Specify a connection name of "mysftestcluster" and a cluster endpoint of "tcp://mysftestcluster.southcentralus.cloudapp.azure.com:19000" (or the endpoint of the cluster you are deploying to).
For certificate based authentication, add the Server certificate thumbprint of the server certificate used to create the cluster. In Client certificate, add the base-64 encoding of the client certificate file. See the help pop-up on that field for info on how to get that base-64 encoded representation of the certificate. Also add the Password for the certificate. You can use the cluster or server certificate if you don't have a separate client certificate.
For Microsoft Entra credentials, add the Server certificate thumbprint of the server certificate used to create the cluster and the credentials you want to use to connect to the cluster in the Username and Password fields.
Click Add to save the cluster connection.
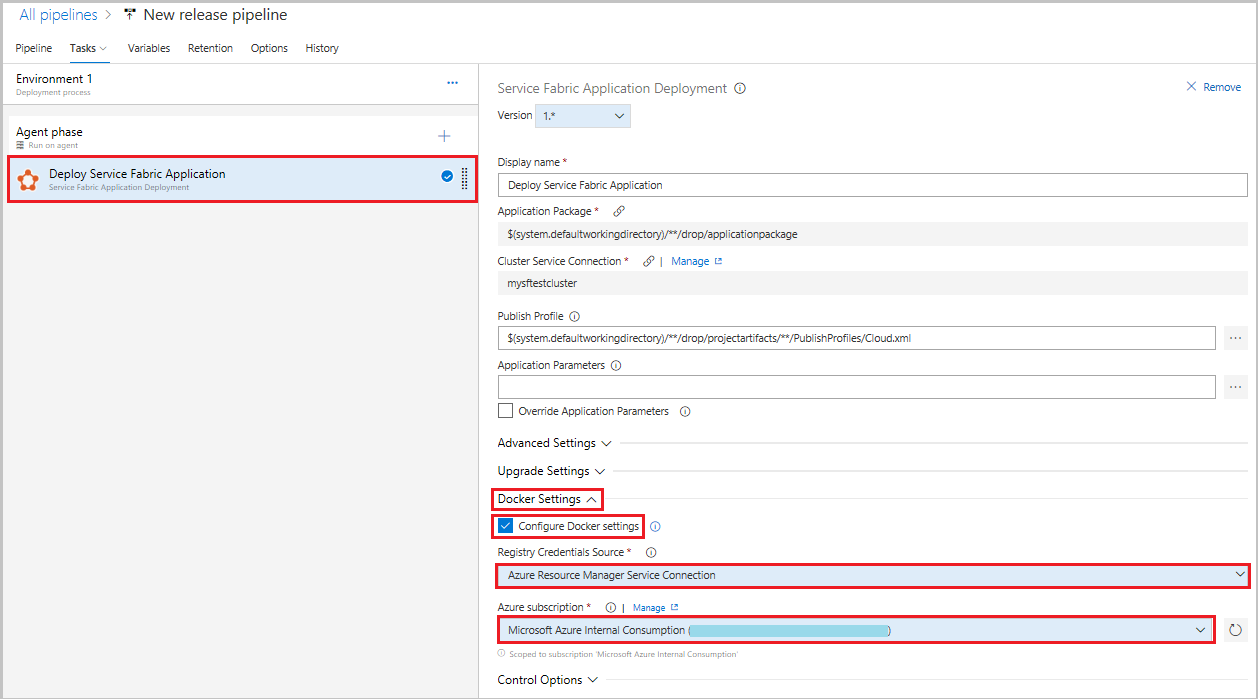
Under Agent Phase, click Deploy Service Fabric Application. Click Docker Settings and then click Configure Docker settings. In Registry Credentials Source, select Azure Resource Manager Service Connection. Then select your Azure subscription.
Next, add a build artifact to the pipeline so the release definition can find the output from the build. Select Pipeline and Artifacts->+Add. In Source (Build definition), select the build definition you created previously. Click Add to save the build artifact.

Enable a continuous deployment trigger so that a release is automatically created when the build completes. Click the lightning icon in the artifact, enable the trigger, and click Save to save the release definition.

Select + Release -> Create a Release -> Create to manually create a release. You can monitor the release progress in the Releases tab.
Verify that the deployment succeeded and the application is running in the cluster. Open a web browser and navigate to http://mysftestcluster.southcentralus.cloudapp.azure.com:19080/Explorer/. Note the application version, in this example it is "1.0.0.20170616.3".
Commit and push changes, trigger a release
To verify that the continuous integration pipeline is functioning by checking in some code changes to Azure DevOps.
As you write your code, your changes are automatically tracked by Visual Studio. Commit changes to your local Git repository by selecting the pending changes icon ( ) from the status bar in the bottom right.
On the Changes view in Team Explorer, add a message describing your update and commit your changes.

Select the unpublished changes status bar icon ( ) or the Sync view in Team Explorer. Select Push to update your code in Azure DevOps.

Pushing the changes to Azure DevOps automatically triggers a build. When the build definition successfully completes, a release is automatically created and starts upgrading the application on the cluster.
To check your build progress, switch to the Builds tab in Team Explorer in Visual Studio. Once you verify that the build executes successfully, define a release definition that deploys your application to a cluster.
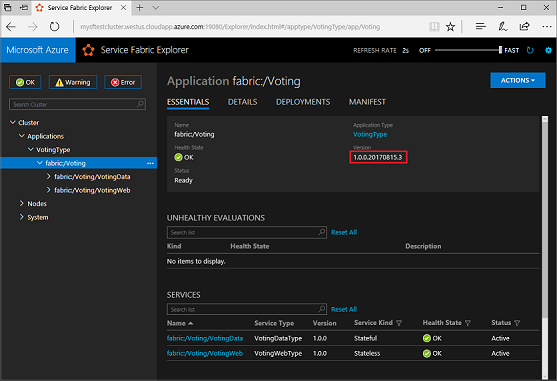
Verify that the deployment succeeded and the application is running in the cluster. Open a web browser and navigate to http://mysftestcluster.southcentralus.cloudapp.azure.com:19080/Explorer/. Note the application version, in this example it is "1.0.0.20170815.3".
Update the application
Make code changes in the application. Save and commit the changes, following the previous steps.
Once the upgrade of the application begins, you can watch the upgrade progress in Service Fabric Explorer:
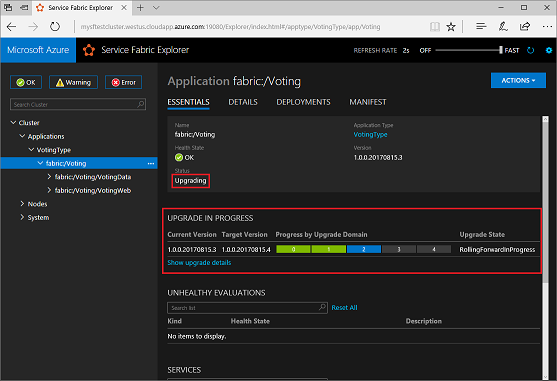
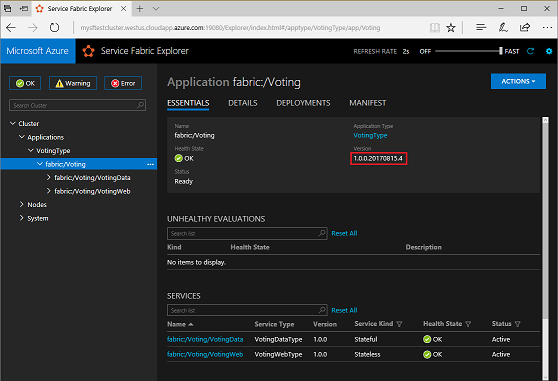
The application upgrade may take several minutes. When the upgrade is complete, the application will be running the next version. In this example "1.0.0.20170815.4".
Next steps
In this tutorial, you learned how to:
- Add source control to your project
- Create a build definition
- Create a release definition
- Automatically deploy and upgrade an application
In the next part of the tutorial, learn how to set up monitoring for your container.