How to create and manage Q# projects and custom libraries
In this article, you'll learn how to create, manage, and share Q# projects. Q# projects are folder structures with multiple Q# files that can access each other's operations and functions. Projects are helpful for logically organizing your source code. You can also use projects as custom libraries that can be accessed from external sources.
Prerequisites
- An Azure Quantum workspace in your Azure subscription. To create a workspace, see Create an Azure Quantum workspace.
- Visual Studio Code with the Azure Quantum Development Kit and Python extension installed.
- A GitHub account, if you are planning to publish your external project to a public GitHub repository.
For running Python programs, you also need:
- A Python environment with Python and Pip installed.
- The Azure Quantum
qsharpandazure-quantumpackages.
How Q# projects work
A Q# project contains a Q# manifest file, named qsharp.json, and one or more *.qs files in a specified folder structure. When a user opens a *.qs file in VS Code, or sets the project_root in a Jupyter Notebook or Python file, the compiler searches the surrounding folder hierarchy for the manifest file and determines the project's scope. If no manifest file is found, the compiler operates in a single file mode. You can create a Q# project manually or directly in VS Code.
An external Q# project is a standard Q# project that resides in another directory or on a public GitHub repository and acts as a custom library. An external project uses export statements to define which functions and operations can be accessed by external programs. Programs define the external project as a dependency in their manifest file, and use import statements to access the items (operations, functions, structs, and namespaces) in the external project. For more information, see Using projects as external dependencies.
Define a Q# project
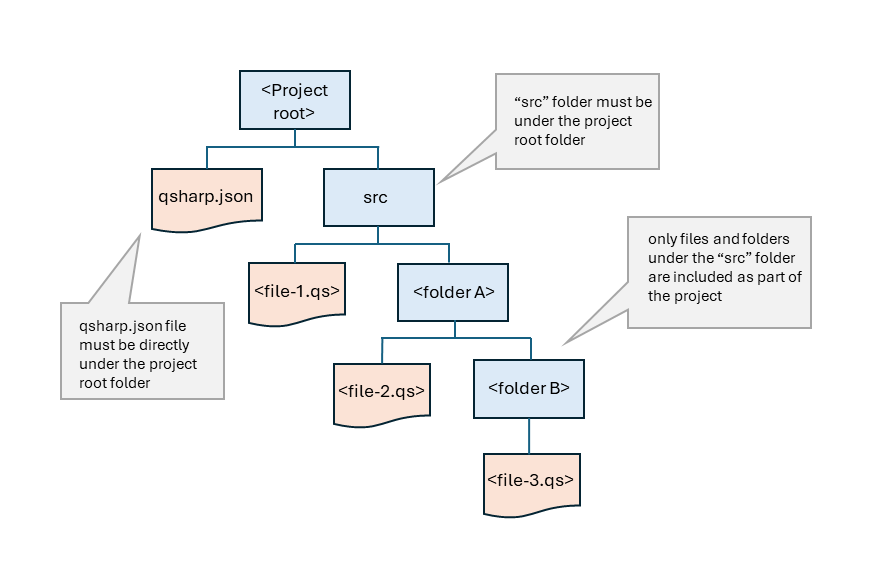
A Q# project is defined by the presence of a manifest file, named qsharp.json, and a src folder (which contains the Q# source files), both of which must be in the root folder of the project. For Q# programs and external projects, the Q# compiler detects the project folder automatically. For Python programs and Jupyter Notebooks, you must specify the Q# project folder with a qsharp.init call. The folder structure for a Q# project, however, remains the same for all types of programs.
Defining the project folder (Q# programs)
When a *.qs file is opened in VS Code, the Q# compiler searches upward in the folder structure for a manifest file. If it finds a manifest file, the compiler then includes all Q# files in the /src directory or any of its subdirectories. Each file's items are made available to all other files within the project.
For example, given this folder structure:
- Teleportation_project
- qsharp.json
- src
- Main.qs
- TeleportOperations
- TeleportLib.qs
- PrepareState
- PrepareStateLib.qs
when you open the file /src/TeleportOperation/PrepareState/PrepareStateLib.qs, the Q# compiler:
- Checks /src/TeleportOperation/PrepareState/ for qsharp.json.
- Checks /src/TeleportOperation for qsharp.json.
- Checks /src for qsharp.json.
- Checks / for qsharp.json.
- Establishes / as the root directory of the project, and includes all *.qs files under the root in the project, per the manifest file's settings.
Create a manifest file
A manifest file is a simple .json file named qsharp.json that can optionally include author, license, and lints fields. The minimum viable manifest file is the string {}. When you create a Q# project in VS Code, a minimal manifest file is created for you.
{}
Manifest file examples
The following are some examples of how manifest files can define the scope of your Q# project.
In this example, author is the only field specified, and therefore all *.qs files in this directory and all its subdirectories are included in the Q# project.
{
    "author":"Microsoft",
    "license": "MIT"
}
Within a Q# project, you can also use the manifest file to fine-tune the VS Code Q# Linter settings. By default, the three Linter rules are:
needlessParens: default =allowdivisionByZero: default =warnredundantSemicolons: default =warnUsing the manifest file, you can set each rule to either
allow,warn, orerror, for example{ "author":"Microsoft", "lints": [ { "lint": "needlessParens", "level": "allow" }, { "lint": "redundantSemicolons", "level": "warn" }, { "lint": "divisionByZero", "level": "error" } ] }
You can also use the manifest file to define an external Q# project as a dependency and remotely access operations and functions in that external project. For more information, see Using projects as external dependencies.
Q# project requirements and properties
The following requirements and configurations apply to all Q# projects.
All *.qs files that you want to be included in the project must be under a folder named src, which must be under the root folder of the Q#. When you create a Q# project in VS Code, the
/srcfolder is created automatically.The manifest file should be at the same level as the src folder. When you create a Q# project in VS Code, a minimal file is created automatically.
Use
importstatements to reference operations and functions from other files in the project.import MyMathLib.*; //imports all the callables in the MyMathLib namespace ... Multiply(x,y);or referencing them individually with the namespace
MyMathLib.Multiply(x,y);
For Q# projects only
- Only one *.qs file in a Q# project can have an entry point defined, defined by a single
Main()operation. - The *.qs file with the entry point definition can be located at any level below the manifest file.
- Any operation or function that is cached from a *.qs file anywhere in the Q# project displays in predictive text in VS Code.
- If the namespace for a selected operation or function isn't imported yet, VS Code automatically adds the necessary
importstatement.
Steps for creating a Q# project
These steps apply to all Q# projects.
In the VS Code file explorer, right-click the folder you want to use for the root folder of the Q# project and select Create Q# project, or open the folder and select View > Command Palette > Q#: Create a Q# project....
VS Code creates a minimal manifest file in the folder, and adds a
/srcfolder with aMain.qstemplate file.Edit the manifest file as needed. See Manifest file examples.
Add and organize your Q# source files under the
/srcfolder.If you are accessing the Q# project from a Python program or Jupyter Notebook, set the root folder path using
qsharp.init. This example assumes your program is in the /src folder of the Q# project:qsharp.init(project_root = '../Teleportation_project')If you are using only Q# files in VS Code, when you open a Q# file, the compiler searches for a manifest file, determines the root folder of the project, and then scans the subfolder for *.qs files.
Note
You can also manually create the manifest file and the /src folder in step 2.
Example project
This quantum teleportation program is an example of a Q# project based the single folder structure shown earlier, and runs on the local simulator in VS Code. To run the program on Azure Quantum hardware or third-party simulators, see Get started with Q# programs and VSCode for steps to compile your program and connect to your Azure workspace.
The example uses this directory structure:
- Teleportation_project
- qsharp.json
- src
- Main.qs
- TeleportOperations
- TeleportLib.qs
- PrepareState
- PrepareStateLib.qs
The manifest file contains the author and license fields:
{
    "author":"Microsoft",
    "license":"MIT"
}
Q# source files
The main file, Main.qs, contains the entry point and references the TeleportOperations.TeleportLib namespace from TeleportLib.qs.
    import TeleportOperations.TeleportLib.Teleport;   // references the Teleport operation from TeleportLib.qs

    operation Main() : Unit {
        use msg = Qubit();
        use target = Qubit();

        H(msg);
        Teleport(msg, target);    // calls the Teleport() operation from TeleportLib.qs
        H(target);

        if M(target) == Zero {
            Message("Teleported successfully!");

        Reset(msg);
        Reset(target);
        }
    }
TeleportLib.qs defines the Teleport() operation and calls the PrepareBellPair() operation from PrepareStateLib.qs.
    import TeleportOperations.PrepareState.PrepareStateLib.*;     // references the namespace in PrepareStateLib.qs

    operation Teleport(msg : Qubit, target : Qubit) : Unit {
        use here = Qubit();

        PrepareBellPair(here, target);      // calls the PrepareBellPair() operation from PrepareStateLib.qs
        Adjoint PrepareBellPair(msg, here);

        if M(msg) == One { Z(target); }
        if M(here) == One { X(target); }

        Reset(here);
    }
The PrepareStateLib.qs file contains a standard reusable operation to create a Bell pair.
    operation PrepareBellPair(left : Qubit, right : Qubit) : Unit is Adj + Ctl {
        H(left);
        CNOT(left, right);
    }
Running the programs
Select the tab for the environment in which you are running your program.
To run this program, open the Main.qs file in VS Code and select Run.
Configuring Q# projects as external dependencies
A Q# project can also be configured as an external dependency for other projects, acting much like a library, where the functions and operations in the external Q# project are made available to multiple Q# projects. An external dependency can reside on a drive share or published to a public GitHub repository.
To use a Q# project as an external dependency, you need to:
- Add the external project as a dependency in the manifest file of the calling project.
- If the external project is published to GitHub, add the "files" property to the manifest file of the external project.
- Add
exportstatements to the external project. - Add
importstatements to the calling project.
Configuring the manifest files
External Q# projects can reside on a local or network drive share, or published to a public GitHub repository.
The calling project manifest file
To add a dependency to an external project on a drive share, define the dependency in the manifest file of the calling project.
{
    "author": "Microsoft",
    "license": "MIT",
    "dependencies": {
        "MyDependency": {
            "path": "/path/to/project/folder/on/disk"
        }
    }
}
where "MyDependency" is a user defined string that identifies the namespace when calling an operation. For example, if you create a dependency named "MyMathFunctions", you would call a function from that dependency with MyMathFunctions.MyFunction().
To add a dependency to a project that is published to a public GitHub repository
{
    "author": "Microsoft",
    "dependencies": {
        "MyDependency": {
            "github": {
                "owner": "GitHubUser",
                "repo": "GitHubRepoName",
                "ref": "CommitHash",
                "path": "/path/to/dependency"
            }
        }
}
Note
For GitHub dependencies, "ref" refers to a GitHub refspec. Microsoft recommends always using a commit hash, so you can rely on a specific version of your dependency.
The external project manifest file
If your external Q# project is published to a public GitHub repository, you must add the files property to the manifest file of the external project, including all files used in the project.
{
    "author": "Microsoft",
    "license": "MIT",
    "files": [ "src/MyMathFunctions.qs", "src/Strings/MyStringFunctions.qs" ]
}
The "files" property is optional for an external project being imported via "path" (that is, a local filepath-based import). It is only required for projects published to GitHub.
Using the export statement
To make functions and operations in an external project accessible to calling projects, you use the export statement. You can export any or all of the callables in the file. Wild card syntax is not supported, you must specify each callable to export.
operation Operation_A() : Unit {
...
}
operation Operation_B() : Unit  {
...
}

// makes just Operation_A available to calling programs
export Operation_A;

// makes Operation_A and Operation_B available to calling programs
export Operation_A, Operation_B, etc.;

// makes Operation_A available as 'OpA'
export Operation_A as OpA;
Using the import statement
From the calling program, you use import statements to make items from an external dependency available. import statements use the namespace that is defined for the dependency in the manifest file. For example, for this dependency
{
    "author": "Microsoft",
    "license": "MIT",
    "dependencies": {
        "MyMathFunctions": {
            "path": "/path/to/project/folder/on/disk"
        }
    }
}
you import callables as
import MyMathFunctions.MyFunction;  // imports "MyFunction()" from the namespace
...
The import statement also supports wild card syntax and aliases
// imports all items from the "MyMathFunctions" namespace
import MyMathFunctions.*;

// imports the namespace as "Math", all items are accessible via "Math.<callable>"
import MyMathFunctions as Math;

// imports a single item, available in the local scope as "Add"
import MyMathFunctions.MyFunction as Add;

// imports can be combined on one line
import MyMathFunctions.MyFunction, MyMathFunctions.AnotherFunction as Multiply;
Note
The currently used open statement in Q#, which is used to reference libraries and namespaces, is still supported but will be deprecated eventually. In the meantime, you can optionally update your current files to use the import statement. For example, open Microsoft.Quantum.Diagnostics; can be replaced with import Microsoft.Quantum.Diagnostics.*;.
Also note that when using the import statement with the standard Q# libraries, you can shorten the root namespace to Std. For example, import Microsoft.Quantum.Diagnostics.*; can be written as import Std.Diagnostics.*;.
Example external project
For this example, you'll use the same teleportation program as the earlier example, but separate the calling program and the callables into different projects.
Create two folders on your local drive, for example "Project_A" and "Project_B".
Create a Q# project in each folder following the steps in Steps for creating a Q# project.
In Project_A, the calling program, copy the following code into the manifest file, editing the path as needed for Project_B
{
  "author": "Microsoft",
  "license": "MIT",
  "dependencies": {
    "MyTeleportLib": {
      "path": "/Project_B"
      }
    }
  }
In Project_A, copy the following code into Main.qs
import MyTeleportLib.Teleport;   // imports the Teleport operation from the MyTeleportLib namespace defined in the manifest file

operation Main() : Unit {
    use msg = Qubit();
    use target = Qubit();

    H(msg);
    Teleport(msg, target);    // calls the Teleport() operation from the MyTeleportLib namespace
    H(target);

    if M(target) == Zero {
        Message("Teleported successfully!");

    Reset(msg);
    Reset(target);
    }
}
In Project_B, copy the following code into Main.qs
    operation Teleport(msg : Qubit, target : Qubit) : Unit {
        use here = Qubit();

        PrepareBellPair(here, target);
        Adjoint PrepareBellPair(msg, here);

        if M(msg) == One { Z(target); }
        if M(here) == One { X(target); }

        Reset(here);
    }

    operation PrepareBellPair(left : Qubit, right : Qubit) : Unit is Adj + Ctl {
        H(left);
        CNOT(left, right);
    }

    export Teleport;       //  makes the Teleport operation available to external programs
Note
Note that the
PrepareBellPairoperation does not need to be exported because it is not called directly from your program in Project_A. Because it is in the local scope of Project_B, it is already accessible by theTeleportoperationTo run the program, open /Project_A/Main.qs in VS Code and select Run.
Projects and implicit namespaces
In Q# projects, if a namespace is not specified in a *.qs program, then the compiler uses the file name as the namespace. Referencing a callable from an external dependency then uses the syntax <dependencyName>.<namespace>.<callable>. However, if the file is named "Main.qs", then the compiler assumes the namespace and the calling syntax is <dependencyName>.<callable>, as in the previous example, import MyTeleportLib.Teleport.
Since it is not uncommon to have multiple project files, you need to account for the correct syntax when referencing callables. For example, in a project with the following file structure
- /src
- Main.qs
- MathFunctions.qs
calls to the external dependency would be
import MyTeleportLib.MyFunction;        // "Main" namespace is implied

import MyTeleportLib.MathFunctions.MyFunction;   // "Math" namespace must be explicit
For more information about namespace behavior, see User namespaces.