Azure Notification Hubs Rich Push
Overview
In order to engage users with instant rich contents, an application might want to push beyond plain text. These notifications promote user interactions and present content such as URLs, sounds, images/coupons, and more. This tutorial builds on the Notify Users tutorial, and shows how to send push notifications that incorporate payloads (for example, images).
This tutorial is compatible with iOS 7 and 8.

At a high level:
- The app backend:
- Stores the rich payload (in this case, image) in the backend database/local storage.
- Sends ID of this rich notification to the device.
- App on the device:
- Contacts the backend requesting the rich payload with the ID it receives.
- Sends users notifications on the device when data retrieval is complete, and shows the payload immediately when users tap to learn more.
WebAPI project
In Visual Studio, open the AppBackend project that you created in the Notify Users tutorial.
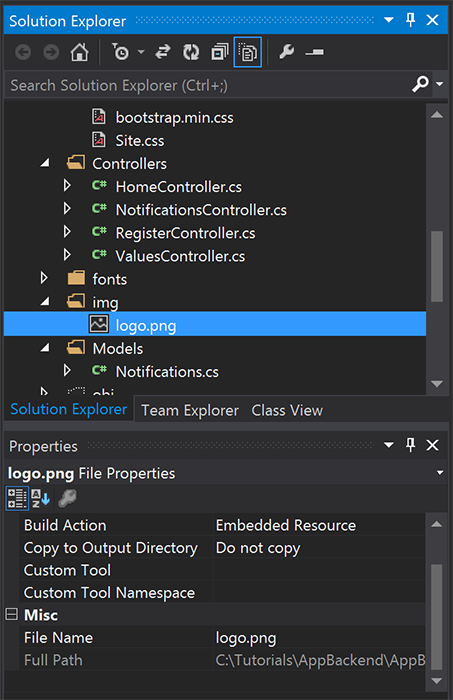
Obtain an image you would like to notify users with, and put it in an img folder in your project directory.
Click Show All Files in the Solution Explorer, and right-click the folder to Include In Project.
With the image selected, change its Build Action in the Properties window to Embedded Resource.

In
Notifications.cs, add the followingusingstatement:using System.Reflection;Replace the
Notificationsclass with the following code. Be sure to replace the placeholders with your notification hub credentials and image file name:public class Notification { public int Id { get; set; } // Initial notification message to display to users public string Message { get; set; } // Type of rich payload (developer-defined) public string RichType { get; set; } public string Payload { get; set; } public bool Read { get; set; } } public class Notifications { public static Notifications Instance = new Notifications(); private List<Notification> notifications = new List<Notification>(); public NotificationHubClient Hub { get; set; } private Notifications() { // Placeholders: replace with the connection string (with full access) for your notification hub and the hub name from the Azure Classics Portal Hub = NotificationHubClient.CreateClientFromConnectionString("{conn string with full access}", "{hub name}"); } public Notification CreateNotification(string message, string richType, string payload) { var notification = new Notification() { Id = notifications.Count, Message = message, RichType = richType, Payload = payload, Read = false }; notifications.Add(notification); return notification; } public Stream ReadImage(int id) { var assembly = Assembly.GetExecutingAssembly(); // Placeholder: image file name (for example, logo.png). return assembly.GetManifestResourceStream("AppBackend.img.{logo.png}"); } }In
NotificationsController.cs, redefineNotificationsControllerwith the following code. This sends an initial silent rich notification ID to the device and allows client-side retrieval of the image:// Return http response with image binary public HttpResponseMessage Get(int id) { var stream = Notifications.Instance.ReadImage(id); var result = new HttpResponseMessage(HttpStatusCode.OK); result.Content = new StreamContent(stream); // Switch in your image extension for "png" result.Content.Headers.ContentType = new System.Net.Http.Headers.MediaTypeHeaderValue("image/{png}"); return result; } // Create rich notification and send initial silent notification (containing id) to client public async Task<HttpResponseMessage> Post() { // Replace the placeholder with image file name var richNotificationInTheBackend = Notifications.Instance.CreateNotification("Check this image out!", "img", "{logo.png}"); var usernameTag = "username:" + HttpContext.Current.User.Identity.Name; // Silent notification with content available var aboutUser = "{\"aps\": {\"content-available\": 1, \"sound\":\"\"}, \"richId\": \"" + richNotificationInTheBackend.Id.ToString() + "\", \"richMessage\": \"" + richNotificationInTheBackend.Message + "\", \"richType\": \"" + richNotificationInTheBackend.RichType + "\"}"; // Send notification to apns await Notifications.Instance.Hub.SendAppleNativeNotificationAsync(aboutUser, usernameTag); return Request.CreateResponse(HttpStatusCode.OK); }Now, re-deploy this app to an Azure Website in order to make it accessible from all devices. Right-click on the AppBackend project and select Publish.
Select Azure Website as your publish target. Sign in with your Azure account and select an existing or new Website, and make a note of the destination URL property in the Connection tab. We refer to this URL as your backend endpoint later in this tutorial. Select Publish.
Modify the iOS project
Now that you've modified your app backend to send just the ID of a notification, change your iOS app to handle that ID, and retrieve the rich message from your backend:
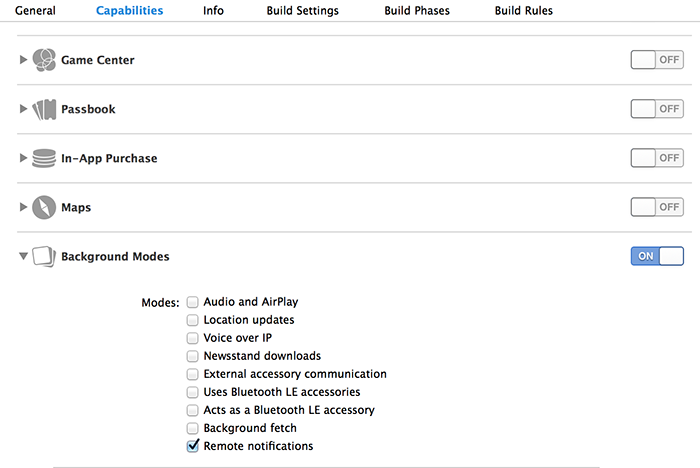
Open your iOS project, and enable remote notifications by going to your main app target in the Targets section.
Select Capabilities, enable Background Modes, and check the Remote Notifications checkbox.

Open
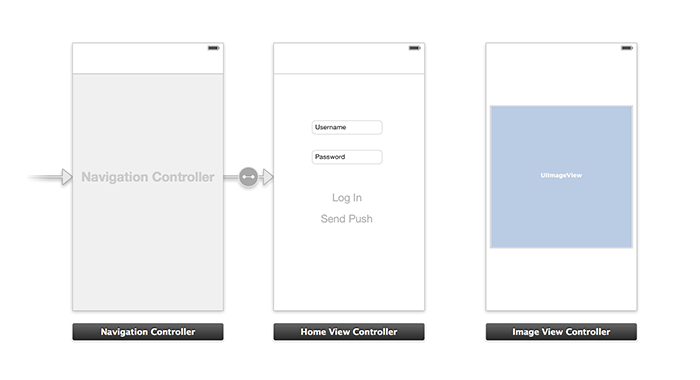
Main.storyboard, and make sure you have a View Controller (referred to as Home View Controller in this tutorial) from the Notify User tutorial.Add a Navigation Controller to your storyboard, and control-drag the Home View Controller to make it the root view of navigation. Make sure the Is Initial View Controller in the Attributes inspector is selected for the Navigation Controller only.
Add a View Controller to the storyboard and add an Image View. This is the page users will see once they choose to learn more by clicking on the notification. Your storyboard should look as follows:

Click on the Home View Controller in the storyboard, and make sure it has homeViewController as its Custom Class and Storyboard ID under the Identity inspector.
Do the same for the Image View Controller, as imageViewController.
Then, create a new View Controller class called imageViewController to handle the UI you just created.
In imageViewController.h, add the following code to the controller's interface declarations. Make sure to control-drag from the storyboard image view to these properties to link the two:
@property (weak, nonatomic) IBOutlet UIImageView *myImage;
@property (strong) UIImage* imagePayload;
In
imageViewController.m, add the following at the end ofviewDidload:// Display the UI Image in UI Image View [self.myImage setImage:self.imagePayload];In
AppDelegate.m, import the image controller you created:#import "imageViewController.h"Add an interface section with the following declaration:
@interface AppDelegate ()

@property UIImage* imagePayload;
@property NSDictionary* userInfo;
@property BOOL iOS8;

// Obtain content from backend with notification id
- (void)retrieveRichImageWithId:(int)richId completion: (void(^)(NSError*)) completion;

// Redirect to Image View Controller after notification interaction
- (void)redirectToImageViewWithImage: (UIImage *)img;

@end
In
AppDelegate, make sure your app registers for silent notifications inapplication: didFinishLaunchingWithOptions:// Software version self.iOS8 = [[UIApplication sharedApplication] respondsToSelector:@selector(registerUserNotificationSettings:)] && [[UIApplication sharedApplication] respondsToSelector:@selector(registerForRemoteNotifications)]; // Register for remote notifications for iOS8 and previous versions if (self.iOS8) { NSLog(@"This device is running with iOS8."); // Action UIMutableUserNotificationAction *richPushAction = [[UIMutableUserNotificationAction alloc] init]; richPushAction.identifier = @"richPushMore"; richPushAction.activationMode = UIUserNotificationActivationModeForeground; richPushAction.authenticationRequired = NO; richPushAction.title = @"More"; // Notification category UIMutableUserNotificationCategory* richPushCategory = [[UIMutableUserNotificationCategory alloc] init]; richPushCategory.identifier = @"richPush"; [richPushCategory setActions:@[richPushAction] forContext:UIUserNotificationActionContextDefault]; // Notification categories NSSet* richPushCategories = [NSSet setWithObjects:richPushCategory, nil]; UIUserNotificationSettings *settings = [UIUserNotificationSettings settingsForTypes:UIUserNotificationTypeSound | UIUserNotificationTypeAlert | UIUserNotificationTypeBadge categories:richPushCategories]; [[UIApplication sharedApplication] registerUserNotificationSettings:settings]; [[UIApplication sharedApplication] registerForRemoteNotifications]; } else { // Previous iOS versions NSLog(@"This device is running with iOS7 or earlier versions."); [[UIApplication sharedApplication] registerForRemoteNotificationTypes: UIRemoteNotificationTypeAlert | UIRemoteNotificationTypeBadge | UIRemoteNotificationTypeSound | UIRemoteNotificationTypeNewsstandContentAvailability]; } return YES;Substitute the following implementation for
application:didRegisterForRemoteNotificationsWithDeviceTokento take the storyboard UI changes into account:// Access navigation controller which is at the root of window UINavigationController *nc = (UINavigationController *)self.window.rootViewController; // Get home view controller from stack on navigation controller homeViewController *hvc = (homeViewController *)[nc.viewControllers objectAtIndex:0]; hvc.deviceToken = deviceToken;Then, add the following methods to
AppDelegate.mto retrieve the image from your endpoint and send a local notification when retrieval is complete. Make sure to substitute the placeholder{backend endpoint}with your backend endpoint:NSString *const GetNotificationEndpoint = @"{backend endpoint}/api/notifications"; // Helper: retrieve notification content from backend with rich notification id - (void)retrieveRichImageWithId:(int)richId completion: (void(^)(NSError*)) completion { UINavigationController *nc = (UINavigationController *)self.window.rootViewController; homeViewController *hvc = (homeViewController *)[nc.viewControllers objectAtIndex:0]; NSString* authenticationHeader = hvc.registerClient.authenticationHeader; // Check if authenticated if (!authenticationHeader) return; NSURLSession* session = [NSURLSession sessionWithConfiguration:[NSURLSessionConfiguration defaultSessionConfiguration] delegate:nil delegateQueue:nil]; NSURL* requestURL = [NSURL URLWithString:[NSString stringWithFormat:@"%@/%d", GetNotificationEndpoint, richId]]; NSMutableURLRequest* request = [NSMutableURLRequest requestWithURL:requestURL]; [request setHTTPMethod:@"GET"]; NSString* authorizationHeaderValue = [NSString stringWithFormat:@"Basic %@", authenticationHeader]; [request setValue:authorizationHeaderValue forHTTPHeaderField:@"Authorization"]; NSURLSessionDataTask* dataTask = [session dataTaskWithRequest:request completionHandler:^(NSData *data, NSURLResponse *response, NSError *error) { NSHTTPURLResponse* httpResponse = (NSHTTPURLResponse*) response; if (!error && httpResponse.statusCode == 200) { // From NSData to UIImage self.imagePayload = [UIImage imageWithData:data]; completion(nil); } else { NSLog(@"Error status: %ld, request: %@", (long)httpResponse.statusCode, error); if (error) completion(error); else { completion([NSError errorWithDomain:@"APICall" code:httpResponse.statusCode userInfo:nil]); } } }]; [dataTask resume]; } // Handle silent push notifications when id is sent from backend - (void)application:(UIApplication *)application didReceiveRemoteNotification:(NSDictionary *)userInfo fetchCompletionHandler:(void (^)(UIBackgroundFetchResult result))handler { self.userInfo = userInfo; int richId = [[self.userInfo objectForKey:@"richId"] intValue]; NSString* richType = [self.userInfo objectForKey:@"richType"]; // Retrieve image data if ([richType isEqualToString:@"img"]) { [self retrieveRichImageWithId:richId completion:^(NSError* error) { if (!error){ // Send local notification UILocalNotification* localNotification = [[UILocalNotification alloc] init]; // "5" is arbitrary here to give you enough time to quit out of the app and receive push notifications localNotification.fireDate = [NSDate dateWithTimeIntervalSinceNow:5]; localNotification.userInfo = self.userInfo; localNotification.alertBody = [self.userInfo objectForKey:@"richMessage"]; localNotification.timeZone = [NSTimeZone defaultTimeZone]; // iOS8 categories if (self.iOS8) { localNotification.category = @"richPush"; } [[UIApplication sharedApplication] scheduleLocalNotification:localNotification]; handler(UIBackgroundFetchResultNewData); } else{ handler(UIBackgroundFetchResultFailed); } }]; } // Add "else if" here to handle more types of rich content such as url, sound files, etc. }Handle the previous local notification by opening the image view controller in
AppDelegate.mwith the following methods:// Helper: redirect users to image view controller - (void)redirectToImageViewWithImage: (UIImage *)img { UINavigationController *navigationController = (UINavigationController*) self.window.rootViewController; UIStoryboard *mainStoryboard = [UIStoryboard storyboardWithName:@"Main" bundle: nil]; imageViewController *imgViewController = [mainStoryboard instantiateViewControllerWithIdentifier: @"imageViewController"]; // Pass data/image to image view controller imgViewController.imagePayload = img; // Redirect [navigationController pushViewController:imgViewController animated:YES]; } // Handle local notification sent above in didReceiveRemoteNotification - (void)application:(UIApplication *)application didReceiveLocalNotification:(UILocalNotification *)notification { if (application.applicationState == UIApplicationStateActive) { // Show in-app alert with an extra "more" button UIAlertView *alert = [[UIAlertView alloc] initWithTitle:@"Notification" message:notification.alertBody delegate:self cancelButtonTitle:@"OK" otherButtonTitles:@"More", nil]; [alert show]; } // App becomes active from user's tap on notification else { [self redirectToImageViewWithImage:self.imagePayload]; } } // Handle buttons in in-app alerts and redirect with data/image - (void)alertView:(UIAlertView *)alertView clickedButtonAtIndex:(NSInteger)buttonIndex { // Handle "more" button if (buttonIndex == 1) { [self redirectToImageViewWithImage:self.imagePayload]; } // Add "else if" here to handle more buttons } // Handle notification setting actions in iOS8 - (void)application:(UIApplication *)application handleActionWithIdentifier:(NSString *)identifier forLocalNotification:(UILocalNotification *)notification completionHandler:(void (^)())completionHandler { // Handle richPush related buttons if ([identifier isEqualToString:@"richPushMore"]) { [self redirectToImageViewWithImage:self.imagePayload]; } completionHandler(); }
Run the Application
- In XCode, run the app on a physical iOS device (push notifications will not work in the simulator).
- In the iOS app UI, enter a username and password of the same value for authentication and click Log In.
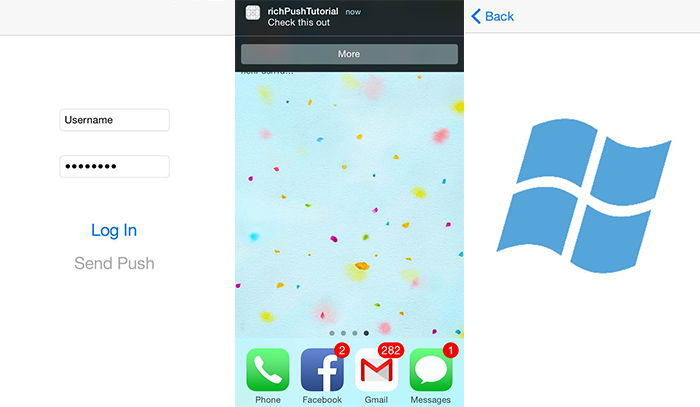
- Click Send push and you should see an in-app alert. If you click on More, you will be brought to the image you chose to include in your app backend.
- You can also click Send push and immediately press the home button of your device. In a few moments, you will receive a push notification. If you tap on it or click More, you will be brought to your app and the rich image content.